
Special Report Insight & Reviews From Larry
Readers Ask This Restoration Pro About Glass & Wet Sanding, And He Tries a Powder Coating Gun and Brake Paint.
Protecting Panel Undersides
I am restoring a 1965 Chevy Stepside. What type of protection do you apply to the back of the body panels that are being worked on, such as the fenders? Do you just prime them or do you paint them too?
Tony Killiri Oviedo, Florida
I’m thinking the underside of the Stepside fenders were painted from the factory so that is how I would treat them—first primer, then paint.
I also would consider applying a heavy coat of undercoating to the top portion of the underside of the rear fenders after they are painted. That will help reduce the chances of getting rock “outies” on the fenders.
Help Me Install My Lincoln’s Back Glass
I’ve been restoring a 1955 Lincoln for some time now and I’ve finally reached the point where I need to install the back glass. My problem came when the installer informed me the glass would not fit with the stainless steel moldings installed. These moldings tuck into a slot in the rubber weather stripping used to secure the glass.
In an article you wrote back in 2000 you mentioned having a problem installing a glass because the aftermarket weather stripping was thicker than the original and the glass wouldn’t fit into the opening. So, remind me, how did you fix the problem?
Harold Pigg Via e-mail
I have two different tricks you can try. First, try boiling the weather stripping in water to soften it.
While it is still very warm, insert the stainless steel trim in the slot and then try to install the glass in the car. Sometimes, a little heat willwork wonderswith aftermarket weatherstripping.
If that doesn’t work, the next step is much more drastic: You will need the help of a real glass expert.Look for someone who does glass work in street rods. This is the guy you want because what you need to do is grind away about 1/8- inch of glass along the top of the glass. This is relatively easy to do on a windshield, but takes more time and care with a tempered back glass. What the glass expert will do is use a belt sander with 80 grit to wet sand the edge of the glass and remove that 1/8- inch of glass. That should give you the needed clearance to install the glass.
Were You Wet or Dry Sanding?
In the April ’08 issue you stated that you color sand using 1000-, 1500-, and 2000-grit sandpapers. The photo seems to indicate you are sanding the panel dry. Is this correct or are you actually wet sanding the panel?
Allan Faust Lebel-sur-Quevillon, Quebec, Canada
I suppose this is one of those“ oh, by the way” things. I didn’t mention the words “wet sanding” anywhere and I should have. If you use 3M sandpapers they are designed to work wet or dry so you can do either. My preference is to wet sand when color sanding. When I dry sand, the residue tends to clog the sandpaper and that elevates the risk of scratching the surface. That’s not a good thing.
When wetsanding I use distilled water and add a few drops of Dawn dishwashing soap to the water. Why distilled water and soap? Our tap water tends to leave spots behind. The soap is there to act as a lubricant.
Where Can I Get Black Plastic Bead?
You mentioned using a black plastic bead product to install the windshield on Project ’46. What is this bead and where can I purchase it?
Jimmy Cotton Sheridan, Arkansas
My glass guy tells me this is not a product you can go out to the local auto parts store and purchase. You will need to approach your local automotive glass installer and ask for the after market windshield bead used to install windshields in late model Chevrolets. He’ll have it by the roll. Expect to pay around $2 per foot for the stuff.
Has Project ’46 Found a Home?
What is the status of Project ’46, the 1946 Ford that you restored and modified? You chronicled the project on the pages of Auto Restorer and late last year announced that the car is for sale. Have you found a buyer?
Asked by numerous readers
At one point I thought I had the car sold; the prospective buyer wanted to present the car as a birthday gift. Sadly, that became unnecessary.
So, it’s still available and for those of you who weren’t with us at the time, that’s a photo of the car on this page. Project ’46 has a Chevy 350 V-8, a Turbo automatic transmission, Edelbrock intake and carb, chrome headers, dual exhaust, Pertronics ignition, Hot Rod air conditioning/heating, power rack-and-pinion steering, American racing wheels, power windows, AM/FM-CD player, cruise control, Auto Meter instruments, Flaming River steering column, Mustang II front end, four-wheel disc brakes, an electric cooling fan and an aluminum radiator.
I have posted the details of the sale on our Web site (LPLBodyWorks.com) or you can call me at .
Another Look at the Brake Fluid Discussion
I must disagree with your characterization of DOT 5 brake fluid. I have long been under the belief that the primary benefit of DOT 5 is that it does not absorb moisture. The fact that it does not absorb moisture means that moisture cannot be transported into the brake system by the fluid as it is with DOT 3. No moisture means no corrosion.
As far as changing DOT 5 every year, the only thing I can say is that I have never changed the DOT 5 in any of my vehicles and the brakes are still working just fine.
Jim Garing Via e-mail
You are right about DOT 5 (silicone based brake fluid) not absorbing moisture. It doesn’t. I think I stated that in the article covering the different brake fluids (January issue). Silicone and moisture do not mix.
I think where we differ concerns moisture in the brake system. Automobiles don’t operate in a vacuum and since they don’t, moisture is going to enter the brake system despite the type of fluid being used. Glycol-based fluids are going to soak up some of that moisture, as evidenced by the discoloring of the fluid over a span of time, while silicone-based fluids will simply push the moisture bubbles around until they come in contact with something in the system that is exceedingly hot and turn to steam, at which point the brakes will feel a little spongy.
I’m by no means an expert on either type of fluid. But like I do with many other things, I talk to people who use these things and pass along the information they have garnered from experience
Automobile racers tell me they use silicone-based fluid for one reason: it will stand up to the extreme heat created by racing conditions. When asked why they change the fluid, the answer is always the same. Moisture gets into the system, and when it does that extreme heat generated by the brake calipers causes the moisture to turn to steam. Steam compresses;fluid doesn’t. So the brakes get spongy.
And Now, It’s Time for a Few Product Reviews…
Eastwood Brake Gray #11756 Z is a heavy duty coating specifically designed for use on brake components. The gray color is extremely close to the clean, natural look of new metal, it’s resistant to DOT 3 brake fluid, and can withstand temperatures up to 400° F.
Since it is epoxy based it is also corrosion resistant and can be applied to metal, ceramic, wood and leather. I’ve used it on brake calipers, master cylinders and spindles on cars that need that “factory” look.I’ve not tried it on ceramic or wood, but I have dripped it on my leather boots. It’s slowly beginning to wear off.
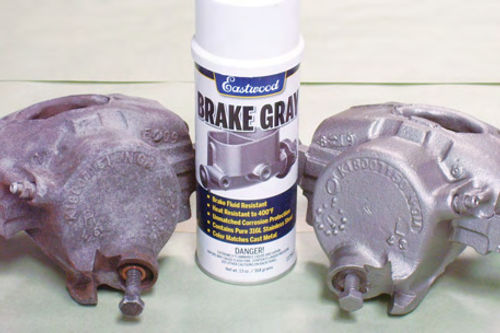
If you are wondering about the color, compare it to Eastwood Detail Gray. When sprayed they look about the same. If you are wondering how this paint looks on a component or if it’s actually DOT 3 resistant, I sprayed three coats on the right caliper in the photo on this page, allowed it to cure overnight, then dripped three dots of DOT 3 on the round section. You can see how well this stuff holds up. The caliper on the left is raw, untreated metal.
Available only at Eastwood, in 13 oz. aerosol cans ($20).
Eastwood Company
263 Shoemaker Rd.
Pottstown, PA 19464
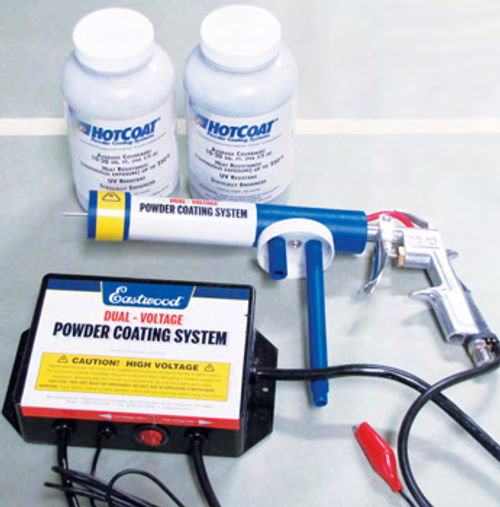
Eastwood Dual Voltage HotCoat Powder Gun
I reviewed the earlier version of this HotCoat Powder Gun a few years ago and since then have powder coated hundreds of small parts using that gun. So as you can imagine, I was more than happy to put this new HotCoat gun to the test.
The Dual Voltage HotCoat Powder Gun #11676 works just as well as its predecessor with the added bonus of being able to change the voltage setting from 15KV to 25 KV.
Why would you need two different voltage settings?
At the 15 KV setting you can coat small, intricate pieces without wasting precious powder and still be certain of getting great coverage and a smooth finish.At the 25KV setting you can step up and powder coat anything you can fit into your oven.What’s anything? At 25 KV you can easily powder coat an engine block and expect great results. You may need a bigger oven, but you get the idea. More voltage, larger parts and a superior finish.
You’ll need a compressed air source(Eastwood Says 5-10 PSI from a portable tank with a regulator or a compressor) and remember to operate this system in a clean, dry, well-ventilated work area. Also, in the interest of family togetherness, a dedicated electric oven should be used for your powder coating projects.
The Dual Voltage HotCoat Powder Gun is only available at Eastwood ($170).


