
Repairing a Dash With a Molded Plastic Cover
Years of Sun Exposure May Leave a Dash Cracked and Worn. Installing a Molded Cap Can Be a Relatively Inexpensive Fix.
THE ARIZONA DESERTS present a near ideal climate for people who love cars. We have about 300 days of sunshine here in the metro Phoenix area and our winters are very mild. No need to worry about major corrosion damage to our cars from snow or salted roads. Many great old cars can be found here with their bodies and chassis intact and relatively free of rust.
There is, however, a downside to our desert climate for old car fans. Namely, baked-out interior fabrics, leather and plastics… including those used to cover the dashes of our beloved car.s
Now I know that small cracks and tears in upholstery and plastic can occur over time just about anywhere. But this is “the Grand Canyon State” and the top of a 30-year-old dash is commonly afflicted with appropriately deep and ragged fissures.
A Victim of the Desert Sun
My current project car is a 1975 Datsun 280Z. As with many cars that have spent most of their lives in the desert, its rust issues were minor in nature. Most of that rust was in the floors, due to water getting into the cabin, settling into the carpets and rusting the steel from the inside out.
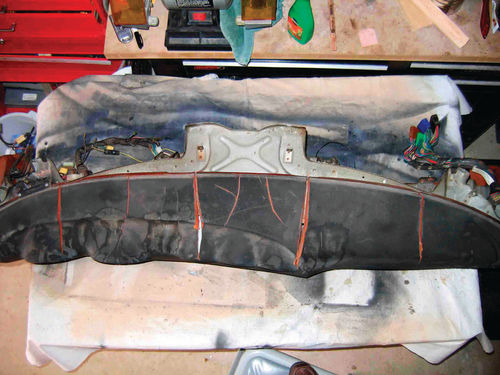
But in addition, prior to my ownership, this car was obviously parked outside for long periods of time. The dash, due to unprotected sun exposure, was a complete mess with no less than four major cracks in its top caused by the drying and shrinking of both the cover material and the underlying foam. This was compounded by years of sun bleaching and baked-in dust (Photos 1 and 2).
Some Ways to Approach the Problem
The choices for a cracked dash on a Datsun 280Z, as well as for many other vehicles, consist of covering the mess with carpet, buying a complete NOS or good used dash, having the dash professionally rebuilt, or using a molded plastic dash cap.
The first option — basically a small throw rug — is cheap, but it looks as if you carpeted your dash, and it holds the dust.
The second and third options—a replacement or rebuilt dash — can easily cost several hundred dollars.
The last option — a molded plastic dash cap — looks good and cost me under $100 plus some time. Be aware that if you are doing a concours-style restoration with the intent to show your car, this will not be considered “original” and you would be best off with a professionally rebuilt dash or a replacement. But if your car is a driver or a “resto-mod” this method looks good and is inexpensive.
Filling the Gaps
The first step for a seriously damaged dash is to remove the dash from the car. This involves disconnecting the dash wiring harness and the speedometer cable, and then unbolting the dash from the body. Use your factory service manual for specific instructions as they will vary from vehicle to vehicle. If your dash has only minor cracks or imperfections the manufacturer of the dash cap suggests installing the cap while the dash is still in the car.
Because my dash was in such poor shape, including crumbling vent tubing for the HVAC, I decided to remove the dash and completely disassemble it. While I had it apart, I cleaned all the instruments, installed new instrument faces and put in new instrument bulbs. I was also able to check the dash wiring harness and make repairs as necessary. I replaced the old cracked and broken paper HVAC ducting with new vinyl-over-wire flexible duct tubing in the appropriate diameters.
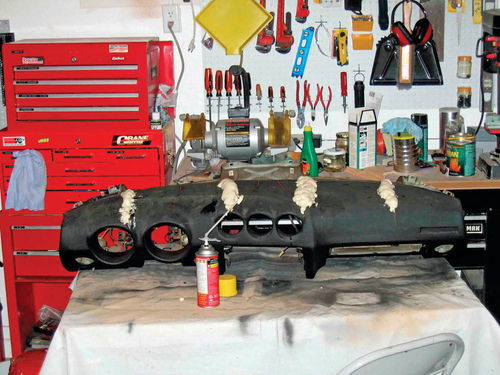
Now back to the dash itself. The cracks in my dash were so bad that there was severe warping at the edges of the cracks. I used a hacksaw blade to carefully remove warped material and cut a wide “V” shape into each crack. I then filled these four major cracks with expanding insulation foam from a spray can. This was done to prevent any problems that might be caused by large hollow areas under the new cap. The manufacturer of the dash cap stated that the new cap needs the underlying foam for support (Photo 3).
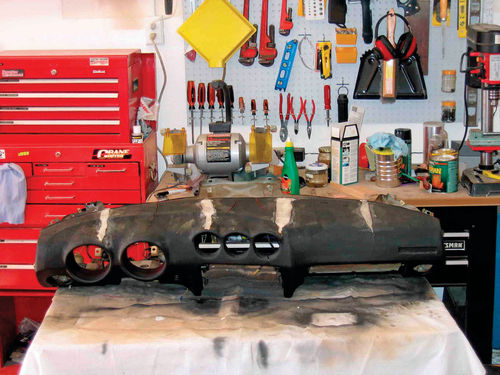
After letting the foam cure, I first cut it down with a hacksaw blade and then sanded it to conform to the original shape of the dash. I now had a good solid platform for the dash cap to sit on (Photo 4).
Choose Between a Partial or Full Cap
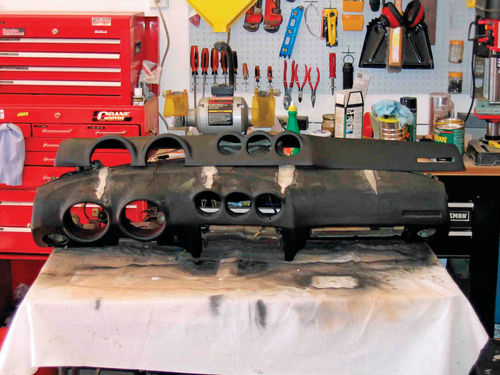
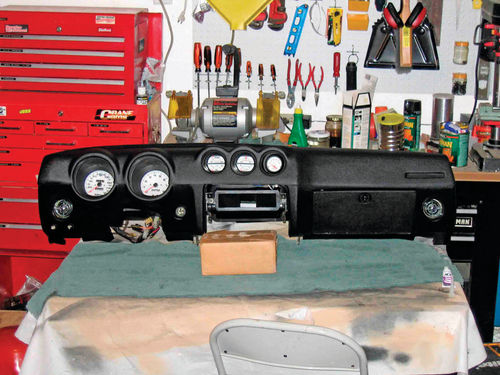
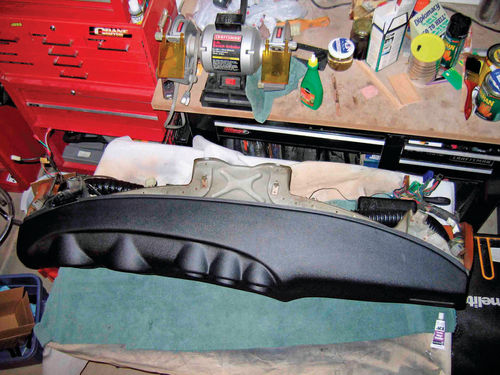
Photo 5 shows the repaired dash with the molded dash cap resting on it prior to installation. I chose to use an upper dash cap only, since the lower portion of my dash was in reasonable shape. A full dash cap is also available for the 280Z, and I would recommend the full cap for those dashes that have more extensive frontal damage or for people wanting a more complete and original look.
It’s a good idea to test fit the dash cap before using any adhesive. The cap is installed using black RTV adhesive supplied by the manufacturer.
The adhesive is applied to the inner perimeter of the dash cap and the cap is pressed in place against the original dash. The plastic dash caps are roughly 1 ⁄16th thick, so they’re flexible.
Instruments and any switches should be installed either before or after installing the dash cap depending on how they will best fit. This last step will vary depending on whether the instrument or switch lays under the new cap or over the new cap.
I reinstalled my cleaned and restyled instruments to the dash, including a new matching voltmeter to replace the old non-working (and very expensive to replace) clock. I cleaned and installed the HVAC vents using the new duct tubing, and reinstalled the wiring harness with changes made for adding the voltmeter. The completed dash is shown in Photos 6 and 7. The dash is now ready for installation back into the vehicle.
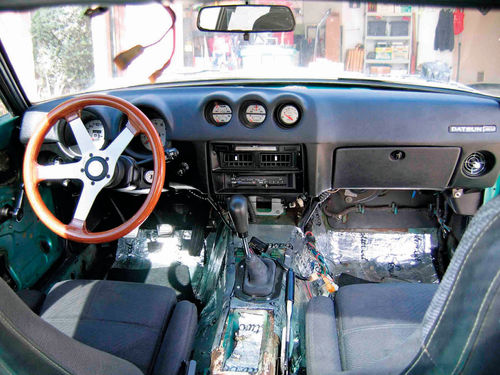
Photo 8 shows the dash reinstalled in my project car. The balance of the interior—carpet, headliner, console and door panels—is still to be installed as of this writing.
As I stated earlier, this is not a perfect solution for a showready car, but it’s a huge improvement at low cost for a vehicle driven and used regularly. And yes, it’s good enough for the local or regional un-judged car shows.
RESOURCES
American Dash Caps LLC
46 Village Way
Port Ludlow, WA 98365
DashSkin ABS Molded Dash Caps
PO Box 141264
Broken Arrow, OK 74014


