
Reader Follow-Up More Approaches to Bushing Removal
A Recent Article Brought Several Bushing Tips Our Way. Let Us Know What Worked Best For You.
EDITOR’S NOTE: IN the February article, “Rebuilding a Starter, Pt. 3,” writer and retired auto technician John Armstrong described his method of using a pick tool to remove the rear bushing from the starter housing. That started a discussion between John and several readers regarding alternate methods of bushing removal. Here are some of those approaches and John’s comments.
Remove a Bushing With Grease
Your bushing removal method can be greatly simplified. Any bushing of any size in a blind hole can be simply and safely removed with the following method: Simply fill the bushing with grease. Make sure there are no air pockets in the grease. Then insert a close fitting shaft. (The originals haft sometimes will work if there isn’t significant wear or the running clearance isn’t too large.) Then give the end of the shaft a sharp blow or two with a hammer. The resulting hydraulic pressure will pop out the bushing every time. I have used this method hundreds of times as an engineer of rotating product for over 40 years and even longer as an auto enthusiast.
Nick Sertell Green, Ohio
John’s reply: That method was one I had considered showing as an option, but it didn’t work for me. I thought it would be a fun demonstration and had made a snug-fitting wooden dowel as a shaft to strike. Then it wouldn’t budge it!
I know people use this method for removing a pilot bushing in the end of a crankshaft, and I know that does work. I suspect it’s because a typical pilot bushing simply has a wall thickness that would be considered nothing short of “fat”in most cases, where the bushings used in the starter have a very thin wall thickness, thus there was not enough surface area to work against.
Also, on some starter nose sections the hole the bushing fits into is open at both ends, so this wouldn’t be an option even if the procedure did work.
Maybe Nick’s had success with this on starter bushings, and in theory it certainly should work, but when I attempted it on the rearcoverofthestarterinthearticle, it didn’t move at all. And believe me, I applied plenty of force when striking the wooden dowel; I wanted it to work. It would have been an interesting addition to the article.

Nick:Obviously this method will only work with a bushing in a blind hole without any vent holes. The only reason that this procedure wouldn’t work is if the shaft fit isn’t tight enough. A half-thousandth’s clearance is about right. As teel, hard nylon or brass shaft would work best since they would not be porous. Otherwise, the grease will leak out. A heavy grease (high viscosity) works best, especially if the bushing is severely worn. It’s also important to keep the shaft very straight. It may take several sharp hammer blows. The resulting hydraulic forces created are very large pushing the bushing up. The other advantage of this method is that the bushing is not damaged. As I mentioned, I have used this method literally hundreds of times.
I recently used this method to remove a clutch bushing on a Corvair engine rebuild, also on a generator end bell.
In a past life I have done much product engineering in the field of aerospace and automotive motors and generators where I was taught this method years ago by fellows even older than I am.
Using Toilet Paper on a Pilot Bushing
I sent in this suggestion many years ago, but I thought it would be good to bring it up again. John Armstrong did a great job in his Starter Rebuild series. In Pt. 3, Photo 27 he shows the difficult task of removing a bushing from a blind hole. In my youth I was privileged to watch a craggy old junkyard worker remove a Jaguar pilot bushing from the end of a crankshaft working under the car with the engine still installed, with no damage to the bushing or the crank.
This is what he did: He found a drift the same size as the pilot shaft. He got a pan of water and a roll of toilet paper. Then he filled the bushing with water-soaked toilet paper mush. He fit the drift in the bushing and hit it with a big hammer. Water and toilet paper fragments shot out around the drift, but the bushing began to creep out too. As he repeated this, adding more mush and banging it into the hole, the bushing came completely out in perfect condition.
I have used this method myself several times, always successfully.
Warning! You must wear gloves and eye protection while using this procedure as the toilet paper shoots out at an extremely high velocity.
Carl Bauske Charlottesville,Virginia
John: I have used grease to fill the cavity of a crankshaft’s pilot bushing and removed it in a similar manner. I never tried it with water and toilet tissue, but the effect should be the same. Once again we are talking about a pilot bushing, which typically has very thick walls. I don’t have one in front of me, but I would not be surprised if the wall thickness is. 250” or more.Comparethistothestarterbushings that were .047”. That’s considerably less surface area to work against. I can only assume that is the reason it didn’t work on the starter bushing. I used typical chassis grease in my attempt, but asIsaid, it didn’t move at all.
“Generator Jack’s” Tap Method
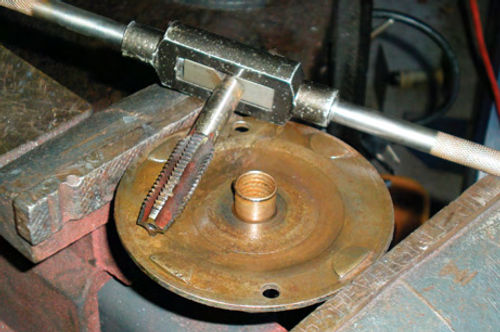
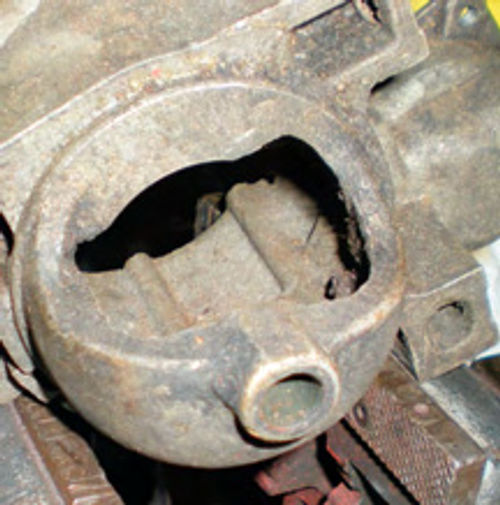
I enjoyed John’s articles on starter rebuilding and was reminded of an approach to bushing removal I learned from an old generator/starter rebuilder by the name of “Generator Jack” back in the very early ’60s (Photos1-3).
When removing the bushings from the units, one way to accomplish this operation is to “tap” (thread) the bushing with a suitable-sized tap. When it is threaded, you can continue threading the tap to the bottom of the plate. Once the tap bottoms out, you continue to screw the tap down and the bushing will rise out of the plate. Or, you can thread the bushing, leave the tap in the bushing and place the wrench end of the tap into a vise and tap the plate off with a mallet.
Rich Overton Via email
John: I tried Mr. Overton’s method (or should I say “Generator Jack’s” method) and it worked great. All you need to be sure of is that you have the PROPER-SIZE tap. I wish I had thought of this; I still can’t get over how easily it lifted the bushing out.
This will be my method of choice in the future. It would also fall into the “fun” category. I’ve included some photos of the tap at work.
(Editor’s note:And for more on “Generator Jack,”see the Letters section.)


