Preserving Your Daily Driver
Even If Your Driver’s Getting Older, It Can Still Look LIke New. (The Same Tips Apply to Your Collectibles As Well.)
ONE TREND I can’t help but notice among vintage vehicle hobbyists is that many of them are tending to keep their daily drivers for longer periods of time. I don’t have any specifics on this, such as a decade ago people used to keep their cars and trucks for an average of “X” years before trading them in and now they’re keeping them for “X+” but through conversations, letters, e-mails, etc., I’m definitely picking up on the idea that a good number of people aren’t inclined to trade in their current ride just because something at the local dealership caught their eye as they were driving past.
One of the obvious reasons, of course, is economic. Many folks figure that given the current state of the economy, this is no time to be making any major expenditures unless they’re totally necessary.
Another reason is that some people have inherited a family vehicle from parents, grandparents or other relatives and while the car or truck isn’t old enough to be considered a collectible, they’re driving it regularly or sparingly, with an eye toward it some day becoming a family heirloom.
Still others have come to a point in life where they’ve experienced one or more instances of seller’s regret, having sold a car or truck or two over the years and immediately wishing the vehicles were still out in the driveway, waiting for them. If they’re really pleased with a vehicle, they’re going to hang onto it even if it’s racked up a few miles and they could easily afford to go car shopping. After all, they no longer feel a need to keep up with the neighbors or the people at work—the only person they really have to impress is the one staring back at them from the mirror.
Taking Care of What You Have
If you’re among the folks who intend to hang onto that driver for one reason or another, it just makes sense that you’ll want to do what you can to protect and preserve the paint and interior. After all, not only will you keep your vehicle looking better in the short run, that’ll help to keep it looking good—inside and out— for years to come. (Of course, the same techniques are going to keep your vintage collectible looking good—after you finish the restoration.)
With all that in mind, I was quick to accept an offer to spend a day at Meguiar’s Inc., giving a car a complete detailing. Meguiar’s, which has been around since 1901, offers a wide variety of car care products and accessories, and is located about 10 miles from the Auto Restorer offices in Irvine, California.
While there, I observed and worked with Michael A. Pennington, their director of training and consumer relations. Our target vehicle was a daily driver with a four-year-old base coat/clear coat finish. I prepared for the day by letting the car collect several layers of dirt, grime and other contaminants, which isn’t difficult given the levels of air pollution in Southern California.
Plan Your Strategy
Pennington said that a good detailing session is made up of three concepts including: 1. Evaluate the finish, 2. Choose the right products, and 3. Use good techniques.
He admitted that choosing the right products can a take a little time because people shopping at the auto parts store are confronted with what he called the “wall of confusion.”
“You visit the store and there’s a wall filled with products to choose from,” Mike said. “All of the brands and products seen together can be overwhelming.”
I’ve been working with Meguiar’s products for more than 20 years, so I felt comfortable with whatever Mike pulled from his product cabinet. If you’re thinking about trying a new brand or product, you might consult with a car buddy or fellow car club member who’s worked with it or you could do what I did two decades ago: visit a well-stocked automotive store, watch the sales help in action until you spot someone who seems to know what he’s doing and ask his opinion.
Then, before you do anything, be sure to carefully read all the directions and warnings on the packages. I know that sounds like something that “goes without saying,” but how many people do you know who subscribe to that old saying, “When in doubt, go back and consult the directions.”
Bath Time
Before we can truly evaluate the vehicle’s finish, however, we’ll have to be able to see it clearly and that calls for a good wash job. And here’s where some of that product advice comes in:
“Don’t use dish soap or any household detergent to wash your vehicle,” Mike said. “People reach for them because they’re handy, but they aren’t the right products to use. You give a car one or two washes with dish soap, and your wax protection will be gone…stripped away.”
So select a product specifically formulated for washing vehicles and check the directions, particularly regarding the amount of soap to be mixed with water.
“Some people feel that if a little soap is good, a lot will be that much better,” Mike commented. “All they’re doing is wasting product.”
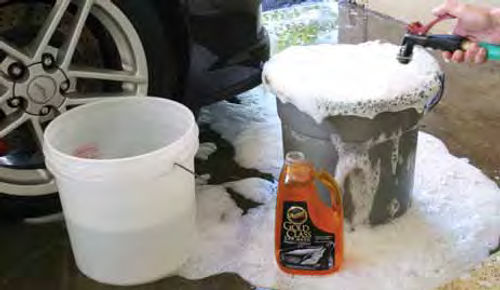
Next, Mike insisted on using “the two bucket system” for washing a vehicle, one for soap and one with clear water for rinsing the wash mitt.
“With only one bucket, you’ll pick up contaminants when you dip your wash mitt in the soapy water,” he said. “That could result in swirl marks and scratches in the finish.”
Another thing to keep in mind regarding the amount of soap to be used is that your soap bucket won’t be filled with water; it may be more along the lines of one-third water and two-thirds suds. So when it comes time to prepare your bucket of soapy water, calculate how much water you’ll actually use and measure out the soap accordingly.
Some other tips to ensure a perfect bath for your car or truck are:
To minimize the chances of water spotting, wash your vehicle in the shade and make sure it’s cool to the touch before you begin.
Before starting the wash process, rinse the vehicle with a strong stream of water to remove loose debris that might scratch the surface during the soaping stage. Wash from the top down because the bottom’s usually dirtier, and always use the above-discussed two-bucket system. Replace the mitt-rinsing water whenever it starts to look dirty.
Wash and then rinse a section of the vehicle at a time, as you don’t want the soap drying in place.
Rinse your vehicle with a stream of water, not a spray. This will sheet the water off your vehicle, leaving less to dry.
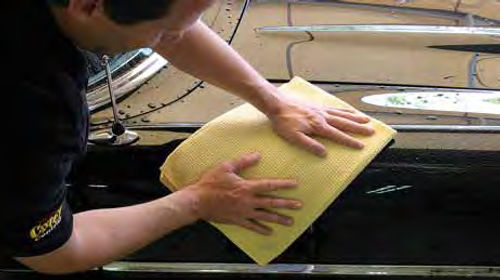
Use name-brand, quality wash mitts and drying towels to reduce the chances of making swirl marks with rough mitts and towels.
Mike recommends using waffle-weave microfiber towels for the drying process.
“They’re like water magnets,” he said, “and tend to hold more water than other types of towels or chamois products.”
Dry from the belt line up and then the belt line down, just in case you missed any dirty spots on the lower part of the vehicle.
If you have compressed air handy, use it to blow water out of openings and crevices. Then dry the door jambs last as they tend to harbor some extra dirt.
Give your wheels and tires special attention, and that includes cleaning them with a brush designed for the job and using cleaners formulated for your wheel type. Aluminum wheels, for example, need a less aggressive cleaner than chrome requires. “Don’t take chances on damaging your wheels,” Mike advised. “If you aren’t absolutely certain regarding the type of wheels that are on your vehicle, contact the manufacturer. They’ll know.”
If you’re too tight on time to include a good washing in your detail day or just don’t have adequate space for a proper wash job, do some homework before taking your vehicle to a car wash. Watch for the kind of attention that the employees give vehicles during the washing and drying stages and take note of the types of cars and trucks brought to the facility. If you see lots of upscale vehicles along with vehicles of all types in excellent condition, those are good signs, Mike said.
Still, it’s better if you handle this process yourself, he added. “When you control the wash and you control the rinse, you’ll do it better.”
As for time intervals, Mike suggests washing your vehicle once a week to keep loose contamination from becoming bonded contaminants.
Evaluating the Finish
Now that the vehicle is clean, it’s time to evaluate the paint’s finish to determine the other necessary procedures for this detailing project.
First do a visual inspection, looking for scratches, stains, oxidation and scuffs. Mike recommends inspecting the vehicle under two types of light, such as sunlight and fluorescent, because different problems can tend to be more apparent under different types of lighting.
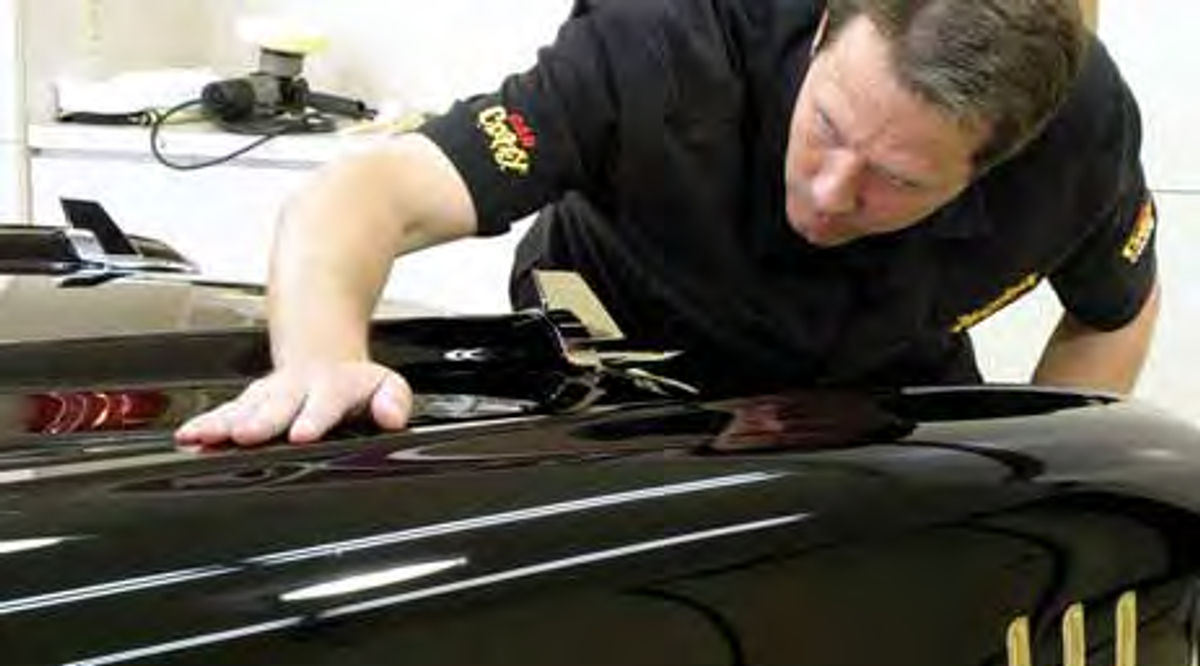
Then run your hands over the vehicle’s surface, checking for bonded contaminants. After doing the touch test on our project car, which had a definite surface roughness, Mike announced that this would be an excellent example for showcasing the value of a clay bar treatment.
A Clay Bar Rubdown
If you’ve never worked with a clay bar you’re really missing something because they really do supply a feeling of immediate gratification.
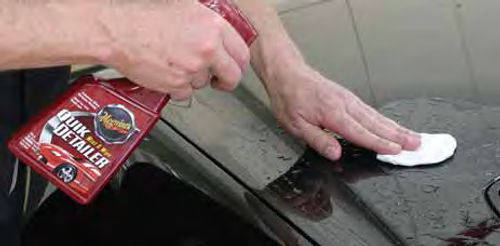
All you do is rip off a section of the bar and knead it into a flat wafer about the size of your palm. Then spray a lubricant, such as Meguiar’s Quik Detailer or a similar product, over an area of about two square feet. Mike says you can’t use plain water as a lubricant, because it “isn’t very slippery.”
Rub the bar back and forth over the vehicle’s surface and two things will happen. One, the surface of the clay bar will start to look quite dirty and two, the vehicle surface starts to feel smoother. You then fold the clay section over a couple of times, knead it again (it will come out clean after several fold-and-knead sessions) spray the surface and rub it again until it’s completely smooth. Then move on to another segment of the vehicle’s surface and repeat the process.
Other things you should know about the clay bar are:
While it removes bonded contaminants, it doesn’t remove paint.
It’s not effective for removing swirls or scratches, which go below the surface.
A clay bar removes wax, but since it restores smoothness to the vehicle’s paint, it contributes to surface gloss and, furthermore, it will help a new coat of wax to adhere better.
While you’re using the clay bar, keep in mind that if you drop it on the floor, immediately toss it in the trash. It could easily pick up contaminants from the floor which, obviously, would damage your vehicle’s surface.
Not Your Father’s Rubbing Compound
It used to be that working with rubbing compounds was something of a scary proposition for anyone who didn’t carry a lot of experience under his belt. While you could remove paint defects with old-style compounds, you could just as easily damage the finish.
But now, fortunately, there are liquid “paint cleaner” products that are nowhere near as aggressive, and much more user friendly than the old-style compounds.
After another visual inspection of the car’s finish, Mike said that he only found light swirl marks and no oxidation or scratches.
If there had been oxidation or light scratches, the next step would have been Meguiar’s Ultimate Compound, a liquid with “micro-abrasive” technology which the company says cuts as fast as harsh compounds but without the scratching.
Instead, Mike reached for a bottle of their SwirlX, a gentler formula that, like the Ultimate Compound, can be applied with a foam applicator or one of the new-style dual-action (DA) polishers.
These DA polishers are another bit of good news for folks who have rubbed by hand because they knew that the big buffers can burn through paint if not handled correctly.
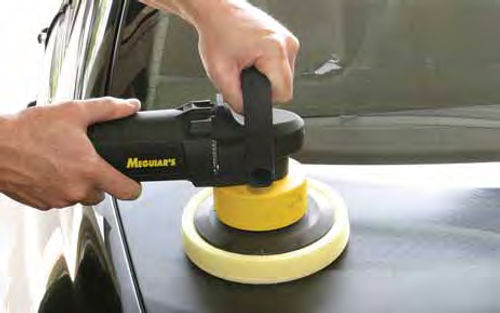
With a dual-action polisher, the head spins on a central spindle which, in turn, rotates around an eccentric offset. This produces something of a slight jiggling motion which produces little heat and, therefore, helps to prevent you from damaging the paint.
The downside of the DA is that it isn’t aggressive enough to remove the deeper scratches that a bigger buffer might handle.
Mike fitted a 7-inch Foam Cutting pad to the DA polisher, which he likened to a “bionic hand,” applied some SwirlX to the pad and we took turns applying it in “smooth, even applications” with light pressure and about a 50-percent overlap.
“Work the product, don’t just wipe it on,” Mike advised. “At this point, you’re still in the exfoliating stage.”
Another point to remember is that the polisher’s power cord should go up, over and on your shoulder. That keeps it from dragging along the vehicle surface and saves you from tripping over it as well.
We removed the SwirlX with microfiber towels, but these had a tight weave, quite different from the waffle weave towels that were used to dry the car after its bath.
(One great thing about detailing a car at Meguiar’s is that they have more clean towels in their bin than the ocean has fish. Wipe for a while; grab a clean towel…it really spoils you.)
Another visual inspection showed that we didn’t need additional applications of the SwirlX.
And by now we had produced some serious surface shine on the project car, so we moved on.
Protect That Gloss
Now that we had removed the loose and bonded contaminants from the car’s surface along with the swirl marks and the old wax as well, it was time for a protective application of Meguiar’s NXT Generation Tech Wax 2.0, a 100-percent synthetic product.
We used the DA polisher again, only this time with a 7-inch Foam Finishing pad (much softer than the Foam Cutting pad).
Thin, even coats were the order of the day here, while working the machine up and down, and back and forth.
Mike suggested a “finger swipe” test to determine when it was time to buff the wax. Lightly swipe your finger along the surface and if it leaves a streak mark, let the wax dry some more. If you swipe and your finger removes the visible layer of flash-dried wax, it’s time to reach for more microfiber towels and start buffing.
Notes From the Interior
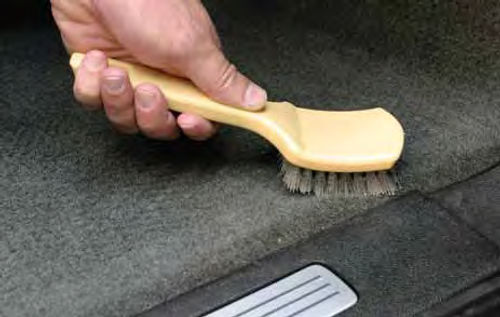
Mike used a small carpet brush to fluff up the nap and loosen dust and dirt before going over the floor with a vacuum. A few applications of Quik Out carpet and upholstery cleaner along with some intense brushing took care of some stains and ground-in heel marks that I felt had become permanent additions to the carpeted front floor mats.
Mike advised against using high-gloss products on the dash for the obvious reason, sun glare can present a hazard while you’re driving. Instead, we used Quik Interior Detailer, which left a matte finish.
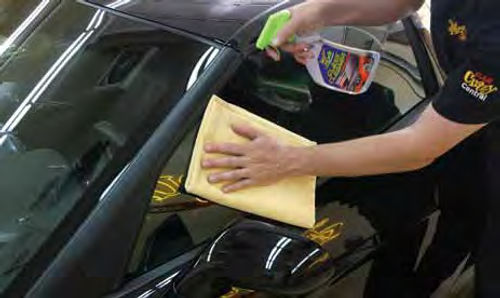
While cleaning the windows with NXT Generation Glass Cleaner both inside and out, Mike suggested that you wipe the windows with a horizontal motion on the inside and a vertical motion outside. That way, if you see streaks, you’ll immediately know what side of the glass they’re on.
The steering wheel had gotten more than a little grungy (I must remember to wash my hands more often), and Mike wasn’t too certain about its prospects for revival. But several applications of Quik Interior Detailer and a period of hard rubbing with a microfiber towel on my part had the wheel looking—and feeling—like new again.
Spray, Foam or Gel?
pray, Foam or Gel? As you’ll recall, we cleaned the tires while washing the car and now it’s time to shine and protect them. There’s a choice between spray, foam and gel products and Mike opted for the gel because it’s “the easiest to control.”
Put on a thin coat with a foam applicator and “really work it in,” Mike advised. But no matter what type of tire product you apply, be sure to remove the excess…or you’ll wind up slinging it along the side of your vehicle when you drive away.
One other thing about the tires. While you’re down there working on them, it’s also a good time to check for wear and monitor your tire pressure.
Contact Them to Learn More…
Meguiar’s maintains an extensive Web site at meguiars.com that includes howto videos (many of them featuring Mike in action), product details and forums. There’s also a section where you can enter information about “your vehicle and your appearance goals” and the amount of time you want to spend detailing. In return, they’ll give you recommendations on the products you’ll need and how often you should use them.
You also can contact their Customer Care Center by phone at , 6 a.m.-6 p.m. Pacific time, Monday-Friday, and 7 a.m.-3 p.m. on Saturday.
Maintaining the Momentum
It doesn’t take long for a vehicle to get dusty during the Southern California summer (it seldom rains) so, it was no surprise that it didn’t take long for my car to acquire a coating. Still, that didn’t stop a passerby from enthusiastically commenting on the car’s “glassy finish.” I think it might be time for the ol’ daily driver to have another wash and surface evaluation.


