Personalize a Rolling Tool Cart
With a Modified Cart, Your Favorite Tools Will Stay Handy. Start With These Tips and Add Some Of Your Own.
THE FIRST TIME I laid eyes on that huge Snap-On toolbox, (you know the one that has its own suspension) I thought I must have it.
But when I found out the price didn’t include any tools, I was forced to think again. This is in no way intended to take anything away from that beautiful toolbox. I would simply prefer to put my money into quality tools first.
When you get right down to it, there are certain tools we constantly seem to be using. Other tools that are more specialized such as pullers, distributor wrenches and timing lights are not an everyday need for most. I seldom use my 1/2” drive equipment; 3/8” is my tool of choice. On the other hand, someone into large trucks or military equipment may have virtually no use for 3/8” drive, and 1/2” or even 3/4” drive might be their choice. That doesn’t mean they are willing to dispose of their 3/8” drive, it just isn’t an everyday tool.
Where I am going with this is to inspire you to create your own tool cart with your most frequently used tools. You will still want to have another toolbox for the stuff not used regularly, or you’ll store some of those other tools on a tool board (or pegboard).
Cart Shopping On a Budget
Inexpensive roll-around carts with a locking drawer can be purchased for well under $100. I purchased mine at Sam’s Club many years ago, but Harbor Freight, for example, carries more than one for around that $100 figure or less.
Keep in mind that these are inexpensive carts and certainly don’t match the quality of professional toolboxes or even Craftsman. However, there are only a few moving parts, mainly the wheels and the drawer. OK, the action of the drawer will be stiff in comparison to a more expensive unit, but the wheels can easily be changed should they give you difficulty—all else is simply painted or plated metal.
Now, Make It Work for You
Once you have purchased one, it’s time to personalize it to best fit your needs. It was most logical for me to use the storage drawer for my various 3/8” ratchet extensions and most-frequently used sockets. I also have a set of long combination wrenches in there (see Photo #1).
The drawer, as well as top and bottom shelves were lined with non-skid toolbox drawer lining purchased some time ago at Walmart—this helps to keep things in place. The top of mine is used to hold an assortment of smaller auto related hardware items while your choice may likely be to keep more tools handy.
Keep in mind that the top of this type of cart generally is open, and if theft and security is an issue you will need to make a more secure closure by creating a lid from sheet metal or wood. This should be easy enough to do by adding a couple of hinges and a lid made from the material of your choice.
To secure it, consider a keyed locking hasp which looks a littler nicer than a simple hasp and padlock.
To keep your new lid open, a prop rod would do the job, or design the lid to lift off if that suits your needs better.
If, however, security isn’t a problem, you may choose to make a slider that covers half of the opening. (Probably wood is the best choice for this as it will be gentler on the painted edge.) This would still allow good access and give you a flat surface to spread things on. Of course, it also can easily be lifted off if you need the compartment to be completely opened.
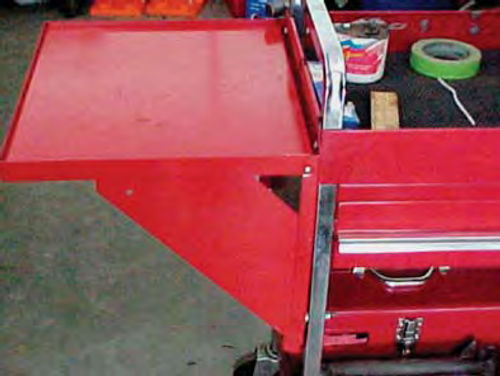
On the left side of my cart I added a folding shelf (a Sears roll-around toolbox accessory). It’s made to hang off the side, but requires attachment to keep it in place. I was able to utilize two existing bolts near the top of the frame rails. These were spaced perfectly. I then added a bolt to each lower corner but had to use several washers to fill the small gap in-between the folding shelf and frame rails (Photo #2). The bonus here is that it folds flat when not needed, thus keeping the length of the cart smaller for tight locations.
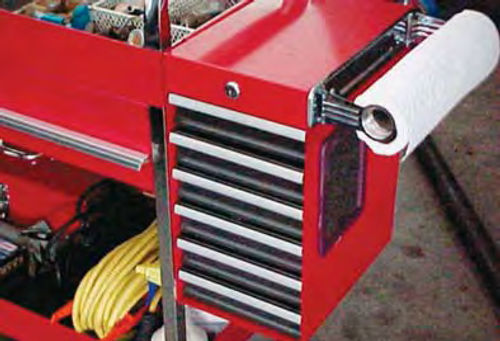
On the opposite side I added a small six-drawer cabinet; again a Craftsman item (Photo #3). As with the folding shelf, it is designed to hang on the side. It has rubber pads on each corner of the side that fits against the cart and its weight keeps it perfectly secure. (So secure that I thought I had bolted it, and was looking for the locations to identify in this article.) I did have to add a cross brace (made of angle aluminum) between the front and back frame rails. This gives the side cabinet its lower contact points for the rubber pads.
By temporarily removing a few drawers I was able to gain access and use a couple of small screws and nuts to secure a paper towel holder to the side. You may have noticed the inexpensive magnetic mirror stuck on the side. This was another Wal-Mart purchase, and was marketed for kids to place inside their school lockers. It’s always handy when working on a vehicle.
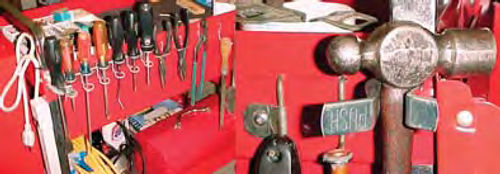
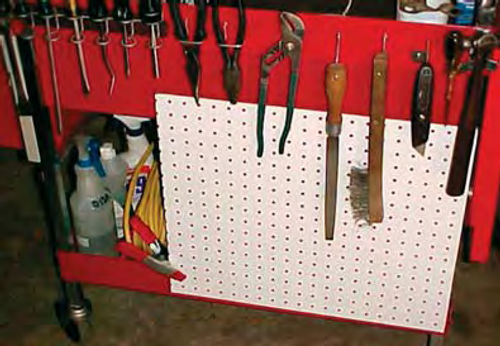
On the back of the cart, opposite the open storage area, I drilled numerous holes and utilized pegboard fixtures (Photo #4). There are many different “pegboard hooks” to choose from. Check your local home improvement store where you generally can buy individual pieces or a package with an assortment of them. They have these in two sizes— 1/8” and 1/4”. You can use either or a combination of both (as I have here). It is simple enough to do, hold the fixture up against the metal surface to get it placed where you want it and use a “Sharpie” to mark the spot where the holes need to be drilled. Remember a snug fit is desired so choose a bit that is smaller than needed and gradually go larger until you can force the peg hook into place. Once you know the correct size bit, you can make your initial hole with it. Tool hooks that have a push-in lower prong work best. The top hole should be one inch above the lower, as this is the standard pegboard spacing. Keeping in mind that this is a rolling tool cart and not a stationary pegboard, I used J-B Weld epoxy on the prongs of each peg hook to keep them from coming loose and flopping around.
One fixture I chose was a standard screwdriver holder with six positions in it. Also, spring-action clamps (as shown in photo #4 on the right) are useful for larger tools. These are usually available in the general hardware section or the lawn and garden area of stores.
Adding Another Shelf
The various photos show that the base of the cart has a rather large open cavity, 16 inches from the bottom shelf to the bottom edge of the drawer. It’s a great place to store an electric drill, extension cord, spray cleaners, lubricants, etc. (At least that worked for me.)
This vertical space could be split in half by forming a shelf out of plywood and notching the corners to fit within the framework of the cart. “L” brackets can be secured to each frame rail to support the new shelf. Here I would use the bigger is better theory and purchase 3/4” plywood (or whatever today’s fractional designation is) unless you have a scrap section of something else laying around that would work.
If you feel you need extra support for the shelf, consider running support braces underneath it, front and back, the length of the cart. The frame rail on my cart is made of one-inch square tubing so angle iron or even aluminum of a similar dimension would be a great choice.
If you take the time to make a shelf or, for that matter, a top for the open cavity, be sure to sand the corners smooth and apply a sealer (like polyurethane) or several coats of enamel paint.
This will do several things for you. Along with avoiding the possibility of a splinter in the hand, it helps keep the wood from absorbing spills and moisture, and then there’s the obvious—the cart will look nicer.
Furthermore, if you made the top from metal, painting will discourage rust.
Save Space for a Power Strip
Do you want to make your tool cart even a bit more useful?
Consider adding a small section of pegboard in-between the frame rails (Photo #5). If you put anything substantial on it, an additional support brace in the center will keep it from sagging outward. Pegboard could also be fitted to the inside of the cart if you chose not to make a dividing shelf.
Also consider securing a multi-outlet power strip with a built-in circuit breaker to an open space (if there is any left) on the cart (Photo #4). How often have you run your heavy extension cord to the location where you are working only to find you need to use two or possibly three power items at different intervals. Sure, someone will say to simply add a plug multiplier to the end of the cord, but what if your son borrowed it? This power strip is not easily removed, so it won’t be missing when you need it, plus you have the built-in circuit breaker closer to the tool(s) being used, as opposed to one much farther away in your home’s or garage’s service panel.
Just remember the circuit breaker’s protection is only as “good” as your power cord, so use a heavy gauge extension cord.
If you choose a 12-gauge cord, you virtually will never need to be concerned with overheating (loading) the cord. At the very least use 14-gauge, which is the standard wire used in these power strips. If you use a smaller gauge wire you will risk the chance of overloading it, and the circuit breaker will be of no value.
Examples of cords I found at a local store were: 14-gauge wire—25’ rated for 15 amps, 50’ still 15 amps, but with 100’ the rating dropped to 13 amps. The 12- gauge cords from 25’-100’ in length were all rated at 15 amps. (I believe shorter, 25’ 12-gauge cords may technically be rated for 20 amps, but the plug ends remain only 15 amps.) The power strip itself is rated for 15 amps or 1875 watts at 120 volts. (A useful equation: Amps equals watts divided by volts. Knowing this formula will allow you to calculate the total draw of your tools, which is necessary math if some of your tools are rated in watts and others in amps.)
By using these thoughts and adding your own, you’ll be able to create a personalized and mobile cart for your most used tools and equipment, and you’ll do it within a budget as well.
And consider this: The steps you’ll save by having your tools close at hand will translate into added energy for the next swap meet!