
John’s Tool Chest, Pt. 1
We All Know That Having the Right Tool for Each Job Is a Necessity. This Restorer Will Show Us Some of His Favorites.
LOOKING THROUGH MY tool box I noticed some items that I felt might be worth sharing with you. There is nothing “cutting edge” here, these items have been around for years, but very well may have passed under your radar. Most of my tools are older, so it’s possible some part numbers have changed. I have caught some of these changes, but likely not all. But even if you can’t find all of these at your local auto parts or hardware stores, you may come across them at swap meets. And I’ve found them all to be very helpful in my restoration and maintenance projects.
3 ⁄8" Drive Accessories
Let’s start with a 3 ⁄8" universal joint. Flex-type sockets are the best choice when possible, but it’s common to need a size you don’t have. The next best thing is a universal joint. However, they aren’t all the same.
Photo 1 shows a standard Craftsman U-joint at the top of the photo, and one made by Snap-on (FU 80A) for “tight quarters” below it. It’s smaller in both diameter and length, actually about ½" shorter. It measures 111⁄16" in length and 11⁄16" in diameter.
So what’s the downside? Not much. Photo 2 shows that the smaller Snap-on U-joint won’t flex to as tight an angle, but at that point it will bind up and be non-functional anyway. Both the universal joints shown here are at least 30 years old, and at that time Craftsman didn’t make one similar. It appears the part number for today’s Snap-on universal joint is FU 80B; and is priced online at $44. This isn’t a push for Snap-on, although they do have some beautiful tools. Basically it’s to make you aware that there can be extreme differences in something as simple as a 3 ⁄8" U-joint, so compare before you buy.
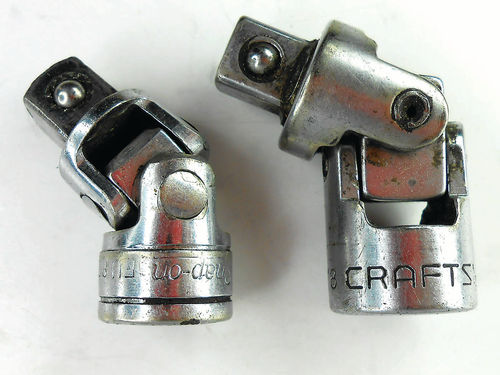
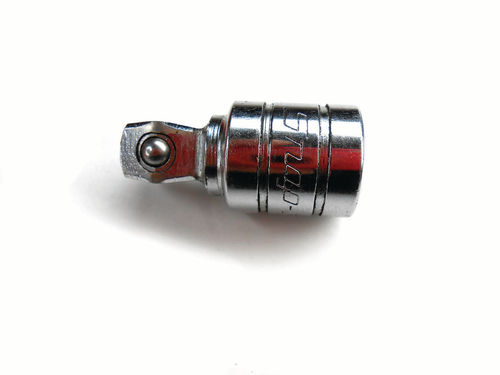
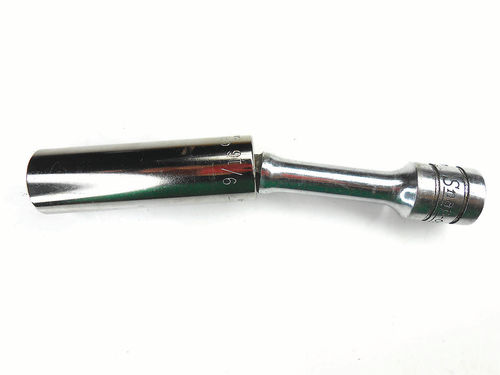
Photo 3 shows a 1 ½" Snap-on wobble joint (FXW 1). When you don’t have 100% straight access to a fastener, and only a slight angle is needed, these are great. As seen in the photo, the drive isn’t square; it tapers off in both directions from the fastening ball. This allows the tool to achieve a slight angle within the socket as seen in photo 4. They’re available in a six-piece set #206AFXWP from 1 ½" to 11" in length for $175, or just purchase the 1 ½" joint (FXW 1; $15), and use it on your standard extensions.
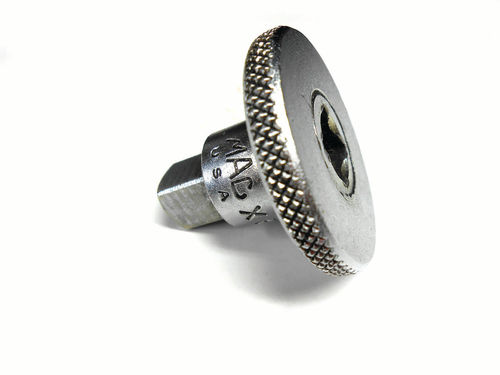
Photo 5 is a knurled spinner made by Mac (XRS1). Essentially this is a 1" extension with a wide knurled collar making it easy to rotate between your thumb and index finger. It’s useful on the ratchet or on its own, and allows the user to start tight fasteners without fear of cross threading. The large diameter of the knurled collar gives the user much more grip and torque than simply attempting to twist and spin a socket or extension by hand, yet not enough to risk thread damage. If you are using an air ratchet, it’s not an issue. But with a hand ratchet it also aids the user when removing something like a spark plug, where it is too loose to make the ratchet click, but too tight to simply remove with your fingers. I found a current price of $27 for this.
Transfer Punches
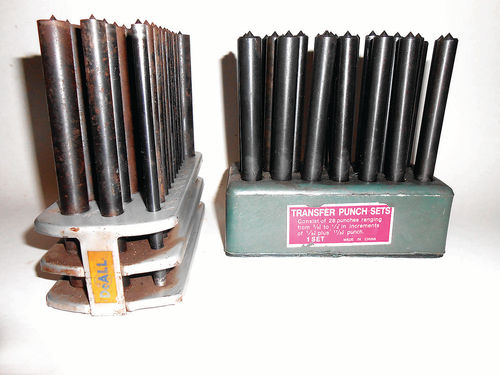
These are extremely handy, especially if you are fabricating parts for your vehicle and using an old part to go by. For years I wasn’t aware of these punches and struggled to make such parts without them. Sometimes I would use a scribe to mark the position of the original hole location onto the new metal, but that only solved part of the problem; finding the center was another. Ultimately, many times it came down to “eyeballing it.” Sometimes it was successful, but often it wasn’t. Depending on what it was you were making, you may or may not have gotten away with it. Transfer punches are the quick solution. Photo 6 shows two sets that I have. The one to the left is an old set made by “DoAll” in the USA, and to the right is a set from Harbor Freight, made in China.
Photo 7 shows the business end of the punches. Both sets start out with the smallest punch being 3 ⁄32", and progress in 1 ⁄64" increments all the way to 17⁄32". Find the punch that will best fit into the hole (can actually pass through it), and with your old part lined up properly over the new one, position the punch in the original hole and then strike the punch. The transfer punch will mark the center of the hole.
I decided to purchase the Harbor Freight set because I frequently use one size punch in a special locating fixture when marking components for workbenches that I make and sell at a monthly swap meet.
Simply put, this set could be considered consumable. It was inexpensive and supposedly has a lifetime warranty. But even if a punch fails and they won’t replace it for whatever reason, I can live with it.
Furthermore, the Harbor Freight set has performed very well and won’t break anyone’s budget as it costs around $10 (harborfreight.com). If you want a USA-made product, Enco, (use-enco.com) offers a similar fractional set for $53, and even offers letter-size sets. Though you likely won’t use them every day, they’re a handy addition to your tool collection.
Electronic Digital Calipers
A 6" digital caliper is a very versatile tool. While it won’t take the place of a micrometer, this one tool can quickly cover a wide range of measurements. Sure there are micrometers out there that will cover the same range by switching out components like the anvil, but that’s time consuming, and would require checking it each time for accuracy with a gauge block.
For most of us a digital caliper is perfect for the many simple day-to-day measuring needs. If, however, the most precise measurements were required, I would definitely recommend using a micrometer.
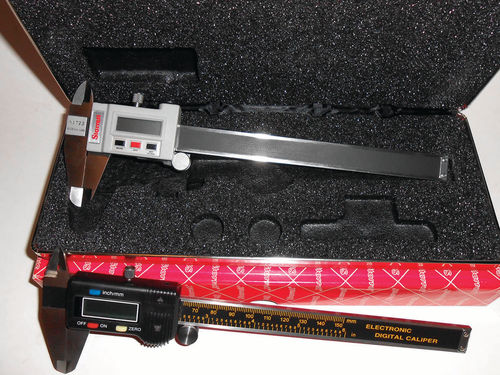
In the top of Photo 8 is the Starrett model #723Z-6/150 made in the USA. Below it is a 6" caliper offered by Harbor Freight, made in China. The Harbor Freight caliper is often on sale for under $10, including the case and battery, amazing!
I have had the Starrett for about 20 years, and it cost $139 back then. This model is no longer made, but in the 2012 Enco tool catalog I found model #799A-6/150 listed as “799 Global series” (raises the question of country of origin?) for $146.99. I decided to call Enco and ask. According to the person on the other end of the phone, it comes from Massachusetts, and is made in the USA. This model, however, doesn’t have the port for printout capability (which I have never used). For those interested there is also an upscale version #798/B6/150 for $220.99.
Digital calipers can be useful for many tasks. Some examples include: measuring loose drill bits where the size identification has worn off, flat sheet metal stock to identify the gauge, round pipe diameter, both inside and outside, brake rotor thickness (although it won’t read the depth of any groove scored in the rotor), and in general anything that you can fit in between the caliper jaws. I often walk into the local hardware store with one in my pocket when I am looking to make a part. I use it to size up their fittings and other useful things for comparison. Today I made a trip to the auto parts store needing to match up a 2 ¼" rubber O-ring for an air regulator. It was perfect for verifying measurements, especially the thickness. Notice the extension at the bottom of the caliper in Photo 9. This can be used to measure the depth of a bore; bolt hole, etc. Another common feature with digital calipers is you can change from inches to millimeters at the push of a button, allowing you to see both. Also, the gauge can be zeroed with the caliper jaws open to any position at any time, so it can be used to measure the difference between similar objects.


While I am by no means a big fan of Harbor Freight, I must admit that these 6" calipers are an unbelievably great value. Should one of these become lost while you’re parts hunting somewhere, it’s not the end of the world; it’s little more than a meal at a fast food restaurant. The only complaint is that the battery life seems a bit short, and this may be due to forgetfulness, accidentally activating or simply leaving it turned on. It didn’t shut off automatically, while the Starrett does.
There’s no doubt that Starrett is the “Snap-on” of measuring tools; considered by many to be the finest made. If your budget won’t allow for spending that much, however, the Harbor Freight caliper is an affordable option.
Special Drill Bits
When most of us think of drill bits, that gray metal index box comes to mind with all the various size fractional drill bits. There are number and letter drills, and even metric bits as well. These primarily come into play when you are drilling and tapping threads, requiring sizes other than the fractional divisions. While looking through the Enco tool catalog I found there were over 40 pages dedicated to drill bits. In addition to those already noted, there were bits with reduced shanks and shanks with flats along with different finishes, composition, angle/point design, and lengths.
Let’s talk about drill bit length for a moment. This could make the difference between reaching something and being able to complete the task…or not. Using a ¼" bit as an example; the normal everyday bit is typically 4" long. There is also what’s referred to as “screw machine bits” where the same bit would be 2 ½" long. Have you ever gotten into a situation where once the bit was chucked in the drill it wouldn’t fit into the work area? These short bits could make the difference. Sure an angle drill will also get the job done, but the same would apply to it in a smaller confine.
On the other end of the scale there are extended length bits. A ¼" bit would typically be 12" long.
If you are wondering when you would use these long bits, the answer is as seldom as possible. This extreme length allows them to flex much more than the standard drill bit, and that increases the chance of breaking. This is mainly an issue with the smaller diameter bits, but the big ones can break too. However, the longer bits are great for reaching into tight restricted areas surrounded by obstacles, as well as allowing you to work on something that would be difficult and time-consuming to remove. A good example is an exhaust manifold with a broken off stud. Of course the broken stud must be prepared by leveling it off and center punching it. If it’s broken off below the surface, a small grinding stone can be used to concave the surface slightly. I know that about now someone is saying if you can get in there and do all that, you probably don’t need the long drill bit in the first place, but very often a small die grinder will fit where a larger electric drill will not. When you try to get the body of an electric drill where you need it, it’s usually making contact with a lower control arm or something else not allowing straight access for drilling.
Most of these bits were purchased from Snap-on in the late 1970s, but today a Google search will lead you to sources like Amazon, Enco, and others. Amazon had several made by Dewalt in the $8-$10 range. Even the local hardware store will likely have some to offer.
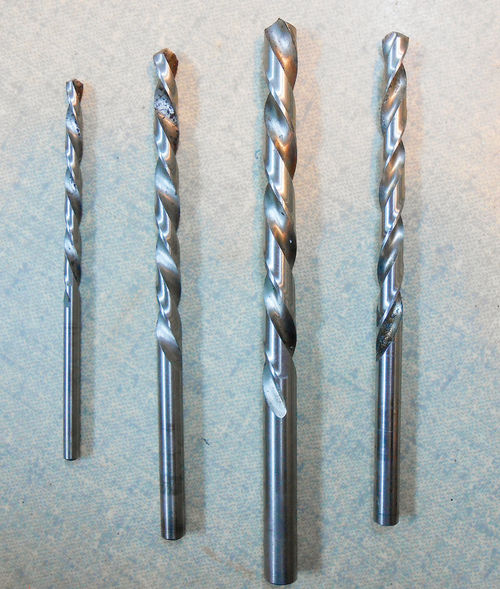
Changing direction for a bit, (I couldn’t resist saying that) Photo 10 shows three left-hand drill bits and to the right is a “standard” bit for comparison. Notice that the flutes spiral in the opposite direction from the standard drill bit. These bits will cut in the reverse direction, so you must have a reversing drill to use them. They are excellent for removing broken bolts and studs with a right-hand thread. A good example is the previous exhaust manifold scenario. If you have the manifold removed, or if you are fortunate enough to be able to get a straight-on aim with an electric drill, a left-hand drill bit is the best removal tool. Often as you drill through the broken fastener, enough wall pressure is removed from the threads and just before the bit passes completely through, it will dig in and thread out the remains of the fastener. With the normal right-hand bit the action is just the opposite, trying to thread it in tighter. If it doesn’t come out with the first left-hand drill bit, and you have enough material remaining to use the next larger bit, do so. As there is less and less metal behind the threads, it is more likely to thread out.
These were purchased through Eastwood Co. many years ago. I hadn’t noticed them in their catalog recently so I suspect they no longer carry them. However, a Google search for “left-hand drill bits” brought up a ton of stuff. Amazon had numerous listings, including a link to Northern tools which had two listings: one for $19.99 and the other for $39.99. Some left-hand bits were packaged in kits that also included extractors (easyouts). Irwin, for example, had one of these kits for $36.39. Office Depot, of all places, had a Hanson 5-piece bit set, marked “USA”, for $32.39. The price range and kit sizes are all over the place so find what fits your needs.
Test Light & the Power Probe
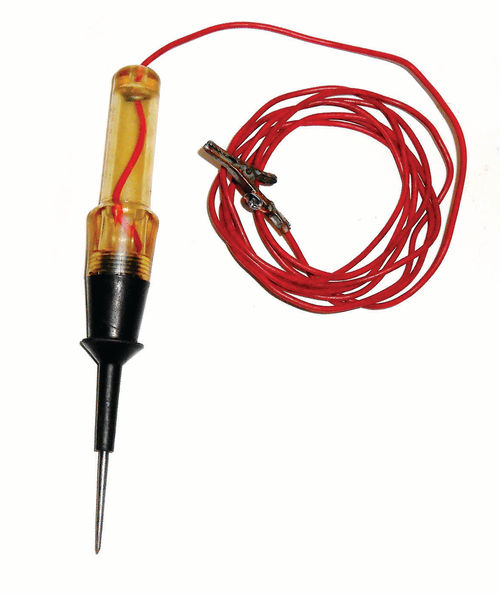
Photo 11 is of an old test light that’s been rewired several times over the years. Its large clear handle lights up brightly when current is found. Having one of these simple test lights is a must if you do even the most minimal electrical work on your vehicle. It can be used for checking lighting problems and help to locate why your brake lights aren’t working, trouble-shooting starting problems, and overhauling starters and alternators. And in a pinch it can even be used to set the ignition timing on your old points/condenser ignition (although I wouldn’t let go of the timing light just yet). Anywhere you have 12V flowing through wires from point “A” to point “B” it can verify if it is, or is not. It has a pick that most of the time is used to back probe connections, but if there is no other option it can be used to pierce through wire insulation. Once the work has been completed, repair any punctures in the insulation with a small application of liquid electrical tape. The price range for a decent test light is likely in the $15-$20 range, although back in the mid-1970s my Snap-on dealer looked at the one pictured here and commented that it was a cheap one. Not too long ago I did purchase a newer one sold by NAPA to keep in my vehicle’s tool box. It has a pretty red handle but a small lamp window, and while it works fine, I like a big blast of light!
If you want to take a leap forward from the test light, consider purchasing a Power Probe. Pictured in Photo 12, this one was purchased around 20 years ago, so don’t expect the new ones to look exactly like it. The red and black clips connect directly to the vehicle’s battery. The one I have has leads over 21' long which allow you to reach most anywhere you need to. Once connected, it’s ready to work. When the tip of the probe is touched to battery positive, the indicator light located in the nose of the tool will light up red. Should it contact battery negative it will light green. It’s nice to be able to verify there is a good ground. Have you ever worked on a motorhome coach? Finding a reliable ground can be a challenge.
By using the switch on the probe and flipping it forward the red light will come on, indicating the end of the probe now has battery positive at your disposal. Flip the switch toward the rear and the light indicates green; you now have battery negative at the probe tip. The unit is also protected with a circuit breaker.
Look again at Photo 12 (Power Probe), and notice the short wire with an alligator clip on it. This is a constant battery negative auxiliary lead, located at the probe. This lead allows you to quickly test something like an electric window switch with it removed from the vehicle. In October 2011 I did a three-part seat restoration series for AR that included a section on the testing and rebuilding of the power seat switch. I used the Power Probe in that project, and it was a huge time-saver.
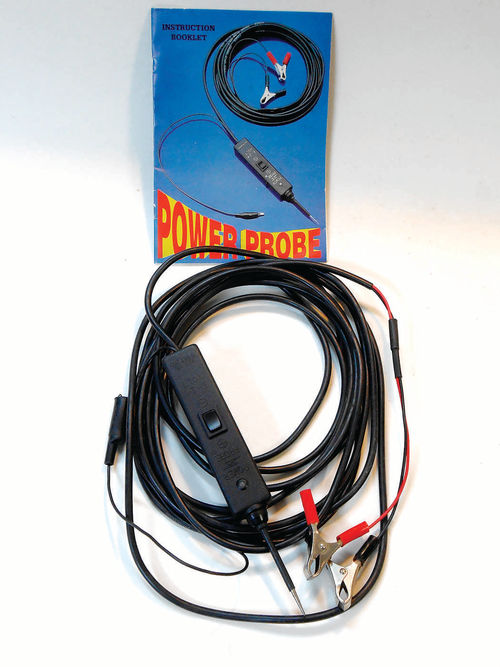
This was purchased from Eastwood, but they no longer carry it. Summit Racing (summitracing.com) currently shows the Power Probe 1 for $75 (this appears to be the same model I have). A Google search also lists Advance Auto Parts (advanceautoparts.com), Amazon and many more options. Amazon has a Power Probe II (Power Probe 219FT circuit tester) for $76.54 at the time of this writing. Other than it being red in color, it appears to be very similar to mine. In addition, there are several new generations of the Power Probe; some look quite alien. You may desire some of the advanced features offered on these other models and it appears that there are many to choose from.
We’ll take another look inside John’s Tool Chest in the near future.


