
Improve Your Shop Safety
There are Many Precautions That Will Help to Protect You. Don’t Take Your Health & Well-Being for Granted.
MY PAINT SUPPLIER dropped by the shop a few days ago with a new 3M Worker Safety Kit #37214. At first glance this kit looked like a collection of the typical hearing and eye safety products you might find on the shelf at your local automotive paint supply store. It contained a full face shield for grinding, a very nice set of ear muffs for all of those noisy shop tasks, two pair of strapped ear plugs, and two pair of safety glasses.
The kit—which goes for about $73— was interesting if only because anything that makes working in the shop a little safer warrants investigation.And with everything you need hearing- and eye safety-wise included, it also presented the possibility of a new product review.
At least that was my thinking until I watched my supplier trip over an errant electrical extension cord on his way out the door.
At that moment I realized that being able to see and hear what’s going on around you in the shop might be a really good thing, but it isn’t the only safety concern we face every time we walk through the shop door. Hazards are everywhere and this looked like a good time to address some of those issues.
Safety Glasses With Something Extra
Since the 3M Worker Safety Kit started all of this brain activity I’ll begin by giving it the once over (Photo 1). AsI mentioned above, the kit comes with a full face shield, ear muffs, ear plugs and safety glasses. Definitely a typical set of shop safety tools until you put on the safety glasses. This particular kit came with one pair of non-magnified, clear plastic safety glasses with the added feature of a 1.5x “reader” bifocal lens. The other pair came with the same clear lens with the 1.5x “readers” but also had the added convenience of LED lights mounted just outboard of each lens.
For a restorer who has seen as many old cars pass through the shop as I have, being able to grab safety glasses with a bifocal lens built into them means I can now go under the dash of just about anything out there and read the fine print on the fuse block. Having the luxury of LED lighting on those safety glasses means I can actually find the fuse block. If you aren’t sure that’s a plus, try ducking your head underneath a steering column with a screwdriver in one hand, a 5/16-inch wrench in the other hand, and a flashlight clenched between your teeth. Having good lighting that focuses precisely where you are looking frees your hands for all those other tasks that come up when you’re staring into dark places and it leaves your mouth available to spew out those select words designed to improve your attitude.
Are these kits available with safety glasses without the bifocal lens? They are, and they are also available with stronger 2.0x or 2.5x “readers.”Check with any automotive paint supplier that carries 3M products to get a kit with the safety glasses best tailored to suit your needs.
Electrical Hazards
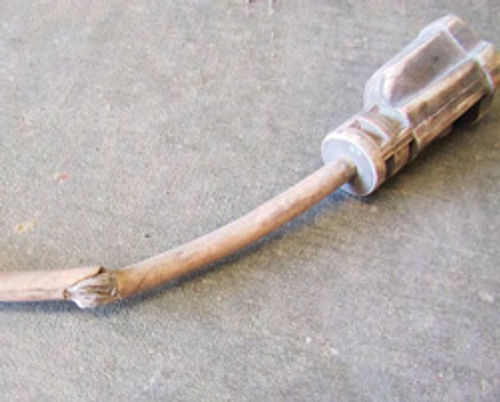
Moving back to the errant electrical extension cord that tripped my supplier, I have to say that while stumbling over a cord might be hazardous enough to cause personal injury, doing so rarely causes risk to your life. However, walking through a puddle of water left from wet sanding that fender and stepping on an electrical extension cord like the frayed one in Photo 2, might really do you some serious harm.
If your feet are wet, or the cord is wet and you step on it, or pick it up for that matter, that could be an electrocution waiting to happen. How so? Did you know that your heart operates on the same 50- to 60-hertz frequency that 110 volt electrical outlets use? That’s also the same frequency doctors usewhentheyyell “CLEAR!” andshock your heart back to life. It’s also the same voltage and same hertz frequency pulsing through that worn-out extension cord. If you have an electrical extension cord in this condition I would suggest giving it the toss and replacing it with a new one.

New electrical extension cords are available at your local home improvement center and from your local automotive parts supplier. Just be sure that your new replacement piece is a three-wire cord. That third wire is there to act as an extra grounding point. Ever pick up an electrical tool and receive a mild shock when you pulled the trigger? Chances are that tool was attached to an electrical outlet using a two-wire cord. That’s why the third wire is there, to improve the ground and stop those irritating little shocks, and maybe even a big one. If you have any two-wire electrical extension cords in the shop, worn or not, I suggest placing them in File 13 and replacing them with three wire cords just for safety’s sake.
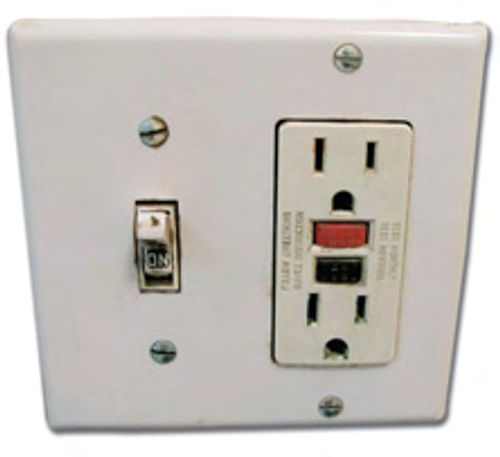
While you are in the replacing mood be sure to check the electrical outlets in your shop. All of them should be GFI (Ground Fault Interrupter) outlets (Photo 3). If your house was built in the last 10 to 20 years all of the electrical outlets in the bathrooms are GFI. That’s the outlet with the little black and red buttons at its center. What does GFI do? These outlets act as a circuit breaker. If a surge of electricity were to move through the outlet, as could happen should you be standing on an exposed wire in your frayed, worn-out extension cord, an internal circuit breaker within the GFI outlet trips and the flow of electricity stops—no more hazard of electrocution.
In case you are wondering what the black and red buttons do, here is an explanation. The black button is a test button. Press this button to test the outlet to be sure it is working properly. Once you press the black button the red button should pop out. With the red button popped out any tool you plug into the outlet should not work. That tells you that the current flow through the outlet has been interrupted and the GFI outlet is working correctly.
The red button is the reset button. Press this button and power should now flow through the outlet. With that, your electric drill should come to life.
A Correct Number of Jack Stands
Speaking of things left lying on the floor, how many jack stands does your shop have? If you have fewer than four jack stands I recommend going out and purchasing more. You need at least four jack stands to properly support your project vehicle.
Two stands might be fine to raise the front end to change the oil, but two stands just won’t cut it when you are doing restoration work. Four stands will bring the vehicle up level and steady.
I could go into how improper jack stand placement can stress a vehicle’s body and cause the doors not to align or the fenders not to fit but that’s not the point here. Right now we’re concerned with working safely. You can place your jack stands under the suspension just inboard of each wheel or place a jack stand under each torque box located underneath the cowl at the front of the vehicle and just forward of the rear axle at the rear of the body. These are all good places to support your project. If you need more information on jack stand placement refer to “Project Charger,” from BowTie Press. I give some good jack stand pointers in that book.
When it is all said and done you want your project vehicle supported in such a way that it is stable, with no rocking, and no tipping. What happens if you don’t support your project correctly?Consider the car in Photo 4. This jack stand slipped and down came the car. Although it didn’t drop all the way to the floor, that’s only because I placed the other three jack stands at a level height and that had a tendency to somewhat balance the car; being under this car when it fell would not have been a picnic.
Paint Shop Safety
If you have checked out my body and paint repair DVDs you’ve seen me suited up in painter’s coveralls, latex gloves, a head sock, and a respirator every time I spray any kind of paint products.This isn’t something I do for fashion’s sake, even though the white suits do look sharp. I do it for cleanliness and personal safety.
If you have been around the automotive restoration business/hobby for very long you have heard the horror stories associated with the hazards of using today’s automotive painting products. These products contain nasty chemicals like isocyanates, xylene,toluene, methyl ethyl ketone, and the list goes on. The thing people don’t seem to understand about these chemicals is that most of them are colorless and odorless.
So, it’s not the stuff you can smell inside the paint shop that is hurting you? Yes, it is. The stuff you can smell,such as the paint itself, is what contains all of these chemicals.
Think of automotive paint the way you think of natural gas. That rotten egg smell doesn’t come from the gas itself. Natural gas is basically odorless. The rotten egg smell comes from an added ingredient to let you know if you have a gas leak. You could say the same about automotive paint. If you smell it, you are breathing it and what you are breathing isn’t good for you.
Now that I have scared you into getting rid of all the paint in the shop, let me cover some things you can do to protect yourself.
Protection always starts with latex gloves. I purchase these gloves by the 100-count box and have had occasions when I wear them all day long. I may put on a pair to mix plastic body filler, toss those and put on a pair to clean something using lacquer thinner, and then toss those for another pair to clean and degrease something, and finally put on another pair to do some spray painting.
Here’s a tip. I put on a pair of latex gloves when working on greasy suspension components and often slip on a pair of heavy leather gloves over the latex gloves. Aren’t leather gloves too bulky to handle delicate repairs? Definitely, but slip them off to slide in a cotter key and your hands are still protected by the latex gloves.
You can find latex gloves at any automotive paint supply store, at the local automotive parts store, and at most home improvement centers.
Protection continues with painter’s coveralls and a head sock. It is generally accepted that the only reason to wear painter’s coveralls and a head sock is to help keep the paint job clean. I think I may have even stated that reason in my painting DVDs. If that gets you to wear these protective items during painting then that’s a good thing.
However, another more important reason to wear painter’s coveralls and a head sock is to prevent the product being sprayed from reaching your skin. Your skin is covered with pores that serve as inlets for whatever happens to be in the air. That fog from spraying may be mostly solvents and paint, but it still contains the above-mentioned nasty chemicals.
Next on the list is a good respirator, or should I Say respirators? I keep two different types of respirators in the shop along with a box of NIOSH-approved (N95) dust masks. All of the semasks are considered to be half-face respirators in that none of them covers the eyes (Photo 5).
They do make full-face respirators that cover the eyes, but I have found this type of respirator tends to fog up unless it is attached to a fresh air system, which I’ll also use on occasion. What occasion would that be? I like a fresh air system when painting a project that is going to take more than 30 minutes or so to complete. Shorter than 30 minutes I tend toward the half-face respirator for convenience.
The first respirator, the one on the left in Photo 5, is specifically for painting and is labeled as such. In other words, if you are looking to purchase a new respirator and it doesn’t specifically state “for use when spray painting,” it is not rated for paint use and should not be worn when painting. The painting respirator shown is 3M #7178.
This unit uses disposable filters and they should be changed after every paint job, or if you are spraying small parts I would change the filters at least once a week.
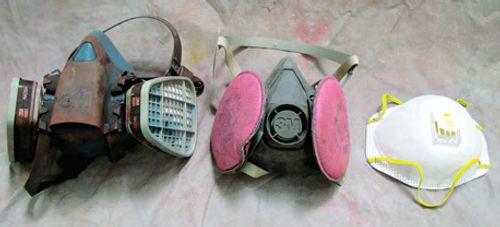
The second respirator is known as a welder’s respirator 3M #7182. Notice the pink filters. Not only are they stylish, they clearly identify this respirator as a welder’s respirator and not a painting respirator. The pink filters are disposable and should be changed every few months depending upon how much welding you are doing.
Do you really need to wear a respirator when welding? Over in the medical world they identify one specific cancer as 6011 welder’s cancer. The 6011 designation is a product number of a popular welding rod. The cancer is a lung cancer and the cause is thought to be the failure to wear a welder’s respirator to protect the welder’s lungs.
You don’t have to restrict the use of a welder’s respirator to welding only. I wear one when sanding plastic body filler and block sanding primer. This unit does a much better job of filtering than does a dust mask.
How do you know when to change the filters on either of these respirators? Breathing will become labored as the filters begin to clog. When drawing in a breath becomes difficult it is time to change the filters.
What role do dust masks play around the shop? Like latex gloves, I purchase these by the box. I wear one when sweeping, blowing the dust off of project cars, and when doing just anything else that stirs dust into the air.
Fire and Cell Phones
Finally, there are the things you never think about until the world explodes. One of those things is a fire extinguisher. If you don’t have at least one in your shop please stop what you are doing and go buy one. If you already own a fire extinguisher check the date. All Fire extinguishers are dated and out of date fire extinguishers may or may not work. Watching a headliner go up in smoke is not time to find out that your fire extinguisher doesn’t work.
Get a fire extinguisher with an ABC rating and hang it on the wall right under a shelf that holds the first aid kit.
That’s right. If you know where one is, you automatically know where the other one is. Just be sure you never pile old parts in front of the extinguisher. It isn’t much good if you can’t reach it. Same goes for the first aid kit.
What does the ABC rating stand for? “A”is for trash,“B”is for liquids, and“C” is for electrical. Look for an extinguisher with the ABC rating and you will be prepared for any type of fire. (Expect to pay around $40.)
Then there is the cell phone…
A few years ago nobody carried one of these dreaded instruments. (And oh, how that has changed.)
But if you are working out in the shop alone a cell phone may be the difference between reaching help and laying there in pain…or worse.
Everybody I know has a cell phone that does everything but ward off the in-laws. I have one that makes calls…Period. It is cheap, but may prove to be worth its salt someday should I need to dial 911 in a hurry.
Got a question? Send it along.
Products supplied by:
English Color and Supply
419 S. Fannin
Amarillo, TX 79102
Automotive refinishing products
LPL Body Works, LLC
5815 Contented Lane
Amarillo, TX 79109
Body and paint repair DVDs


