How -to Tile Your Garage/Shop Floor
There Are Many Ways to Cover Up Your Garage Floor… These Peel-and-Stick Tiles Are Worth Considering.
FINDING THE BEST material to cover a garage/shop floor can be a never ending quest. I’ve tried bare concrete, paint jobs, carpeting, and ribbed rubber mats. While all of those alternatives worked to varying degrees, I never quite achieved the nirvana I was seeking: a surface that is durable, attractive, comfortable to walk on and easy to clean.
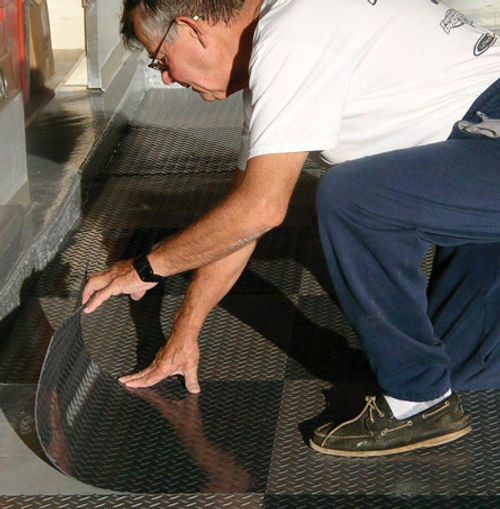
Then I discovered the G-Floor RaceDay vinyl tiles made by Better Life Technology (BLT) of Lenexa,Kansas.(TheG in the G-Floor name stands, logically, for “garage.”) The tiles are available in two sizes(1x1-foot or 2x2-foot), two patterns (diamond tread and Levant leather-like grain), and 12 colors. This material is approximately 0.10-inch thick and has a peel-and-stick backing so there’s no adhesive mess.
Check Your Floor First & Read the Warranty
These tiles work over both concrete and wooden floors…with a few caveats. According to the installation instructions, excess moisture or alkalinity can cause adhesion problems. Home improvement stores offer test kits to assess such conditions because installing tile over concrete slab floors is a common practice.The BLT warranty coverage disclosure also mentions the possibility of staining from asphalt, driveway sealer, and rubber wheels.
The concrete in my garage was poured nearly 50 years ago and has been painted twice with epoxy paint so the above concerns didn’t apply to me.
In preparation, I repainted adjoining surfaces that would not be covered with tile and cleaned the floor of debris, oil droppings and loose paint. While the BLTinstructionssuggestfillinganycracks or floor depressions with latex underlayment, I deemed that step unnecessary because there were no major discontinuities in my floor.
Some Cutting and Trimming Tips
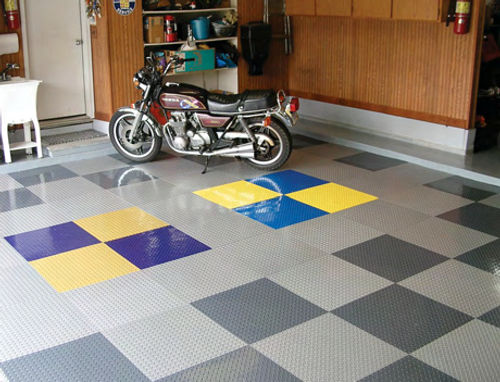
I picked 2x2-foot tiles with a diamond tread pattern and mapped out a gray and silver checkerboard array. Since both of my progeny have fled the nest for college, I decided to spice up the floor with two sets of school colors. A maize (bright yellow) and blue display celebrates the University of Michigan while a gold and purple array honors Albion College. This embellishment earned the highest possible praise: “awesome” exclamations from my two sons.
Peeling and sticking these tiles is the easy part. The harder task is adjusting the pattern to suit the out-of-square nuances found in practically all garages. The left side of my two-car parking area was fairly straight so the nine tiles installed along that edge required no trimming. I was also home free on two open edges of my pattern. The fourth side did require trimming because the original masonry crew was less than diligent about squaring up their borders.
Trimming this tile with a razor knife or box cutter can be done with a firm, patient hand. But for the two-foot-long cuts, I used a fine-toothed blade in my circular saw. This tile cuts cleanly and excellent results were achieved with the power approach.
Moving a bookshelf out of the way and fine trimming edge tiles consumed nearly half a day. Peeling and sticking tiles down in the open areas used up the remaining half.
In about six relatively leisurely hours, I finished the installation of 90 tiles covering 360 square feet. My wife contributed an unqualified seal of approval.
Results & the Price Tag
Achieving a tight fit with little or no gap between adjoining tiles isn’t difficult, and minor irregularities present in any floor disappear under these tiles. The adhesive is strong but it’s also easy to lift a tile to adjust the fit or to replace a damaged square. (The RaceDay tiles are covered by a five-year warranty.)
Furthermore, if a tile ever come loose, it can be reattached with a spray or pressure-sensitive adhesive, according to the company’s instructions.
Of course, there is a price to be paid for stunning appearance and ease of installation.While BLT publishes prices on its Web site (bltllc.com), actual sales and delivery are handled by retail agents.
The black, grey, and white tiles are a bit less expensive than the nine other colors. With freight included, the price ranges between $3.15 and $3.53 per square foot and tiles are sold in increments of 10 per carton. The total cost of my project was about $1200.
Undecided About Covering His Work Area
So far, I’ve resurfaced only half of my man cave, the portion where easy cleaning is essential because of frequent in and-out traffic.
A leaf blower has proven to be an effective tool for purging the debris dropped by cars, while the inevitable oil drops deposited by the aged cars and motorcycles in my collection have thus far been easy to wipe up with paper towels.
As yet, I have not decided whether to use RaceDay tile in the working half of my garage. Stepped-on metal chips and the sharp edges of jack stands are two concerns. The epoxy paint in that area is still serviceable so I intend to exercise a wait-and-see option for now.
Let’s just say that these RaceDay tiles have moved me more than halfway toward my full nirvana goal.
Resource
Better Life Technology LLC
9812 Pflumm Road, Lenexa, KS 66215