How -to Repairing Plastic Bumpers, Pt. 2
Working With a TPO Bumper Isn’t an Easy Restoration Task. This Advice From a Pro Will Help You Do the Job.
LAST MONTH I tackled the issues of repairing the original soft bumper, the Endura Bumper used on the late ’60s and early ’70s GTO, and the first generation, or urethane-based, plastic bumpers used on cars now approaching classic status. This month I want to cover the repair of the second generation of plastic bumpers, those made of TPO, Thermoplastic Olefin.
TPO bumpers have actually been around for almost as long as urethane plastic bumpers, they just weren’t in wide use like the urethane units. Their use at first was confined mostly to trucks and economy cars. They were used on trucks because of their stiff durability and on economy cars because they could be left unpainted and in their natural color, black.
Of course, today that isn’t the case. TPO bumpers are found on all types of vehicles, not just trucks and economy rides.What is more, naturally black TPO bumpers have become outdated. The majority of TPO bumpers used today are painted. In fact, TPO, or a variation of this type of plastic called TEO, thermoelastic olefin, has become the plastic of choice across the automotive industry when it comes to bumpers.
Automobile manufacturers like TPO bumpers because they are strong enough to withstand most minor impacts without sustaining damage and are rigid enough that they will never sag and wrinkle in the hot sunshine, unlike its predecessor, the urethane bumper. TPO bumpers stay pretty much as is right up to the point that someone bangs into them.
And that’s where this article comes in—repairing TPO bumpers.
Not an Easy Job
The problem with TPO bumpers, however, is that they can be very difficult to repair. Just drive down the alley behind your local auto body repair center and check out the discarded bumper pile. That pile will be deep and you will find discarded TPO bumpers from just about every make of vehicle on the road.
Why toss them and not fix them? Not only are TPO bumpers difficult to repair, they can be a nightmare to paint. How so? TPO bumpers are formulated with a built-in wax-based mold release. It is this wax that facilitates ease of removal from the casting forms and that speeds up bumper production.However,it is also this wax that makes refinishing TPO bumpers more difficult. When was the last time you tried to paint over a waxed surface?
With all of that said, TPO bumpers can be repaired, and they can also be painted. You just need to know the tricks.
Some Tricks With TPO
The first thing you need to know about TPO is that this type of plastic can be heated to the melting point, allowed to cool, and it will return to its original state. Recall in last month’s article on repairing urethane bumpers that I said heating those bumpers would alter the chemical makeup of the plastic and leave behind a sticky and stringy mess? That isn’t the case with TPO. Heat doesn’t affect its chemical makeup and that’s a very handy trait when it comes to repairing these bumpers. It means dented TPO bumpers can be warmed up, the dents pushed out, and when allowed to cool, the dent stays out. It also means these bumpers can be plastic welded to take care of cuts and cracks.
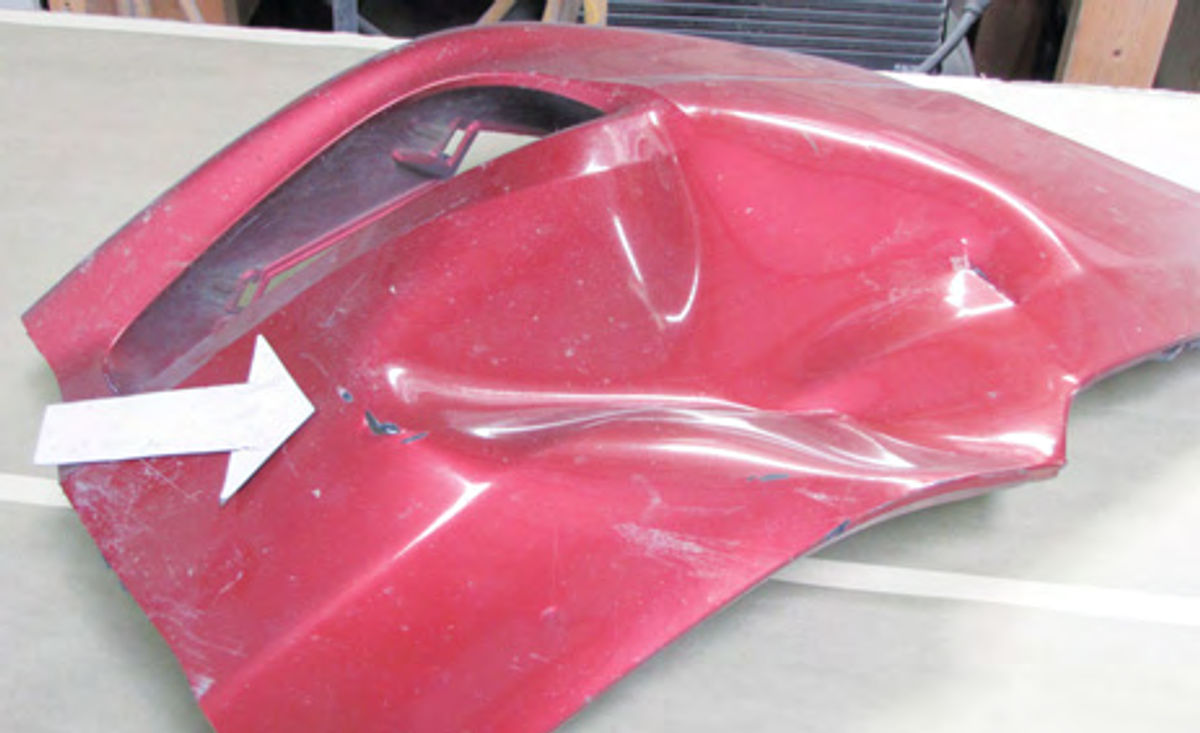
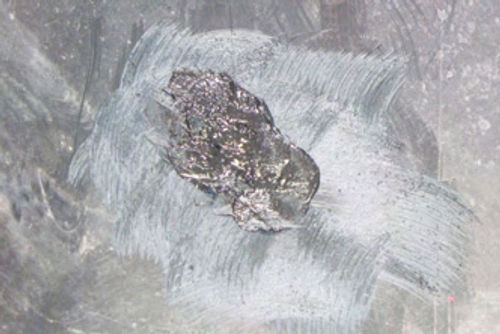
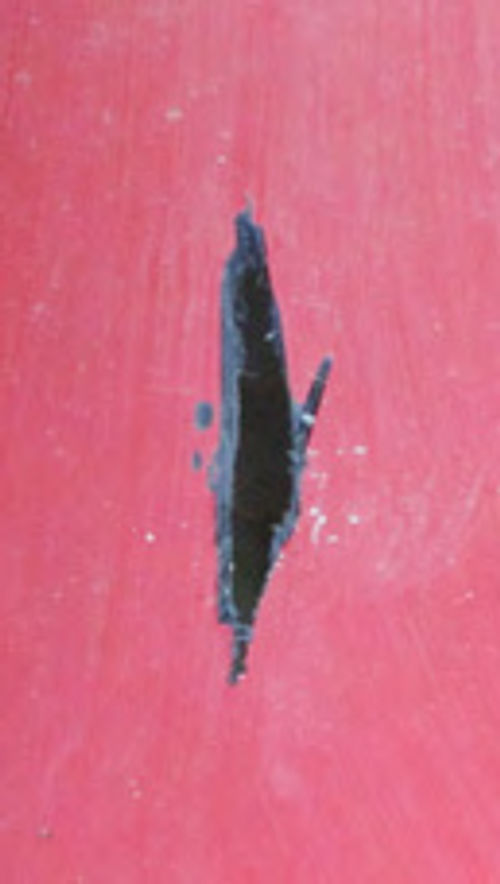
Let’s look at an example. Notice the damage to the bumper in Photo 1. This area has been pushed in and as a result the plastic has cracked where the bumper was pushed in (arrow). That’s another trait of TPO bumpers; when hit hard enough to cause a severe dent like this one, these bumpers tend to stay dented and the plastic will have a tendency to stress crack. Had this been a urethane bumper, this dent would have most likely popped back out and all you’d be left with is a cracked finish.
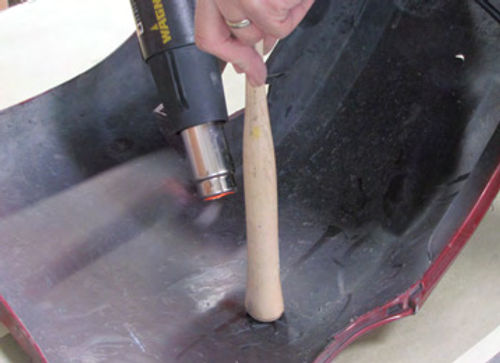
But to repair this bumper, the first consideration is how do you get a dent like this to pop back out? Fortunately, TPO acts much like formed steel in that it prefers to be in its previously undamaged shape. To help that characteristic along, the first step is to apply heat to the backside of the bumper using a heat gun to soften the plastic.
Take note that the heat gun I’m using in Photo 2 is not a hair dryer. This gun is made by Wagner and produces 1200 watts of heat. That’s enough heat to curl the hair on your head, so be careful. Hold the heat gun about six inches away from the surface and heat an area slightly larger than the damaged portion.
How much for the heat gun? A gun like this can be found at the local home improvement store for around $40.
Once the dented area is warmed and softened, my preference is to use the wooden handle of a body hammer to push the dent back out. The wood won’t transfer the heat from the heat gun so I don’t have to worry about getting burned.
What I’m looking for here is to produce enough heat to soften the plastic so the dent can be pushed out. To be sure the dent comes out and stays out, I concentrate most of the heat around the edges of the dent. After a little heating, the dent will push right out and stay there.
You say the dent pushed out but left a ring of high plastic around the area where the dent was located? That’s pretty common. Heat works wonders as far as getting the dent to push back out is concerned, but because the plastic is often stretched in the area surrounding the dent that ring of stretched plastic will remain.
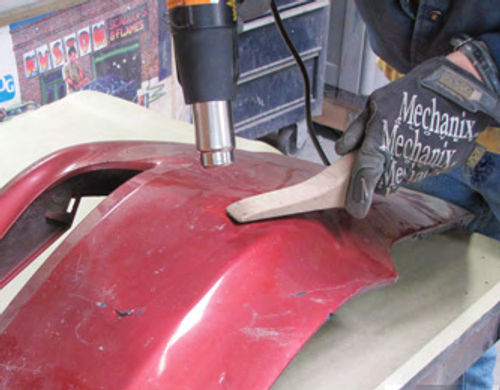
To remove the high areas I flip the bumper over and concentrate the heat from the heat gun in the area of the ring. Once the ring begins to warm and soften I use a wooden paddle, this one happens to be a lead-working paddle, to push the high areas down flat (Photo 3). If you don’t have a lead-working paddle, a wooden paint stir stick will work just as well. The idea here is to use something flat to push against the warm plastic. A flat paddle or flats tristick equals a flat surface.
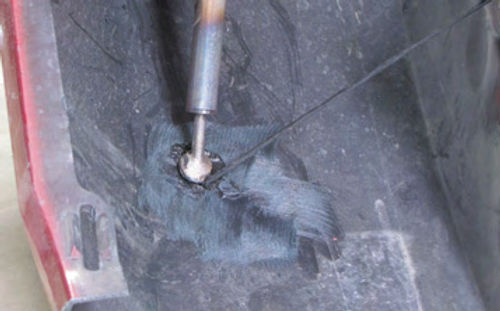
Remember the stress crack visible in Photo 1? To repair this crack I flip the bumper back over and use the Eastwood Plastic Welding Kit #50347 to weld the crack shut. (See Photo 4. The kit itself is shown on page 16 of the May issue.)
Notice in the photo that I’ve ground back the area around the crack in order to roughen the surface for better adhesion when welding and to open the edges of the crack into a “V” shape so that my weld can spread out some. What did I use to grind the crack? A right-angle mini grinder with a 24-grit 3M Roloc disc #1408 attached.
The end result is seen in Photo 5. Keep in mind that the weld doesn’t need to be pretty; it just needs to be structurally strong. To accomplish that, I made sure the “V” groove I cut into the bumper was at least three-quarters of the way through the thickness of the plastic, something in the neighborhood of a sixteenth-inch deep.
Back to the Outside
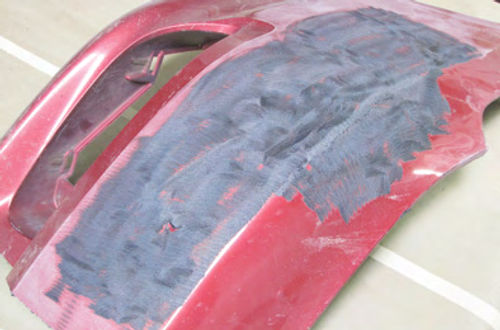
That takes care of the damage on the inside. To repair the outside of the bumper, I’m going to use a different method. Notice in Photo 6 that I’ve used the right angle grinder with the 24-grit disc attached to remove all of the paint around the repair area. What isn’t obvious here is that I not only used the right-angle grinder to remove the paint, I also used the grinder to help smooth the surface by leveling some of the bumps. Remember, this bumper had a huge dent and no matter how carefully I worked to remove the dent, the surface of the bumper was left slightly bumpy and wavy.
Time to Start the Cover-up
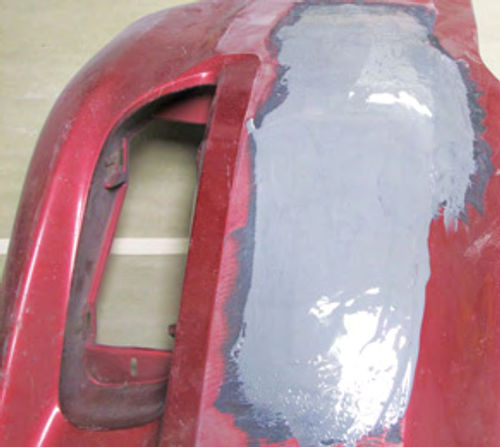
With the old paint gone, the next step is to cover the entire repair with a heavy layer of EZ Sand from the 3M EZ Sand Flexible Parts Repair Kit #5895 (Photo 7). This is the same two-part material I used to repair the urethane bumper last month. I prefer this product because it works just like plastic body filler and is easy to sand, thus the name. I mixed equal parts from each tube in the kit and put down a thick layer to help level the numerous small bumps and waves created when I heated the bumper to remove the dent.
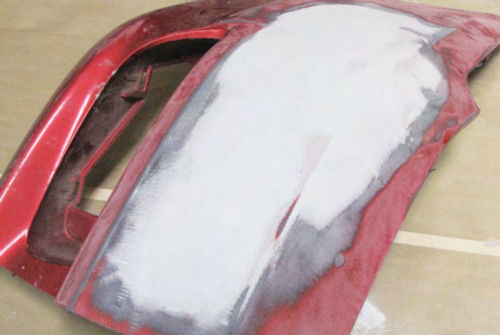
Once cured—about two hours—the EZ Sand can be block sanded using 180- grit on a six-inch block. After that, the EZ Sand is covered with a thin layer of plastic body filler (Photo 8). Why cover the EZ Sand with filler? The main purpose is to take care of pinholes and any other minor imperfections I might have missed while sanding the EZ Sand.
What type of filler did I use? In this case I opted for Evercoat Easy Sand #420. Find this product at the same automotive paint store where you purchased the 3M EZ Sand. It will set you back about $28 for a quart.
Bridge Over a Troubling Bumper Cut
Now let’s repair another problem area. And in this case, the cut seen in Photo 9 needs a little more than welding and filling. To be sure my repair will hold up over the long run, I need to bridge this cut with some of the wire mesh that comes in the Eastwood welding kit.
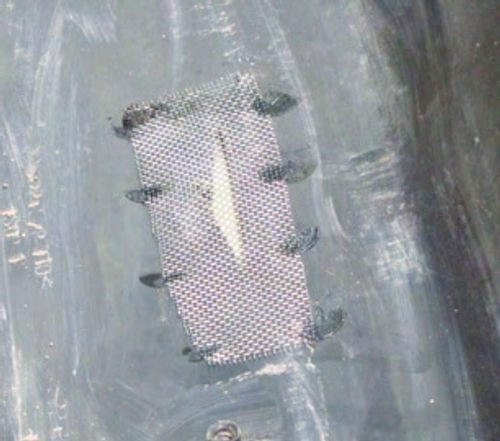
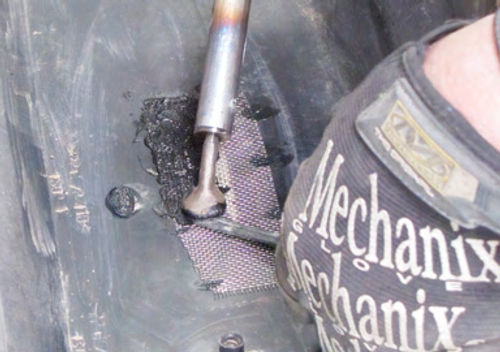
I cut a piece of wire mesh slightly larger than the cut in the bumper, then used the heating iron from the kit to melt the mesh into the bumper at several spots along the edges of the mesh (Photo 10). I did it this way to help hold the mesh in place as I covered it with the Fiberflex welding rod (Photo 11).
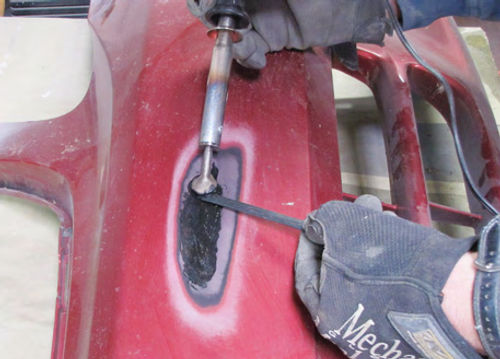
Flipping the bumper over, notice that I feathered back the paint using a DA sander with a 180-grit disc attached then opened the cut even more using the right-angle grinder with a 24-grit Roloc disc attached. After that I Finished filling the cut with more welding rod (Photo 12). Next I sand the welded area smooth using 80-grit on a short block then cover the repair with a layer of EZ Sand. Once cured, the EZ Sand receives the same sanding and smoothing treatment as previously discussed.
Getting the Paint to Stick
The result of all this work is a bumper that is ready for priming. But before you mix any urethane primer/surfacer there are a few things to know about the process.Recall that I said paint has a difficult time sticking to TPO bumpers? You’ll understand what I mean when you start making repairs to one of these bumpers and see how easily the old paint slips off the surface. That’s a scary thing when you know that eventually you’ll be putting fresh paint back on your bumper.
But don’t worry, there are some things you can do to help make the paint stick. First off, notice in the photos that I only removed the paint around the areas being repaired. If the old paint is sticking it doesn’t make sense to remove it. Just feather it back using a DA sander with 180-grit attached.
Once the paint is feathered back and the bumper is ready for primer, you must apply an adhesion promoter. What’s that? One brand of adhesion promoter which I use is Bulldog from Klean Strip (kleanstrip.com).An Adhesion promoter does just what the name implies; it helps primers and sealers to stick to TPO surfaces. Without it, primer or sealer just won’t stick—period.
Adhesion promoters come in 15 oz. aerosol cans, pint cans and quart cans. Be sure to read the directions, as all adhesion promoters must be applied several minutes before priming or sealing any TPO bumper. Apply the adhesion promoter to all exposed TPO surfaces and allow it to feather back onto the already sanded old paint.
My preference is the aerosol type as you can spray it and store it, no brushing or wiping. Look for the 15 oz. can of Bulldog on the same aisle as the Evercoat products at the paint store and it will set you back about $18.
Another tip: Even if you apply an adhesion promoter, never apply paint, base coat or single-stage directly to any exposed TPO surface. Exposed TPO must be primed or sealed before painting. Why? For whatever reason, paint doesn’t like to stick to TPO, even when using an adhesion promoter. Paint that reaches exposed TPO will often wrinkle and bubble within minutes of application. That’s an important telltale sign. If you find wrinkles or bubbles you need to stop what you are doing and get some primer or sealer on the surface.
Finally, if you are repairing the TPO bumper on your ride, lightly wet sand the painted surfaces away from the repair area using 320-grit as you most likely will be painting the entire bumper. Take care not to sand through any edges that might expose the TPO beneath. What happens if you expose an edge? You’ll need to feather in a little sealer over the exposed edge before you can apply any color.
What if you are working with a new TPO bumper? Lightly wet sand the surface using 320-grit, apply adhesion promoter per the instructions on the can, seal it and paint it. Got a question? Send it along.
Products and services supplied by
LPL Body Works, LLC
5815Contented Lane
Amarillo, TX 79109
Body and paint DVDs
English Color and Supply
419 S. Fannin St.
Amarillo, TX 79102
Automotive paint and supplies
Eastwood Company
263Shoemaker Rd.
Pottstown, PA 19464


