Door Panel Repair, Pt. 1
So, You Bought a Used Replacement Door and It Looks Good. Wait, What’s That Along the Door’s Bottom…
ALTHOUGH THE AFTERMARKET side of the automotive restoration parts business has greatly improved since I did Project Charger in 2001-03, there are still a large number of much needed body panels that are not available.
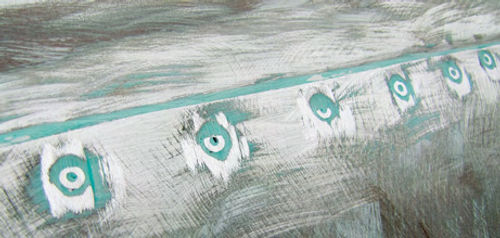
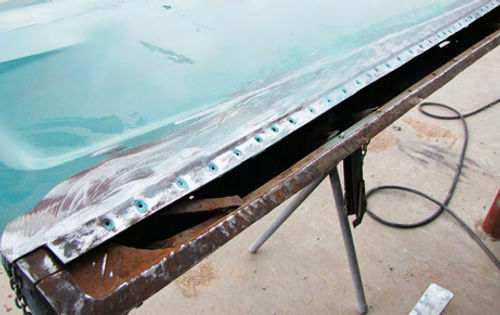
So when you find yourself looking for a reproduction part that doesn’t exist, you are left with few options. You can scour the salvage yards looking for usable parts or you can take your chances with online auction sources. Either way you might end up with something that looks like the door in Photo 1.
This door came straight from a salvage yard and is off of a 1968 Dodge Charger. At first glance it doesn’t look that bad. However, a closer inspection reveals that at some point in its life this door had the bottom few inches of the outer panel replaced. Most likely the replacement was due to rust in the lower corners and/or along the bottom edge of the door. A lot of vintage doors have this problem due to poor drainage—the moisture gets in but it can’t get out.
Maybe that’s something to put on your vehicle cleaning list, to check the drains along the bottom edge of the doors to make sure they are open and draining as they should. You just might avoid the problems this door experienced.
When Reproductions Aren’t Available…
As luck would have it, replacement door skins have recently become available for this car. That’s great if you are working with this particular model. I could order up a new skin, cut off the old one, install the new one, and not worry about the mess someone made of the lower section of this salvage yard outer door panel. That would be an easy fix for me in the case of this door, but what do you do if a replacement skin isn’t available for the doors on your project and you are facing the same rust issues that plagued this door? The answer to that is to fabricate something that will work.
The good news is that the lower few inches of most vintage doors are nice and flat, with no body lines or creases. That makes fabricating this part of a door skin something anyone with a few tools, a few feet of flat stock sheet steel, and a little time can do. Cut out and bend up some steel, remove the old rusted metal, replace that with the new steel, and presto, you have just salvaged what might have been a candidate for the scrap pile.
So that is what I’m going to do here, go through the steps to correctly repair this obvious poor attempt at rust repair along the bottom of this door.
Starting the Project
This particular door arrived at the shop completely disassembled, so I didn’t have to worry about taking the door apart. For me that’s good because I don’t like to weld on any door that still has the glass in it. MIG welders tend to spatter and all it takes is one small dot of hot metal to pit a door glass. Once that happens the glass is ruined. If you need to make this repair on your ride’s door by all means remove the glass.
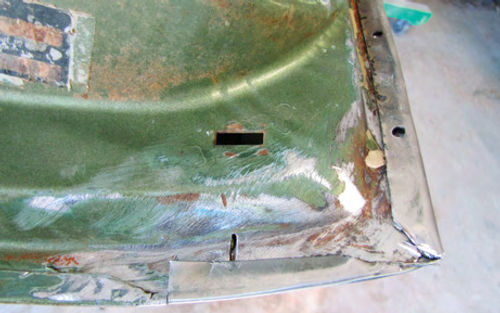
Repairing this door starts with grinding away all of the old plastic body filler to get a look at exactly what I have (Photo 2).
What you are seeing in the photo is evidence that I may have gotten lucky since the replacement section that was installed at some point in the past was bonded to the door using something like 3M8115 Panel Bonding Adhesive instead of being welded in place. That will make removing the piece easier.
Something else visible in the photo is the line of pop rivet heads. I don’t like to see any type of steel panel repair that uses aluminum pop rivets to hold the panels together because aluminum against steel can create galvanic corrosion. In other words, since these are two dissimilar metals the steel will react with the aluminum and rust will begin to form around each and every rivet along the seam of this repair. I won’t go into the fact that aluminum and steel expand at different rates as the temperature changes and that alone can cause any plastic body filler applied over the repair to eventually crack and fail.
So why did the repair technician use the aluminum pop rivets in the first place? They are there to help secure the replacement piece to the door skin while the bonding adhesive cures. What should have happened was that once the adhesive cured, the pop rivets should have been drilled out and removed; then the holes should have been filled with additional adhesive. Removing the rivets and sealing the holes would have helped prevent moisture penetration between the two pieces of metal as well as prevented any galvanic corrosion issues.
Removing Rivets and Adhesive
My next step was to drill out and remove all of the rivets using a 1/8-inch drill bit, then use an air chisel along the repair seam to break the adhesive and separate the two pieces. After that a little cleaning and rust treating will prepare this panel for the next step.
So, how do you remove the bonding adhesive from all of the countersunk rivet holes in Photo 3? Heat works best. I used a plumber’s mini torch to cook the adhesive until it softened and it came right out.

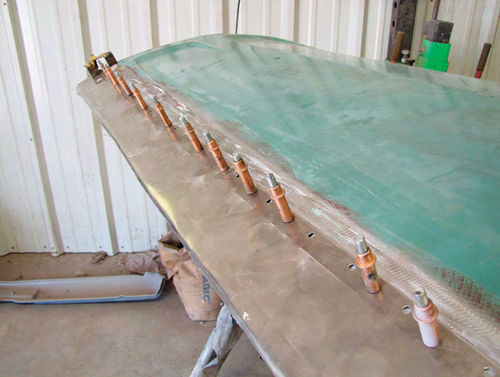
Also notice in the photo that whoever made this repair did at least one thing correctly. He notched both ends of the outer door panel to allow the replacement piece to butt against the old panel so that it could lay flush against the existing panel. That eliminates having a bump of metal along the edges of the door that would be there had the replacement piece been allowed to overlap onto the old panel. What the repairer didn’t do was to tack weld the ends of the replacement panel where it butts to the old panel. Failure to add those tack welds means the strength of the door has been compromised and the first place you would see the paint cracking would be right where those two panels butt together.
Fabricating an Answer
Getting back to repairing this door, as I mentioned above a complete outer door skin is available in the aftermarket. However, all I need is the lower three or so inches of the skin. A search online for that piece was successful, but the problem was that while the piece was long enough it wasn’t wide enough to cover all of my needs. To solve that issue I opted instead to purchase a 4x8-foot sheet of 18-gauge steel so I could fabricate my own panel section.
I started by measuring the length of the door, in this case 511 ⁄2 inches, and added another inch so that I would have enough material to wrap a half-inch of the replacement piece around each end of the door. Next I measured the width I would need, which is 3 inches at the front of the door and 4 inches at the rear. I added another half-inch to those measurements to allow the bottom of the piece to wrap around the bottom edge of the door.
I then cut out the repair piece using Eastwood’s #11797 Throatless Sheer ($180) and folded the half-inch edges to 90 degrees using a 48-inch metal brake a local truck restorer was kind enough to lend me.
But I didn’t stop there. At the lower corners of the piece I used a pair of sheet metal shears to make 45-degree cuts across each end (Photo 4). Why make this cut? Once I’m ready to hammer and dolly work the folded edges and bend them over the flange of the door frame I will end up with too much metal at the corners. By cutting the 45-degree wedge from the corners I’m removing most of that excess metal and in doing so making the corners much easier to fold (Photo 5).
After that I fit the replacement piece to the door by trimming away any excess metal above the pre-existing flanged line where the pop rivets had been and trimmed each end so that both would butt to the old panel. (That’s the part the previous repairer got right.) Next I drilled a series of 5/16-inch spot weld holes spaced about three inches apart along the top edge of the replacement piece and spaced about four inches apart along the folded edge that will go over the bottom lip of the door.
To prepare the door to accept the new replacement piece I cleaned up the flange the previous repairer added along the cut edge so that the replacement piece would dovetail into it then applied a coat of weld-through primer(3M 5913) all along the flanged edge, along both sides of the door where the replacement panel will be located, and along the lower lip of the door frame.
If you are working with a door that hasn’t been previously repaired you can make this flange using the Eastwood #31092 Panel Flanger ($40). The reason for the flange is twofold; to add strength to the door skin along what will become a weld seam and to allow the replacement piece to tuck into the original door skin for a smoother transition from new metal to old metal.
To help the replacement piece lay flat against the door panel I used the Eastwood #13751 Panel Holding System ($40) to secure the two panels together. This also helps prevent warping as I weld the two pieces together (Photo 6).
Don’t have a Panel Holding System? A good alternative is to space #8 x 1 ⁄2-inch sheet metal screws every three inches along the seam line.
Reducing the Weld Warps
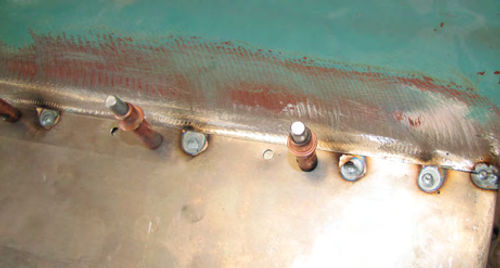
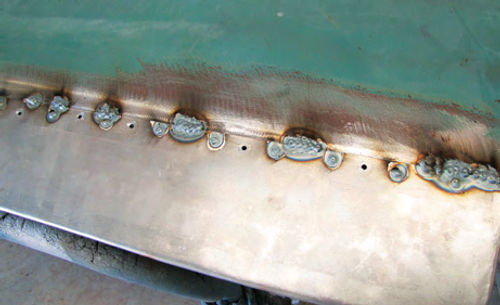
Welding starts by tacking both corners where the new metal butts to the old metal then welding the spot weld holes I drilled earlier. Notice in Photo 7 thatI first welded the end then skipped every other spot weld hole as I worked my way down the seam line. This method helps reduce the concentration of heat in one spot and that helps to reduce warping.
Once the spot welds were welded shut I moved on to welding the seam line (Photo 8). Notice in the photo that I laid down a short weld bead, about an inch long, then moved a few inches down and repeated the process. This pattern of weld…space…weld continues until I have the entire seam line welded.
What are the tiny holes visible in the photo? Those are left from where I used the Panel Holding System to secure the two pieces of metal together. Once I have the seam line welded I’ll come back and weld those holes shut.
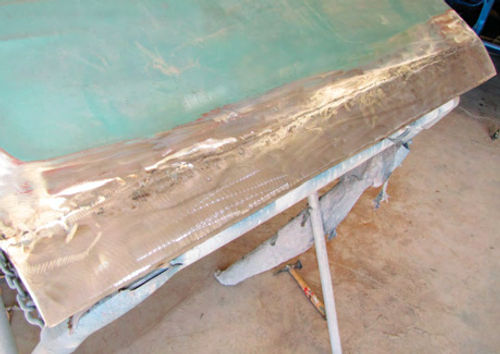
Here is the end result (Photo 9). All of the spot weld holes are closed, on both the front and the back of the piece, the seam has been completely welded, and I finished by grinding all of the welds smooth. From here I will use a DA (dual action sander) with 80-grit sandpaper attached to remove the rest of the old paint that remains on the door. Then I’ll apply a little plastic body filler over the rough spots to bring this door back into usable condition.
Next time I’ll go through the process of applying primer and painting this door. Got a question? Send it along.
Products and materials supplied by:
LPL Body Works, LLC
5815 Contented Lane
Amarillo, TX 79109
Body and paint repair DVDs
Eastwood Company
263Shoemaker Rd.
Pottstown, PA 19464
Restoration tools and supplies