Door Panel Repair, Pt. 2
Last Time We Replaced a Metal Section On Our Project Door. Now We Turn to Priming, Sanding and Painting.
LAST MONTH I went through the process of repairing a very badly damaged door off of a 1968 Dodge Charger. This time I want to take that door through the priming, blocking and refinishing aspects of the repair.
Believe me, I Fully understand that the block sanding part of a restoration is the ugly part. It can be difficult, dirty, tedious and time-consuming. But for all of the drawbacks associated with block sanding a primer coat, doing so has to rank somewhere around a nine on a one-to-10 scale of importance when it comes to the final appearance of your ride. If you block sand the vehicle correctly, it shows. If you don’t block sand the vehicle correctly that shows too. So let’s go through the process from start to finish and show you how to get your ride to look its best.
Preparing the Panel for Primer
I ended up applying far more plastic body filler to this door than I originally had anticipated(Photo 1).My first thought was that this door would only need filler applied along the bottom edge where I had replaced a section of metal. However, after sanding off all of the old paint using a DA (dual action sander) with an 80-grit disc attached I found so many door dings and hail dents that I decided my only option was to skim coat the entire outer panel with plastic body filler.
That led to some sanding using 40-grit sandpaper on an in-line sander and finishing up using some 80-grit sandpaper on a 12-inch-long block to take out the deeper scratches caused by the 40-grit.
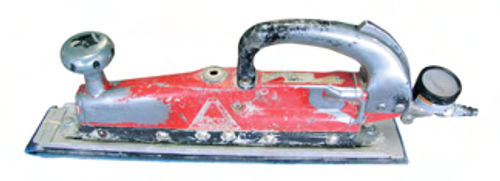
Notfamiliarwithanin-linesander?Then take a look at Photo 2. This one has been around the shop for a number of years and has seen a lot of use and abuse. Made by ATCOA Viking this is a pneumatic tool that operates by sanding in a back and-forth motion. This tool is specifically designed to sand plastic body filler and requires a very specific type of sandpaper known in the business as “file paper.” File papers come in a variety of sanding grits ranging from 36 up to 100 with each sheet measuring 2 3 ⁄4 x 16 inches. The advantages to using an in-line sander are faster sanding and a flatter and smoother final surface than can be achieved using a hand block or orbital type sander.
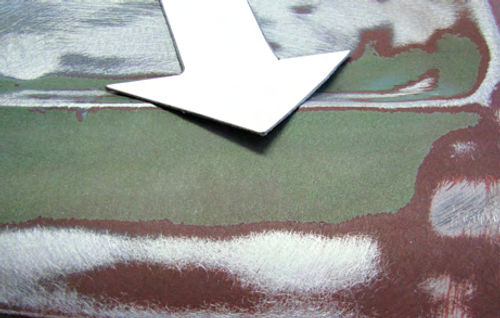
If I may backtrack for just a moment, something to pay close attention to when working with vintage parts is the old paint. Notice in Photo 3 that as I began sanding the old paint using the DA sander the edges of the old paint began to flake away instead of feathering back. This is a telltale sign that the old paint is hard and brittle and that it is not well adhered to the underlying factory primer coat. What that means is that all of the old paint must come off before applying the primer coats.
Applying the Primer Coats
In the old days we piled on coat after coat of lacquer-based primer/surfacer knowing full well that as those coats dried, usually over the course of several days, they would shrink significantly. What we didn’t understand about those primers was that the shrinkage didn’t stop after a few days of drying. The shrinkage continued, even after the paint had been applied over the primer and the vehicle was decorating someone’s garage. Before long, the primer’s tendency to shrink caused the finish to begin to show strange little lines beneath the paint known in the business as “sand scratches.”
Luckily, primer/surfacers have improved over the years. Professional body shops no longer use lacquer-based primer/surfacers for the reason mentioned above and neither should you. Why would you want to spend hundreds of dollars for quality paint only to apply it over a substandard primer that is going to shrink and leave your finish with ugly “sand scratches” all over it? You wouldn’t, and the best way to prevent that primer shrinkage is to use a 2K primer/surfacer that doesn’t shrink.
In case you are wondering, 2K means that the primer/surfacer, whether it be urethane- or epoxy-based, is a two part product requiring the use of a hardener.
Then there's the issue of which primer/surfacer to purchase.
Every paint brand out there carries at least two grades of 2K primer/surfacers: lower cost-lower quality primer/surfacers and higher cost higher quality 2K primer/surfacers. The price difference from best to worst can be staggering, but there is a reason behind that difference. Higher quality 2K primer/surfacers have more solids in them, which means you will use less primer to achieve more surface build than you will when using a lower quality 2k Primer/surfacer. Higher quality 2K primer/surfacers also tend to sand easier and clog the sandpaper less than do lower quality 2K primer/surfacers. That Said,sometimes it makes economic sense to go with a more cost-effective primer/surfacer. When that need arises there are steps you can take to reduce the number of coats required as well as the amount of time spent block sanding a cheaper grade of primer/surfacer. Here’s how:
My preference when working with vintage parts to start by applying three coats of primer/surfacer whether that product be lower costing or higher costing. That’s because when you are working with vintage parts they tend to grow dents, dings and flaws from what you might have thought was an otherwise perfect panel.
Three coats of primer/surfacer is enough to let me block sand the panel and find all of those problems so they can be corrected before applying the final coats of primer/surfacer and perfecting the surface.
Finalcoats?Yes,we’re not involved in high-volume collision repair. We’re involved with getting it right and that usually means priming more than once.
Once those first three coats of primer/surfacer are applied I Like to give them at least two days to completely cure out before starting the sanding process. In the ideal world I write the application date on the panel being primed and set it aside for a week to be sure the primer/surfacer has completely cured. Why the delay? The longer primer/surfacers cure the easier they are to sand.
If I am working with a higher quality primer/surfacer I allow the primer to cure then apply a guide coat over the primer and start the block sanding process using 320-grit sandpaper. However, if I’m working with a lower quality primer, one that doesn’t provide the build you get from a higher quality product, Istill give it at least two days to cure but start the sanding process by lightly hand sanding the surface of the panel using 220-grit sandpaper. After that, I clean the panel by blowing it off and degreasing it then cover the entire repair with 3M Super Red Putty #5972 (Photo 4). This Is a nitrocellulose putty designed specifically to fill pinholes and minor sand scratches. The reason for applying this product is that once applied it becomes a multi-tasking guide coat by filling those pinholes and sand scratches that the lower quality primer/surfacer might have failed to fill. Once the Super Red Putty is dry, usually overnight, the door is ready to be block sanded using 220-grit sandpaper.

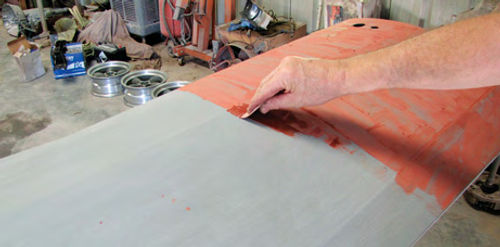
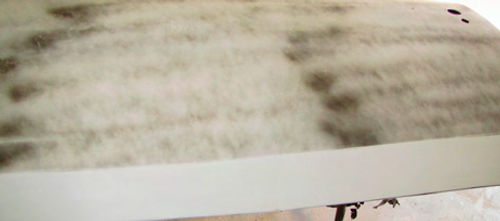
The results from using Super Red Putty can be seen in Photo 5. Although I’m not done with the block sanding process it is obvious that the putty is doing its job. It has filled the deeper sand scratches and highlighted those areas that will need a little more attention.
What kind of extra attention might this panel need? You can see in the photo that I have left a few large areas of red putty. If those don’t stand out and the red putty disappears before I sand through the layer of primer that tells me I have a low spot. Any low spots found will require more filler. Which filler? I prefer to use Evercoat Easy Sand #421.This Is a polyester filler designed for use over plastic body filler and previously primed surfaces.
Be aware that 220-grit sandpaper cuts very fast and most likely you will sand away the bulk of the primer before you are done.
The Final Coats of Primer
The reason I need to apply these last coats of primer is for insurance against missing any minute sand scratches or tiny pinholes. Primer is going to fill those imperfections and leave me with a very nice surface. I apply this final layer whether I’m working with higher- or lower-quality primer/surfacers.
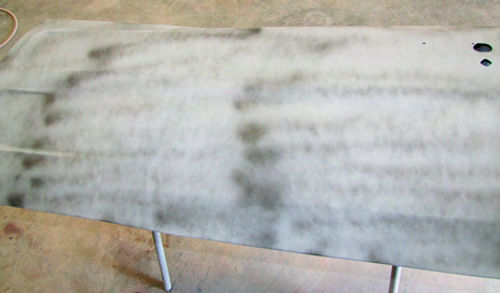
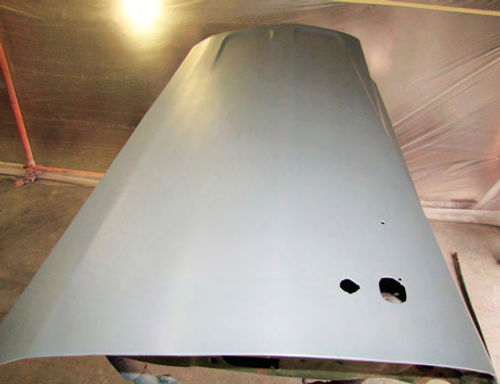
Since these are the final coats I only need to apply two of them and I like to give these coats at least 48 hours to cure before sanding. To sand these coats I like to use 320-grit on an eight-inch-long block and wet sand the surface. Notice in Photo 6 that I have already applied the primer/surfacer coats and have also applied a light guide coat of aerosol black over the primer. That will give me a good contrast to ensure that I don’t miss any imperfections that might still be on the door.
Whether you are block sanding a panel for the first time or the last, you always pay attention to the body lines (Photo 7). In this case the body line to be concerned with is the line near the bottom of the door in the area where I sectioned in the replacement piece of metal. Once I know this body line is perfectly straight all that is left is to block sand the remaining flat areas of the door.
Refinishing the Door
Refinishing starts with a good cleaning. Even though I’ve wet sanded the final coats of primer/surfacer the door still needs to be washed with soap and water. My preference is to use a few drops of Dawn dishwashing liquid in a gallon of clean water. After that the door is rinsed with clean water and dried using an air blower.
This also is your last chance to look for imperfections before the seal coat goes on. The best way to do that is to use a bright light, something like a drop light, and go over the entire surface of the door. What you are looking for is anything that doesn’t look right. Usually that something is a tiny dot of black. Why black? Black means you are seeing a pinhole that was filled with guide coat but not sanded away during the sanding process.
But let me caution you against bringing out the sanding block and trying to remove the dot. Sometimes that works; most often it doesn’t. The problem is that the pinhole is deep. That is why it failed to go away with the first two sanding rounds. If you attempt to remove it now by block sanding until it is gone chances are you will end up creating a low spot in the panel. That low spot will not show up until the clear coat goes on. That’s no time to find a flaw.
So what’s the cure? Fill The pinhole with more Super Red Putty. Allow the putty to dry, then block sand the dot smooth using the 320-grit sandpaper. That will eliminate the pinhole and the panel will still be ready for sealer. That is, after you have cleaned the panel again using soap and water plus a degreaser. Once the panel has been degreased it is time to tack it clean and apply the seal coat.
My preference for a sealer is PPG Global D8072. This is a 2K sealer and uses D884 Hardener. It mixes 6 parts sealer to 1 part hardener to 3 parts reducer. Apply one wet coat and allow that coat to dry for 15 minutes before applying the color coats (Photo 8).
Some Issues With the Paint
If you have visited your local automotive paint store in search of vintage paint colors chances are you have encountered the same problem I occasionally encounter, that vintage colors are not available in the higher quality paint lines. They are only available in the cheaper paint lines.
The reason for this is simple. The higher priced paint lines evolve downward into the cheap paint categories as improvements are made in the paint products and newer lines of paint are developed. That evolution translates into an almost nonexistent need for the older paint formulas in the newer paint lines leaving the aging paint lines as the only source for those formulas. As confusing as that sounds, that’s the reality of things.
The only caveat to using the cheaper paint lines is that in many cases the amount of color in the mix is reduced and the amount of clear binder is increased.What does that mean? It means that full coverage may require up to four coats of color instead of the two coats generally recommended. Of course, the only way to know that for sure is to always pray a black and white test panel. This type of test panel comes half black and half white. Your Local paint supplier will have a supply of these test panels. All you need to do is ask for them.
When spraying these test panels count the number of coats it takes for the black to cover completely. When the black is covered you know you have achieved full coverage, whether that takes two coats or five coats of color.
Does this reduced color in the mix only apply to mixed base colors? No, it also applies to mixed single-stage colors.
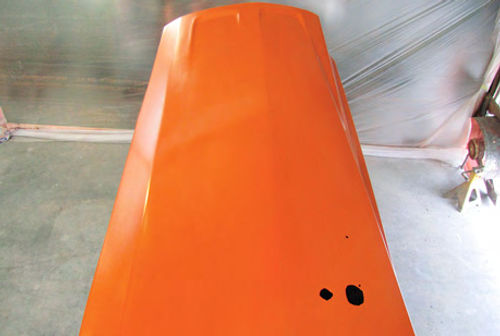
This particular color (Photo 9) achieved full coverage after three coats. This color came from the PPG Omni line and mixes one part color to one part reducer. I cleaned the door with a tack rag before applying the coats and will clean the door again with a tack rag once the coats have dried for at least 30 minutes. After that it will be on to the clear coat.
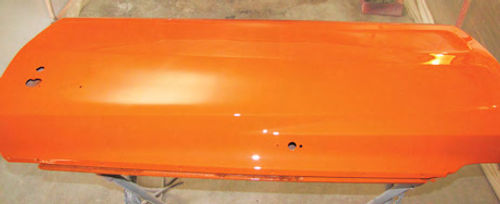
Three coats of PPG Concept 2002 Polyurethane Clear mixed at four parts clear to one part DCX61 Hardener to one part reducer and applied in medium wet coats gives me the finish I’m looking for (Photo 10).
Got a question? Send it along.
Resource
LPL Body Works, LLC
5815Contented Lane
Amarillo, TX 79109
DVD Paint and Body Repair Series


