
How -to Repairing Plastic Bumpers, Pt. 1
Different Types of Bumpers Require Different Approaches. First, We’ll Concentrate on the Endura & Urethane.
IT FRIGHTENS ME to think about it, but the day when all classic rides sported fancy chrome bumpers is slowly giving way to the day of classic rides sporting painted plastic bumpers. It’s that 25- year-old classic car status coming to bear. Of course, this is something that I should have seen coming as far back as 1968 when Pontiac decided to soften the nose of its iconic GTO. I thought that bumper was just a fad. What did I know?
This swap to plastic bumpers is a change I’m going to blame flatly on GM. First they messed with the Goat, then the Camaro, then everything else.It didn’t take Ford and Chrysler long to follow suit. These days everything on the road that weighs less than three tons has some type of a plastic bumper on it. This, I suppose, is the reason I get so many inquiries concerning the repair of these bumpers.
So, with that thought in mind I think it’s time to tackle the issue of plastic bumper repair. I’ll start by going all the way back to the beginning and give you some tips on repairing the well-known GTO Endura Bumper.
Sanding Away the Paint
At first glance, this appears to be a plastic bumper much like the one on the late-model sedan parked in the garage. But peel away the paint and underneath lies a thin layer of semi-rigid foam glued to a steel bumper. Strip away the foam and you are left with what looks very much like the chrome version of this same bumper. That bumper was a far cry from the collapsible plastic bumpers used today, but it was a start.
To restore one of these bumpers you first have to remove the old paint. GM sprayed these bumpers with lacquer, so after 40 years there probably isn’t much of the old finish left to takeoff.
What you can’t do to remove the old paint is apply a harsh chemicalstripper or use a media blaster. Chemical strippers will remove the paint, but they will also soften and destroy the thin layer of foam. The same thing applies for using a media blaster. The thin layer of foam just won’t hold up under such an onslaught. Besides, you’d never be able to get all of the chemicals or all of the media out of the foam even if it did survive the treatment.
That leaves sanding as the best way to get down to the layer of foam. An orbital palm sander with 80-grit sandpaper attached will make short work of the old paint and as long as you don’t overdo, it will leave the layer of foam intact. What you should be left with is a steel bumper covered with foam that is most likely cracked, dented or has chunks missing (Photo 1).
Be Sure to Cover Everything
Repair Is a matter of filling all of those cracks, dents and gouges using the 3M #5895 EZ Sand Flexible Parts Repair Kit.
The trick to making this a real solid repair is to purchase at least three EZ Sand kits, as it will take that much to cover the entire bumper, and apply a thin layer over the entire foam-covered part of the bumper. You can find 3M #5895 EZ Sand anywhere automotive painting products are sold. EZ Sand comes as a two-part kit and will set you back about $45 per kit. Mix equal parts from each tube, one is black, the other is white, and apply just like you would apply plastic body filler.
Why cover all of the foam? It is the only way to be sure all of the imperfections have been covered. Minor cracks have a way of hiding until being exposed by painting. That’s a little late to learn you missed a crack. Allowthe EZ Sand to cure for a few hours and sand the surface smooth using 180-grit sandpaper.
Of course a second, and perhaps a third application will be necessary to fill the deeper problem areas. Be sure to lightly sand any areasthatstillshow a gloss before applying additional EZ Sand. Once the bumper is back in good condition, the EZ Sand will accept urethane-based primers and all you are left with is refinishing.
But as you might suspect, this is a look at one aspect of plastic bumper repair. There’s much more to be discussed.
The Beginning of True Plastic Bumpers
When vehicles first began to make the switch from chrome steel to soft plastic, Thermoset plastic or polyurethane plastic was the material of choice. Around body shops these bumpers were known simply as urethane bumpers. Body shops liked them because they were extremely pliable, which made them easy to install, and they were easy to paint because no special treatment was required prior to painting, just scuff sand, seal and paint.


The problem with these bumpers came from the same characteristic that made them so easy to install. Since they were pliable, as mentioned above, they had a tendency to sag and develop waves across the flat surfaces. It’s unsightly to say the least.
To correct the problem of wavy and sagging bumpers, car manufacturers drifted away from the urethane bumpers and began to replace them with bumpers made from a product known as TPO (thermoplastic olefin). These bumpers, which by the way are still being used today, are semi-rigid, which makes some of them more difficult to install, and they were all more difficult to paint due to the inclusion of a mold release in the plastic.
Body shops have a love/hate relationship with these TPO bumpers. Body technicians love them because they can throw away a damaged one and slip on a new one. Painters hate them because getting paint to stick istricky. Manufacturers love the preference to toss and replace. There’s profit in that scenario.
That’s pretty much the history of plastic bumpers, but it doesn’t address the issue of repair. To do that you first need to know which type of bumper you have as urethane and TPO bumpers cannot be repaired and painted in the same manner.

Identifying Plastic Bumpers
When plastic bumpers first appeared the task of identification was very simple, just flip the bumper over and look at the back side. If the bumper material was yellow, the bumper was made of urethane. If the back side of the bumper was gray or black, the bumper was made of TPO. That seems easy enough, and if you are working on a ride manufactured in the ’70s, ’80s or early ’90s, this is as good a method of identification as any.
However, starting about 15 years ago things began to change. Yellow no longer defined a bumper as being made of urethane. While some remained yellow, others were gray, and still others were black. On the other hand, TPO bumpers never changed. They started off black or gray and remain that way as of this writing.
But even if your ride was built prior to 1990, when urethane ruled the world, you need to be certain about what you have. Therefore, you have to put the bumper through a few tests so you’ll know how best to proceed with repairs. The first test involves feel. The back side of a cleaned urethane bumper looks and feels like milk bottle plastic (aside from not being white). There is no shine, no slime, no nothing, just the look and feel of hard dry plastic. By contrast, the cleaned back side of a TPO bumper looks somewhat shiny and feels greasy. That greasy feel is the mold release incorporated into the plastic.
Next is the sanding test. When sanded (use a 24-grit Roloc disc on a die grinder) urethane bumpers sand into a gritty powder, much like plastic body filler. By contrast, when TPO bumpers are sanded using a 24-grit Roloc disc,theywillsandin chunks and even seem to melt some what.
Finally, there’s the welding test.When all else fails, this test tells the tale. When heated with a tool like the welder in the East wood Plastic Welding Kit#50347that I’ll be using later, urethane bumpers will smoke and discolor. The plastic will soften and melt, but when allowed to cool it will not harden again. It will remain soft and stringy.Howcome?Urethane bumpers are 2K, meaning two chemical compounds are mixed together to form the urethane which is then poured into a mold to form the bumper. Heat upsets this chemical balance and alters the makeup of the urethane so that it does not return to its previous state.

TPO, when heated with the welding tool,simply melts. When allowed to cool, it returns to its previous hard plastic state. You guessed it, that trait makes TPO bumpers a little easier to weld repair than urethane bumpers.
But then we came here to fix both types. I’ll start with urethane bumpers.
Repairing Urethane Bumpers
As I mentioned above, urethane bumpers don’t lend themselves very well to being exposed to high heat. In other words, these bumpers don’t like to be plastic welded.
That doesn’t mean they can’t be plastic welded, I’ll go through that step a little later, it just means that in many cases repairing these bumpers should be accomplished using a different method, such as the 3M EZ Sand Flexible Parts Repair Method.
Remember that stuff? It’s the same material I prefer to use in repairing the first-generation plastic bumpers on the Pontiac GTO.
Now let’s look at repairing a minor problem on a urethane bumper.
Start by cutting a “V” groove about a half-inch wide into the scrape or tear using a 90-degree die grinder with a 3-inch, 24- grit Roloc disc attached. Be careful not to cut all the way through the bumper. Shallow but “V”-shaped works best.
The purpose of the “V” cut isto spread out the repair to provide more surface area for the EZ Sand. Notice in Photo 2 that after I made the shallow “V” cut, I widened the repair area by roughly an inch and a half on both sides. Again, this gives the EZ Sand more surface area for a better repair.
Fill the “V”with EZ Sand and allow the material to cure three to four hours. Once cured, the EZ Sand is sanded smooth using 180-grit sandpaper (Photo 3).
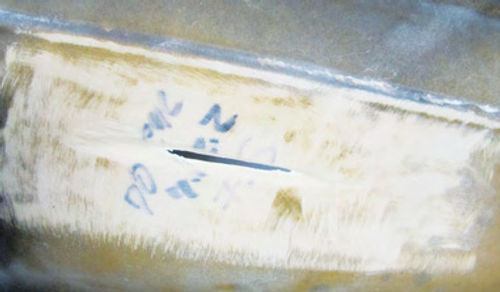
Working With a Deeper Cut
Now let’s look at a cut that goes all the way through the urethane bumper. My preference is to first rough up the back side of the damaged area using the 90- degree die grinder with a 24-grit Roloc disc attached. I start by roughing up an area at least twice as large as the damage (Photo 4).
After that, I make a “V” cut along the length of the damage on the outside of the bumper then cover the “V” with masking tape (Photo 5). What’s The purpose of the tape? It’s there to keep the EZ Sand I’ll be applying to the inside of the bumper from seeping through the cut. And how much EZ Sand is it going to take for this type of repair? If all goes well, you can make a repair like this with onekit.
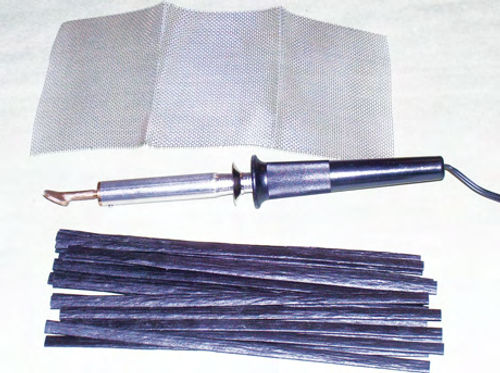
With the bumper flipped back over exposing the already roughed-up inside area, I mix enough EZ Sand to completely fill the repair. I use only a small portion of the mixed EZ Sand to initially coat the repair. A small disposable paint brush works great for spreading the EZ Sand. I then place a single layer of fiberglass mat over the repair taking care to push the fiberglass into the EZ Sand. Next I cover the fiberglass with the remaining portion of EZ Sand (Photo 6).
What’s the purpose of the fiberglass mat? It’s there to help strengthen the repair as well as to help the EZ Sand stay in place. Once the EZ Sand cures, after a few hours, I flip the bumper over, remove the masking tape, and finish the repair by filling the “V” cut on the outside of the bumper with more EZ Sand.
Plastic Welding & Urethane Bumpers
Remember I said that urethane bumpers don’t lend themselves well to being heated? Keeping that in mind, the process I’m going to show you now should be thought of more as a brazing technique than a welding technique. How’s that? Think about when you’re brazing two pieces of metal together. The parent metals don’t melt, only the brass melts, and when it does melt it flows out over the parent metals to create a good bond between the two metals. I’m going to do the same thing here, melt a plastic repair welding rod and allow it to flow out over the parent plastic to form a good bond.
Just be aware that you can’t perform this technique with just any plastic welding rod. The rod must be a Fiber Flex rod. Yes, if you purchase the Eastwood Plastic Welding Kit #50347 it will come with FiberFlex rods (Photo 7). (In searching the Internet, we also found packs of 30 FiberFlex rods for about $35.)
The technique starts just like any other bumper repair method, by cutting a “V” groove along the length of the back side of the damaged area. Use a 90-degree die grinder with a 24-grit 3M Roloc disc attached and make the cut about an inch and a half wide and roughly half the depth of the plastic being cut.
Using the Eastwood Plastic Welding Kit, I allow the 80-watt welding iron to pre-heat for a few minutes to bring it up to melting temperature. You will know the welder is at peak temperature when you can touch a welding rod to the tip and the rod melts.
A trick you can use to make the weld is to heat the end of one of the welding rods until the surface becomes liquid (Photo 8). Then immediately flip the rod over and press it into the “V” groove. That starts the brazing process and from there you can continue to melt the rod and fill the “V” groove.
Remember, this is a brazing process and not a bonding process. Do not attempt to melt the plastic bumper. Melt the rod and fill the groove (Photo 9).
Once you have the back side of the bumper welded, you can flip the bumper over and repeat the brazing process on the outside of the bumper.
Some Finish Work


My preference for finishing the outside of the bumper is to first sand the brazed area using 80-grit sandpaper on a block. This levels the fill rod and removes the paint back a few inches. Once I’m satisfied with the results, I cover the repair with a thin layer of 3M 5895 EZ Sand and sand that smooth using 180-grit sandpaper.
After that, I treat the repair the same way I treat any other repair, by feathering back the old paint, applying primer and refinishing.
Whatprimerisbest?Any high quality 2K urethane primer/surfacer will adhere to a cleaned and sanded urethane bumper.
Next time,I’ll cover the repair process for TPO (thermoplastic olefin) bumpers. Got a question? Send it along.
Resources
Eastwood
263 Shoemaker Road
Pottstown, PA 19464
(Eastwood Plastic Welding Kit#50347;$70)
3M Corporate Headquarters
3M Center
St. Paul, MN 55144-1000
3M EZ Sand Bumper Repair Kit #5895
Project Work By:
LPL Body Works, LLC
5815 Contented Lane
Amarillo, TX 79109
(A good source for automotive restoration books
as well as paint and body work DVDs by the
author of this article.)


