BUILDING-AND USING-AN ENGINE CRATE
He Found Some Bargain Engines Online, But They Had to Be Shipped From the Sellers. The Solution Was to Build a Special Crate For His Online Finds.
The antique car engine was priced at just $75, shockingly cheap! But it was half a continent away, shockingly far! What’s a car collector to do—build a crate?
Actually, yes. And in my case send it out twice, because just a day or two later another $75 engine that I wanted came up for sale.
Both engines, one in Pennsylvania and the other in Wisconsin, were listed on the online auction site eBay as “pickup only.” I suspected that neither seller wanted to locate a pallet, strap the engine to it and then make arrangements for a freight company to ship it off.
I confirmed this when I contacted the sellers, each of whom readily agreed to load a crate if I’d build it and handle the shipping details.
That Much to Ship It?
My enthusiasm for the crate idea, however, quickly dimmed when I phoned YRC Freight (the merged former rival carriers Yellow Freight and Roadway Express). Shipping the 500-pound engine from eastern Pennsylvania to Nebraska via YRC, I learned, would cost me $569. An extra $122 for a truck with a lift gate (necessary to load the engine for the seller) would bring the freight cost to $691. Ouch!
Did it make sense for me to pick up the engine myself? Assuming gas at $2.50 per gallon in a pickup truck that gets 13 miles per gallon, a 2800- mile round trip would cost $538 in gas alone.
Add in $400 for four nights at motels plus at least $100 for food— and more for highway tolls and other incidentals—and I could easily spend $1200 retrieving a $75 engine. Suddenly, that eBay engine is no longer “shockingly cheap.”
The high cost of retrieving them is why so many $50 and $75 old-car engines go begging on eBay. Thus ended my brief foray into longdistance shipping.
But wait. On the advice of a trucker friend, I called another freight line, which quoted $298—nearly half the YRC quote—but with one big stipulation: the seller would have to deliver the engine to a freight terminal located an hour or so away from him. Their quote would rise considerably if they had to pick up the engine at his home. So still I hesitated.
From this second carrier, however, I did receive two important pieces of advice should I decide to ship an engine by motor freight.
One, I should drain all the oil and gas. Two, I should crate the engine. Because trucking companies have to stack loads in their trailers to make a decent profit, an engine merely strapped to a pallet could have something fall on it in transit.
A Rate That Tickles My Fancy
When the seller of the Pennsylvania engine, John, suggested I get a shipping quote through The Freight Rate Co., however, the price came down to an amount I could handle.
The Freight Rate Co. quoted $418 overall to ship me the Pennsylvania engine and transmission: $146 to ship my empty crate to Pennsylvania and $271 to return the full crate to me.
Included in the quote was a lift gate on both trucks on the Pennsylvania end: the one that would deliver my empty crate to John and the one that would return for the crate after he loaded it.
How did I just save $276 over the $691 shipping quote I got when I called YRC directly?
“We get discounts of 50 to 60 percent,” according to Angela Miller, the inside sales representative with whom I worked at The Freight Rate Co., a “third-party logistics” firm or broker founded in 1998 in Daytona Beach, Florida.
Like other brokers, the company has rate agreements with several freight lines, which are eager to offer discounts through brokers in order to fill their trucks on LTL (less than truckload) trips.
Three Steps to Build a Crate
Thus I set out to build my first-ever custom crate, a project that, in theory, is as simple as 1, 2, 3.
For step one, you’ll need to construct a cradle to hold the engine securely during its adventure in moving.
Step two involves building a similar cradle or container within the crate for placing any loose bolt-on parts that will be shipped with the engine: transmission, carburetor, air cleaner, engine splash pans, radiator and the like.
Step three requires building a crate, the turtle’s shell that will protect the engine and related parts from damage in transit.
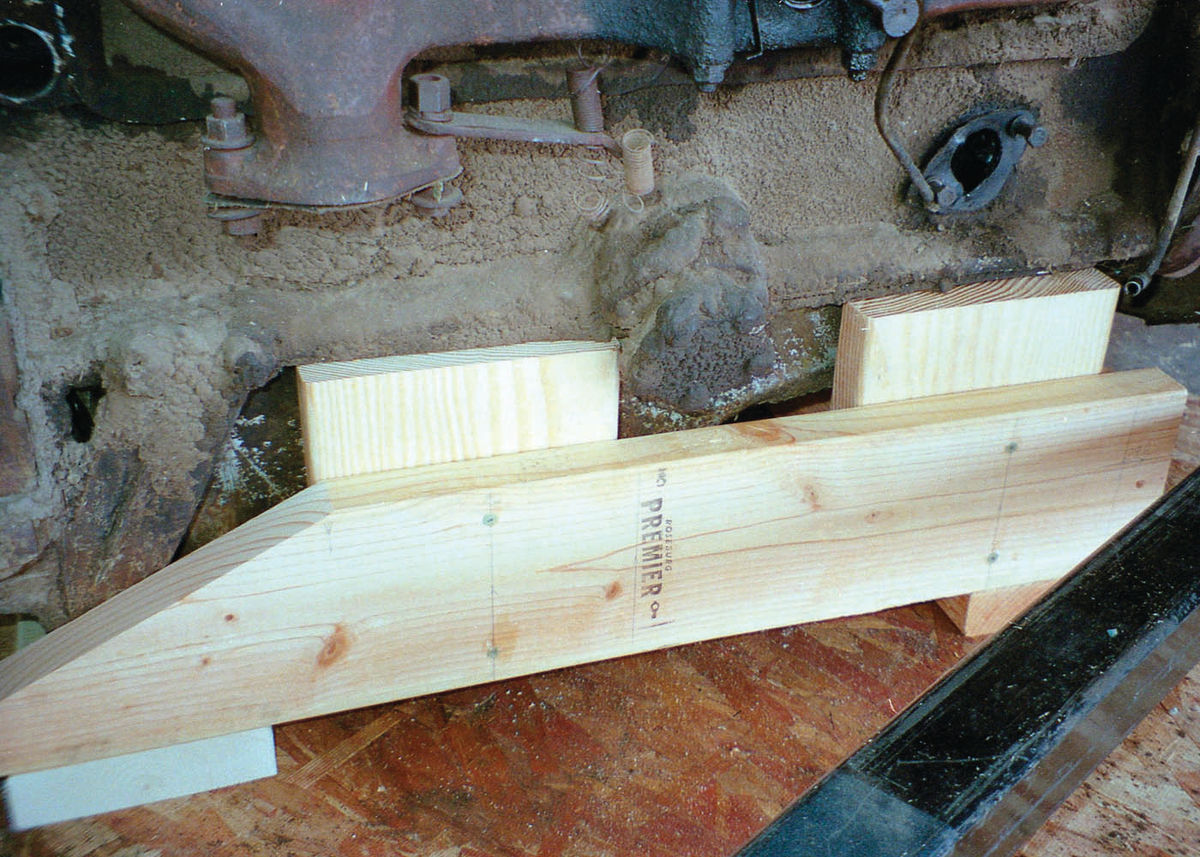
For the 1939 Plymouth engine I’d bought from the Pennsylvania eBay seller, I replicated the bases I’d previously built to make rolling engine stands for the 1930s Mopar 6-cylinder engines I favor. This time, however, I simply left off the casters (Photo 1).
Although strong, these wooden stands are relatively inexpensive and easy to assemble because they require only deck screws and 2-by-6-inch lumber. I cut the wood on my table saw, saving myself the time, money and tools necessary to buy, cut, grind and weld metal tubing.
Measuring the Engine
A critical measurement for any engine cradle is the height of the side rails (the uprights that support the engine) that are screwed inside the side rails. Also important are the length of the side rails and the distance between them.
Specifically, the side rails must be high enough so the engine’s oil pan clears the floor of the crate; long enough to bear against nearly the entire length of the block’s oil pan flange; and spaced from side to side so the oil pan is a snug fit in the cradle.
If the side rails are too far apart, the engine could slip off the cradle and tip sideways during shipping.
If, as in my case, you already own an engine similar to the one you’ve bought, you can easily measure and build an engine cradle. Though more difficult, it is possible to build a crate to fit an engine you’ve never seen. If you belong to a car club, you may be able to locate a nearby member who will let you measure his engine.
Otherwise, you’ll have to ask the seller for very precise measurements of his engine: the height, length and width, plus the greatest depth of the oil pan. Be sure to allow for such obstructions as exhaust pipes, external oil pumps, bell housings, the crankshaft’s front pulley and the like.
Next, a Transmission Cradle
For step two, securing miscellaneous parts, I had only the engine’s loose transmission to worry about. For it, I welded some scrap angle iron into a cradle so I could place it side-by-side with the engine. Given the small size of the transmission compared to the engine, the amount of fabrication work was minimal.
As with the engine cradle, I merely copied a design I’d previously used to build stands for storing transmissions (Auto Restorer, May 2005). I originally built the stands to prevent my spare transmissions from flopping onto their sides, thereby spilling oil and occupying too much floor or shelf space.
I bought two nylon ratchet straps that, by passing over the engine and under its cradle sideboards, would secure the engine inside the crate.
Because I’d designed the transmission stand for storage, two bolts secured the front of the gearbox; its rear end simply sat on a wooden upright. This wouldn’t do in a shipping situation. Therefore, I cut three pieces of wire that John, the seller of the 1939 Plymouth engine, could use as enormous twist ties to lash down the rear of the tranny.
To begin constructing the crate, I used my cherry-picker hoist to lower a test engine onto a piece of oriented strand board (OSB), the modern plywood. This allowed me to gauge the proper size of the crate’s floor.
Though I could have simply built my engine crate atop a standard pallet, I wanted to keep my crate as tiny as possible to hold down shipping costs.
Thus I used 2-by-4-inch lumber to create a sturdy, miniaturized pallet, even using my table saw’s wide-cut dado blade to replicate the cutouts that forklifts require (Photo 2).
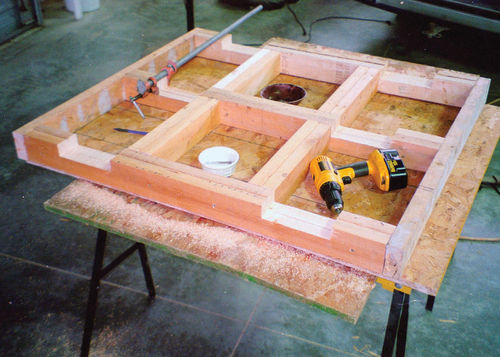
With a chalk line, I laid out the contours of the completed 2-by-4 base atop the crate’s OSB floor. These lines guided me as I pre-drilled holes for the long deck screws I used to securely attach the floor to the base.
Reinforcing the Crate Sides
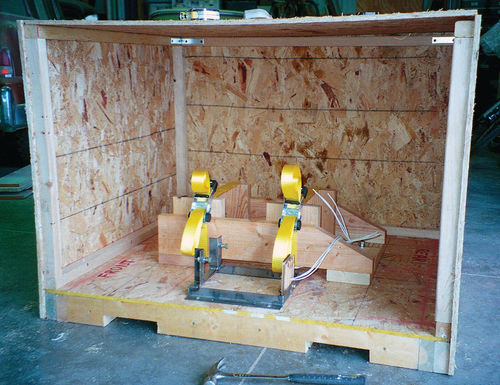
Next, I attached the two cradles to the crate floor. For the transmission cradle I used deck screws; for the cradle that would hold the 500-pound engine, I used heavy bolts, nuts and flat washers.
I cut the crate’s four sides to allow a few inches of air space above the top of the engine. For two reasons, I ripped some 2-by-4s to create a framework of 2-by-2-inch lumber around the perimeter of the crate’s four sides:
One, I needed a backstop to hold the deck screws I’d use to attach the sides. Two, I wanted a crate strong enough to support a load, should the shipper elect to stack another crate on mine (Photo 3).
The crate’s lid, like a car’s roof, was critical to the overall sturdiness of my homemade shipping container, I knew.
Accordingly, I waited until I’d attached all four sides before measuring and cutting the top, which I wanted to fit snugly into the recessed framework created by the 2-by-2 lumber at the top of each side.
Into this framework, I placed metal T-nuts, which allowed me to secure the crate’s top board using machine thread bolts, which I judged stronger than wood screws.
Though I’d been careful to design a compact crate, I’d given little thought to the other determinant of shipping rates: weight. Quite reasonably, I’d assumed that a sturdy 2-by-4 base, six large pieces of OSB (the top, bottom and four sides) and two cradles would weigh, oh, 100 pounds or so. But I was “weigh” off.
My Crate’s a Heavyweight
The base alone, with the OSB floor attached, weighed 68 pounds. The sides, including their strengthening 2-by-2 framework, weighed 22 pounds apiece or 88 pounds total. By adding 20 pounds for the crate’s top, 26 pounds for the engine cradle and binders and 4 pounds for the transmission cradle, the completed crate topped out at 206 pounds.
I know these weights because I briefly considered shipping the crate to John, the seller of the engine, in pieces via UPS or FedEx.
Both shippers, however, are geared toward delivering lighter packages. And even if they had been able to ship more cheaply than by motor freight, I was asking too much to expect John to assemble the crate before loading it. I therefore scrapped the idea of using UPS or FedEx.
While playing around with The Freight Rate Co.’s online calculator, however, I playfully entered 103 pounds—half the crate’s actual weight—and discovered that the shipping quote didn’t change. Evidently, then, the size of the load takes precedence over its weight.
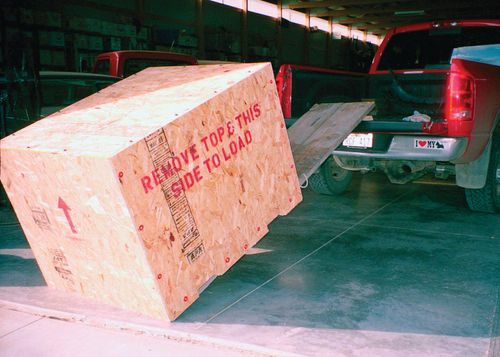
Before I sent off the empty crate to John, I put myself in his position: how would he know the best way to open it once it arrived?
I supplied the answer in two ways. One, by using a red paint pen to draw circles around the deck screws and bolts he’d need to remove. Two, by stenciling some pointed instructions directly onto the crate (Photo 4).

Previously, I’d asked John to remove the fragile fuel pump from the front lower right corner of the engine, which was missing its carburetor. Concerned that the two openings would allow dirt and moisture inside the engine during shipping, I wired inside the crate two metal hole covers—labeled “FP” and “CARB”—for John to install.
Eastward, Ho!
To send off my homemade crate, which outweighs me by three score pounds, I had to somehow load it into my pickup without a forklift.
Fortunately, I have a plank ramp that I use for loading such heavy items. Employing this ramp, I managed to load the empty crate for the 75- mile drive to the Omaha, Nebraska, terminal of Old Dominion Freight Line, which shipped the empty crate to Pennsylvania (Photo 5).
The forks on the forklift that removed the crate from the back of my truck stuck slightly: I didn’t make forklift slots in my base quite tall enough! But the forklift driver nevertheless managed to unload the crate, which arrived in Pennsylvania a few days later.
After loading the engine, John had YRC (the carrier that would return the full crate to Omaha) pick it up on a Tuesday. It arrived at the freight line’s Omaha terminal Friday, sitting on a standard pallet but otherwise looking virtually unaltered.
To make John’s job easier, I’d written him some instructions, including tips for how to best position and secure the engine and transmission on their stands. I should have placed them inside the crate. In my haste, however, I’d shipped him the crate, written my instructions and popped them in the mail, certain they’d arrive in time.
John Gets His Wires Crossed
In fact, the crate beat the instructions to their destination. John, who loaded the engine promptly, never saw them, evidently, and made at least three missteps.
One, the wire that secured the fuel pump and carburetor covers inside the crate on its outbound trip was designed to do double duty by lashing various loose parts (fan hub, front engine mount, fuel pump and crankcase breather tube) to the engine for the return trip.
For these parts, John instead used the three heavy wires that were supposed to anchor the transmission to the back of its cradle. Consequently, his second misstep was in allowing the back of the tranny to simply float on its cradle during shipping.
He compounded this error, his third, by mixing up the position of spacer nuts, thereby bolting down the tranny too close to the front of its cradle.
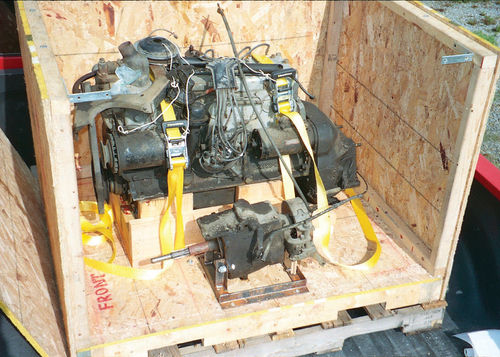
Consequently, the back of the gearbox, unable to settle properly onto its wooden upright, was canted at a steep angle. All of this put undue stress on the tranny’s bolted-down front tabs, which could have easily broken in transit but didn’t (Photos 6 and 7).


John also grossly overtorqued the deck screws holding the removable side in place, causing a few of them to nearly tear through the wood. For the crate’s next use, I had to place small washers beneath each screw.
The crate, I noticed, had been rained upon, possibly at John’s shop or perhaps in transit. For all I knew, it rode from Pennsylvania strapped upon a flatbed trailer. The rain had put waves in the wooden top; I spotted rust on the crate’s top bolts, the transmission’s input shaft and the bare-metal transmission stand.
Even so, and despite all the effort that went into building and ferrying the crate, I couldn’t have been happier with my purchase (Photo 8).
North—to Wisconsin
Five days after the crate returned from Pennsylvania with a ’39 Plymouth engine on board, I drove it back to the Omaha terminal of Old Dominion. The carrier had again won the honors of shipping off the empty crate—this time to Wisconsin. A different trucking company, Roadrunner Transportation, returned it with a new prize inside: a 1936 Plymouth engine.
Once again, I fumbled and was late getting my printed crate-loading instructions off to the Wisconsin seller, an intuitive car guy who figured it all out perfectly. He phoned to say he’d loaded the engine and transmission in the crate the same day it arrived.
This time, to avoid another long drive to Omaha, I’d paid a trifle extra to have a truck deliver the crate directly to me. I declined to pay extra for a truck with a lift gate because, luckily for me, a construction crew with a forklift was working at my place.
When a local transfer company’s semi pulled up to the end of my driveway and its driver threw open the rear door, however, we discovered that my crate was sitting smack-dab in the middle of the otherwise empty 53-foot-long trailer. (Again, my crate was sitting atop a standard pallet!)
Joe, a full-time carpenter and occasional forklift operator, couldn’t get near it with his heavy forklift. I ran for some nylon tow straps, which Joe used to pull the loaded 785-pound crate to the back edge of the trailer.
He then used the forklift to set it neatly into my pickup, after which I drove to my pole barn, removed the crate’s top and side and lifted out the engine with my cherry picker hoist (Photo 9).

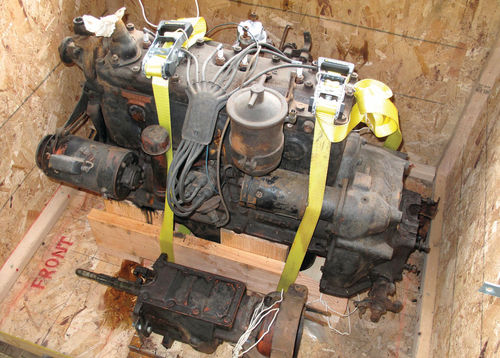
Like the ’39 Plymouth engine from Pennsylvania, the ’36 Plymouth power plant was a peach (Photo 10). I’d been able to tell as much from the very clear photos posted for both eBay auction items. Of course, I’d queried the sellers about the stamped engine numbers to make sure I was actually getting 1936 and 1939 engines.
How Great Is a Crate?
Building and sending out an engine crate—was it worth the effort?
For years—no, make that decades— I’ve searched to find such nice, complete engines at swap meets and old-car salvage yards. No luck. Consequently, I’m sold on the idea of hand-picking the best old-car engines available as they come up for sale—usually quite cheaply—on eBay.
Although I invested some time in building my crate, it has already brought home two nice engines and is standing by to repeat its performance. True, I did some running around to deliver and retrieve the crate each time I sent it on a mission. But some inconvenience attends most old-car activities.
By contrast, the several incomplete (but nevertheless expensive) engines I’ve bought from salvage yards have each cost me mightily in time and energy: I’ve had to remove them from the cars myself—usually on hot, sticky days.
I will make one change because of the trouble that the trucking companies evidently had with my crate’s custom base. On both outings, the crate returned sitting atop a standard pallet. Before the crate’s third mission, then, I’ll make it official by removing the crate’s custom base and screwing the floor directly to a standard pallet.
So, all in all, yes, it was worth the effort. The bumper sticker I’d create to best express my feelings is this one: Crate Engines Are Great Engines.


