
Battery & Starter Troubleshooting, Pt. 1
When You Turn the Ignition Key, Do You Get a Clicking Sound? Or the Starter Barely Turns? Here’s Some Help.
IF YOU ARE experiencing a “dead” battery, or the starter turns the engine over slowly, or you hear a clicking sound when trying to start your vehicle, there are several possible problems to consider. These problems can include:
1. Poor or corroded connections at the battery and/or the starter solenoid (this would include the condition of the cables themselves). 2. A defective (or simply worn-out) battery. 3. An electrical drain, which could be an accessory staying on or an unwanted electrical ground. 4. A starter with excessive current draw. 5. A charging system problem, most typically a loose drive belt, bad voltage regulator or a malfunction in the alternator.
Some Safety Reminders
But before we get started with our project, there are a few things worth mentioning here with regard to safety on the job.
As you probably know, avoid smoking, open flames or creating sparks around the battery as the gasses can be explosive. This is especially true during charging.
Wear eye protection. You’re not trying to make a fashion statement, and in the event of a mishap it might save your eyesight. Safety glasses, goggles or a full face shield are all inexpensive protection.
Disposable rubber gloves are another good precaution. Should you get some electrolyte (the term used for the battery’s mixture of sulfuric acid and water) on your skin, wash it off as quickly as possible. The burning sensation will remind you to take prompt action. Make sure you have water close at hand should an accident happen.
Also, never perform any service such as taking a specific gravity reading or even adding water with good clothes on. It doesn’t matter how careful you are when you’re working around a battery, you will somehow end up with “holey” clothing when they come back from being washed, guaranteed.
Assessing the Situation
There are any number of ways to approach potential battery problems. We’ll start by inspecting and cleaning the battery connections, and then check the battery’s state of charge. From that point we will follow one path if the battery is fully charged. If, however, the battery is discharged there will be a few extra test steps in the procedure which will include recharging the battery, checking the charging system, and testing for a drain on the battery. So let’s get started.
1. If you hear a clicking sound when trying to start your vehicle, it generally indicates low voltage to the starter. This is often due to bad cable connections. Poor connections at the battery post clamps are most often the culprit, but a discharged or failed battery can also be the problem. In some cases it is a starter solenoid, but much less often than people think.
Let’s start with the simple stuff by checking and cleaning the battery connections. (I would recommend this regardless of your problem.)
Routine battery service such as cleaning the posts and the cable clamps once was considered normal maintenance, but since the advent of the low-maintenance battery we tend to pay less attention to it. Snowy corroded connections are far less common today than they were decades ago due to new battery designs, but that doesn’t mean cleaning isn’t necessary. The outward appearance may look fine, but don’t be fooled. Cleaning the posts and clamps is time well spent. Both your battery posts and the insides of the clamps should be clean and shiny.
Photo #1 shows a side terminal cleaner at the bottom. Above it to the left is the typical post cleaner, and to the right is a post and clamp shaper. A pocket knife or small wire brush can also be used. Apply a light coating of petroleum jelly to both surfaces before re-assembly.
Remember to always start by removing the battery’s ground cable first. If you want, you also can put on a pair of those felt washers (usually red and green) before re-attaching the cables to the battery. They do help prevent corrosion.
Should you have a snowy, heavily corroded cable clamp, use baking soda and a small amount of water to help neutralize it. If you notice the cable is splitting open where it connects to the clamp, the cable itself is likely full of corrosion and should be replaced (remember to use the correct gauge). Inspect the other ends of the cables: are they bolted tightly to the engine block and starter solenoid? If your battery is a top post design and is getting a dirty build-up on the top, clean it off. The dirt combined with battery acid becomes conductive and can actually put a slow drain on your battery if it bridges between the positive and negative posts. So if your battery is secured by a metal top frame, the two posts have now become much closer, probably two inches or less. Dirty build-up connecting each post to the metal frame is all that is needed. If there is enough build-up, you can verify this by touching one lead of your voltmeter to either post and the other probe into the dirty build-up. You will actually obtain a voltage reading.
If you still hear a clicking sound at this point, continue reading steps #3, 4 and 5. It will be addressed again once we verify that the battery is fully charged and passes a load test.
While it has nothing to do with starting your vehicle, now is also a good time to clean and repaint the battery box.

2. If absolutely nothing happens when you turn the key, try turning on the headlights. Do they light? If they don’t, then move to step #3 evaluating the battery and its state of charge. If they do light, try starting the engine with the headlights on while someone observes them. Do they dim down and go out or almost out? If the answer is yes, move on to step #3.
If they stay bright, you may have a safety switch-related problem. If the vehicle has an automatic transmission, you may have a defective neutral safety switch, or one that is out of adjustment.
To verify if it’s an adjustment problem, secure the park brake and place your foot firmly on the brake pedal. With one hand turn and hold the ignition key on the start position while using your other to move the shift lever slowly through its entire range from stop to stop. If, suddenly, the starter starts to spin as you are moving the lever, re-adjusting the switch will most likely take care of your problem. Adjustment is usually accomplished (on the column-mounted type) by loosening a couple of screws which will allow you to slide the switch back and forth. You should be able to position it where (in most applications) it will start in neutral and park (if you have Park in your selector range).
If nothing happens during this test, you can bypass the switch entirely. If your switch has only one wire connected to it, disconnect it and, using a jumper wire, connect the wire to a good ground. Many switches combine the neutral safety and backup light switch into one. Most have four wires connected to them. One pair serves the backup lighting while the other completes the starting circuit. Connect a jumper wire in between one pair of wires and momentarily turn the key to the on position. If the backup lights come on, you can disregard this pair of wires and now plug the jumper wire into both ends of the other connector, completing the circuit. Once again make this test with the park brake applied for safety, and put your selector in neutral or park. If the starter now spins, you found your problem, a defective neutral switch.
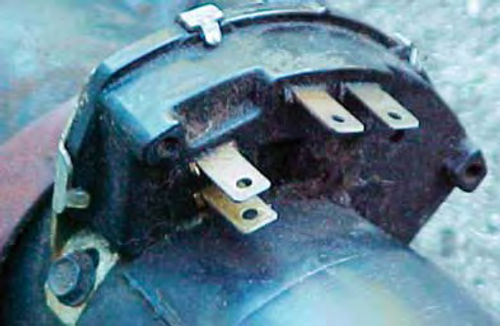
Photo #2 shows a ’60s Chevy column mounted switch. Both the neutral safety and backup lights are incorporated into this switch. The two connector blades that are side by side at the top serve the backup lights, while the other two located to the left (one above the other) are the neutral safety connection. Also notice that where the switch is secured to the column at the left it’s slotted to allow for adjustment.
If you have a manual transmission, some vehicles (probably late 1960s and onward) require depressing the clutch pedal to be able to start the engine.
Some early ’70s cars had the seat belt interlock system. I remember a friend was sent on a road call for a non-starting vehicle, only to find out that a bag of groceries sitting on the passenger seat would not allow the car to start because the seat belt was not secured.
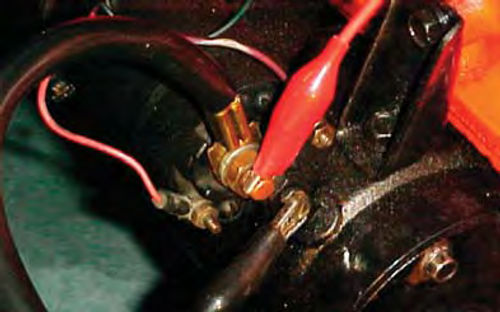
Whatever your vehicle, determine what safety features are incorporated into the starting system and evaluate them as we did with the neutral switch. Most always a switch can be temporarily bypassed for testing purposes. Just think about what you are doing or have disabled before carelessly turning the key. You don’t want to accidentally back through a closed garage door. There’s also the possibility of a defective ignition switch. Use a voltmeter or test light and verify you are receiving energizing current to the solenoid when the key is held in the start position. The terminal on most GM solenoids is marked with an “S”, while on the Ford type fender well mounted relay it’s the small post closest to the cable from the battery. Your test light should light with the key held in the start position (as shown in Photo #3). If it doesn’t, and all the safety switches are functioning properly, you likely have a defective ignition switch or a problem in its related wiring. This could include a blown fusible link if your vehicle has them in the wiring. The shop manual for my ’66 Chevelle indicates a minimum of 7.7 volts is required to engage the starter drive when cool.
3. The next item to look at is the battery. Checking the specific gravity or looking at the “eye” (if equipped) will tell you the battery’s state of charge. In most situations, a battery hydrometer is needed to check the battery’s specific gravity. This can be purchased at an auto parts store, but make sure you get the type that will give you a numerical reading, not the version with the four or five different floating balls and a chart to equate the state of charge. The calibrated type allows for specific comparison of cells and a more exact reading. I purchased a new one from NAPA a few years ago and it cost less than $10. They also make one with a temperature compensation scale. This can be handy if you work in a wide range of temperatures.

A specific gravity of 1.270 indicates a fully charged battery at 80 degrees F. Photo #4 shows the typical scale on a hydrometer float. Make sure it is floating freely and not making contact with the top of the hydrometer, as this will give you a false reading.
Some variation in readings between cells is allowable, but usually the difference should be no greater than .050 points. If the battery temperature is below 80 F, subtract .004 for each 10 degrees F, or add .004 for every 10 degrees F above. In most situations you won’t need to be concerned about this, but if you are checking a battery out in your barn and it’s 30 degrees F, 1.250 specific gravity is the same as 1.270 at 80 degrees F.
If your battery is equipped with a state of charge “eye,” it should be green. If your battery is totally sealed and has no “eye,” use a digital voltmeter to take a voltage reading. A fully charged cell will show 2.1 volts. So, a 6-volt battery should read 6.3 volts, while a 12-volt would be 12.6 volts.
So, under normal operating conditions (no battery charger has been hooked up or lights knowingly left on, draining the battery), any of these readings; @1.250 spec. gravity or above, a green “eye”, or no less than 12.4 volts on a 12-volt battery tells you the battery has a full charge or close enough, so the charging system has been doing its job, and there are no electrical drains on the battery creating the slow (or no) spinning starter. If your battery was found to be discharged, you will need to proceed to step #7 and recharge the battery.
4. Next we will evaluate our fully charged battery. Many batteries have removable caps, and accurately checking the battery requires that the liquid level in all cells be equal. A low cell will give you a higher reading.
Now, you don’t need to get crazy about this, but if the cells are significantly unequal, add de-mineralized water (the type you would use in your steam iron). Be careful not to overfill the cells. There is an indicator of some kind in each cell where you should fill to, such as a smaller diameter opening. This is 3/4” below the top of the battery.
If you had to add water, the battery will need to be charged briefly so an accurate reading can be obtained. Charging will assure the liquids have all mixed. For those who may be curious, pure water has a specific gravity of 1.000, while sulfuric (battery) acid would read 1.835. The ratio is 64% water and 36% acid equals a specific gravity of @1.270 at 80 degrees F.
Let’s say most of the cells read @1.270 but one reads 1150. This could very well be telling you the battery is your problem, or will be in the very near future.
The last word, however, is to apply a load with a carbon pile. This is the only method to truly test a battery.
Most parts stores will test them for free. But if you are addicted to tools like I am, you often can spot an old Sun or Snap On load tester at an auto swap meet for minimal cost. Harbor Freight as well as others sells inexpensive models that will also work.
This test will show your battery’s capacity. The load is a specific amount and depends on your battery’s rating. Most batteries today are rated by cold cranking amps or CCA. Some will actually state to test the battery at “xxx” amps.
Should you purchase an older carbon pile machine, it may not show the CCA scale for testing. Don’t worry though, it’s easy to remember. Half the CCA rating equals the amps for conducting the load test. For example, a CCA rating of 600 would be tested at 300 amps.
The load is applied to the battery and at 70 degrees F it must remain above 9.6 volts with the load on for 15 seconds.
Photo #5 shows a typical carbon pile being used. The large knob is turned clockwise until the desired load reading is reached. On this unit the meter on the left indicates the load applied (@375 amps in this case). The meter to the right indicates the battery voltage during the test. The battery can be tested at most any temperature, and there is a varying voltage scale to correspond with it. The lower the temperature, the lower the allowable voltage reading. Generally speaking, a bad or weak battery may hold for a few seconds and then the voltage will fall off rapidly. There won’t be any doubt in your mind as to its condition. If the battery had just been charged, advise the person testing it because there will be what is known as a “surface charge” on the battery. Before the actual test a 300 amp load is applied for 15 seconds to remove this surface charge.
Sometimes people get confused and wonder why a battery showing 12.6 volts is not getting the job done. The best comparison is to think of stacking together 8 “D” cell flashlight batteries. While they will total 12 volts, you would never dream of trying to start your car with them. They simply don’t have the capacity. I recently removed a battery from my motorhome that was eight years old. The only reason it had any indication of life was due to the fact I always keep a battery maintainer hooked up to it. (A maintainer works to keep a battery fully charged. If you connect a digital voltmeter and watch how it works, it will start to charge the battery when the voltage has dropped to 12.9 volts. It will very slowly increase until it reaches 14 volts, and then will stop charging. The cycle will repeat over and over, keeping the battery fully charged, without overheating or overcharging it.) The age of the battery alone assured me it was worn out, but it did show 12.6 volts. Note, however, that it wouldn’t even light a 12- volt trouble light! If your battery failed the test, it must be replaced, and unless you have unusual circumstances you have found your problem.
5. If the battery tests good and you still have a clicking sound or slow spinning starter, this would indicate the ignition switch is sending the voltage signal to the starter solenoid (or relay), so now let’s run some tests for voltage loss (also referred to as voltage drop). This will indicate the condition of our battery cables, their connections and the solenoid. On most tests, 0.2 volts is usually the most allowable voltage loss on a 12- volt system. You may be unable to perform some tests on certain vehicles (such as Chrysler products with internal solenoids), so verify this in your shop manual along with the exact voltage drops allowable for your vehicle.
Disable the ignition so the vehicle can’t possibly start. If you are using an analog type voltmeter to perform these tests, connect the positive lead to the positive post or the negative lead to the negative post when connections to the battery are necessary. Digital meters will function regardless of the polarity, but disregard the minus sign if it appears.
A. Connect your voltmeter to the battery’s positive post and the other to the starter solenoid stud. You can either use a remote start button or have an assistant turn the ignition key to the start position and observe the reading on your meter. It should not exceed 0.2 volts. If it does, you can narrow down your test points, and perform the same test with one probe connected to the cable clamp while holding the other directly against the battery’s post. A high reading here would indicate a poor connection between the clamp and the post. Next you could try taking a reading from the post to the opposite end of the cable (not the stud). If the reading is now OK, then your connection at the solenoid is poor, and the cable is good. (Undersized cables will also give you a high reading, and don’t be fooled by the thick vinyl coating over the copper wire.)
B. Now we will check the ground side. Connect your voltmeter (or probe) to the negative battery post, and connect the other lead to a spot of bare metal on the starter housing. As we did before, turn the key to the start position and note the reading. Once again it should not exceed 0.2 volts. If it is high, narrow the test by removing the voltmeter lead connected to the starter and connecting it where the cable bolts to the engine block. Repeat the test until the high resistance is found. This could include the starter being poorly grounded to the engine block, or an undersized cable.
C. Testing the solenoid for resistance is done by connecting one lead of the voltmeter to the battery terminal on the solenoid and the other to the “solenoid to starter motor terminal.”
On the Ford fender well-mounted relays, this would be the two large studs on opposite sides. After making this test, make one more to evaluate the cable from the relay to the starter. Move one voltmeter lead to the large starter motor terminal side of the relay, while connecting the other test lead directly to where the cable connects to the starter and test again. Both readings should not exceed 0.2 volts.
On most GM vehicles there is a connection at the base of the solenoid that passes through a rubber grommet into the starter. A small bolt attaches it to the solenoid. (See connection in Photo #6). Be careful when making this connection that you don’t let the test lead make contact with any other part of the starter, or other grounded surfaces. Make your other connection to the solenoid battery terminal. Once again the loss reading on your voltmeter should not exceed 0.2 volts. If it does, replace the solenoid.
Next time, we’ll test the starter, inspect the charging system, check for drains on the battery and we’ll also include some handy shortcut charts for all of the work we’ve covered.


