Work Safely In Your Shop
There are Numerous Products to Help Keep You Comfortable and Safe While Working. These are Well Worth Having.
Editor’s note: AR has been publishing for 25 years, and now as always we want our readers to be safe while enjoying their participation in the hobby. With that in mind, we asked contributor John Armstrong to share some safety pointers with us. John is a retired shop mechanic who’s very active — and safety conscious — in his garage as his regular articles will attest.
WHETHER WORKING ON a vehicle or using tools and machinery, you need to think about safety before getting started. When it comes to personal protection, quality and comfort are usually the biggest concerns. I wear eyeglasses all the time, so it’s important that any protective eyewear or respirator will fit comfortably with my glasses, and perform as they should. Additionally, I choose to search for products that are made in the U.S. This is not always easy or even possible, and often the “big name” manufacturer is not the one made in the U.S. This is not to say there is anything wrong with products made elsewhere, it’s just my preference.
Most of the basic personal protection items are not expensive, so cost usually is not an issue. However, I will occasionally mention prices of various items throughout this article. This will give a rough comparison of cost levels between products. Prices will obviously vary depending on your region, who made an item, and where and when it was purchased. As for the prices listed here, I have either found them (at the time of this writing) in home improvement centers, catalogs or listings on the Internet, and have rounded them up to an even figure. So use the information as a means of comparison only.
Eye and Face Protection
If there is ever any uncertainty regarding when to wear safety glasses while working — then wear them all the time. No need to be concerned with making a fashion statement here. Safety glasses offer good general protection, while goggles and face shields offer more and are better suited for when you are using anything generating flying sparks. By this I am referring to using a cut-off wheel, grinder or power sanders; not arc welding or torch cutting. Welding is in a class all its own and will be covered separately later in this article.
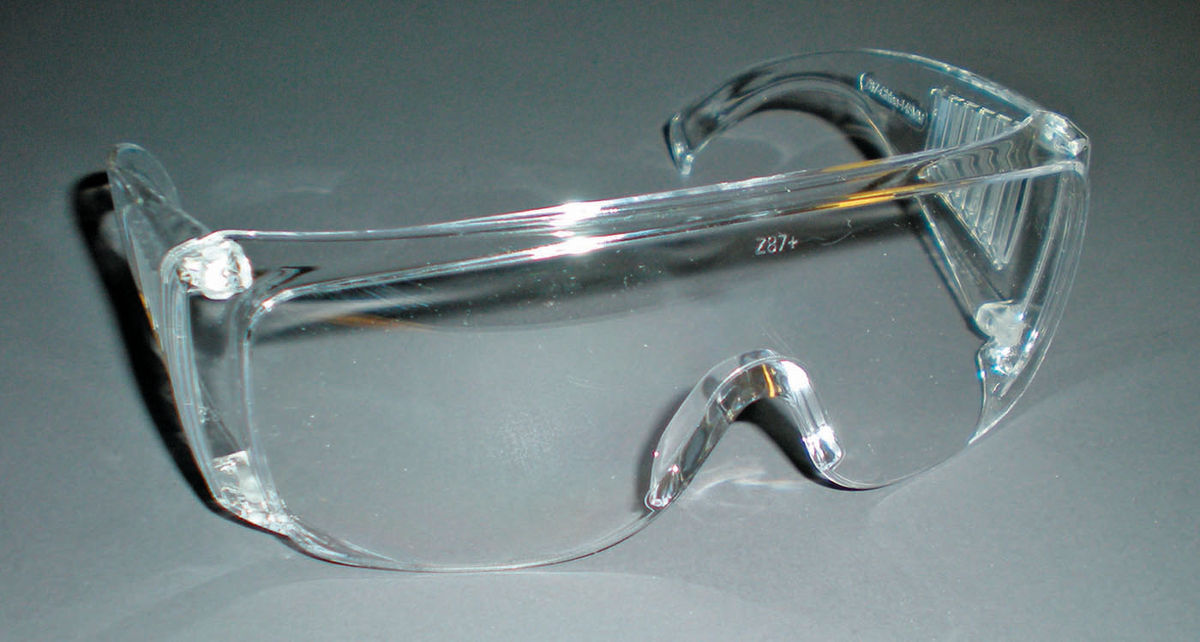
Safety glasses come in tons of different styles and are available in any number of tints, or clear. When looking through one catalog there were over 20 pages on safety glasses alone. Photo 1 shows a basic pair of clear safety glasses. These are larger than most because they are designed to fit over your daily eyeglasses. Their cost was less than $3.
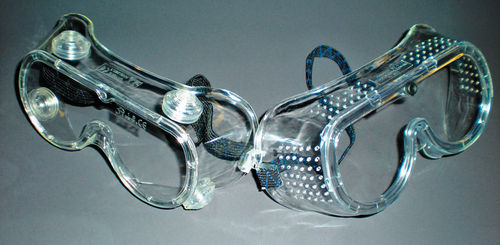
Goggles offer more protection but tend to be a bit less comfortable and have a tendency to fog, although anti-fog cleaners are available as well as goggles that are designated anti-fog. The basic goggle is offered in a “safety goggle” and another that is considered a “chemical splash goggle.” They look almost identical. The difference is in the way the lens is ventilated. On the left in Photo 2 is a “chemical splash” type, and to its right is a “safety” goggle. The “safety” style has many small vent holes, while the “chemical splash” has several special breather plugs designed to let air flow through, but keep liquids that might get splashed on it from entering. These are generally priced in the $3-$6 range, depending on where they are purchased, and whose name is on them. In other words, they are affordable enough that you can purchase several pair and keep each one stored next to the equipment that will require them. A few good locations would be next to the drill press, bench grinder, hand-held grinder and electric power drills to name a few. It’s a good idea to avoid hanging them up by the elastic strap. The strap will prematurely stretch if you do. If possible, try them on before you make a purchase. Some will fit more comfortably than others. I have found that some of the cheap pairs tend to dig into my nose.
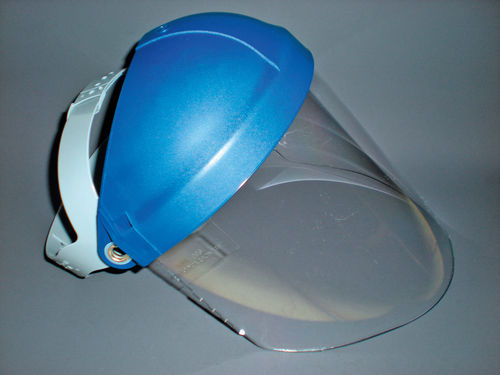
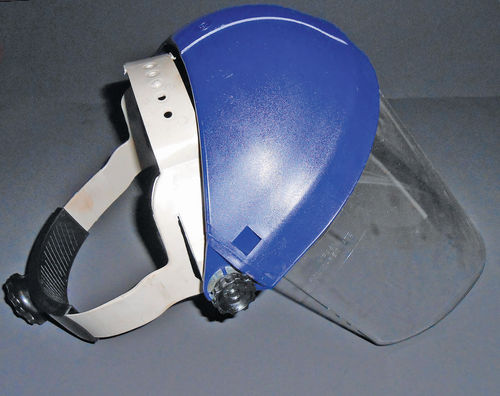
Full face shields offer great protection, however you should still wear safety glasses or even goggles underneath them. I purchased two like the one shown in Photo 3 at a home improvement center and both failed after a short time. To put it simply, the plastic headgear cracked on both. As a temporary fix JB Weld was used to repair the headband, but when the lens became loose, and would no longer stay in position, it was time for something better. Photo 4 shows the 3M “Tuffmaster” full face shield I purchased from Enco tools (use-enco.com). The headgear and lens were purchased separately and cost $25. The headgear is a ratchet type, with adjustable tension knobs for the flip-up lens. While more costly than the ones from the home improvement store, no doubt it’s a much better design, and the money was well spent.
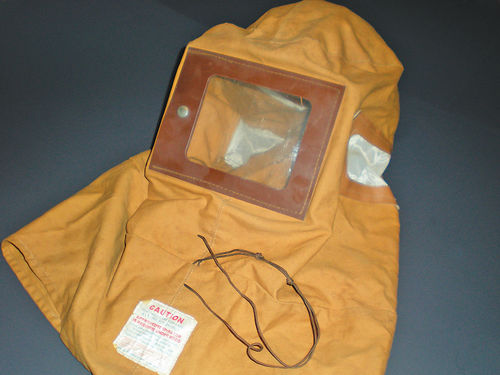
Sandblasting requires full head and face protection in the form of a sandblasting hood like you see in Photo 5. This type is considered for light duty, occasional use and should be used in conjunction with respiratory protection. They are available in several levels of quality and weight of material. The lens slides out for replacement when a new one is needed. They used to sell an optional mesh screen to place over the lens to extend its life, and possibly add a bit of additional protection; however I always found it difficult to work with. For full-time use there are hoods equipped with a fresh air supply. Northern Tool + Equipment is one current source for these hoods (northerntool. com). A Google search will show many other options as well.
Protect Your Hearing
Decades ago I worked next to a tire changer where a loud blast of air was constantly being used to help seat the tire to the rim. There was a price to be paid for this, and ear protection would have been a very smart choice.
Noise levels are measured in decibels or “dB.” OSHA (Occupational Safety and Health Administration, osha.gov) requires (for shops and industry) that hearing protection be used at 90 dB and higher. Some examples are: a table saw @ 93 dB, lawnmower @ 94 dB, impact wrench @ 102 dB and auto racing @ 130 dB.
These days I simply decide what’s uncomfortable for me, and for those tasks wear ear plugs. In my case that includes when I’m using an air chisel for tasks like exhaust work or possibly suspension bushings, grinding welds with a hand held grinder, and even using a cut-off wheel tool. Note, however, this is an example of my needs, and isn’t meant as a guideline for others. If there is any question, contact the manufacturer for the dB rating of the tool being used and then decide for yourself.
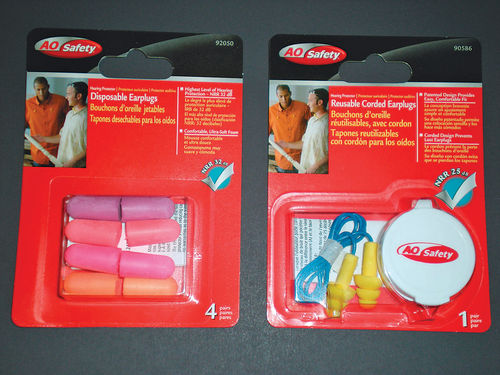
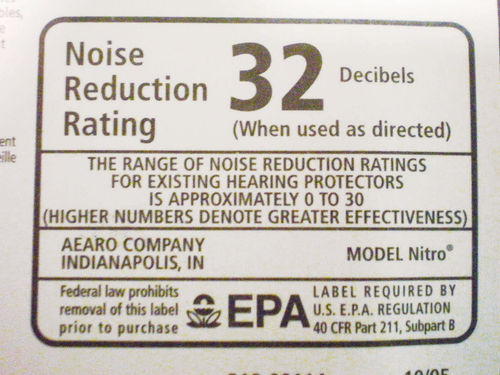
Ear protection comes in two basic forms — earplugs or earmuffs. Within each category there are again many variations to choose from. All are given an “NRR” (noise reduction rating). These ratings are determined in a laboratory environment, not a working shop, so the NRR rating serves best as a comparison between the many different products. Most ratings are from 21 to 33, with the highest number offering the most protection. Earplugs earn the highest ratings, but the earmuff design is not far behind. There are disposable foam earplugs (left side of Photo 6) that expand and conform to the shape of the ear’s canal. These are available in straight form, tapered or with grip rings. Some have installation stems so there is no contact with fingers, while others are connected together with a cord. Reusable earplugs are made from a flexible (silicone-like) material. A typical pair is shown in the right of Photo 6. These are rated at 25 dB (NRR), while the foam ones are 32 dB (NRR). Photo 7 shows the EPA rating on the back of the package. These two packages were priced in the $3-$4 range at the local home improvement center.


The earmuff style comes in different ratings, styles and colors, as well as ones that will connect to a “hard hat,” and even others with a radio option. If having something inside your ear bothers you, this will likely be your choice. If you work in a warm climate, however, keep in mind that earmuffs will make you feel warmer.
Breathing/Respiratory Protection
Grinding welds, sanding, painting, sandblasting, and welding certain metals are a few examples of situations where respiratory protection should be worn, and there are several variations and styles of protection.
A Disposable Style Mask/Respirator is similar in appearance to those you might see a doctor wearing in a hospital. Some may be simple dust masks, while others offer additional protection from nuisance-level gasses and vapors. Check the manufacturer’s specifications for what a particular mask is designed to do. In one catalog, 3M listed 18 different “particle” masks, and over half of those were also listed for nuisance-level odor protection. These are lightweight to wear, and some are designed with a one-way valve to allow air to escape when you exhale; others even have adjustable straps. The most basic particle masks run about $14 per box of 20, while some can run as high as $12 each. These masks are all assigned a rating by NIOSH (National Institute for Occupational Safety and Health, (cdc. gov/niosh). Their website will supply a more detailed definition of their ratings, but here is a quick reference: The vast majority of particle masks carry a rating of “N95.” There are three different prefixes used, and “N” indicates “not resistant to oil,” or it won’t handle oil vapor. The number following the letter is its efficiency rating, and there are three levels. The “95” indicates it’s at least 95% efficient. The efficiency rating could also be rated a “99” or even “100” (which actually is considered 99.97%). The two other prefixes to be aware of are “R,” which is “somewhat” resistant to oil, and “P” which is strongly resistant to oil.
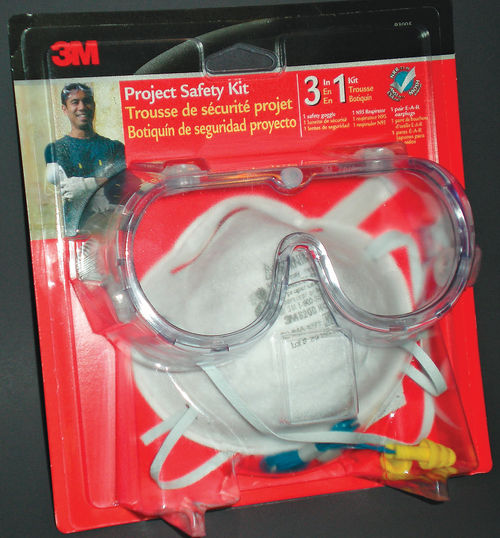
Photo 8 is a basic kit marketed by 3M and includes a pair of “chemical splash/ impact goggles,” “reusable corded ear plugs” that are rated 25dB (NRR), and a “sanding and fiberglass respirator” rated N95. This was purchased at my local home improvement center for around $8.
Cartridge-Type Respirators most of ten are designed with replaceable cartridges and filters. They are available in full- and half-face mask designs as well as small, medium and large sizes. The full-face mask is rated at a higher level of protection and offers your eyes protection as well. Beards can pose a problem, however, due to the inability of the mask to seal against your face. I have a beard and have found that the “positive pressure” supplied air respirator (covered later in the text) works best for me. Check with the manufacturer for its recommendations.
There is a wide selection of cartridges & filters available for the different vapors and gases you might be exposed to either in welding or painting. Photo 9 shows a prepackaged combination sold at a local home improvement store and labeled “paint spray respirator.” It includes a 3M 6000 series half-face mask (large size); their #3MR 6001 cartridge for organic vapor; pre-filter #3MR 5P71 (rated P95); & the pre-filter retainers #3MR 501. It cost just under $30. Note the package is stamped with a “use-by” date, as these cartridges don’t last forever. Once the package is opened you will find the cartridges are sealed in a foil pouch which is again stamped with the same use-by date. Wait to open the sealed cartridges until you are ready to use the respirator.
When not in use it’s a good idea to wipe off the respirator, allow it to dry completely and then store it in a plastic bag, or even a large “Zip-Lock” bag. Remove as much air as possible before sealing the bag. This will keep trash from finding its way into your respirator, and might benefit the cartridges as well. A final note, if you work in a climate where it is hot year-round, think about storing the mask in an air-conditioned environment. A constantly hot shop environment will shorten the life of both the mask and its elastic straps.
When dealing with suppliers such as Airgas (welding supplies) you can purchase the mask and all the components separately, allowing you to choose the cartridge and filter combination you desire for about the same price as the home improvement center. As you may have noticed, the pre-filters are rated with the same NIOSH rating used for the disposable style respirators mentioned above.
While I have been referencing 3M, there are several other manufacturers to choose from, such as North (by Honeywell), Sperian and MSA. Check your local supplier or their websites for their selection of masks and cartridges.
Supplied Air Respirators (also known as a fresh air respirator). Usually an air supply pump is located away from the working environment where it draws fresh air through a filter and supplies it via a long hose to the respirator mask. This is the most expensive of the options, but is without a doubt an excellent one.
Photo 10 shows a unit called the “HOBBYAIR 1” system. This version is equipped with a 40' air hose (not shown in the photo) and a half-face mask. In the top of the photo you see the air pump. It’s not complicated. On one end is the power plug. Plug it in and it’s on, no switch that could accidentally be turned off. On the side you can see a garden hose-style thread. This is where air is discharged and the supply hose connects. On the other end you see a purple round disc; this is the intake air filter. To the right of the pump is the half-mask respirator. The hose connected to it extends downward and clips onto the black nylon waist belt. The belt has two functions, first it supports the weight of the supply hose when you are moving around and second it keeps the quick disconnect located where you can easily find it. The air supply hose may resemble a large garden hose, but don’t be fooled. It’s a heavyweight, reinforced hose so that it won’t collapse. The unit is manufactured in the U.S. and is available through Axis Air Group, Inc. (axispro.com). The price is $429. It’s designed for the hobbyist (as the name states) and is not NIOSH approved. I have owned the one you see here for over 10 years, and though I only use it for occasional sandblasting and painting chores, I have had no complaints. It supplies a cool stream of air to breathe comfortably.
They offer other combinations with a longer supply hose, full face masks, and even a unit to supply air to two masks at the same time. In addition they also produce a “PRO AIR” system which is NIOSH approved for those who would be using it in a commercial environment. When comparing, keep in mind that any NIOSH-approved unit would be expected to be more costly. If you Google “fresh air respirators” on the Internet, you will find other suppliers and even plans on how to make your own. The other manufacturers’ units that I viewed were more expensive than those offered by Axis, and as to making one yourself, that’s great, but only if you can do it properly.
For example, Jerry Christopherson modified some diving equipment to use for an air supply while painting his vehicle. The article, titled “Make a Scuba Respirator,” can be found in the September 2007 issue of AR.
There are a few other respirator options, but for the most part the above-mentioned are the most practical for the automotive hobby.
Hand Protection
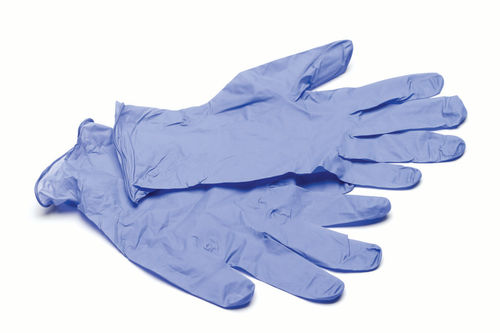
When working with solvents, paints, parts washers and chemicals in general, it’s always important to protect your skin from absorption. Even just to protect yourself from some of the grease and dirt, gloves are a good idea. There are many choices as you might expect. I will mention the different types and the different materials used.
Disposable Gloves — These can be made from Latex, Nitrile, Vinyl, Neoprene, or combinations of materials. A thin flock-lining is available in some gloves to absorb moisture. Options of powdered or powder-free are also readily available.
Latex — Some people may have an allergic reaction to Latex; it tends to tear more easily than other materials, and is not considered the most chemical-resistant.
Nitrile — It offers good resistance to most chemicals, is much more resistant to cuts and tearing, and would be considered by many as one of the best choices.
Vinyl and Neoprene — These also are good options. They, too, offer good chemical resistance, but don’t be confused by some of the thin vinyl gloves used in the food service industry.
Thickness — There are choices available when it comes to the material thickness of some gloves. Thickness is measured by “mils,” each mil being equal to .001". I found one manufacturer with separate thickness ratings for the cuff, palm and fingers. More typically a single rating is used for the entire glove. Most are in the 4-8 mil range. They commonly are sold in boxes containing 50 or 100 gloves, and available in various sizes. Disposable gloves can sometimes yield several uses per pair, or you may require several pairs before a job is completed. Prices generally range from $7-$20 per box, with the higher mil thickness gloves packaged in smaller boxes of 50.
Reusable Chemical-Resistant Gloves — Usually sold by the pair, and offered in similar materials as the disposable gloves. There are two basic styles:
Unsupported — Similar to disposable gloves, and are available in various thicknesses. I found them ranging from 13-30 mils. These are similar to what you might have under your kitchen sink for doing cleaning chores around the house. They offer mid-level dexterity and sensitivity. Not as much as the thinner disposable gloves, but they offer better chemical protection. The majority run around $5 per pair.
Molded or Supported — These gloves maintain their form and are not something you typically could wad up and stick into your pocket. The fingers are often curved for a more comfortable fit. These are the heaviest of the chemical-resistant gloves. They offer the best overall chemical protection, and are available in a smooth- or rough-textured finish. A gauntlet-style cuff is another option. Some use special liners to increase strength and puncture resistance; others may have an insulated lining. As you might imagine, these offer the least when it comes to dexterity and sensitivity. Price range is generally $5-$10 per pair, but some exotics like Honeywell’s “North Viton” gloves exceed $80 per pair. (If the Viton name sounds familiar, you may have seen it listed in a carburetor kit. It is often used on the tip of the replacement carburetor needle.)

To sum it up, when purchasing any gloves for protection against skin absorption of chemicals, the substance being handled must first be known. Then decide the chemical-resistance level needed versus dexterity. For the most part, as the level of chemical resistance increases, so does the thickness, while the dexterity of the glove decreases. Gloves are available through large import tool stores like Harbor Freight, but a much larger selection can be found through industrial supply companies such as Airgas (airgas.com). Their catalog has 20 pages of these protectivegloves. They offer their own brand, as well as many selections of each style from companies like Kimberly-Clark, Honeywell, Best, Ansell and Microflex. The manufacturer (and in some cases the supplier), can usually answer specific questions when comparing different gloves and their resistance to specific chemicals.
General Protection — Without going into any great depth here, I am basically referring to protection from cuts, burns and abrasions. This would mainly apply when doing rough, dirty work such as with the suspension and exhaust systems. In addition, protection when working around hot engine components is a concern. There are “tons” of gloves to choose from, far more than the chemical-protection type previously mentioned. Personally I find inexpensive cotton Jersey gloves excellent when having to work around hot exhaust manifolds, and split cowhide leather gloves get the job done when handling the rough tasks. Seeing as we’re not dealing with chemical toxicity here, simply find what is comfortable and yields the protection you feel is needed for the task.
Welding Protection
This may not be a concern for those who don’t do any welding, but you never know what tomorrow might bring, and it never hurts to have some basic knowledge.
Welding Helmets — Photo 11 shows the standard “passive” welding helmet and next to it is an auto-darkening. The passive helmet (left) is a “Jackson Shadow,” and comes with a fixed shade value. Shade #10 is a commonly used lens, however for my eyes I find #9 is better for doing light, low-amperage work like automotive sheet metal. This type helmet usually runs in the $35-$40 range. Auto-darkening helmets offer you the advantage of being able to see through the lens before striking an arc, so there is no need to swing your head to lower the welding helmet. This is very helpful when doing stitch welding where you are pausing slightly between welds, or when in situations where you can’t swing your head to lower the helmet such as when working on your back, under a vehicle. The helmet on the right in the photo is a Miller Digital Elite. It has an adjustable lens shade range from #8-13, as well as delay and sensitivity controls. Delay is the time it takes for the lens to switch to the “clear state” after welding or cutting, and Sensitivity allows you to tailor the lens to different light levels, in special welding conditions. X-mode is for welding outside in sunlight. This definitely improves performance, eliminating most “false” arc signals to the lens. This helmet also has a special mode with lens shade #5-8, useful for gas welding and cutting. Suggested retail for this helmet is $359, however it can be purchased for less. When it comes to cost you can spend more, or a lot less depending on your needs, and who makes the product. Both helmets offer the same protection for your face and neck against sparks as well as UV rays. UV (ultraviolet) rays are created by the arc welding process and will burn your skin, resembling the appearance of sunburn. In addition, protect your hair by wearing a welding hat underneath the hood. These are cotton hats with a short, “stubby” bill, and are worn with the bill to the rear, like a baseball catcher.
Personally I prefer to deal with well known manufacturers of welding equipment for all my needs, and especially when it comes to eye protection. Some of the cheap prices out there can be very tempting, and certainly pique one’s curiosity as to what they can actually give you for the price. But my choice is to cut back on something else and divert those funds toward a name-brand helmet. Again, this is just my own preference.
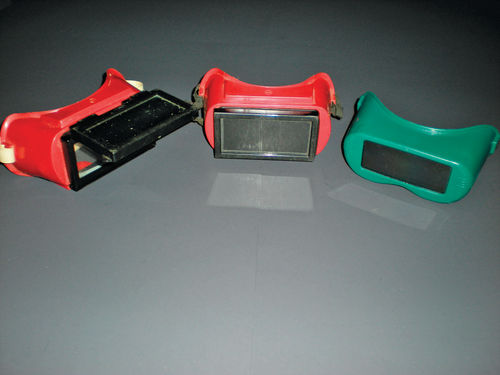
Goggles for Gas Welding and Cutting — While many of the newer auto darkening welding helmets include a special mode for cutting and gas welding, Photo 12 shows several variations of the more traditional welding goggles. They usually come equipped with a #5 shade lens. The green pair to the right is a rigid design, and has no venting. The lens can be changed, if needed, by removing a spring-type retainer inside the goggles. They are very light in weight at only 4 oz., and because of that, comfortable to wear
Manufactured by Jackson, the red pair in the center is vented and constructed from a softer, more flexible material, making them quite comfortable to wear. The lens frame slides off for a quick and easy lens change. These are, however, a bit heavier, tipping the scale at 7 oz.
The pair to the left is also manufactured by Jackson, with similar construction, but has a flip-up shade. These are a dual-function goggle. When the shade is up, you have the equivalent of safety goggles with a clear lens, handy for grinding. When you are ready to gas cut or weld, flip the lens down and you’re ready to go. The clear safety lens is replaced by sliding off the entire framework, while the filter/shade requires the simple removal of a spring clip for replacement. These are the heaviest of the three and weigh in at 10 oz. The price range is $10-$15 per pair.
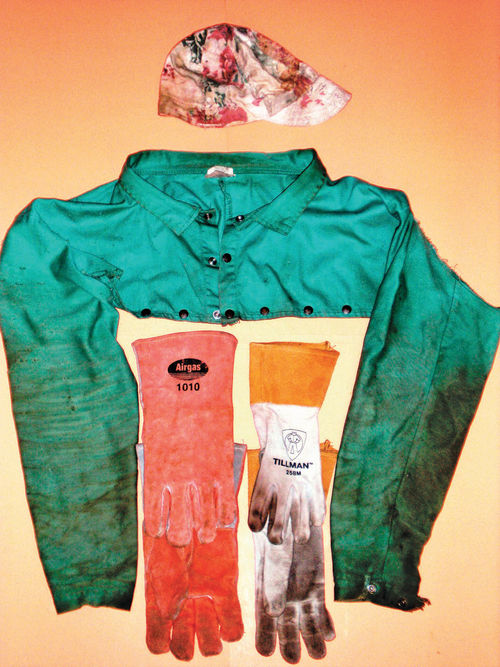
Protective Clothing — You must protect your skin during welding to avoid burns from both flying sparks and UV rays. Some good basic protection you probably already have would be a long sleeve cotton shirt, jeans and high top boots. Photo 13 shows some additional protection such as the flame-retardant cotton vest, hat and welding gloves. The vest covers only to your chest, but if you desire, a bib is available that snaps onto it. While the one pictured here is made of specially treated cotton, the same is available in leather. Leather offers better protection but is heavier and warmer. This needs to be taken into consideration, and weighed against the environment you are working in. Similarly there are aprons, jackets and “jump suits” for the same purpose. Choose the style that you are the most comfortable with and yields the protection needed.
The gloves you see to the left are typical thick welding gloves. They are available in cowhide, pigskin and Elk. Cowhide is probably the most popular and economical, but each has its pros and cons. The Airgas gloves pictured are cowhide and cost $10. To the right is a pair of TIG welding gloves by Tillman. These are made of deerskin. They are thin, soft and snug-fitting. These are great for both gas torch and TIG work, and are priced about the same.
Proper ventilation while welding is important. This can be as simple as welding outside, or next to an open window in your shop. Make sure if you are using a shielding gas in the welding process that the ventilation doesn’t create turbulence directly around your welding project, otherwise a poor weld will result. So if you’re welding outside in the open air, consider positioning your back to the breeze and your body will help shield the weld.
There is much more when it comes to safe welding practices, but that goes beyond the scope of this article. If you haven’t taken a welding course, or have been away from welding for some time, check with your local technical school. In my area they offered 12-week courses, with classes two nights of the week. The course I took had the first two or three evenings in the classroom and the remainder was all supervised in the shop. You will learn things about welding and welding safety that you wouldn’t likely find printed in a book, and it will enhance your welding skills.
A Fire Extinguisher
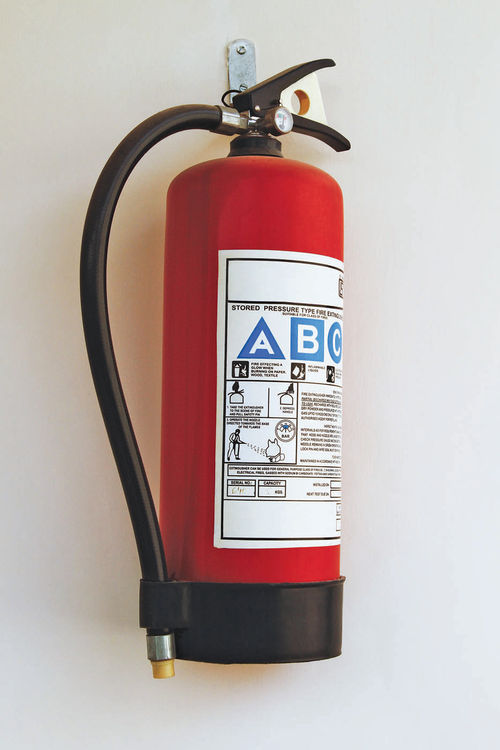
Whether you weld or not, having a fire extinguisher should be considered a must. Location is equally important so that it can easily be found in an emergency. Mounting by an exit door is usually a good location. Again, there are choices to make as to the type and size you need. Dry chemical, Halotron & Carbon Dioxide are all options. Choose a size that is easy enough to handle, but also large enough to extinguish a small shop fire. A supplier can help with advice regarding size and type. Extinguishers are rated by Class, either A, B, C or D depending on the type of fire they are designed to fight. The welding instructor from our local technical school shared an easy way to remember what each class stands for. Remember the word “POEM.”
Class of fire = what type material it covers
“A”= Paper
“B”= Oil
“C”= Electrical
“D”= Metal
Painting
This requires some of the items previously mentioned such as respiratory protection and gloves for sure, but depending on the size of the project fully protective clothing may also be needed.
Small jobs can be done out in the open air, but if they must be done inside your shop, work with an open window nearby. Depending on your project, you might need to construct a spray booth with ventilation. If that’s the case, see the article “Build a Portable Spray Booth” in the December 2006 issue of AR. It shows how to construct a booth from PVC pipe and covers ventilation, lighting, etc.
And, of course, check with your local government to be certain that spray painting is allowed in your area.
General Work Area Safety
Whether you are involved with a welding project or just doing routine maintenance on your vehicle, a clean, well-lit, and uncluttered work area adds to the safety and ease of a project. Avoid leaving oily rags, or open containers of drain oil lying around.
In commercial environments special containers with gravity closing lids are required for used rags. You don’t have to go out and purchase one of these containers, but at least create a specific container for dirty rags, and keep up with it. Always be aware of what’s flammable that’s in your shop or garage. If you rely on paper towels for cleaning up oil and grease, and then dispose of them in the garbage can, keep that in mind. When you have finished for the day, empty it, and/or remove it from the shop.
If your vehicle drips oil, clean out the drip pan regularly or consider using a Drip Trap Pad made by CPI Divisions (see Product Review January 2010 AR). This product is made from corn stalks and will absorb and hold oil. They also offer absorbing pillows for cleaning up spills.
Store paints and solvents all in one location in your shop, well away from where any welding might be performed.
Professional shops have an eye/face wash station in the event of an accident. Should an emergency arise you should certainly have running water within quick and easy access of your work area. I utilize an inexpensive laundry sink that’s plumbed in with the garden hose, but just a garden hose would do. If your garage or shop is a distance from your home, a basic first aid kit is a good idea.
Editor’s note, continued: If you would like to send in your thoughts and tips on shop safety, we’d be happy to share them with fellow readers.
Resources
• Airgas, airgas.com. Visit their website and enter your zip code in the store locater for the location nearest you. They offer welding supplies as well as safety items for respiratory,sight and sound.
• Axis Air Group Inc., axispro.com — 105 N. Rowell Road, Hampshire, IL 60140; . They are the manufacturer of the HOBBYAIR (fresh air supply) systems. They also offer turbine paint systems and protective clothing for painting.
• CPI Divisions/Clean Plus Inc.; cpidivisions.com; . The manufacturer of the Drip Trap Pad as well as other absorbing and cleaning products.
• ENCO, use-enco.com; . Suppliers of safety equipment, industrial supplies, tools, machinery, machinist tools and more.
• Northern Tool + Equipment; northerntool.com. Use the store locater on their website to see if there is a location near you. They carry a general line of tools as well as some safety and industrial equipment.
Regulatory & Safety Agencies
• OSHA —Occupational Safety & Health Administration, osha.gov
• NIOSH — National Institute for Occupational Safety & Health, cdc.gov/niosh
• NSC — National Safety Council, nsc.org
• AWS — American Welding Society, aws.org


