
Restoring Damaged Threads
Sometimes, Older Metal Threads Will Give Out When Stressed. Then It’s Nice to Have These Inserts on Hand.
Servicing the cooling system is usually uneventful, and is simply good routine maintenance, but this time there were a couple of bumps in the road for me. I first noticed that the upper radiator hose neck in my 1986 Chevy Caprice was starting to leak around the solder seam. Typically this isn’t a difficult repair, and most of the time can be fixed with a propane torch and some solder.
But being a charter member of the “lifetime warranty club” I recalled that this radiator had a lifetime warranty on it. On some things, like radiators, you can never be 100% sure if you are covered or not, as there are some “gray areas.”
This was an all-brass, USA-made, Modine radiator that was purchased from NAPA about six years earlier. Modine is a respected name in the industry and their radiators have always looked factory original and performed well for me.
That said, the only way to find out if it would be warranted was to bring it into my NAPA retailer, so I removed the radiator, grabbed the receipt and drove into town.
I was mentally prepared to wrestle with the sales clerk and argue my position, but that couldn’t have been further from what happened. He explained that he didn’t have one in stock, but could have it the following day. Wow, just that easy. He advised me to hold on to the radiator, and bring it back for the exchange the next day.
When I came back, the replacement radiator was sitting in the store in a box. But when he removed it from the box I couldn’t believe this radiator was for me. Plastic tanks were the first thing I noticed, which included a heater hose connection with a rubber plug/cap located above the transmission cooler connections on the right tank. There were “steps” in the radiator necks to fit various diameter radiator hoses and it had an aluminum core. Of course, it was manufactured in China and looked like a “one size fits none” if there ever was one.
When asked what had happened to the Modine radiator line, the clerk advised me they no longer manufactured automotive radiators. Reluctantly I returned home with it, telling myself it would be hidden by the fan shroud so it would be hard to detect this vastly different looking animal. I even tried to make myself feel better with thoughts like, “I won’t have to ever think about soldering any seams on this radiator.”
The installation went smoothly while all along the way I was thinking of my other options such as a Griffin aluminum radiator. It would take a boatload of money, however, and this isn’t a show vehicle, so they remained just that, thoughts.
Now What’s Leaking?
All seemed to be OK, but after a couple of days the faint smell of antifreeze along with a diminishing level of coolant in the overflow reservoir was noticed. I wasted no time in condemning the new radiator.
There was no evidence of leakage on the ground, so pressurizing the system was the next step in tracking down this small leak. To my total surprise, my pressure tester wouldn’t fit this new radiator. As shown in Photo 1, it will fit down into the neck, but its thicker plastic lip won’t allow the adapter to fit. While the radiator cap fits normally, this Stant tester will not. Certainly an adapter is made that will take care of the situation, but that was the last thing on my mind at this point. Ultimately the decision was made to drive the vehicle, and give it some time to let the evidence build up.
If I Just Tighten This Bolt…
As it turned out, (to my surprise) it wasn’t the radiator after all. Instead a small accumulation of coolant was puddled up next to the thermostat housing. The thermostat had been replaced during the cooling system service, but due to a slight distortion in the intake manifold mating surface a special thick gasket made by Fel-Pro (#35562T, fits GM V-6 & V-8, 1955-95) was used. This appears to have a foundation made of plastic, 1 ⁄8" thick with a raised silicone seal on both sides, and it’s applied without sealant. This will compensate for distortion in mating surfaces. I have used these gaskets over the years for this problem with total success. Maybe the bolts weren’t tight enough? Cautiously I choked up on the ratchet and applied light pressure, and that’s when I could feel the threads give out. Always being careful not to over-torque bolts, I didn’t beat myself up over it. After all, the aluminum intake manifold was over a quarter century old and mine weren’t the only hands to have ever pulled wrenches on this vehicle. Somehow, though, I still felt there was a conspiracy and that new radiator was the instigator! Well, maybe not.
A Need for Thread Repair
Heli-Coil thread inserts are the most commonly used means of repair, and they were put to use here.
This is how they work: The stripped threads are drilled out to a larger size, and then a larger-size tap is used to cut new threads.
A special tool is then used to thread in what looks like a tightly wound spring. This is the thread insert, and it reestablishes the original thread size.
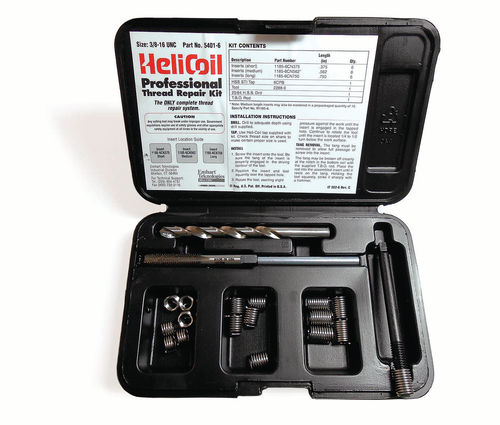
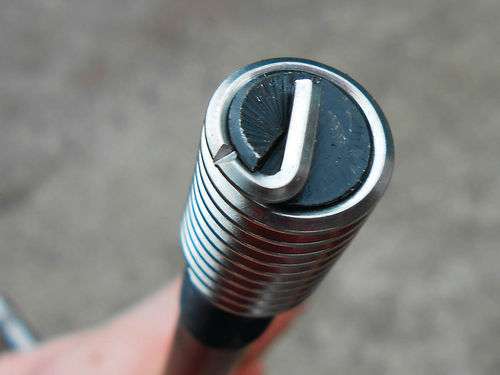
Photo 2 shows the kit used for this project. This kit is for 3 ⁄8"-16 thread repair. It includes the proper size drill bit, tap, special installation tool (shown to the right with an insert on its end), and a punch used to break off the installation tang. It also includes three different length repair coils. This was purchased through Enco (use-enco.com). I have had excellent working experiences with them, and they have a good selection of products to choose from. Of course there are many other suppliers out there as well and you might want to start by contacting Heli-Coil itself at emhart.com. Under Resource Center on the web site there is a “find a distributor” listing.
Preliminary Work
With the engine cool, the first thing to do is drain off some of the coolant into a container. You don’t need to drain the radiator completely; just enough to drop the coolant level down below the thermostat, but sometimes it’s easier to drain it all and not have to think about it.
Keep in mind that Antifreeze/coolant (ethylene glycol) is poisonous, and animals are attracted to it. If you plan to leave the project for a while for lunch or to make a parts run, secure the container in a safe place, or transfer it into a jug that can be sealed up. This will make it easier when it comes to refilling the radiator as well.
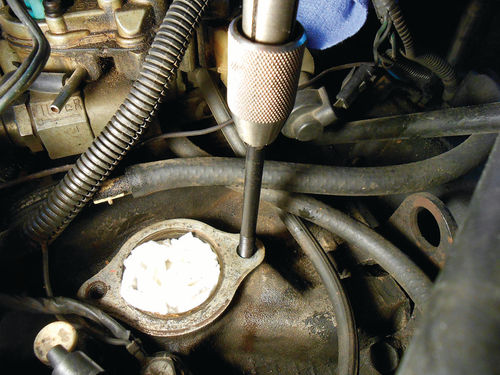
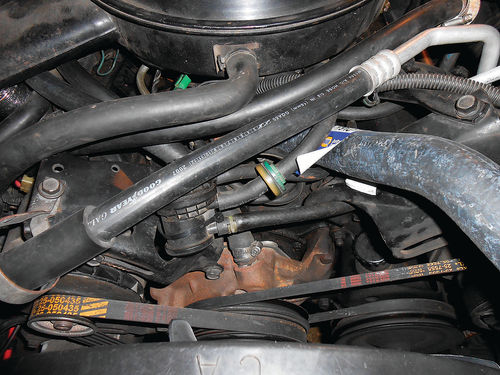
There are plenty of obstacles and hoses to get past before you ever get close to the thermostat housing as can be seen in Photo 3. Unless you are so familiar with the vacuum routing that you know each hose by name, it’s a good idea to tag and mark each hose and its connection, or draw a map that indicates what goes where. Not doing so could be a huge mistake. Trying to find vacuum routing for your specific vehicle usually isn’t as simple as it sounds.
Reach For the Drill and Eyewear
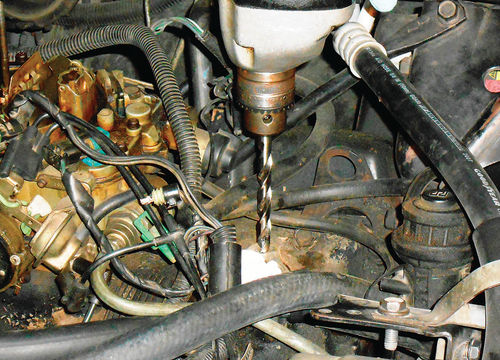
Once all is out of the way, and there is room to work, it’s time to drill out the old threads. Before going any further, make certain to wear eye protection during this procedure. Drill bits and taps can unexpectedly break, and there could be chips flying from the drilling and threading.
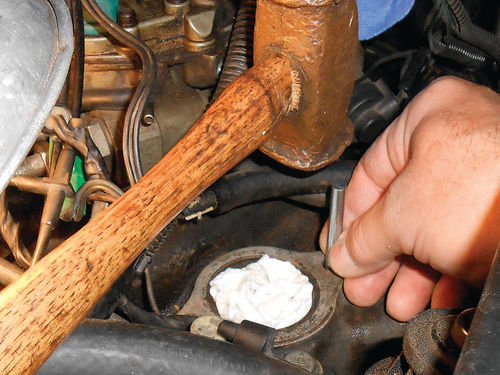
The 25⁄64" drill bit included in the kit was chucked up and the drill positioned squarely over the hole as seen in Photo 4. The fact that you are drilling through existing threads; the manifold is made of soft aluminum and there is only a minimal removal of material will all add up to making the drill pull quickly to the bottom of the hole. It only took a few seconds to drill, and then a shop vacuum was used to clean up the debris, both inside of the hole and out.
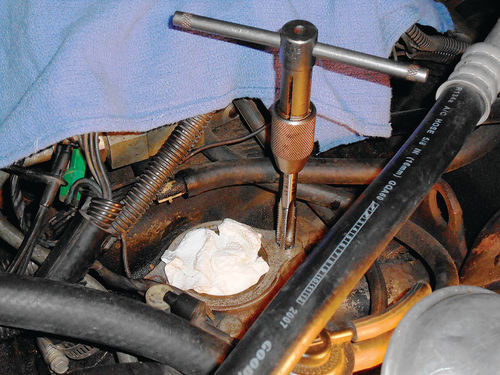
Next up is cutting the new threads. The tap is secured in a tap holder, lubricated with oil and positioned squarely in the hole.
Once it’s firmly established in the hole, slowly thread it in about one-third to one half of a turn, and then back up slightly to break off the created metal chip. This process is repeated until the bottom of the hole is reached. About halfway through, I removed the tap and vacuumed the accumulation of chips from the hole, and then threaded the tap back in to complete the threading (Photo 5).
If the tap should start to feel like it’s binding, back it out completely, vacuum out any debris, re-lubricate the tap and proceed again.
When finished, again vacuum any chips from the newly threaded hole. You could use compressed air to blow the chips out if you have no other option, but that can be dangerous. In addition to the potential for personal injury, especially to your eyes, you need to keep the chips from ending up where you don’t want them. So make sure your eye protection is on, and hold a rag over the immediate area to catch and contain any flying metal chips when using an air blower. Play it safe and also cover any open nearby targets like the throat of the carburetor.
Picking an Insert
Now it’s time to choose which length thread insert to use. It’s tempting to use the longest one that will fit, but there are things that must be considered. We are doing a repair on threads in a hole that has a bottom, so using an insert that is too long would make it difficult or impossible to remove the drive tang. This tang is broken off after installation by using a punch (included in the kit), and striking it with a hammer. There must be enough room for the tang to bend slightly and break free. Also, once the insert is installed you want the top of the threads to be slightly recessed below the working surface; about a quarter- to a half-turn is what the manufacturer recommends.
Taking all this into consideration, the ¾"-long insert will work fine for this application. If you’re working with a “through” hole, find the length that gives you the most threads as long as it won’t extend out the bottom.
Photo 6 shows the insert on the installation tool. The insert threads on the tool just as a nut would thread onto a bolt. Look closely and you will notice a notch in the coil to the left of the drive tang. This is where the tang will be broken off once it has been fully installed.
Installation is simple; the tap holder is again used and the tool is positioned over the newly threaded hole. It is threaded in clockwise until the desired depth is reached, ½-turn below the surface as seen in Photo 7.
Be aware that there is no backing up, so pay close attention while you’re working. Once it’s properly positioned, drop the punch into the newly installed thread insert and tap sharply with a hammer, which will break off the tang. Thankfully it doesn’t take much of a hammer swing, as space can be restricted (Photo 8).
The last thing is to remove the broken-off tang from the bottom of the hole. I tried the shop vacuum, but the tang seemed to get hung up on the insert. Ultimately I magnetized the tip of a miniature screwdriver and was able to remove it. Compressed air also could be used (carefully) for removing these metal chips as was mentioned earlier, and had the hole been a little larger a small magnet or tweezers would also do.
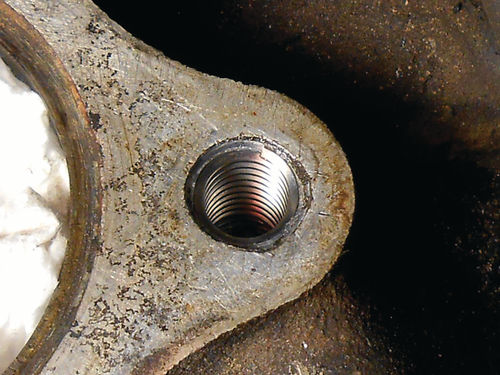
Photo 9 shows the end results. This is a sound repair, and is very hard to detect.
I repeated this procedure on the other thermostat housing bolt hole as well. The threads most likely were also stretched and getting ready to let go, so that was the time to take care of it. While you certainly wouldn’t do this if there wasn’t a thread failure, the threads created by the stainless steel insert will definitely out-perform the original aluminum ones.
All that remains is to replace the thermostat housing, hose and coolant, and check again for leaks.
In my case, the puddle of coolant on the intake manifold was eliminated.


