
Restoring a 1968 Triumph TR250, Pt. 2
It’s Time to Work With Coil Springs, Remove the Body, Restore the Frame, Start the Rebuild and Make the Dash Look Good Again.
The Triumph TR250 project started as a fix-up job, but by the time we took the radiator, engine, transmission and brakes off the car it had become clear that a body-off-frame restoration was the only way to go. And since we don’t do body work at our shop, Gunner’s Great Garage, our job was going to be focused on restoring the chassis, power train and interior of the car.
With work on the radiator, engine and transmission underway, the chassis rebuild became Job No. 1.
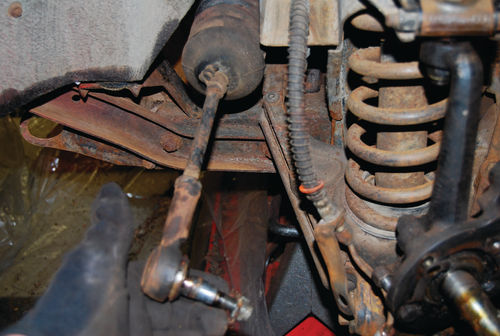
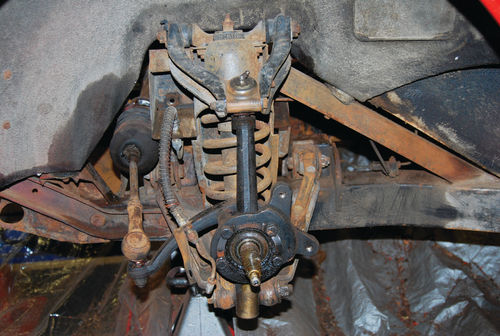
Up front we were dealing with an independent front suspension with ball joints, upper and lower A-arms, trunnions, stub axles (swivel pins) and tube shock absorbers (dampers). The steering was of the rack-and-pinion type. The TR250 also had independent rear suspension (IRS) with lever-action shocks and swing arms. Triumph fitted disc brakes up front and drum brakes at the rear.

Taking a car apart requires far less talent and patience than putting it back together. There is some heavy lifting involved, so make sure your shop has an engine hoist, several sizes of bottle jacks and a bunch of tie-down straps (the type used for cinching cars to trailers) readily available. You’ll need hammers and rubber mallets, different-size crowbars, some large wrenches (for suspension parts), large pickle forks for splitting ball joints, and an assortment of hand tools and power tools. C-clamps often come in handy, too. And brake tools for brakes.
Use Caution With the Coils
Taking the front suspension apart is tricky, since the coil spring compressed between the A arms is powerful and can become an “unguided missile” if you are not careful.
We ran a tie-down strap through the upper A-arm and under a floor jack. With the jack pad under the lower control arm, we unbolted the shock. Then we slowly lowered the jack, gradually decompressing the coil spring and dropping the lower A-arm to get the decompressed spring out of its seat in the lower A-arm. This works very well with the smaller British sports cars.
Remember that you want to take the car apart—not rip it apart. If you can save parts for re-use or even to serve as models for what you need, you’ll be better off than if you snap every bolt during the removal process. With old cars, there are many times when you’ll have an original bolt with no exact modern replacements available. Saving original bolts may allow you to make a duplicate of the old size or design, but if you don’t save the worn original, you’ll have no model to go by.
Lifting the Body
To remove the TR250 body you have to take out a number of fasteners that bolt it to the frame. Some of these have shims and pads under or around them. Remove the shims as carefully as possible and make a diagram of how many were used in each shimmed location. Having the engine and transmission out of the car made the job of body removal easier. The front and rear bumper brackets had to be removed. We decided not to remove the front fenders from the body tub, although some Triumph restorers prefer to take the fenders off.

When you pick up a convertible it is going to flex, which will throw off your door gaps. The TR250 body tends to sag at the rear. Many restorers weld temporary braces onto the body to support it in position. We ran tie-down straps from the rear to bracing under the cowl and cinched them tight to hold the position of the panels. (As it turned out, our precautions didn’t matter because the body man removed the straps and we had to adjust the door gaps when we reattached the body.)
We jacked the body up and then we mounted it on a wheeled Uni-Dolly device that clamps to the pinch welds. After that, three of us pulled the frame out from under the car and sat the body on a Backyard Buddy Easy-Access Car Dolly. This is a wheeled device with pieces of square tubing that can be set up various ways to support a frame at the front and rear.
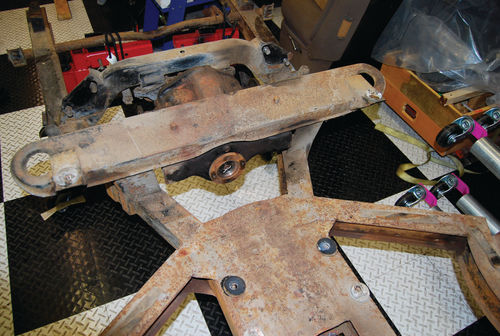
Turning to the Frame
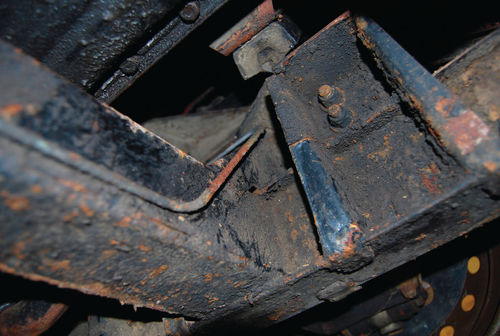
With the body off, the frame got our attention. The first thing you should do is photograph it, section by section, so you know where the various pads and hardware items should be placed or attached on the frame. The TR2 through TR250 Triumphs have similar frames and the TR250 though TR6 models use frames that are a bit different in design. All of these frames look very robust, but in some years there are characteristic weaknesses in the original designs.
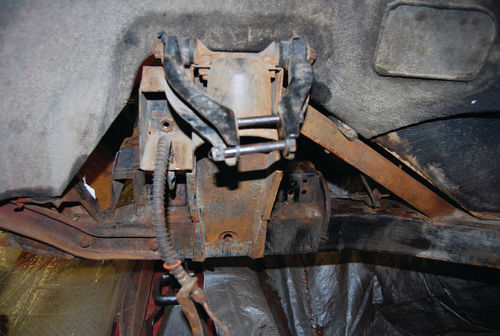
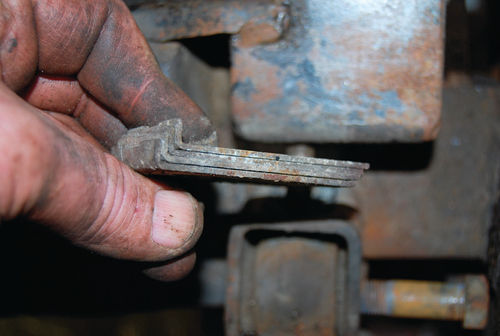
The frame under our car showed evidence of a previous repair on the fifth crossmember back that the differential hangs from. Up front, where the A-Arms attach to the frame near the spring tower, another crack showed up on the righthand side after we removed some crud and surface rust. Cracks in both places are common and parts suppliers sell reinforcement kits. On our car, the crack at the rear had already been welded, so we purchased the front reinforcement kit.
Unfortunately, parts suppliers don’t provide instructions with the kit even though the steel reinforcing plates are dished and have to be positioned properly before you weld them on the frame. As we found out, if you don’t do this, you can’t fit the attaching bolts. We then asked for instructions and the parts supplier sent some photocopies from a book. The instructions were not very clear and our experienced welder misunderstood them. We had to drill and cut the plates to get the bolts in.
An outfit named Roadtronics Automotive Technologies Co., Inc. (www.rat-co.com) actually manufactures new frames for TR2 through TR6 Triumphs. The frames are beefed up in areas where the original frame had weaknesses and are available with upgrades like mountings for rear tube-type shocks. The frames have visual differences from a factory frame, but they interchange perfectly with the original. If you’re building a car for the street (as we were) these frames are actually better, performance-wise, than an original Triumph frame. We didn’t know about this frame at the time we restored the original and beyond that, the appearance of the replacement is not 100 percent like the original (there are structural and appearance differences)… and it is not cheap.
What to Keep...and What to Replace
As we took the car apart, we organized the parts as carefully as we could. In most cases they were poked through old pieces of cardboard or strapped to chunks of cardboard with electrical ties. Then we could write assembly notes right on the cardboard. Other parts were stored in plastic bags or boxes. Even as carefully as we organized things, some parts got lost. Still, it is true that the better you sort and store removed parts; the easier things will go back together. Take lots of photos with a digital camera and keep a daily logbook. And remember…don’t throw away any of the parts you take off of the car; at least not until the restoration is done.
Once the car is apart, with all the parts organized and labeled, it’s time to start thinking about which parts can be reused and which you are going to have to replace. Most parts for these cars are available from catalogs, but sometimes it’s actually better to have the old parts rebuilt. This may cost less or more than buying new parts, but the quality of the older parts is a known factor.
Reproduction parts may be of good quality or they may be cheap parts made oversees in someplace other than England. Joining a Triumph club or Internet newsgroup can help you determine the quality of parts available because you’ll be able to benefit from other members’ experiences with various suppliers. We tend to prefer rebuilt brake parts, generators and starters, carburetors, distributors, transmissions, radiators, water pumps, lever shocks and oil pumps.
Try to make a complete list of the new parts you plan to order from catalogs. Why? Some suppliers offer free shipping on larger orders, so you can save money by placing orders large enough to take advantage of the free service. Secondly, if you wind up doing lots of small orders, your regular shipping charges will be higher than if you order a lot of parts at once. Ordering everything you need at once is preferable, but it’s not easy to figure out what you need and paying for it all at once might be difficult or impossible for some restorers.
Another good idea, if you have the option, is to go to a Triumph Club national meet where mail order suppliers are selling parts. In the middle of our project, we saw that the 2015 Vintage Triumph Register national convention was being held in our state. A company named the Roadster Factory from Armagh, Pennsylvania, was selling parts there and we saved a lot of money buying parts from them at the show (the-roadster-factory. com).
After ordering as many new parts as needed and sending other parts out to be rebuilt, we turned our attention to restoring some of the old parts. This involved cleaning the parts of grease, putting them in the media blasting cabinet to remove remaining dirt and rust, priming the metal and painting the parts. We trailered the frame to a sandblasting shop and they got it really clean. Then we bought a bucket of satin black Rust-Oleum paint and mostly rolled it onto the frame with a roller. Then we used a brush to touch up a few spots. It came out looking nice—not quite as smooth as powder coating—but a lot cheaper.
The Rebuild Begins
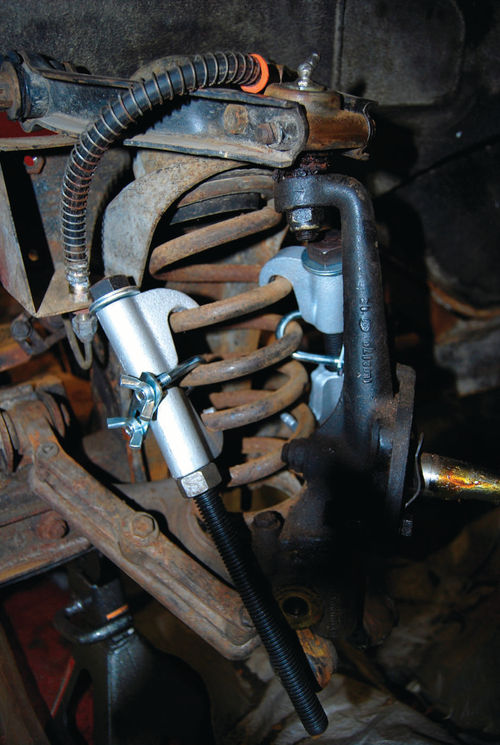
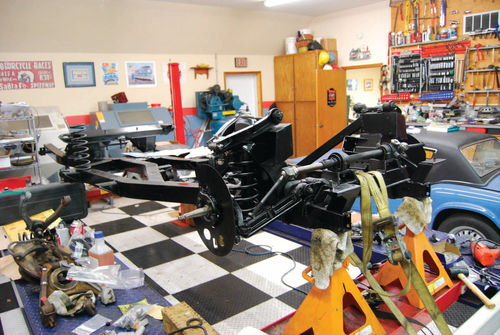
We started rebuilding the front end of the car. We mounted the inner ends of both A-arms to the frame attachments with new rubber bushings installed in the A-arms. An Eastwood external coil spring compressor kit was then used to squish the coil spring down to a length that could fit between the A-arms.

We repeated the technique of placing a floor jack under the lower A-frame and running a tie-down strap under the jack and over the upper A-arm. We pulled the strap tight and jacked the A-arm, then made the strap tighter. This was repeated until the ball joint (at the top) and the trunnion (at the bottom) could be positioned on the outer ends of the A-arms to “sandwich” the spring between the A-arms. Naturally, new rubber bushings were installed in the outer A-arm ends.
We did not like the first set of ball joints. They were of the permanently lubricated type and the swivel pins took a lot of effort to move. We tried drilling the tops of the ball joints and inserting Zerk fittings. This worked well on one side, but on the other side the hole somehow got too big even though we were very careful when drilling it and used the same bit on both sides and the same drill. The second one may not have been as strong as the first and a little more material came off or the drill might have snagged a burr and pulled on it a little. We then went online and found a supplier that sold ball joints with grease fittings in them and replaced the first set of new ball joints with these. Everything seemed to swivel better.
All of the front brake parts had been sent to Brake & Equipment Co. in Minnesota (brakeplace.com) for rebuilding or replacement. We installed newrotors, rebuilt calipers, cleaned up original hardware and refinished backing plates. The thickness of the brake pads was like new, so the car obviously had a brake job just before it was taken off the road in the ’80s. We roughed up the pads that came on the car and re-installed them. We installed the refinished steering rack with new rubber mounts and installed new tie rod ends.
At the rear of the car we removed the hubs, drum brake parts, axle half-shafts, lever shocks and shock links, the coil springs and the suspension swing arms. The wheel cylinders were sent to Brake & Equipment and the shocks were sent to Worldwide Auto Parts (nosimport. com) in Madison, Wisconsin, to be rebuilt with a lifetime warranty. Worldwide also supplied new shock links. The brake drums were turned locally and refinished with Eastwood brake parts paint.
The rear coil springs were easier to remove, since placing a jack under the large swing arms holds them until the compression is off. The important thing is to count the number of shims at each of the swing arm fasteners and make a diagram so that you can put them back the same way. Install new reproduction bushings and bumpers on the swing arms, put the shims back and then replace all of the other suspension and brake parts. Put new rubber boots on the half-shafts (these get wired in place) and button everything up with proper torque.
There was a pricey Monza exhaust system on the car and it was in good solid shape. We blasted all the pipes clean and refinished them with flat black exhaust paint. The chrome pipe ends at first seemed too far gone, but they looked good when we blasted and painted them. The TR250 came with a single exhaust and the Monza system splits into duals. Since we were re-installing it, we wanted the mountings on both side to match, so we fabricated a right-hand mounting.
While the body was off, we bent up a new set of brake lines (or “pipes” as the Brits call them). Automec sells pre-sized brake line kits for British sports cars that are made of copper-nickel alloy. This material looks great, won’t rust and can be bent into shape by hand without using a bending tool. Each piece is numbered and sized, but is straight or coiled. We used the old steel lines as a pattern for shaping the new ones. Automec also uses what’s called a Universal flare that seals with fittings that take either a bubble flare or a double flare.
Next, we installed the rebuilt engine, then attached a new clutch (using the proper clutch alignment tool) and the rebuilt transmission. After all of these drive train parts were bolted together, we replaced the short drive shaft. Up front, a new radiator went in, too. At this point, we were ready to drop the body on the car.
The Body's Back in Place... With One Mistake
The body came back from the body shop painted Viper Red. Again, four or five of us lifted the body and dropped it down, over the drive train, onto the frame.
John Diermeier of John’s Custom Auto in Manawa, Wisconsin, helped us shim the body so that the doors fit properly and the front fender-to-cowl gaps looked even. John got under the car when it was raised on the lift and adjusted the spacer plates and shims until everything fit well. It took about two hours to get all of the adjustments set right. We made one big mistake by leaving the old parking brake cables on the left side of the frame where they were pinched between the floor pan and frame. Luckily, we were somehow able to snake them out without having to loosen up the body bolts. Be careful not to do the same thing on your project.
We Really Should Have Checked the Heater
Now that the body was sitting back on the frame, we were ready to get down to the nitty-gritty. At this point the car looked pretty good and, if you asked us, we would have told you it was about 90 percent finished. However, the problem was that everything that now looked good had to work. Also, we didn’t realize how long it takes to work on what you think are going to be small details.
For instance, we’d never tried the heater. When we did, there was no electrical action. We removed it (not easy) and the motor tested out OK. It was the switch that didn’t work. Then, we discovered the baffles were “puffed out,” so we wound up taking the whole heater apart, restoring it and fixing the baffles. Then we had to do an equally difficult re-install of the heater under the dash.
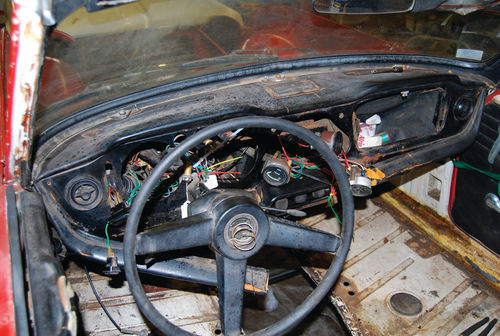
The car had no carpeting or upholstery when it came to us, but the padded dashboard and wood instrument fascia were in pretty sad shape. The console that holds the radio was missing and this is a structural piece! Luckily, the man who brought us the car still had it, but it too needed restoration. The steering wheel with no horn button looked sad, too. You could tell that this car had been stored outside for quite a while. It’s amazing that it didn’t rust away.
We removed the vinyl dashboard padding pieces and the fascia. We didn’t think that any of this was salvageable, but we actually re-used the fascia. We removed the gauges, carefully tagging the wires using electrical ties with specific color combinations that could be matched up for reassembly. We removed the heater ducts. We should have removed the heater at this point, but we didn’t. Doing it later made the job much more difficult. We didn’t remove the upper steering column or wheel, but we took off the black vinyl wheel spokes cover.
The vinyl pads for the dash were available in catalogs, but relatively pricey. We found a perfect used set at the British Swap Meet in Wheaton, Illinois, last March for something like $75. These pieces were not easy to remove, but patience paid off in both removing them and installing the replacement pads.
The original fascia had a lacquer clear coating that was yellowed and cracked. We lifted the coating off, piece by piece, with the edge of a razor blade. The fascia underneath the coating turned out to be in good shape, except for two spots. We tried filling the spots and staining overeverything. The stain looked great, but wouldn’t “take” on the two spots we had filled. We took it to a cabinetmaker and he fixed the two spots for $30. That saved us about $300 over the cost of a new fascia. We did stain it darker than the original, but it looks nice.
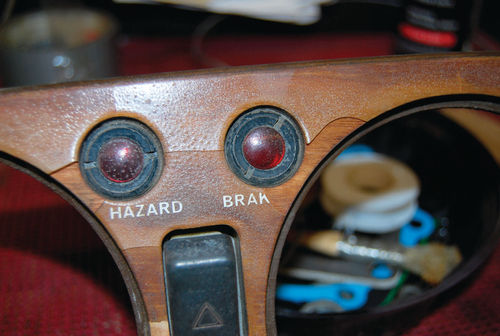
We removed all the instruments and controls. There was dirt inside most of them. We carefully pried off the rims of each round gauge, removed the old finish and painted them. We cleaned the glass lenses. A test showed that cleaning the gauge faces would remove the graphics, so we cleaned the dust with a computer keyboard cleaner spray and replaced the glass and rim on each gauge. We cleaned the vinyl radio “console” and the steering wheel spokes cover and re-dyed the vinyl black. A new horn spring and button made the steering wheel look new.
(In Part 3 we’ll talk about upholstery and carpeting, window hardware, chrome trim attachment, wire wheels, heating ducts, trimming the trunk…and some problems you don’t want to run into on your next project.)
Resource: Gunner’s Great Garage
E116 FuhsRoad, Manawa, WI 54949


