
Readers Respond
Who Has the Best Time With a Car? One Reader Has a Strong Opinion on That While Others Talk With the Writer of Our Spitfire Series.
I Can Answer Your Question…
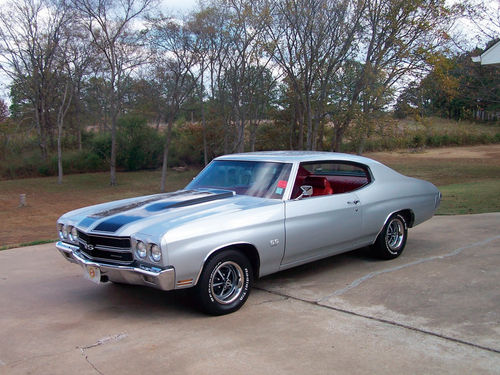
Ted, Loved your May Rearview Mirror column with the ’70 Chevelle SS. I could have been the driver of that car when you saw it, but I live in Mississippi. But to answer the question you posed in your column about who has the best time with a ride—the original or current owner—I can assure you that I have had the best time because I am the original and current owner. I purchased the car on Feb. 14, 1970. It is Cortez silver with black stripes, has a 4-speed, 350-horsepower 396 V-8, and is a bucket seat, nonconsole car with a red interior. It’s equipped with a positraction rear, A/C, power steering and power disc brakes up front. It has never been restored, just well kept and unmolested.
When I purchased the car I was a second lieutenant in the Air Force, halfway through pilot training, I was pretty sure my next assignment was Vietnam so I drove it like I stole it for the first year. Now, 47 years later, it still turns heads and gets driven at least weekly. This was the everyday family car for 20 years; it brought both of my sons home from the hospital and transported us all over the country during my 24-year military career.
Now it gets the prime spot in the garage. It really is a memory machine; every time I grab a gear the memories flow, and I feel like I’m 22 again.
Rob Cox Olive Branch, Mississippi
Triumph Spitfire Dialogs
Editor’s note: The ongoing restoration series by Bo Shaw regarding his ’76 Triumph Spitfire 1500 has brought a number of letters from British vehicle enthusiasts outlining their experiences. We forwarded one from reader Bob Foley of Mansfield, Massachusetts, to Bo and wound up with quite an exchange of information. Here it is:
Bob Foley: After following the series on the 1976 Triumph Spitfire restoration, a couple of ideas came back to me from my work on a Spit and GT6. Here’s something to consider with regard to brake lines. I replaced many of the lines on my Spit (if you are smart, just do them all at one time) and I have been using CuproNickel material. It costs at least 2-3 times what you pay for steel line but it’s easy to work with and I suspect it will never corrode. That’s probably not a real concern on a collector car but the ease with which you can form this stuff makes it worth the investment. Another thing I learned along the way is that the “English” (I guess Girling) fittings are not the same as typical brake line nuts and so forth. The flares are bubble flares that take a bit more finesse to fabricate and I think a purist will say are not “reusable.” In essence, to my way of thinking, the bubble flares are two-thirds of a typical double steel line flare. The CuproNickel line will easily take either.
Bo Shaw: The recommendation to use CuproNickel for the brake lines is new to me as I have always used either standard steel or stainless steel lines, and never had much success (i.e., none) in successfully forming or flaring either material. As discussed in Part 5 of the Spitfire series (June), I decided to go with pre-bent brake lines from Classic Tube, and ordered just the standard steel lines. The reasons for this were two-fold: 1.) I have demonstrated absolutely no talent for forming brake lines in the past, and related to that, 2.) I am working on a tight schedule to get this car done for my daughter in time for Triumphest in September. Standard steel brake lines are acceptable here in dry Arizona. I think that the upgrade to CuproNickel or stainless steel is a much better way to go in Mr. Foley’s New England environment.
Bob Foley: As far as the nuts, for the uninitiated, the business end that contacts the tube flare has what is equivalent to 6 or 7 threads-worth of non-threaded round surface. That end of the nut will actually flare a bit once the fitting is tightened. I am not sure if that is the design, but it does make the nuts hard to work with once you disassemble the fitting. One way I found that helps with reuse is to gently file that bottom round unthreaded portion with a fine-toothed metal file. It only takes going around the circumference a couple of times and I think you might accomplish the same result with some medium grit sandpaper. The idea is to only remove the slight flare that occurs with tightening. If you try to reuse these nuts without checking and removing the slight flare it can hang up on the female threaded portion of the fitting. If you are not real careful you can strip those threads. Here again a purist might not want to put those nuts onto a newly formed bubble flare but I have not had any issues once I cleaned up the ends. Sherco Auto Supply in Pompano Beach, Florida, has brake line material and nuts available (sherco-auto.com). I believe they may now have the “Girling” style nuts and fittings. The Federal Hill Trading Co. in Oxford, Massachusetts, (fedhillusa.com) is also a good resource for those components.
Bo Shaw: I encountered this very issue in trying to reuse one of the old brake line pieces. (The reason for this reuse is discussed briefly at the end of Part 4.) I had a problem getting the old nut on the brake line to screw into the new 3-way union, and I did notice while examining it that the nut appeared to be slightly flared. As noted in Part 6 on page 14 of this issue, I tried Mr. Foley’s suggestion with a fine-toothed file. It took more than a couple of turns for me, in fact it took almost an hour, but it did work!)
Bob Foley: Another brake line trick I learned from a restorer is to use solder wire as the “model” for the line you want to cut, form and replace. It’s easy to work with and it holds whatever shape you need to put into the brake line. And don’t forget to put the nut on the line before you make the flare. I don’t have to say why I add this reminder. Maybe a reader has a trick to always remember to do it?
Bo Shaw: I have heard of this solder wire method and have known several people to use it successfully. Unfortunately I bend brake lines so infrequently that I forget to use this technique. And, yes, I have forgotten to put the nut on before making the flare...
Bob Foley: The description of the rear axle bearing removal brought back some memories also. I welded up my own puller similar to the commercially available model and I was able to get three of four bearings off without a lot of fanfare. But number 4? I clamped the axle shaft in my vise and cranked the puller as tight as I could get it. My homemade version has a ¾-inch threaded rod so it can be cranked on pretty aggressively. After a number of unsuccessful whacks and cussing I soaked the taper with a good dose of penetrating oil and let it sit with the puller tightened up overnight. The next morning, with one solid pop from a two-pound hammer, the taper came right apart as easily as the first three.
Bo Shaw: I did try leaving the puller on overnight after liberally applying penetrating oil (Kroil). It did not work in my case and eventually came down to the use of brute force to remove the hub, but it is obviously worth trying.
Bob Foley: If the owner wants to do a bit of “customizing” on the rear suspension, there are C2 Corvette part number air shocks that many people adapt without much effort. A search of any Triumph owners’ site should turn up the appropriate part numbers and required bushings.
Bo Shaw: Thank you for the tip, but I have had a set of Koni shocks designated for the Spitfire sitting on the shelf for a couple of years now and they are going to be installed. But I will pass this on to other members of my Triumph club.
Bob Foley: A couple of winters ago I rebuilt the transmission. It really is a pretty simple, straightforward gear box and I don’t think you need to be an expert. I carefully followed a manual and it turned out OK. The syncros were pretty well worn on the original and with the rebuild, shifting is tight and smooth. You can get the parts for not a ton of money and be sure you include the parts for the shifter linkage. The only parts I wish I could have replaced were the forks. Mine had more wear than I like and I would not want to pound the shifter too much. Apparently the lube for the transmission is not readily available everywhere so if you change out that lube, be sure to get the right stuff. I forgot the details but the general idea is that newer, more commonly available formulations have additives that cause premature corrosion of the brass internal parts.
Bo Shaw: The Spitfire was not a driver when I acquired it, so I do not know the condition of the transmission although I do know that it does not have overdrive. Overdrive is very desirable in these cars as they can be very “buzzy” at highway speeds, something that I learned with my Triumph TR3A. Overdrive units for these cars can still be found but they are very pricey. In the case of the TR3A I instead installed a Toyota 5-speed manual transmission using the HVDA conversion kit (hvdaconversions.com). I will do basically the same for the Spitfire, using the Ford T9 5-speed conversion from Frontline Developments in the UK. (To be documented in a future Auto Restorer article.) The original Spitfire tranny is in the storage shed along with a TR4 transmission. (There may be a rebuild in its future.) I have been told by several sources to use GL-4 gear oils instead of GL-5 for exactly the reason stated by Mr. Foley.
Bob Foley: When I pulled the tranny, as noted, it was pretty sloppy and the throw-out bearing was starting to sing so it needed replacing. While you are at it, might as was well change out the clutch. Took some cursing for me to figure out the flywheel had to come off to get at the pilot bushing. If you never saw it done, a Spit transmission comes out through the interior after removing the passengerside seat. It’s a one-man job but it would be a lot easier with a helper.
Bo Shaw: Mr. Foley is correct and the Spitfire transmission can be removed via the interior. For my Spitfire I removed the front clip and removed the engine and transmission as a package. This method entails more work, and should definitely be done with a helper or two, but it does save wear and tear on one’s back. I will be reinstalling the Spitfire’s engine/transmission as a package once they are reunited.
Bob Foley: All this reminiscing has made me ready to get my car out on the road.
Bo Shaw: I agree. I think that I will take my TR3A out for a drive...
Editor’s note: Following is an exchange regarding the Spitfire project between reader Bond Hanson of Florence, Oregon, and Bo:
Bond Hanson: Read with interest Part 4 of the Spitfire 1500 project (March). Years ago I worked in an independent foreign car repair shop between working in Ford dealerships. The rear wheel bearings were the bane of existence, getting the hub off without trashing it was tough, and the factory part was $100 back then. Fortunately, there were a lot of Triumph Heralds with good bearings in the wrecking yards back then so we would get one, install a grease fitting, lightly grease it, and the Spitfire was back on the road.
Back then I said that I would never ever own one but now I have had a 1980 for a number of years. If you have one and the rear wheel bearings are still good but have the factory plugs in them, I would recommend putting grease fittings in them and giving them a shot of grease now and then.
Even more important is converting the undersized 3/8 in. wheel studs to 7/16 in.—it could save your life. You can check on Internet forums to get the numbers for NAPA and other brands that will fit without modifying the hubs.
Thanks for a great magazine.
Bo Shaw: I had not heard of this modification before and so did some research. The 7/16-in. studs are indeed recommended if planning to change over to wider alloy wheels with stickier tires. Most of the Internet forums I saw recommended acquiring a set of Land Rover Freelander 12mm studs, which are a workable replacement for the stock Spitfire studs. The Freelander studs have the correct knurl diameter, will not interfere with the rear brake cylinders, and are about half an inch longer than the stock Spitfire studs. The longer length makes them ideal for use with alloy wheels that have thicker centers than the stock steel wheels. Apparently, the Freelander 12mm studs are readily available for order from several sources in the UK and compatible lug nuts are also common. As I do plan on upgrading the Spitfire to alloy wheels, these larger studs seem to be a very sensible upgrade.


