
Replacing Seat Springs
When You’re Having Trouble Seeing Over the Steering Wheel… It’s Time to Invest In a Cushion—or Fix That Seat.
CARS AND HUMANS share a tendency—when they reach a certain age, things tend to sag. That truism was becoming apparent in both our Studebaker’s 56-year-old seat springs and my 83-year-old body. Of the two aging problems, the seat springs were considered repairable.
The effects of more than 70,000 miles of posterior extremities bouncing around on the driver’s side of the front bench were becoming increasingly apparent. So, a seat cushion was placed on the driver’s side to compensate for the indentations. Then, every few years, the quick fix solution was to replace the cushion with an increasingly thicker pad.
Time for a Better Fix
However, quick fixes usually are not good fixes, so a permanent repair was considered. The first item of business was finding a spring supplier. After a few phone calls, we stumbled across Snyder’s Antique Auto Parts in New Springfield, Ohio. (We figured this perfect symbolism, new springs from New Springfield, had to be a good omen.) After explaining the problem to them, they told me to take careful measurements and draw a sketch of the required replacement springs.
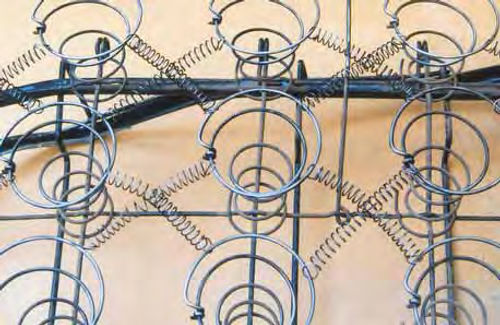
The car’s front bench was then pulled out and turned over on the work table. It was immediately obvious that the engineer who designed the basic frame had too much time on his hands—he had decided to make the frame as complicated as possible. A Rube Goldberg collection of fixed rods, rods with small coils formed into them as they passed under other rods and a wire grid were accompanied by springs in various sizes: big, medium, small and very small, running in every direction. In addition, stuffing and layers of burlap and cloth made up the rest of the package (Photo 1).
Looking Inside the Seat
As this article is about springs, the upholstery gets short shrift. But the upholstery and padding have to come off to get at the springs. The soft goods consist of, from the top down, upholstery that is hog-ringed to the outer frame, next is free-floating foam rubber (replaced about 10 years ago and still good) that’s held in place by the secured upholstery. Then burlap cloth that’s hogringed to the inner frame, and, finally, the bottom layer, a free-floating burlap pad interwoven with fine stiffening wires. The stiff burlap pad is held in place on top of the springs by the secured burlap cloth. Every make of car is probably different but the patterns are similar.
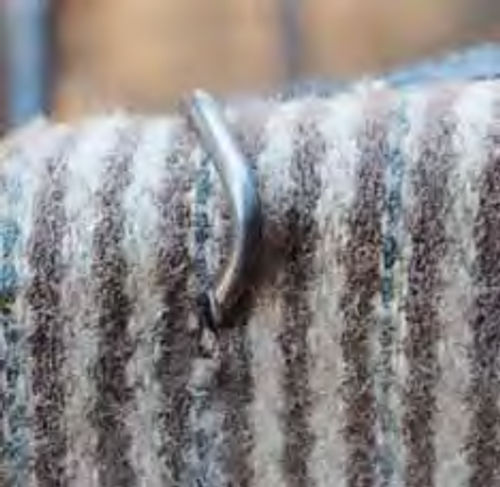
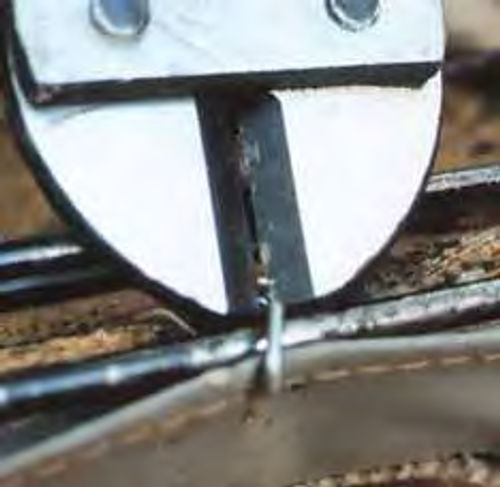
Photo 2 is a typical hog ring holding upholstery to the outer frame. When removing upholstery, do not try to open hog rings by prying, even with two good long-nose pliers, or you will tear the cloth. Use a small bolt cutter or a very heavy side cutter (Photo 3). Sometimes it is easier to cut the hog ring in sections. Remember that rough removal of hog rings will tear up old upholstery.
With the soft goods removed, all of the short coil springs that are placed all around the outside edges of the frame seemed firm. The six main coil springs in the center of the passenger side were quite stiff. But the six main coil springs in the center of the driver’s side were obviously soft. The very small springs that tied the top ends of the short and main springs together were reusable. If they are too stretched out, just clip off a coil or two and form a new end hook. Besides, there appeared to be at least a gazillion of the things.
Working from the top, all of the very small springs were removed from the top of one of the soft main springs. The next step was more-or-less unscrewing the base of the main spring from the bottom wire mesh to allow removal of the spring. Then simply repeat five more times to remove all six guilty springs (Photo 4).
Careful measurements and a sketch of the number of turns in the required main springs were sent to Snyder with the added complexity that there was a small hump very near the cut-off bottom end of the spring (Illustration 1). The bottom end of the main spring, being more-or less screwed into, over and under a cross hatch of wires, needed the hump to fit over one of the wires as an anchor point to keep the main springs secure from rotation while the very small springs kept the top-end centered. There must have been a better design somewhere in the world.
Snyder could make the springs, but could do nothing about the hump. Being brave, I ordered six mainsprings from Snyder and started looking for a pair of odd pliers, locking pliers, wire-bending tools or anything else that might solve the problem. In a tool box labeled “house tools,” there was a ceramic-tile breaker with eight-inch handles that had a perfect contour for the bottom anvil. But the top striker was too short, so a new and deeper upper striker was fabricated. With the newly fabricated striker, the tool was perfect and bent the required hump in some heavy test wire.
Spring Compression Testing
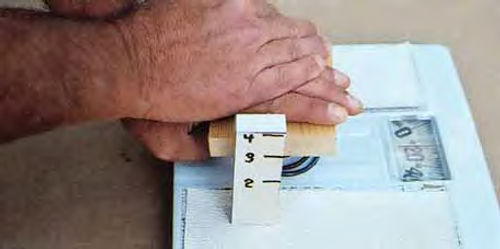
The new springs arrived and to make certain that they would do the job, they were compression tested against the original springs. A very “scientific” device made up of a bathroom scale and two blocks of wood did the job. Pushing the new springs down to the two-inch mark of the upright gave roughly a 22-pound reading while the old springs would read about 16 pounds (Photo 5). Everything was going as planned.
Trouble With the Wire
But then a serious problem arose. The wire was too stiff and hard, and the elegant special tool I’d prepared wouldn’t bend it. Seeking a possible solution, I called my kid brother Jim, a retired tool and die maker who also happens to be a heat-treating and metal-hardness guru.
Jim carefully educated me on the hardening of spring steel. His opinion was that no hand-lever contraption would ever dent the new wire. A special set of dies and a one-ton press would be better.
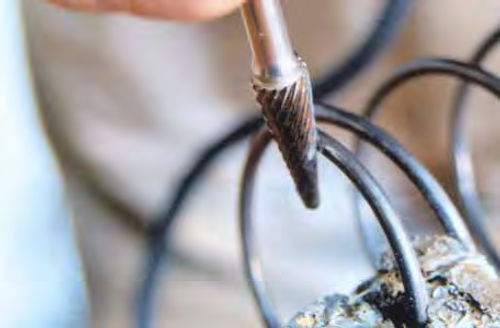
We discussed wire thickness; the new wire was visibly of greater diameter. Finding my electronic micrometer, it read 0.115 on the old spring and 0.135 on the new one. After relaying to Jim the dimensions and describing the function of the hump, it was mutually agreed that there was no lateral or torsional strain on the hump; it was simply an anchor point. It was also agreed that notching the new wire halfway through would not present a breakage problem and would provide an anchor point.
A high-speed die grinder and a carbide bit made short work of the new notches (Photo 6). The anchor notch was cut half-way through the wire.
Screwing the bottom of the new and now-notched main springs into the lower grids was easy as long as the correct path was followed. Looking down, call the front of the seat North. The insertion pattern was under the North grid wire, over the East, under the South, over and notched to the West. It only took a few minutes to replace the six main springs and connect all of the very little springs crosswise between the main springs. That took care of the mechanical repairs.
Hog Rings and Stuffing
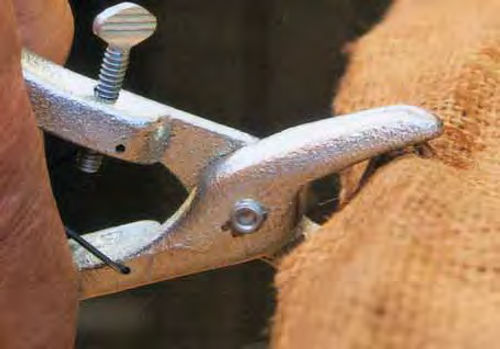
The next step called for the installation of the soft goods. With the seat rightside up, the stiff burlap pad went directly on the springs, then the burlap cloth that holds the stiff pad in place was hogringed to the inner frame. As shown in Photo 7, there are two sizes of rings. Use the big hog rings when attaching to thick rods and then use the small ones, called “shoat” rings, when attaching to wires and thin rods. Always use the special cupped pliers or you run the risk of the ring twisting and really tearing your upholstery (Photo 8).
With the frame right-side up, lay the foam and upholstery in place. Wrap a few cords around the entire seat, or use two people, as the seat has to be turned bottom-side up to replace the stuffing and hog ring the upholstery. To secure the now upside-down upholstery, first hog ring both front and back at the middle. Then, stuffing and ringing, work toward the ends. Turn the seat right-side up from time to time to check for a smooth surface.

No Need for That Extra Cushion…
Now, stand back and admire your handiwork for a minute or two. Then put the seat back in the car. Climb in…wow. You can actually see out the windshield without sitting on an extra seat cushion. And that’s no joke. Take a good look at the promotional pictures of those old Studebakers. One does tend to sit way down inside the cars.
Supply Notes
Hog rings are just what they sound like, they are inserted in the upper snout of hogs to keep them from rooting and tearing up the ground. Shotes are young hogs and they require smaller rings. Therefore, hog rings are a farm product and the necessary rings and pliers can be purchased at farm supply stores.
Resource
Snyder’s Antique Auto Parts
12925 Woodworth Road
New Springfield, OH 44443


