
Perfect Your Spray Techniques
Proper Spray Gun Positioning Is Crucial to a First-Class Job. This Will Show You the Best Ways to Aim & Move.
NOT LONG AGO I checked out a Corvette purportedly painted by a professional. The car had been sprayed a very transparent, heavy metallic, pearl red color. The color should have really popped on this car, but I have to say, the results were less than desirable and I hope the owner didn’t pay a lot of money for the job.
The thing about transparent colors that are heavy in metallic and/or pearl is that these colors have a tendency to “flop,” that is, to change from light to dark depending upon the direction of the light hitting the surfaces of the car. That can be a good thing if done correctly. The finish will appear to be one color when viewed at one angle and another color when viewed from an opposing angle.
This car apparently didn’t get the memo, as the finish was flipping and flopping all over the place.
It had light spots, dark spots, blotches that appeared to contain a high concentration of pearl, dry areas and runs…and that was from only one angle. This car was a rolling example of what not to do when spray painting.
The Importance of Positioning
After giving the car the once-over, I began to wonder if, in my spray painting articles, I’ve given enough emphasis to the techniques used to maintain a correct spray pattern as you paint. I also realized it might not be enough to emphasize the need for keeping the spray gun correctly positioned without better explaining why this positioning is so important.
Is spray gun positioning really that important? Only if you want to eliminate light spots, dark spots, dry spots and runs in your finish.
The problem I found when I began to write this article was in formulating a method that would convey the consequences of bad spraying techniques in such a way that could easily be understood and corrected. Then I took a cue from my grandson who had decided to paint his own bedroom and, based on that, I decided a spray gun wasn’t the best choice to display examples. A brush seemed a much better option.
OK, at first it may seem strange to compare a paint brush to a spray gun, but if you think about how the stroke of a brush looks when compared to the stroke of a spray gun, there isn’t much difference.
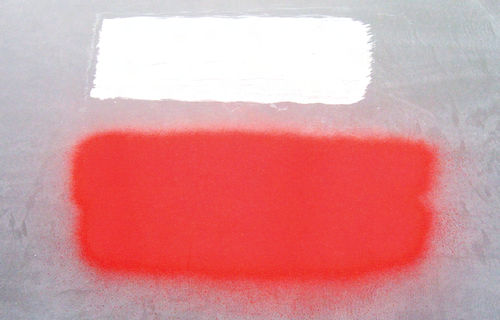
Consider how the single stroke of a paint brush looks on a surface when the brush is correctly loaded with paint, held properly, then moved at an appropriate speed across the surface being painted. You get a nice even layer of paint, no blotches, no dry spots, and no runs (Photo 1).
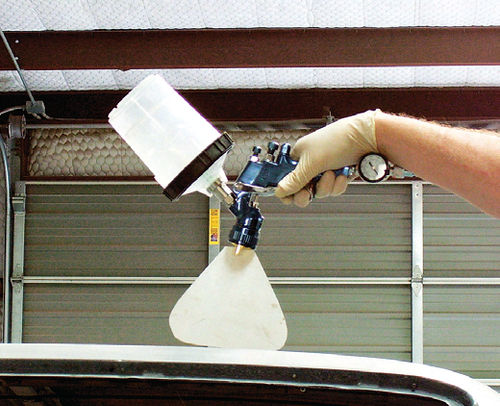
Now consider that same type of paint stroke using a spray gun. If loaded correctly, that is, the paint is reduced correctly, the gun held correctly, which would be six to eight inches from the surface, then moved across the surface at an appropriate speed, about one foot per second, you get a nice even layer of paint, not that much different from the brush stroke (Photo 2).


Don’t Start-Stop-Start-Stop, Etc.
Now, let’s go deeper. What you didn’t see was a brush stroke that stopped halfway through the stroke and started over. The result of doing that would have been a heavy concentration of paint where the two strokes overlapped.
It’s the same with a spray gun stroke. The stroke starts then ends. It should never start and stop then start and stop again. That would result in a heavy concentration of paint where the strokes overlap. What’s wrong with that? That is how you end up with light and dark spots, especially when spraying heavy metallic or high-pearl colors.
Recall that back somewhere, probably in my book “Revive Your Ride,” I mentioned you should never paint a fender, then the door, then the quarter panel on an assembled car because doing so leaves areas of overlapped color where the adjacent panels meet. That’s one cause of light and dark spots.
Are there other causes? Yes, so let’s get to those.
Consider working that same brush, loaded with paint, horizontally across a door opening with its various bends and contours instead of over a nice flat surface (Photo 3).
Notice the runs and the missed areas in the example?
The runs occur because the brush is going to bump into obstacles, such as the opening facing and the hinge plate, which will cause the brush to leave a heavy concentration of paint at those points. The missed areas show up because the brush stroke didn’t take into consideration the change in terrain, for lack of a better word, and, therefore, failed to reach into the deep bends and contours.
That’s a painting technique problem that can easily be remedied by first changing the direction of the paint stroke from moving across the door opening to working the brush vertically up and down with the opening and, second, by repositioning the brush so that its width is now horizontal to the opening. These two changes enable the brush to reach into the bends and contours and apply a nice, even layer of paint to the missed areas (Photo 4).
Reach for Your Gun
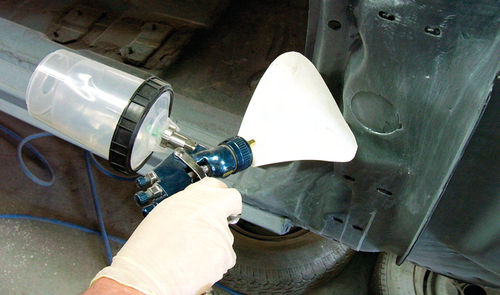
Now consider swapping the brush for a spray gun and painting the same door opening. The same problem holds true. If you use the example in Photo 5, it is easy to see that making a spray pass horizontally across the different layers of the door opening with a vertical spray pattern will give you the same results as the brush. Paint is going to concentrate on the protruding surfaces and either completely miss the deeper contours and bends or leave them with only a light misting of color. Now think about how this is going to look if you are spraying that heavy metallic or high-pearl color. Can you say light spots and dark spots?
However, if you turn the spray nozzle from a vertical spray pattern to a horizontal spray pattern as shown in the example in Photo 6, then alter the spray stroke from horizontal to vertical, like with the paint brush, you improve the coverage and eliminate the light and dark spots. You also very much reduce the possibility of getting runs.
It’s that simple act of turning the spray nozzle from a vertical spray pattern to a horizontal spray pattern then adjusting the direction of the spray movement from horizontal to vertical that changes a difficult area to paint into an easy-to-spray, well-covered area that is going to look right no matter how the light shines on it.
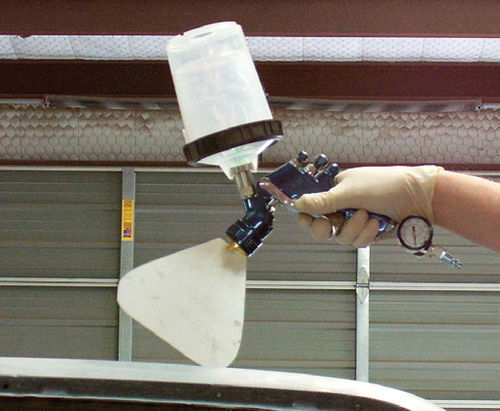
Don’t Dump Your Cup
While I’m on the subject of spraying a difficult-to-cover area like this, I have to admit that I have been known to take the lazy way out and rotate the position of the spray gun like the example in Photo 7. This is the fast and nasty way to alter a spray pattern. But before you get lazy, consider what happens to the contents of the cup when you do this. First, if the cup is full, you run the risk of having the cap pop off and dumping paint all over your shoes.
Second, even if the cup isn’t full and the cap stays on, you still run the risk of clogging the vent opening in the top of the cap. That results in a vacuum forming inside the cup and that stops the flow of paint through the spray gun. How long does it take to not be lazy and give the spray nozzle a quick turn? It’s certainly less time than it takes to clean up spilled paint or unclog a vent opening.
Avoid “Tiger Stripes” on the Roof
Now let’s go back to the flat surface I started with, a roof panel. If there ever existed a panel that’s prone to being slighted when it comes to achieving good paint coverage, this is it. After all, the very nature of the beast dictates the need for reaching the spray gun way out away from your body to lay down a spray pass while at the same time concentrating on not touching any part of the car with your body or the air hose.


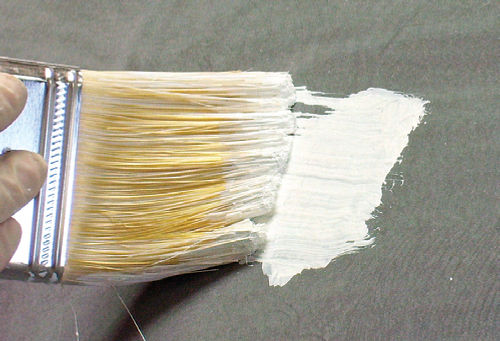
Once again, let’s pick up the paint brush to see what happens if you have to lean way out to make a paint stroke (Photo 8). Notice how the bristles of the brush lean at a roughly 30-degree angle? How much coverage is being achieved out on the far edge of the brush (top)? How much coverage is being achieved on the near edge (bottom)? Let’s go for not much coverage on the far edge and way too much coverage on the near edge.
Now think about exchanging the paint brush for a spray gun and still attempting to reach out as far as you can to lay down a spray pass (Photo 9). See the correlation between the paint brush and the spray gun as far as coverage is concerned? The upper part of the spray pattern is directing paint out into the air while the lower part of the pattern is directing paint onto the panel. That’s lousy coverage.
If you are spraying a heavy metallic finish here you won’t get the light and dark spots I talked about previously, instead you will end up with what we call “tiger stripes.” Generally speaking, these are caused by the excessive buildup of paint, which will be along the near edge of the spray pass because that is where most of the paint is going, and a lack of paint along the far edge of the spray pass.
Technically speaking, “tiger stripes” are caused by the metallics in the thick build-up of paint along the near edge of the pass failing to orientate themselves within the paint layer. Instead, they are laying flat. That will cause that part of the finish to be darker than it should be.
Out on the other side of the spray pass the metallics can’t orientate themselves because the finish was applied way too thin and will dry almost immediately. That will leave the metallics standing straight up. The result will be an almost silver appearance along that line because the standing metallics will reflect the light hitting them.
What if you are spraying a high-pearl or solid color? You may still get the “tiger stripe” phenomenon, especially with the high-pearl color. You will definitely get streaks of dry color. Either way the finish isn’t going to look very nice.
What’s the solution? It’s the same as with all of the problems I’ve mentioned here. The spray gun must be held so that the full width of the spray pattern is being applied. Normally that would be absolutely perpendicular to the surface being painted, or in the worst case, within 10 degrees of perpendicular as demonstrated in Photo 10.
That’s pretty easy to do when spraying areas such as the door opening I showed you earlier, or when spraying the sides of a car. But what about getting that perpendicular spray gun placement when spraying a roof panel? I wish I had a magic bullet here, but I don’t. All I have is a few suggestions as to how you can get the roof panel closer to you while minimizing the risk of touching the car with your body or the air hose.
Ways to Approach a Roof
Got a rotisserie? Certainly this is the easy way out. All you have to do is rotate the body and paint the roof of the car while it’s still on the rotisserie. I used this trick to spray the huge roof panel on Project ’46. I turned the car and sprayed the roof the same way I sprayed the side panels, gun perpendicular, no reaching and stretching.
No rotisserie? In that case, I position the vehicle as close to the floor as possible, bearing in mind the need to also spray the rocker panels.
That, of course, means you can’t get the vehicle too close to the floor. Why not? Even though we try to keep the spray booth clean, gravity brings everything down and the floor can’t help but collect dried paint dust. Bring a spray gun down close to the floor and you are bound to stir something into the air. And if it’s in the air, it might end up in your fresh paint.
How do you get a vehicle close to the floor? Try letting some of the air out of the tires or removing the wheels altogether and positioning jack stands at their lowest point under the suspension. That will help.
Or, you might try a little shop-made scaffolding. A couple of three-foot step ladders with a 2x12 between them can easily raise you a foot or so above the floor. That will also help.
Then there’s a trick I learned from a really short painter. He taught himself to walk on stilts; house painters do it all the time, and he eliminated his problem of having to stretch on his toes to reach the center of a roof panel. (Before you try anything this extreme, however, make sure you’re athletic enough to simultaneously balance on stilts and spray precisely…or you could wind up with a painting disaster and a potentially painful injury.)
Don’t Try to Rush It
Any other suggestions? Just a few. Loaded spray guns get heavy after a while. It never hurts to simply stop and give your arm a 15-minute rest any time you feel the need. Remember, strained arms become shaky arms. We’re trying to lay down paint here, not tap out Morse code. Finally, if it doesn’t feel right, stop. Find another way to hold the gun. Find another way to reach an area. Find the right stance and get comfortable. Quality takes time.
Got a question? Send it along.
Editor’s note: For a copy of Larry’s book, “Revive Your Ride, Secrets from a Body and Paint Restoration Pro,” visit autorestorermagazine.com or call 800-738- 2665 ($24.95).
Resource
LPL Body Works, LLC
5815 Contented Lane
Amarillo, TX 79109
Paint and body repair DVDs


