
Painting Simple Pinstripes
A Nice Stripe Along a Character Line Adds a Finishing Touch. So Be Careful When Masking and Buy Quality Tape.
WELL-EXECUTED PINSTRIPES can greatly enhance the impact of a vehicle’s paint job. The professionals and gifted hobbyists who free-hand complex pinstripe themes on cars, trucks and motorcycles are some of the most talented individuals associated with restoring and customizing. The intricate designs they produce are nothing short of astonishing.
So, let’s be clear about one thing—that kind of work is not what this article is about. What it is about is a way for the rest of us to make a straight or gently curving pinstripe or two or more on a personal project. This method is best suited to making a single stripe along a body-length character line.
One of the challenges of painting a stripe with the help of masking tape is the difficulty of spacing the two tapes equally distant from each other the whole length of the stripe. The method described here is one way to ensure a uniform line—essentially constructing a pinstripe template for a one-off project.
While it’s a bit more labor-intensive than just laying down two pieces of masking tape and painting between them, it works well and would be a quick, easily executed method for a single line.
One more thing before we start: I realize that plastic pinstripes are available in many widths and colors to suit most applications, but unless the original stripes on a vehicle were in tape and you want to exactly duplicate them for originality, I think paint just looks better.
Four In a Row
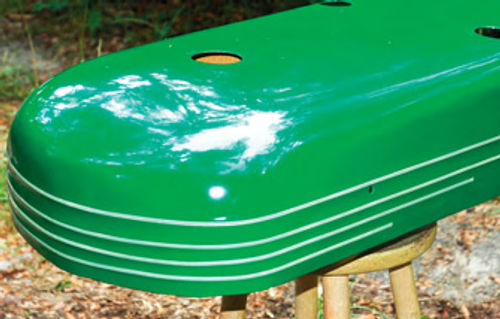
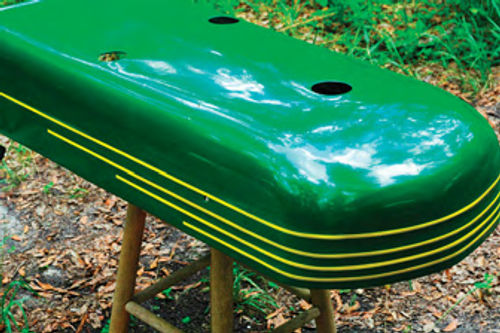
My demonstration project is the hood from a late-1940s Oliver-Cletrac OC3 crawler tractor. This hood is a bit more challenging than a single-stripe project in that it calls for four closely-spaced stripes. Along the bottom edge of the hood are four raised reinforcement/character lines that wrap around its perimeter (Photo 1). When I began restoring the hood for my brother, it was in very rough shape but retained remnants of original decals, paint and yellow stripes along each of these four ridges, so I decided to duplicate them on the finished hood. This hood also illustrates elements of Art Deco influence that was so prevalent in American car, truck and general transportation styling during the 1930s and ’40s. Photo 1 shows how the hood looked after I had finished all the repair and body work and had sprayed it in Oliver green enamel.
For this method of painting stripes, the first step is to locate high quality, fine-line masking tape of exactly the width of the intended stripe. I used 3M’s 218 Fine Line Tape in a three sixteenth inch (3/16”) width. This polypropylene tape is flexible, so it will easily take moderate curves, and it leaves very sharp edges. It is available in varying widths from one eighth (1/8”) inch up to at least three inches.
Start the tape at one end of the intended stripe, sighting along the length and laying it down in lengths as long as possible to avoid wiggles (Photo 2).
This can be a bit tricky, aslinesthat— on casual observation—appear arrow straight on vehicle sheet metal are almost always subtly curved. This hood looks simple, but the four raised character lines are not spaced equally from each other. Also not apparent in the photos is the fact that these character lines actually dip about a quarter of an inch where they wrap around the nose; they are not straight lines.
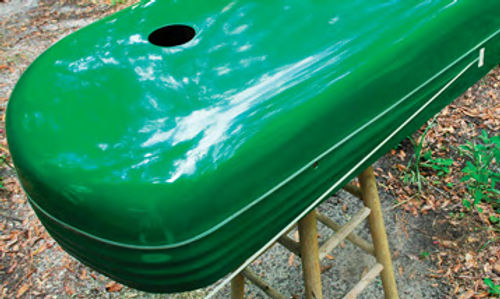
The finished pinstripe on your project will be exactly where you place this tape, so patience and care pay off at this stage. Formy project,I eyeballed carefully and followed the highest part of the raised ridges to lay down the tape. I used small vertical pieces of masking tape to mark the ends of each raised ridge. As they progressed toward the lower edge of the hood, each ridge was about eight inches shorter than the one above it.
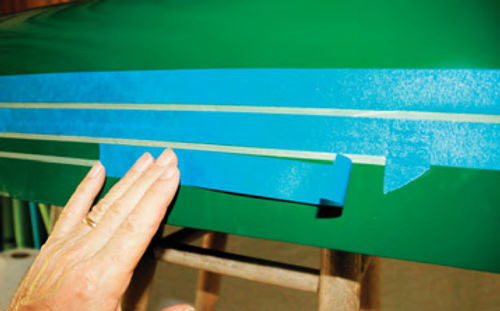
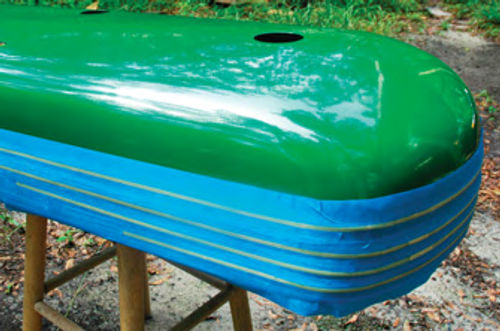
Photo 3 shows all four stripes taped. This is how the hood will look when finished except that the stripes will be in yellow. On your own project, you’ll want to decide how to end the stripes (square, round, pointed, etc.) and cut the tape accordingly. I decided to leave the tape ends square on this hood, as it seemed to fit the design.
Masking the Stripes
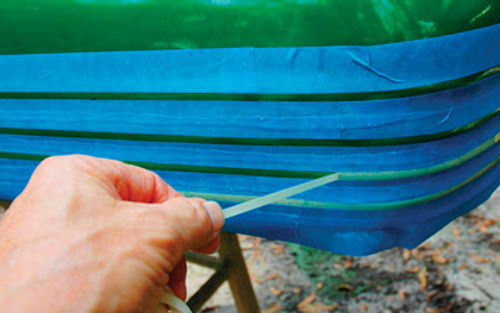
The next step is to mask around and between these stripes with a contrasting color of masking tape. I used an inexpensive blue hardware store tape on this project but would recommend a better quality poly tape. These generally are available in various colors from auto paint shops or various online sources. The tape I used for masking between the stripes left the edges a bit fuzzy in places when I pulled it off after painting. This masking step is as critical as the original taping in regard to final appearance. You need to tape very carefully so that the contrasting filler tape is right against the edge of the intended paint stripe but not overlapping. Tape a bit at a time, smoothing with a finger as you work (Photo 4). In Photo 5, all the stripes have been masked.
Lift Tape, Then Clean
Next, carefully remove the thin stripe tape, leaving the intended stripe area clear and ready to paint (Photo 6). You will also need to carefully clean the stripe areas with a cleaner/degreaser appropriate to your paint before painting, making sure you don’t lift edges of the remaining mask in the process. Q-tips work well for this. Finally, go over all the edges of the remaining masking tape, pressing lightly with a tack cloth to ensure that all the edges are sealed.
Should You Spray or Brush?
It is worth saying again at this point that it is better to use a good quality plastic automotive masking tape for masking between the stripes, as it will leave a sharper edge than the inexpensive hard ware store paper tape. I also used newspaper to mask over the top of the hood to prevent overspray before I sprayed my stripes. Painting the stripes with a brush is probably a better choice than spraying, however. You can control the paint in the narrow stripes and leave less overlap onto the masked areas, and thus be less likely to produce a fuzzy edge if your stripe paint is too thick or the masking seal isn’t perfect.
After painting your stripes, wait for them to dry appropriately (depending on the paint used) before carefully removing the masking tape/material, and you have the finished project (Photo 7).
The optional final step on my pinstriping project would be to wait for the enamel to fully cure, then lightly color sand the whole hood—with 2000-grit wet/dry paper—and then polish it, though this probably would be considered overkill for originality’s sake on a 1940s-era crawler tractor.
On my project, all the prep, masking and painting took three hours, most of that time being in masking around the stripes. A single stripe would take much less time.


