
Milt’s Tune-Up Advice
The Cracked Elbows and Line Were Clear Signs of Vacuum Leaks. But What Caused the Two Diagnostic Codes He Found?
ON THIS ’95 Olds the “check engine” light was coming on intermittently after its warm-up period. The owner commented: “The car runs great. We drove to Vegas (250 miles) and still had a quarter tank of gas. It also upshifts slowly when I let up on the gas. It passed its smog inspection a year ago. I changed the plugs and fuel filter just before the smog check.” The inspection shop commented, “This is a real clean car.”
About the Vehicle
This ’95 Olds is equipped with a 3.8- liter V-6 PFI (port fuel injection) engine with EGR (exhaust gas recirculation), HO2S (heated oxygen sensor), and a TWC (a three-way catalyst with oxidation of hydrocarbons [HC], and carbon monoxide [CO], and a reduction of nitrogen oxides, NOX). It also has SFI (sequential fuel injection—the injector squirts fuel toward the intake valve during the intake stroke in the spark firing order).
The odometer displayed 81,000 miles. That’s low mileage for a ’95 in 2008. However, it is 13 years old. “Stuff” does not stay new for 13 years.
A Complete Tune-Up Is In Order
What’s a tune-up? Is it just “get the codes out,” replace that code part and be done with it in an hour? Nope, that approach doesn’t work.
These days, a tune-up can include a visual inspection of vacuum lines, an oil change, new spark plugs and plug wires, a fuel pressure and flow check, injector cleaning, a fuel filter and an air filter.
I recommend that a computer “scan check” be performed last, reviewing the “data stream” values, and finally “getting the codes out,” if there are any.
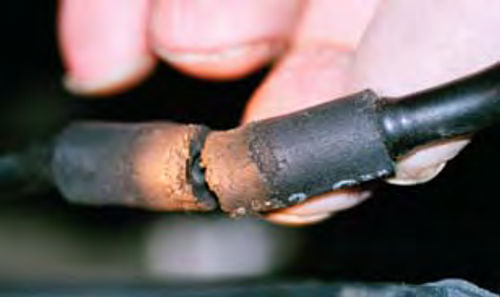
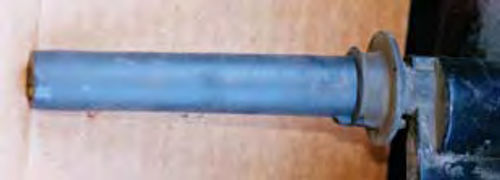
Vacuum lines: The vacuum lines were inspected. The rubber elbows located on the throttle body vacuum source ports had large cracks and had been repaired with rubber tape. The tape had since grown old and stretched, leading to moderate vacuum leaks. In addition, the vacuum line to the fuel evaporative canister was almost broken in two at a rubber hose connection in the plastic line.
The top elbow line on the throttle body to the evaporative canister was cracked. It had a “Y” connection to the fuel pressure regulator. The bottom elbow on the throttle body was also cracked and repaired with tape which had stretched, causing a moderate vacuum leak. This line goes to the vacuum-operated transmission modulator. (See Photos 1, 2 and 3.)
The vacuum source elbows and the tubing appeared to be the original. All were replaced with new parts. (There will be more comments later on these vacuum leaks as well as their cause and effect.)
Spark plugs: the plugs were replaced around 1000 miles prior to this tune-up. Inspection of one spark plug showed grayish inner porcelain. A normal color on this year vehicle (1995) is white. This grayish inner porcelain, which indicates a lean fuel mixture, was our first clue to other tune-up problems and/or a computer problem. The plug gap on this one plug was 0.070 inch with a spec of 0.060 inch listed on the under hood label.
We opted not to change the plugs. (See Photos 4 and 5.)
After startup we verified the plug firing voltage was 12 to 15 kilovolts (kv) at idle, 30 kv during snap throttle, and 52 kv at each coil (3), open circuit. No misfires on this distributorless ignition system.
Connections: When disconnecting computer controlled sensors, it’s good maintenance to spray the electrical contacts with Electronic Cleaner (part No. 1040) available at Car Quest Auto Parts Stores carquest.com). (See Photo 6.)
Fuel pressure: Right on specs! It measured 55 psi with the key on and 50 psi at idle. Upon snap throttle the fuel pressure increased to 55 psi. The specifications are 48 to 55 psi with the key on and 38 to 52 psi at idle.
The snap throttle pressure change proves the fuel pressure regulator is functional. It’s important to keep in mind that these measurements were performed AFTER repairing the vacuum leaks.

The fuel pressure specifications are listed in the Motor Information Systems Car Care Guide (motor.com).
Note that the VIN (vehicle identification number) code was “K” on our ’95 Olds engine. Fuel pressure specifications for other VIN engine codes are different. Always identify the engine to confirm correct engine tune-up specifications. In this case the VIN code K is the eighth digit in the VIN.
The fuel flow measured “about a cup” in 10 seconds of flow, plus the engine ran smoothly during this measurement. This level of performance proves the fuel pump and filter are OK.
Note: Fuel pressure and flow measuring kits with adapters for most vehicles are available from auto parts stores.
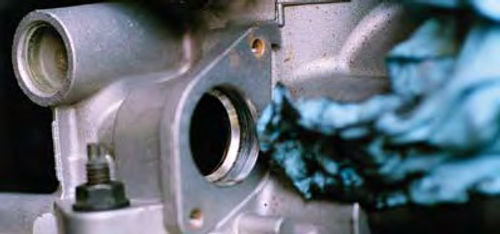
Throttle Body: The throttle body was removed for service. The throttle plate and adjacent throttle bore area were cleaned with solvent (paint thinner) on a rag. The throttle body was reinstalled using a very light film of gasket sealer.
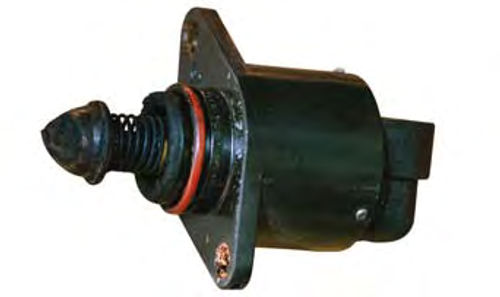
Idle air control: The idle air control (IAC) motor was removed from the throttle body. The IAC motor pintle was “carboned up,” possibly causing an idle surge. The pintle was cleaned with solvent (paint thinner) using a shop rag. The IAC orifice seat in the throttle body was also cleaned with solvent.
Note: The IAC motor mounting screws were lock tightened and difficult to remove. Do not let the Phillips screwdriver slip during removal. Buff and oil the threads before reinstalling. (See Photos 7 and 8.)

EGR: The exhaust gas recirculation valve is a pintle valve that is duty cycled by the computer when driving the car. Upon removal from the engine, the EGR valve had a very light carbon residue on the pintle valve tip. The EGR port was clean. The EGR valve was reinstalled with no service.
Fuel injector cleaning: The injectors were cleaned using a BG Product injector cleaning system and a BG injector cleaner kit (available through BG Products in Wichita, Kansas, bgprod.com).
The fuel pump electrical connector was disconnected. It is located near the fuel filter just in front of the right rear wheel on our ’95 Olds.
After installing the fuel injector cleaner apparatus, we introduced the cleaner through a small funnel, closed up the chamber, supplied shop air and adjusted the cleaner apparatus pressure to 40 psi (10 psi below the 50 psi idle pressure).
This results in all the injector cleaner going into the injectors instead of back to the fuel tank through the fuel pressure regulator and the fuel return line.
The engine started and ran at idle for 15 minutes on this injector cleaning setup. After 15 minutes it began to idle rough and detonate. The cleaner was emptying out of the injector apparatus. The ignition switch was turned off.
After we removed the injector cleaning apparatus and reconnected the fuel pump, the engine was restarted and we saw no fuel leaks at the fuel connector port on the fuel rail.
Using a stethoscope, we noted the injectors had a louder click compared to their operation before the cleaning. This means the injectors are now very clean, resulting in a very smooth idle.
According to the label on the fuel injector cleaner, the BG product cleans the injectors and removes intake valve and manifold deposits.
Computer Scan Checks
After all the tune-up items were serviced, the scanner check was last.
According to the under hood label, this ’95 Olds is “OBD I (onboard diagnostics I) certified.” It is equipped with an OBD II 17- pin diagnostic connector. Note: many 1995 vehicles are equipped with OBD I data streams and no OBD II emission monitors.
Codes: Two codes, 112 and 361 were stored. What is this? Code 112 is the air temperature sensor circuit located in the air filter. That had been disconnected. This was caused by turning the key on with the air temperature sensor disconnected. When we removed the air filter, a false code was set.
The 361 code is an ignition coil primary/secondary circuit malfunction. We had checked the coil voltage with an open wire, a plug wire removed from the spark plug. Code 361 was also a false code.
These two codes were “cleared” and did not return.
No other codes were stored. We had inadvertently “set the codes” (112 and 361) during our tune-up.
Scan data stream review: The tune-up related scan data were reviewed. The computer was commanding closed loop. The oxygen sensor voltage was varying rapidly from 50 to 800 millivolts (mv). The TPS (throttle position sensor) at closed throttle was 0.36 volts. The coolant temperature was 214° F and the MAT (air temperature sensor) was 107 F.

Note: The coolant high temperature (over 200° F) is normal on many vehicles. Some go as high as 235°. This is OK. Make sure the radiator pressure cap is good. Do not change the thermostat to a lower temperature.
The battery voltage was 13.5 volts with the lights on (charging) at idle.
The brake on/off switch and the shift lever switch were operating normally. The transmission fluid temperature was 207°. The AC switch showed on-off when turning on and turning off the air conditioning.
The spark advance was 18 degrees at idle and 28 degrees at 1200 rpm in drive. The idle air control (IAC) was at position 38 in drive and at position 54 with the air conditioning turned on. During this time the idle rpm in drive was holding around 675 to 700 rpm. The idle rpm held steady when turning the steering wheel. All this proved the idle control system was normal. Remember, we only cleaned the IAC motor pintle. (Note: IAC unit readings are listed in terms of “position.” As the position increases, more air is bypassed around the throttle blade to “hold” the idle rpm at specifications.)
The idle load was 31 percent and 53 percent at 1200 rpm in drive.
The MAF (mass airflow sensor) was 2 grams per second at idle and 6 grams per second at 1200 rpm in drive. The MAF reading increased to 25 grams per second during moderate acceleration on the road test.
The EGR duty cycle was 31 percent on the road at 30 mph cruise on the road.
Check Engine Light Concern
What happened here? With the scanner disconnected there was no check engine light.
During the road test, the driver reported “more pep” and a “better shift.” He also reported he did not have to “let up on the gas to let the transmission shift.”
And there were “no codes present” after the road test.
Vacuum leaks comment: Remember our repair of the vacuum leaks on both rubber elbows at the throttle body? One was to the transmission modulator and the other was to the fuel evaporative control system and the fuel pressure regulator. This condition causes a higher than normal long term fuel trim of 150 (128 is normal). This 150 means there is a rich correction (effect) for a slightly lean mixture caused by the moderate vacuum leaks.
During our road test, the short term fuel trim was varying from 125 to 130 (varying around 128 is normal). The long term fuel trim was continually reducing. It was 140 after the road test and eventually would reduce down to 128, which is normal.
I believe the computer strategy was causing the intermittent check engine light, yet not serious enough to “set a code.”
The intermittent check engine light was, apparently, just “warning the driver” that a problem existed. There were no “historical codes.”
Our Results and Advice
I recommend that you always perform a tune-up first. Pay attention to maintenance details. Service and repair tuneup items exactly to the specifications listed on the under hood label and in auto repair manuals.
Clean the fuel injectors and measure the fuel pressure. Test the oxygen sensor voltage and confirm closed loop operation with a scanner.
Road Test Results: More pep, better shifting, no check engine light, excellent drivability (no hesitation), better gas mileage, quicker startup and very low emissions.
Resources
“Tuning up Autos and Trucks” by Milt Webb
2005 Car Care Guide
Motor Information Systems


