
Makin’ Them Roadworthy Boost a “ New ” Vehicle’s Reliability
You’ve Just Purchased a Vintage Driver and Are Ready to Go. These Tips Will Help to Ensure an Enjoyable Ride.
IT’S A GREAT feeling to see the vintage vehicle that you just bought finally sitting in the driveway. You found, purchased and transported it. Now it’s time to relax and enjoy your new ride. The work is over, right?
Uh—not so fast.
At the risk of popping the bubble of euphoria, I suggest you now spend some effort, and an affordable amount of money, to improve the reliability and safety of your new purchase.
Even if you inspected the car carefully prior to purchase, there are many maintenance unknowns that you should check. And if you start with the presumption that the car has not been maintained properly for a long time, if at all, you will be accurate more times than not.
Heading Off Future Breakdowns
My reliability improvement plan consists of replacing consumables (fluids, filters, belts, hoses), plus checking and replacing, as required, the high-wear components (battery, ignition parts, tires, etc). These steps will eliminate the majority of the common causes for breakdowns. You will need to do this sooner or later, so why not do it in one project now?
Fluids & Filters
A good place to start is by replacing all the fluids and filters that probably have not been changed at recommended intervals over the years.
Unless you are certain that the engine oil was changed recently, replace it with good quality oil of the proper viscosity. Detergent oil turns dark after a short time in use so color is not a good indication of how old it is. Even if it looks clean, it may have been in the engine a long time if the car was stored. You will rest easier knowing that you removed dirt, moisture and acids that may have built up.
If The oil looks really bad, plan on changing it again after a few hundred miles to flush out more contaminants that will be put in suspension by driving the car.
Radiator coolant fluid is rarely changed at the recommended interval. If it looks muddy, it is much too old. Even if it looks good, some of the anti-corrosion additives may have been depleted.
If you decide to use one of the many radiator flush chemical treatments available today, don’t expect miracles. It will not clear a clogged radiator.
When you buy the antifreeze fluid to mix 50/50 with mineral-free water, consider using the extended life fluid. If used properly, the extra additives will increase fluid change intervals from two or three years to as much as five years. The instructions on the container specify that you should not mix it with standard antifreeze. It won’t damage anything, but the resulting mixture’s replacement interval will revert to that of standard fluid. (For more on cooling system maintenance, see page 9.)
The brake fluid probably will need to be changed as well. Although manufacturers recommend changing the fluid every two or three years, few owners ever change it until a line breaks or leaks. The moisture absorbed by the fluid corrodes the metal lines and weakens them. If your vehicle’s brake fluid is the color of root beer instead of being transparent, flush it out with new fluid until only new fluid is in the system.
If you prefer to switch to DOT 5 silicone fluid, investigate what that entails. And keep in mind that you will need to flush all of the old fluid out before filling the system with the silicone fluid.
There are two opinions among knowledgeable mechanics as to the benefits of changing the fluid in an older automatic transmission.
One group feels that, assuming there are no symptoms of a problem, changing the fluid may cause one. The older oil may contain contamination that increases the required friction between components. Replacing it with new fluid could result in the transmission slipping.
The other group prefers replacing old fluid of unknown quality and age. As with many automotive issues, it is difficult if not impossible to find a consensus, so in the end it’s your choice. But whether you’re changing the transmission fluid or just topping it off, ensure that you use the correct type.
Of course, you won’t change the water in the battery, but do check that there is the proper amount available. If it is not at the correct level, replenish it with clean, mineral-free water. Distilled water is preferred.
Filters
Changing the filters (fuel, oil, transmission and air) in your car serves two purposes. By inspecting the old filter, you may determine the condition of the components upstream of the filter. You can also verify that the fluid supplied to components past the filter will be clean.
Corrosion from the fuel tank breaking loose and clogging a fuel filter is a common cause of an older car’s engine suddenly stopping.
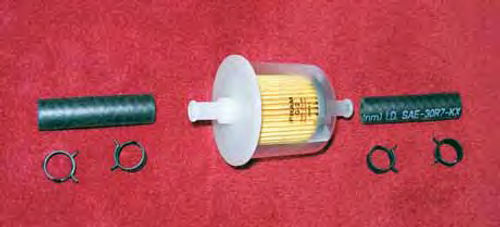
If there seems to be an inordinate amount of flakes and debris in your main fuel filter, replace the filter with one that has a transparent housing. You can then see how rapidly the contamination builds up after a few miles of driving.
If the filter is clogged, you will need to remove the tank, clean it, and then reseal the interior.
Many cars would benefit from a coolant filter installed in the upper radiator hose. One model of Gano filter incorporates a clear housing to show the cleanliness of the flowing coolant and particles caught by the filter screen prior to them reaching and clogging the radiator
If you change the fluid in an automatic transmission, replace the filter at the same time.
A dirty paper air filter suggests that the previous owner was not thorough in maintaining the car. If yours is dirty, replace it. They are cheap and easy to change.
If you have an old-style oil bath air cleaner, check your workshop manual to learn how to maintain it.
Ignition
Because ignition problems cause a sizable percentage of roadside breakdowns, it is worthwhile to ensure that your ignition components are in top shape. Ignition parts of unknown age and state of wear mask how close to trouble you may be.
Consider starting with new parts. They are inexpensive and quite possibly will not need to be replaced again for as long as you own the car.
Start at one end of the ignition circuit and replace all parts as necessary. Plugs, wires, distributor cap, rotor, points and condenser are all limited-life components.
A quick check to look for poor connections and cracked insulation can be accomplished at night. With the engine running, raise the hood and check for sparks.
You can learn a lot about the engine from the appearance of the spark plugs. As you remove them, check for oil or fuel fouling, excessive carbon and damage to the center insulator.
Some engines have at least one spark plug that is difficult to remove due to its location. It is extra important that you check that one as whoever replaced the plugs previously may have skipped it because of the difficult access.

Ignition systems using mechanical parts instead of electronic components are more than adequate if they are adjusted properly. However, they do require more maintenance so, even if parts are new, you will need to check and adjust the spark gap, point gap and spark timing periodically.
Some owners prefer to replace the mechanical points system with aftermarket electronic components. (For more on installing an electronic ignition, see the June issue.)
Electrical Wiring
Wiring insulation and connections are chronic sources of electrical problems. Old insulation becomes brittle with age and may crack if bent from its original shape. Moisture gets in the cracks and causes short circuits. Avoid piercing the insulation with pointed meter probes for the same reason.
Remove the grounding wires between the body, engine and frame. Clean the connecting surfaces with a wire brush and replace the wires. Applying dielectric silicone grease after tightening the attaching hardware will delay new corrosion.
Improper repairs and poor installation of added accessories cause many of the wiring problems with older cars. Take the time to correct poor workmanship.
Hoses & Belts
Coolant hoses on vintage vehicles often suffer from neglect. If there is any indication of hardening, swelling, cracking or collapse of your hoses, change them. The lower ones are especially vulnerable to damage from heat.
This would be a good time to replace the old thermostat and to check the radiator cap to avoid a future cooling problem.
There usually are several lengths of flexible hose connecting metal lines of the fuel delivery system. They eliminate the flexing and fatiguing of the hard lines.

These hoses are rarely changed so they become brittle. Hose material is cheap. Replace them now to avoid their failure.
Engine problems due to a leak in a vacuum line are common in older cars. A line can be chafed, cracked due to brittleness from age, or accidentally knocked off as you work under the hood. The newer the car is, the more lines that were used. If any are in doubt, replace them with new, flexible ones.
You should also replace your accessory belts unless you believe that they are less than three years old.
Battery
The American Automobile Association roadside service lists “failed battery” as its number one cause for roadside assistance. A strong battery will get you through a lot of potential crises. If your generator fails when you are a long way from help, a strong battery will power your ignition for many miles.
Batteries last longer if they are used regularly. If they are allowed to go completely flat, their useful life is drastically shortened. A voltage-maintaining charger will lengthen the life of a battery. Also, your charging system will not be required to charge a partially depleted battery.
Fuel Pump
Older fuel pumps (before fuel injection) employed a rubberized fabric diaphragm to push the fuel into the carburetor. After many years, these diaphragms tend to leak and fail. Furthermore, modern fuels may contain chemicals that attack the material in diaphragms. Therefore, replacing pumps that are obviously old is prudent.
Pumps that were built or overhauled recently will have diaphragms made of Nitrile fabric which is impervious to alcohol. So, be cautious with NOS pumps or those overhauled years ago as they may have the older, fabric diaphragms.
Brakes
Inspect the brake components on at least one front wheel and one rear wheel—all four are better. Wear a dust mask as old brake materials often contained asbestos. Even newer brake materials can produce hazardous dust.
Front brakes wear considerably faster than rear ones, but for that reason the front ones may have been replaced more recently. If the thickness of the shoes or pads is thin enough that you might need to change them before you sell the car, why not replace them now?
While in the wheel area, check the wheel cylinders or calipers for wear and leakage. If there is any doubt about their condition, replace them.
Check the metal brake lines for corrosion, kinking or wear. As noted earlier, brake fluid absorbs moisture so lines may corrode from the inside out. Pressing a sharp tool against the line will check for weak spots. Carefully check the lower areas of the line where trapped water will tend to collect. Other problem areas are under clamps and brackets where mud and debris will hold moisture against the metal lines.
Don’t forget to test the parking brake. It can serve as an emergency backup.
Tires & Wheels
As important as tire condition is to safety, it is odd that there is no agreed shelf life for tires or a recommended service life. Even the NHTSA Web site has no firm recommended age limit for tires. Some car manufacturers claim six years is the limit, some tire manufacturers use 10 years as a guideline. Once again, you are pretty much on your own in deciding how many years you will accept as the maximum.
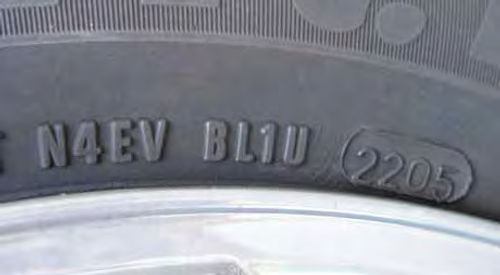
You can determine the manufacture date of a tire from a code molded into the side wall. Find a number preceded by the letters “DOT.”
Tires made during and after 2000 will show the week and year of manufacture by the last four digits. The year is told by the last two digits and number of the week by the previous two digits. For example, the last four digits of “2408” would signify the 24th week of 2008. Tires manufactured prior to 2000 show only the last digit of the production year. Thus, in this case the “8” can mean 2008, 1998 or even 1988.
Experts agree that worn tread, cracks in the side walls and any obvious road hazard damage are grounds for replacement.
Your wheels have unknown histories even if they are the ones that came with the car from the manufacturer. Any bends, cracks, gouges or signs of excessive wear are reasons to have a wheel technician check them.
If the possibility exists that a wheel might not be up to safe standards, strip the paint, remove any corrosion, and inspect for cracks or damage. It may be easier to simply replace it.
Gauges
One or more of the gauges that you will rely on may have lost its calibration after several decades. Fortunately, most are easy to test.
Verify the accuracy of your fuel gauge soon after you buy the car. That way, you may avoid the embarrassment, hassle and possible danger of being stranded due to running out of gas.
Drain or siphon the fuel out of the tank, stopping periodically to confirm that the gauge operates properly. When the gauge reaches “Empty,” stop removing fuel and fill the tank. Subtract the number of gallons it takes to fill the tank from its listed capacity to learn how many gallons remained when the gauge read “Empty.”
The temperature gauge can be checked with a common thermometer or with a remote sensing temperature gauge available at most auto parts stores.
You can check your oil pressure gauge using a direct reading gauge that screws into the sensor port.
Fuses
Locate your main fuse block. Compare the sizes of fuses with the sizes shown on the fuse box cover or in the service manual. It’s a good idea to keep a spare of each size in the glove compartment.
While you are at it, check your service manual to locate any fusible links in your car. They are often found in the headlight switch or wires and not always obvious.
Fuses are rarely changed unless they blow so they may have a corrosion problem. To be certain, remove each one, wire brush the contacts and replace it.
The Jack
Verify that all the parts of yourjack are present and that you know how to use it. Some younger readers may be unfamiliar with a bumper jack and might want to ask an older friend or relative to show them how to work with this vintage automotive tool.

While you are looking in the trunk, check the spare tire. Is it the correct size and roadworthy? Is the inflation pressure correct? Quite possibly it’s been in there a long time.
Parts/Tools/Manuals
Keep a service manual available in your car. In addition to the troubleshooting and repair information you need, it will help a professional mechanic who is not familiar with systems as old as yours if his assistance is required.
Many difficulties can be minimized or eliminated by carrying the proper tools and parts with you in the car. There is no need to fill the trunk with your entire toolbox and inventory of parts, but carry the key ones.
A screwdriver with several interchangeable bits, an adjustable wrench, a ratchet with an extension and sockets, a utility knife, needle nose and regular pliers, duct tape, a small coil of wire and an LED flashlight with fresh batteries makes a basic toolkit.
Another handy item is epoxy putty. The kind that has both putty and catalyst formed together into a cylinder is best. Kneading a length of this rod will provide an excellent material with which to repair leaks.
It is prudent to carry parts that might strand you. The ignition parts that you removed but that were still working should be sufficient to allow you to limp home. (And consider adding an extra tune-up kit as they generally aren’t very expensive.) A spare fuel pump is also a good item to carry unless yours has been replaced recently.
If you keep these tools and parts in a cloth bag rather than a tool box, you will avoid many annoying rattles.
Time and Cost Required
The project that we’ve discussed may appear time consuming, but the basic plan to replace fluids, filters and ignition parts should fit into a weekend. Most of the other tasks are straight forward do-it yourself projects. Some, such as brakes, may be left to professionals.
One soon finds, however, that time estimates for older car projects are difficult to predict. Who can foresee that a small, 20-minute project will transform into an hour and a half project due to a rounded nut, broken stud or a seal that wouldn’t stop leaking?
You may wonder how much the parts for all this will cost. To get a general estimate, I checked the Internet and an auto parts chain. For this example, I selected items that I considered necessary for a ’72 Oldsmobile Cutlass with a 350 V-8 engine.
For the replacement items (fluids, filters, belts, hoses, ignition parts, thermostat, radiator cap, etc.), the total was just under $300.
The other high-wear items (tires, battery, fuel pump, etc.) can add a few hundred dollars more, but you likely won’t need all of them.
Realize that most of the outlays will be one-time costs and that you will have replaced many items that cause a substantial percentage of expensive breakdowns.
If you perform this project soon after you buy the car or truck, regard it as part of the purchase price.
Why would anyone spend this much on a budget vehicle? Peace of mind is a big reason. There will be fewer surprises later if you take these steps right away.
Years ago, there was a TV commercial about car repair that ended with a mechanic informing you that “You can pay me now or pay me later.” I would modify that to: “You can pay me now or pay me a lot more later!”


