John’s Tool Chest, Pt. 2
You Never Can Have Too Many Tools Within Easy Reach. Here’s Another Batch to Use Regularly In Your Projects.
THIS ONGOING SERIES looks at a collection of tools this restorer has found helpful in his work. Since this is a series, we’ll be starting here with Photo 14.
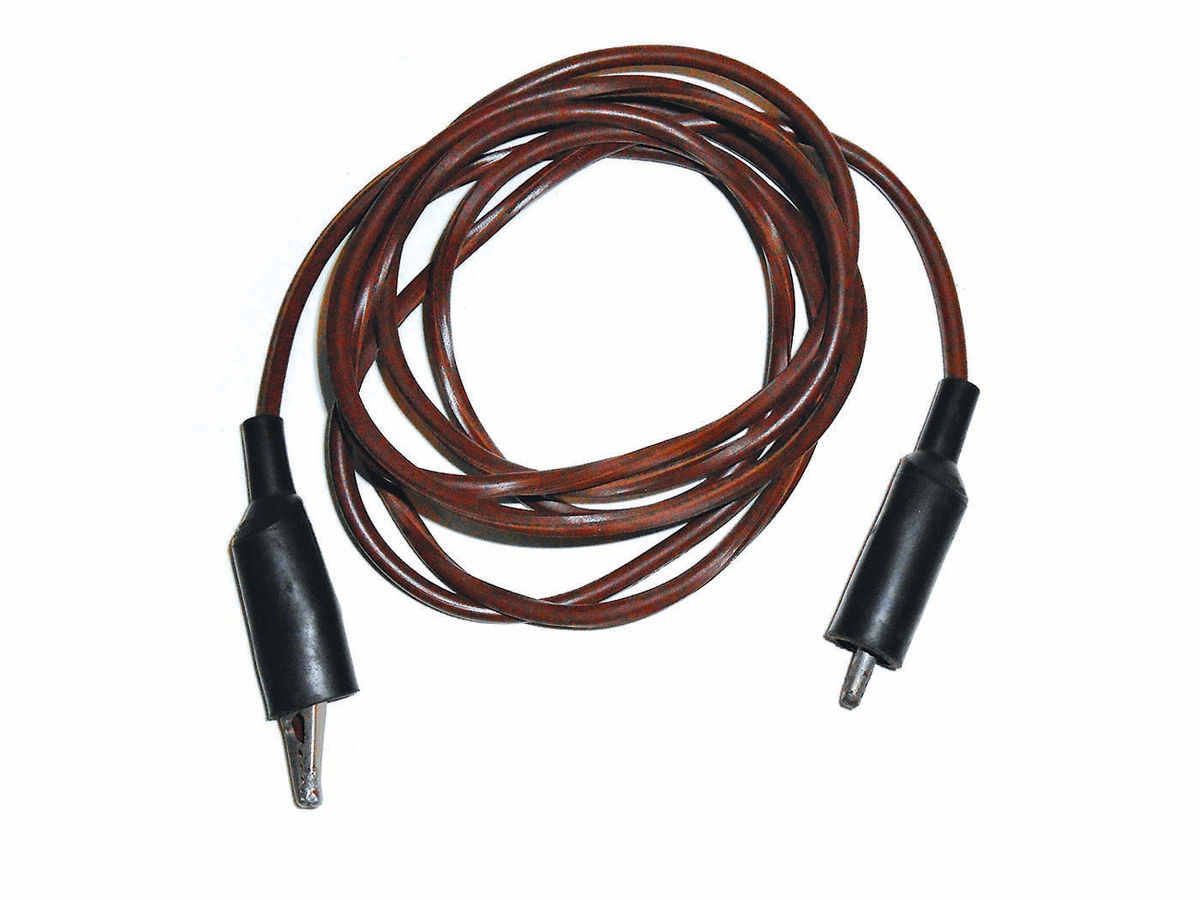
Jumper/Test Leads
You can purchase or better yet make your own jumper/test leads like that pictured in Photo 14. I make them from brown 16-gauge speaker wire purchased from Radio Shack on a 100' spool. The Vinyl covering and wire are very flexible and seem to resist kinking fairly well. It is a two-conductor wire so simply cut the length needed and then the two can easily be pulled apart and separated. You can now create two jumper leads of the same length, or possibly cut one strand into several shorter ones of various lengths. I usually solder alligator clips on the ends, but if you have the need, small battery clamps like those on the Power Probe (October) also can be used.
Ignition Spark Tester
Photo 15 is an ignition spark tester. The clip is marked “made by Mueller Electric Co, Cleveland Ohio,” but they may have only made the clip. Simply connect the spark plug wire in question to the spark plug, and clip it onto a good ground where it will be easy to see. Turn the ignition on, spin the engine over and watch for a good blue spark. This plug has a ¼" air gap to jump.
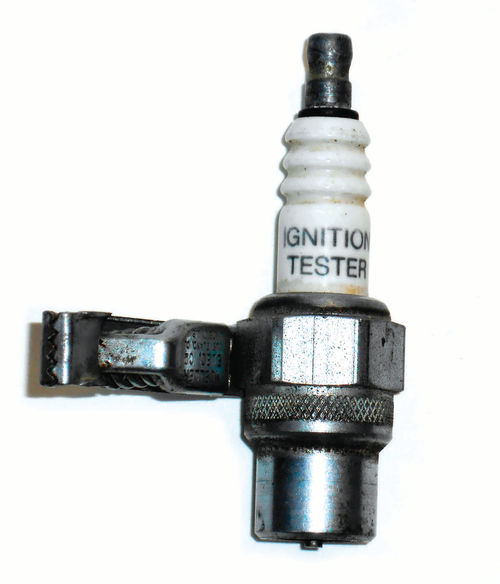
Sure, you can accomplish the same thing by sticking a screwdriver in the end of a plug wire and holding it close to a good ground, but it will also require a second person to turn on the ignition, or a remote starter switch. This is fast and simple.
I didn’t find this for sale on line; possibly I didn’t choose the correct search words. If it’s not available at your local auto parts store, it’s easy enough to make. Simply solder, or drill and screw a clamp to the side of an old spark plug. Maybe connecting the clamp via a short wire to the plug would be a good idea, making it easier to position the test plug where it can be seen. Preferably use a larger diameter plug with an extended tip. This will allow you to create a larger air gap. Bend back and break off the ground electrode so that the spark will jump from the center electrode to the perimeter threads of the spark plug. That’s all there is to it.
Automotive Meters
Photo 16 shows the Fluke 78 Automotive meter with the optional induction RPM attachment. I purchased this in 1999 from A&I Supply in Illinois. At that time the meter cost $197.75 and the rpm pickup (FLU RPM80) was $40. Since then A&I has gone out of business, and while some other suppliers do list the 78 meter on line, once you click on it, it’s shown as no longer available. After calling Fluke, I was advised that the 88-5 (88V) is the updated replacement, supposedly offering all the same features and then some. I found the Fluke 88-5 meter for sale on line anywhere from $379 to $475 and still made in the USA.
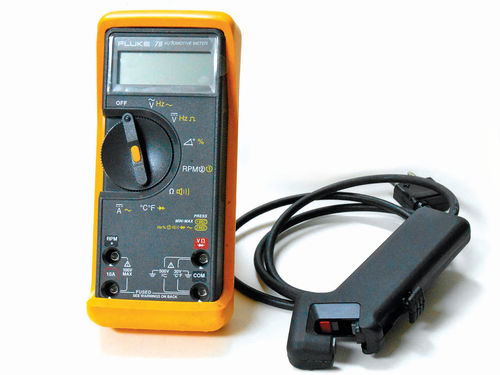
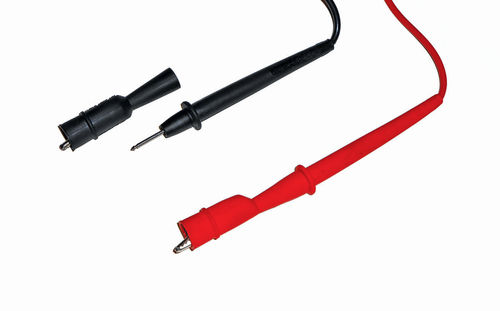
I had an older Snap-on meter which also used a secondary rpm pickup. It was much larger, and finally quit working. I really liked the secondary ignition RPM pickup, (although for vehicles that no longer have ignition wires this option would appear to be of no use) which ultimately led me to purchase this Fluke 78 meter. Photo 17 shows the Fluke test probes. As you might expect, they are the best; 4½' in length with optional alligator clips that quickly snap in place, giving you the best of both worlds. It also came with a thermocouple bead (80PK-1) and adapter plug (80AK) that allow the meter to make surface temperature measurements from minus 40° to 500° F. The Fluke 78 meter functions are controlled by the rotary switch and the button in its center gives you additional mode options. Some of the 78’s features include; dwell, and duty cycle (useful in checking things like the electronic carburetor on my ’86 Caprice that has “Computer command control”); Volts (DC & AC); Amps (limited to 10A, DC & AC); ohms; temperature; rpm, and a bar graph at the bottom of the display which is handy for checking throttle position sensors. The box and card inside states that all 20, 70 & 80 series meters purchased after 1996 have a limited lifetime warranty, of course there are the usual exclusions, and the LCD display/ screen has a 10-year warranty. My only dislikes: I would prefer the selections be marked AC; DC; (etc.) but understand the symbols are more universal; and the 78 requires unscrewing and removing the back door in order to access the 9V battery. My meter may sit for some time before it gets used again, so I remove the battery to be safe. Removing the back door is time-consuming and seems a bit much, but according to the Fluke representative I spoke with, the 88-5 has a battery compartment door.
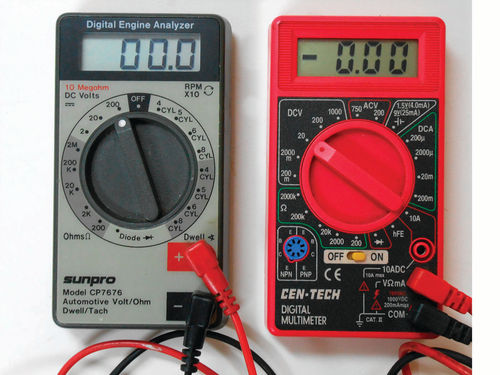
Photo 18 shows a couple of considerably less expensive meters. To the left is the Sunpro CP7676 made by Actron and marketed today as the Actron CP7676. This newer version looks very similar and has the addition of a 750VAC scale; and they expanded the ohms range to include the 20M scale. The meter is easy to read and use, and all functions are selected through the rotary switch. In addition to the previously mentioned functions, it also has an rpm and dwell setting for 4, 5, 6, & 8 cylinder engines; Ohms scale with diode test range and DC volts. My old version has 50" long test leads with alligator clips on the ends. While I didn’t see the length mentioned, I did read that the leads have clips on the ends. It has been reliable over the years, however the DCV appears to be off by 1 ⁄10th volt on the one I own; certainly not a deal breaker. Currently the Actron CP7676 is available through Amazon for $50.79 with a one-year warranty.
To the right has to be the cheapest meter ever made on this planet. Sold by Harbor Freight, I believe it was purchased for $3 during one of their special sales that seem to run 29 days out of every month including February.
It has a sliding on/off switch, and then the function is chosen via the rotary switch. It has the following functions DCV; ACV; ohms scale with diode test range; DCA, and a couple of others that I am uncertain of. If you are wondering why in the world I purchased this meter while possessing both the Fluke and Sunpro, the answer is two-fold. The first reason was to see what could be purchased for only $3 (which included the 9V battery). Secondly, if the volt and ohms portion worked reliably enough for emergencies, it would go into my vehicle’s tool box. It appears they do, and it did. The leads are annoyingly short at only 30" (but they could be lengthened easily enough if it’s that much of an issue) and the meter doesn’t have a dwell function for setting points. Personally I wouldn’t consider making this my only meter, but it’s perfect for carrying in the vehicle for an emergency. How it can be manufactured, shipped over from China and sold at such a low price is nothing short of amazing.
Gasket Scraper
There are plenty of good gasket scrapers out there to choose from, but Photo 19 shows the one I reach for most frequently.
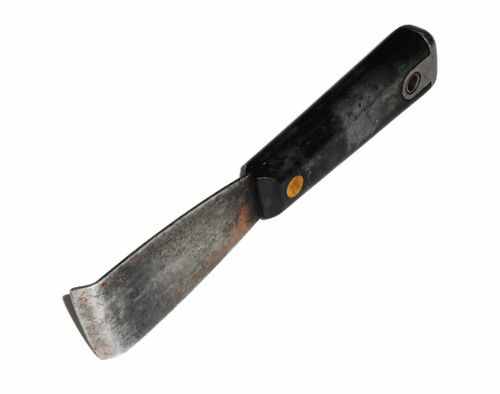
This started life many decades ago as a 1½" wide putty knife. The end of the blade (3 ⁄8" length) was placed in a vise and bent at a 45° angle. I don’t believe the tip was heated before bending, but if it was, I used nothing more than a regular propane torch. Finally, an edge was ground on it, and a favorite scraper was created. It’s inexpensive and easy to make. Just start with a good quality scraper, even an old one with character will do.
Metal Dyes
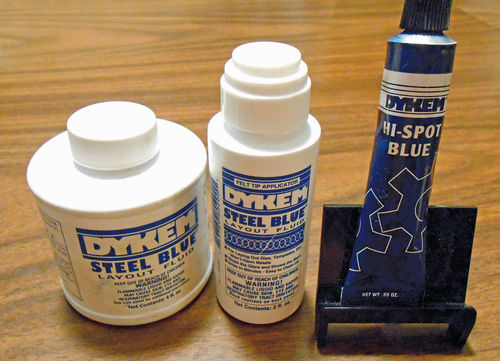
Some might not think of the items shown in Photo 20 as tools, but they certainly are. Anyone who has worked as a tool & die maker, or performed other tool room tasks is likely familiar with the name Dykem. They are a well known manufacturer of layout dye; like Q-tips is to cotton swabs. If you ever make or modify parts, this is handy to have. These are dyes used to coat metal, making it much easier to scribe and see any drawn outlines. The large container to the left has a brush in the cap while the one in the center has a felt applicator. These are blue but red is also available. The dye is fast-drying, and cleans off quickly with lacquer thinner, although they sell their own “remover” as well. To the far right is a tube of Hispot dye. As the name implies it’s used to “detect high spots on bearings, gears and other close fits.” The first use that comes to mind in the automotive field is when setting up differential ring and pinion gears for checking the pattern. This product has the consistency of watery toothpaste, and a little will go a long way. Maybe it’s just me, but this stuff has a habit of getting on my hands and clothing the minute the tube has been opened, so be forewarned. Visit dykem. com for more information about their products. Each item cost roughly $6 and was purchased through Enco (use-enco. com; 800-use-ENCO). They also offer an aerosol spray version that’s regularly $11.
Cotter Pin & Hose Removal Tools
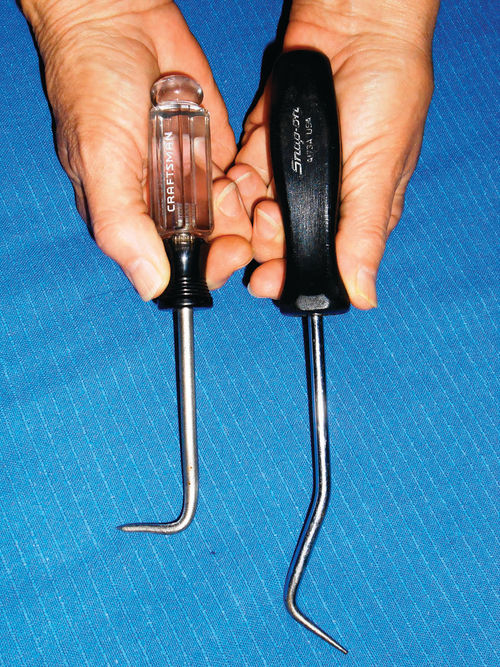
The hook tools you see in Photo 21 are marketed for two different chores. The one to the left is made by Craftsman, and is even identified as a “cotter pin extractor” on the handle. It’s also marked “4319 Y WF”. The number or possibly number/letter combination is certainly their part #.
To the right is a similar-looking tool sold by Snap-on, although they market it as a “hose tool,” to aid in hose removal. Its part # is A173A. The Craftsman is just over 7" in total length, while the Snapon is almost 10". The differing lengths and tip angles make both tools useful in different situations. The Craftsman has been used for what it was intended, and sometimes when the need arose it would be struck on the end of the handle to drive out a cotter pin. In some situations it is also easier to wiggle under a particular hose than the Snap-on tool due to the 90° tip angle. The Snap-on’s added length as well as the offset and more relieved tip angle gets it into places the other can’t reach.
And never ever strike the handle of a Snap-on. If the tip should ever break on you, the first thing the Snap-on sales rep will do is examine the end of the handle. Should it show signs of being struck with a hammer, you can bet your odds are slim of getting a replacement. And should he or she replace it for you, you will receive a lecture while the new tip is being pressed into your old handle, almost as though you were being given a warning by a police officer on a traffic violation. I do love Snap-on tools, but they can be particular. On the other hand, making a return to Sears with a broken or even abused tool is totally painless. On line it appears the Craftsman is $7.99 and Snap-on now shows a “soft grip” version, part #A173BR for $24.45. It’s not unusual to find the Snap-on pictured at auto swap meets used for around $10 or so. If I could only own one of these tools it would most likely be the Craftsman. Thankfully, I can have several.
Sockets for Different Tasks
When I started working on cars as a teenager, my first Craftsman tool set included only 12-point sockets. At that time in my life a socket was a socket, and points had something to do with my driver’s license. It wasn’t long before I was attempting to remove a rusted exhaust manifold bolt and the 12-point socket spun around it as if the bolt head were round. My friend Don spoke up and said, “Use a six-point socket.” He loaned me one, and it did the trick. Photo 22 shows two sockets the same size; 12-point to the left, and a 6-point to the right. When you look into the ends of these sockets, it seems pretty obvious why the 6-point would be the socket of choice on a fastener that’s worn or where a lot of torque will be applied. Today the 12-point sockets from those early days remain in my tool box, but see little use. I must admit, though, when working on hard-to-reach, non-corroded fasteners, a 12-point flex socket offers the advantage of being able to rotate and reposition the socket into more positions, which can sometimes eliminate binding.


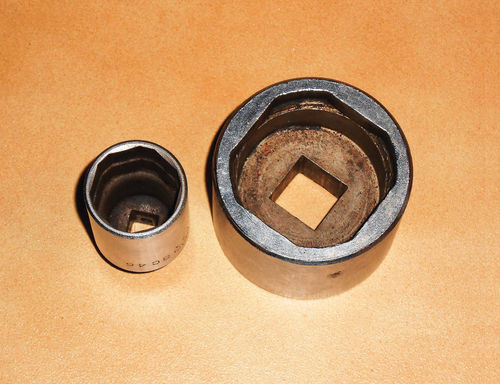
Photo 23 shows another variation, the 8-point socket. These fit square heads and are useful in removing the fill plugs from many differentials, manual transmissions, and even the steering gear box of larger vehicles. While an open end wrench will usually work, a socket is handy for those tight plugs. It’s not unusual to find that these pipe thread plugs have been over-tightened, and an open end wrench may slip. 9 ⁄16" and 5 ⁄8" are handy sizes to have.
In addition, there also are special purpose sockets worth having. Take a look at Photo 24. To the left is a socket for removing oil pressure sending units. The one seen here is made by MAC (SC 46), but you can purchase them most everywhere. It is “stepped” inside to allow fitting two different size sending units. This is a 3 ⁄8" drive only, but there are others out there that have the addition of a hex on the end of the socket, allowing a wrench to also be used to rotate it. If you look around at swap meets before the time comes where you need one, you will likely find a used American-made socket for a couple of dollars. It sure beats trying to remove a sending unit with slip joint pliers.
To the right in Photo 24 is a ball joint socket made by New Britain Tools (NH 460). If memory serves me correctly, this socket was purchased to thread in ball joints on a 1972 Plymouth Satellite. While GM was busy pressing in ball joints, Mopar was threading them in. This is the smaller of the two designs and is designated as the 159⁄64", and the other is 2 9 ⁄64". The socket pictured is a ¾" drive; however a step-down adapter will reduce it to the more convenient ½" drive. If you own a Mopar of that era, check your shop manual to see if your ball joints are listed as the thread-in type. If so, and you do your own front end repairs, these sockets are a must. You can use that electronic caliper to check the size of your ball joints. This way you won’t end up with a large socket when you need a small one, etc. Frequently these sockets will show up used at swap meets in the $8- $10 range, but once again you need to purchase it before the time comes when you need it. Online Northern lists the small socket for $30, and Summit Racing has the large one for $16.
Joining Wires Together
A reliable soldering gun and some rosin core solder are essential tools if you will be doing wiring repairs on your vehicle. I use an old Weller #8200 N (100/140 watts), but if more heat is needed, I reach for the Wen model #450 (also sold under the Blue Point name). This gun came with three different tips for varying heat needs, a light-duty 25- 100 Watts, medium-duty 100-200W, and a large heavy duty 200-450W. Neither of these soldering guns are in production today, however they live on at auto swap meets, usually for around $5.
New soldering guns can be purchased most anywhere: Ace hardware, home improvement stores, professional tool suppliers and online as well. Stick with a name brand; this will make life easier when it comes time for new tips.
But before you solder those wires together, slip on a piece of heat shrink tubing, this will seal the repair from the environment. True Value or Ace hardware has a selection that will handle most needs.
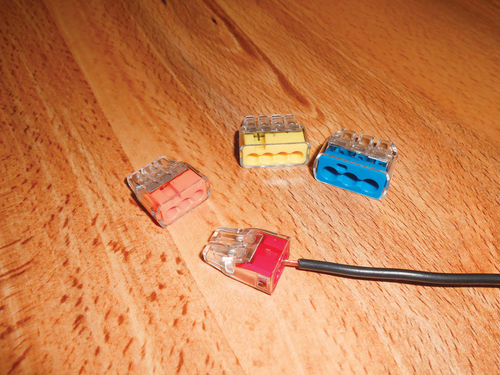
There may be some instances where soldering just isn’t an option. A good example might be an awkward location under the vehicle’s dashboard. In a case such as that, push-in wire connectors may prove to be a good choice. Once the end of the wire has been stripped, no tools are needed; the wire is simply pushed into one of the ports of the appropriate wire connector as seen in Photo 25. These are made by Ideal Industries, and they offer connectors that will union as many as eight wires, or as few as two. This is a neat way to join a group of wires together. Most connectors will hold wire from 18 to 12 gauge, but the blue connector seen in the photo is for larger wire, 10 to 14 gauge. Notice also the piece of 18 gauge in the photo, it fit tightly in the connector. Smaller wire would call for a test-and-see approach. Designed primarily for household wiring, they are rated to stand up to 600V and a temperature of 221° F. How about taking the wires out of the connector? I didn’t read anything about releasing wires once installed, so I assume it is designed as a one-time use. Make a mistake? Then cut the wires off at the connector and start again. That being said, I was able to remove that 18 AWG test wire by twisting and pulling at the same time. When dealing with multiple wires it wouldn’t be easy, or even possible, and I doubt the manufacturer recommends it. Currently Ideal manufacturing makes these in the US, and a Google search shows a number of suppliers. Home Depot lists a 10-piece assortment for $13.14, while the other listings appeared to usually sell a quantity of 100, all one size, for $15-$20.
To seal against moisture, the wire entrance of the connector could be coated with a liquid sealer like liquid electrical tape. I purchased some liquid tape not too long ago at Lowe’s and Home Depot for $6. It comes in a can with a brush applicator. Eastwood also carries it, and they used to have it in a selection of colors as well.


