
How -to Working With a New Welder
We Take a Look At a New Welder Designed for Auto Hobbyists. And We Offer Some Useful Tips From a Pro As Well.
I FIRST CONSIDERED putting the new Eastwood MIG 175 wire welder #12012 through its paces and offering you a report on the results. But as I began to use the unit, testing one type of weld then another, I realized that merely reporting on the welder was going to leave myself open to a lot of questions. What kind of questions? How about the difference between a good weld and a bad weld, or a weld that is too cold, or a weld that’s too hot? Then there’s the aluminum welding aspect of this machine. How do you weld aluminum? I took off my reporter’s hat and dusted off my welding cap.
The Welding Machine
The Eastwood MIG 175 welder (catalog price, $500) is a 240-volt, 50-60 Hz, 22 amps metal inert gas(MIG) welder with a duty cycle of 30% at 130 amps(Photo 1).
To better explain, a duty cycle is 10 minutes long. A welder with a 30% duty cycle must be rested, or allowed to cool down, for seven minutes after a continuous run of three minutes. That’s not bad for a compact welder intended for use by a hobby restorer.
To understand the flip side of a duty cycle, a professional welder, a guy who welds all day long every day, would require a welder with a 100% duty cycle. That welder doesn’t need any rest time. It can be used continuously all day long. It will also set you back some serious bucks.

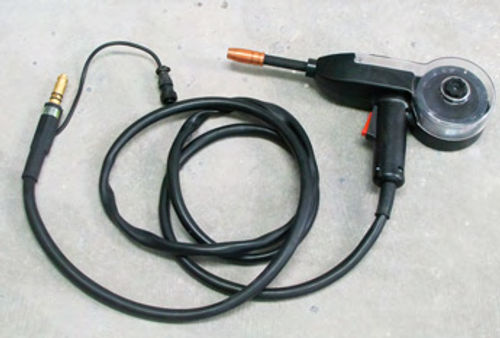
This unit comes with a torch gun cable assembly (Photo 2), the normal set-up for wire welding, a spool gun assembly (Photo 3), used primarily for welding aluminum, a ground cable, gas flow regulator and hose, hand-held welding shield, wire brush, a wrench for changing out worn welding tips, and a 2 lb. spool of .023 MIG welding wire.
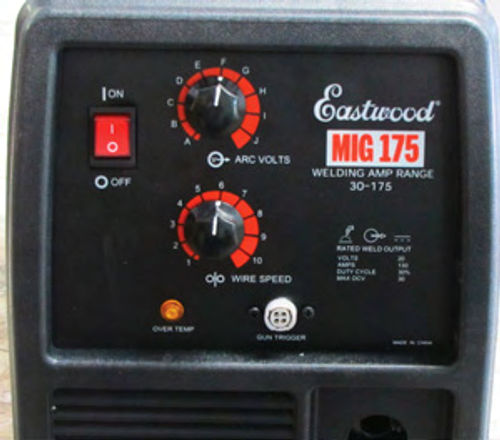
On the front of the machine you will find an ON/Off switch and two round control knobs (Photo 4). The upper knob is the heat control knob with 10 settings, A through J, with A being the lowest setting and J being the highest. Most 16- to 18-gauge metal is welded at the E setting, about mid-range.
The lower knob is the wire feed control knob and it, too, has 10 settings, 1 through 10. The lower the setting the slower the wire is fed from the welding tip. A normal setting for 16-to 18-gauge metal is 6.
All that said, this welder is described as “infinitely adjustable,” which means you can set the heat control and wire feed speed to 5.8 and 6.3, respectively, if you so desire.
Machine Set-Up
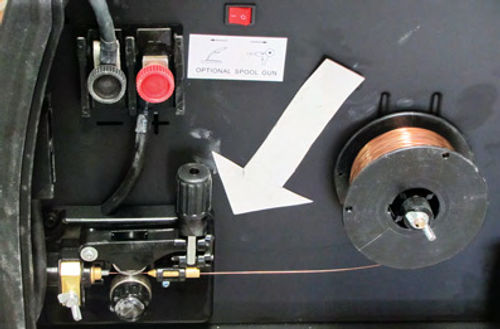
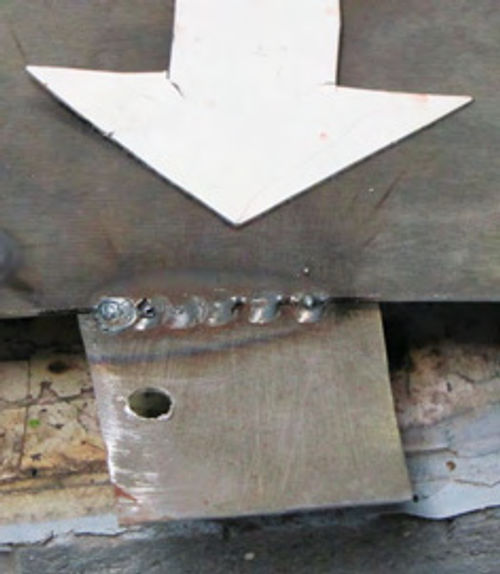
Aside from the control knobs on the front of the welder, just about everything else you need to know can be found inside the lift-up side panel on the machine (Photo 5). The arrow points to where the gun torch cable is attached to the welder and to the wire feed roller mechanism. The spool of welding wire for the gun torch cable is mounted just to the right of the arrow.
The wire size I’m using is .023-inches, or .6 mm. This is the default wire size used in most MIG welders to weld mild steel. However, should you need to use a larger diameter wire, such as the .035- inch (.9 mm) flux-cored wire, you will need to remove the wire feed drive roller (lower roller) and flip it over. The roller is marked .6 mm on one side and .8 mm on the other side. Use the .8 mm side for larger, .9 mm diameter wire.
What’s with the .035-inch flux core wire? A flux core wire does not require a shielding gas to protect the molten metal pool from the atmosphere when welding. The downside to using flux core wire is that because the weld is not being protected, more heat is required to weld with the larger diameter wire and the flux core wire tends to splatter drops of molten metal much more than does welding with a shielding gas. This machine did not come with a roll of flux core wire, but I keep one in the shop for emergency welding should I run out of shielding gas.

Speaking of shielding gas, to MIG weld you will need a bottle of compressed gas that contains 75% Argon and 25% CO2 . Commonly known as C25, these bottles are available anywhere welding supplies are sold. Your first bottle will set you back at least $90 and after that replacement bottles will cost about $40.
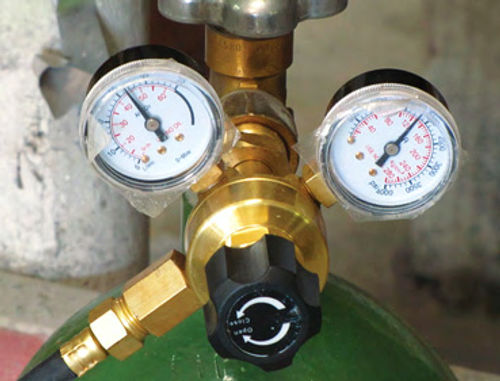
Once you have a bottle of shielding gas in hand, it is connected to the welder using the hose and regulator that comes with the welder. The regulator will have two gauges and a control knob (Photo 6). The gauge on the right indicates the amount of gas present in the bottle, up to 4000 PSI, while the gauge on the left indicates the air flow pressure at the welding tip, around 25 PSI.
To set the regulator, slowly open the valve on the bottle and watch as the gauge on the right begins to read pressure. The gauge on the left will read zero. Next, turn the welder on and press the trigger on the gun torch.This will activate the wire feed and open an internal valve to allow gas to flow out to the welding tip.
Now turn the knob on the front of the regulator to the right until you hear gas escaping from the welding tip. Still holding the trigger depressed, continue to turn the knob until the gauge on the left reads 25 PSI. Stop. The gauge is set and you are ready to weld.
Preparing to Weld Steel
Like everything else associated with restoring old cars, learning how to MIG weld requires practice.That’s what we’ll do here, practice.
The first step has to be personal safety. The machine comes with a hand-held shield to protect your eyes. Use it every time you weld or you risk burning your eyes. How do you know if you have burned your eyes? This is one of those things that come upon you hours after you have stopped welding. Your eyes begin to burn then they feel like sand has been poured into them. The cure is a trip to the emergency room for treatment.


If the hand-held shield doesn’t suit you, or you just don’t like the idea of welding with one hand, I suggest the Eastwood Auto-Darkening Welding Helmet #12099 ($70). This helmet allows you to keep both hands free for welding. Some of us are a little shaky on Mondays and having two hands to steady the welding tip is a big help.
Next you will need a pair of leather gloves. Welding creates a lot of heat and leather gloves are a must to stop that heat. To prevent molten weld splatter from burning your arms, wear a long sleeve shirt. To stop weld splatter from curling your hair, check out the rack of welder’s caps while at the welding supply store.
Time for Some “Nickels”
Since welding is an electrical task,whatever you are welding must be grounded. Fasten the ground clamp to a clean area of metal even if that means grinding away the paint to get that clean connection.
To weld, you hold the torch so that you are “pushing” the weld forward. Holding the gun in the right hand, tilt it back about 20 degrees and move from right to left (Photo 7). What that does is to keep the wire moving just ahead of the puddle of molten metal and that helps form the weld bead. Welding pros refer to this process as “laying down nickels.”
Let’s start by welding one of those beads (Photo 8). What you are seeing here is an example of tuning in the machine. The first weld attempt (top) was much too cold; the heat was set at B. Notice how the weld appears to be piled on top of the metal. It is. I didn’t have the heat range high enough to get good penetration. I also had the wire speed set too slowly at 3. I knew that because the wire burned all the way up to the welding tip.
The next example was too hot (center). The heat was set at H. I turned the heat setting up too high and that resulted in the hole burned into the metal.
Having too fast a wire speed, around 7 in this case, can also result in holes being blown in the metal from the wire being continually pushed into the molten metal pool.
The last example is just right (lower). The heat was set at E. This is the kind of weld you are looking for. The bead is almost level with the metal being welded which means the heat penetration was perfect. The wire speed set at 5 was also correct. This is the best example of a practice weld that I can think of. When you can lay down a bead like this, you are getting there.
Other Types of Welds
But then auto restoration requires very few welding beads. Most of the time you are either welding spot welds, or maybe you know them better as plug welds; doing tap welding, as on occasions when you need to join two pieces of thin metal together, or filling holes.

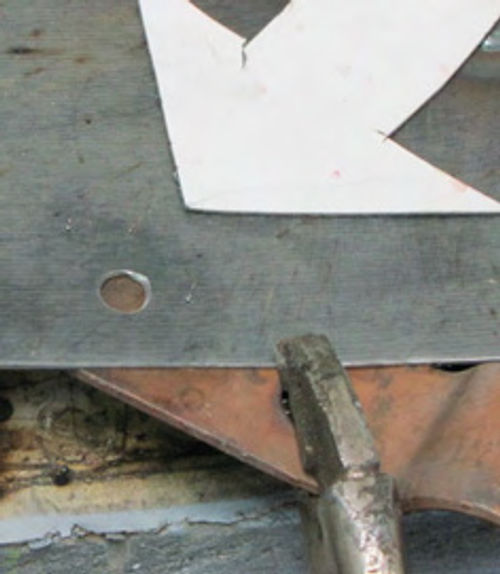
Let’s start with spot (plug) welding (Photo 9).
The nozzle in the photo does not come with your welder. Known specifically as a spot-welding nozzle—notice the half-round notches at the head of the nozzle—this nozzle will help you produce almost factory-looking spot welds. The way this nozzle worksisto first drill a 5/16-inch spot weld hole in one of the panels being welded together then press the nozzle against the panel directly over the drilled spot-weld hole. Pull the trigger and hold it for at least three seconds but not more than eight seconds to weld the spot weld hole shut. The notches in the nozzle are there to allow the inert gas to escape during welding.
Can’t find one of these nozzles at your local welding supply store? Purchase an extra MIG welding nozzle and cut four notches about 1/4-inch deep into the tip of the nozzle. You’ll get an instant spot-welding nozzle.
Tap welding is nothing more than an alternative to bead welding when working with thin metal. How thin? 16-to 20- gauge (Photo 10). What I’ve done is to weld a small dot across the seam where the two panels overlap, moved 1/8-inch down and repeated the weld. The idea here is to prevent blowing holes in the panels being welded together, which would happen should I attempt to weld a long bead, and instead make a tiny tap weld. This method also greatly reduces the chances of heat warping whatever is being welded. Where would you use this welding method? Anytime you need to patch rust or when you have a long section of metal to weld such as on a quarter panel.
Filling holes is easy provided you have the right tools.
If you place a flat copper backing plate behind the hole to be filled you can easily weld any hole shut (Photo 11). Where do you find a piece of flat copper? Eastwood has a set of flat, curved and angled plates #51139 ($50) orseveral magnetic welding backers ranging in price from $22 to $42 (#22994, 22995, 22993).
Welding Aluminum
The process of welding aluminum starts, understandably, by converting the welder from welding steel to welding aluminum.
Make sure the machine is off and unplugged. Open the side panel and flip the internal switch from MIG to Spool Gun. (Look for the square red switch directly above the arrow in Photo 5.) Next, remove the gun torch and install the spool gun cable. Next,switch the gas regulator from the C25 bottle to a bottle of pure Argon. This gas switch is key to aluminum welding. You must have 100% pure Argon gas to weld aluminum. Next, install the roll of aluminum wire that comes with the machine into the spool.
According to the instruction manual that comes with the welder, any aluminum you attempt to weld should be 1/8-inch thick or thicker.
But before I blow that theory out of the water, I’ll add one more thing that should have been in the manual. Any aluminum you attempt to weld must be perfectly clean.
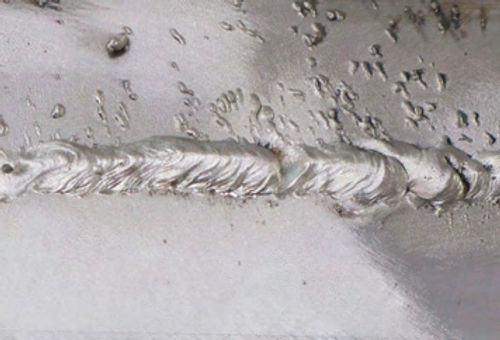
You simply cannot weld dirty, greasy or painted aluminum. It just won’t work (Photo 12). This was my test weld with the spool gun. These pieces of aluminum are 1/8-inch thick and the welder was set at heat range E and wire speed 5. You’ll notice that it took me a couple of attempts to lay down what I would refer to as a good weld. However, this was just for warm-up.
What I really had on my mind was the “1/8-inch minimum thickness for welding” note in the manual. I hadn’t welded aluminum in quite some time but I did know that with a little practice just about anybody can weld thick aluminum, especially with a machine like this.
I needed to weld something thinner, much thinner (Photo 13). These test panels are 20-gauge (.0375-inch or 1/32- inch) sheet aluminum. I lowered the heat range to B and the wire speed to 3. To weld these panels together I used the same tap welding technique I used to tap weld mild steel with the exception of shortening the weld time from three seconds down to two seconds. The results are as good as you could want considering the final product will need to be ground smooth.
I Approve
To sum up this machine: I like it. The power is there to weld just about anything automotive with the added bonus of being capable of welding aluminum should the occasion arise. Got a question? Send it along.
Resources
The Eastwood Company
263 Shoemaker Rd.
Pottstown, PA 19464
Automotive restoration tools and supplies
LPL Body Works, LLC
5815 Contented Lane
Amarillo, TX 79109
Automotive paint and body repair DVDs


