
How -to Replacing Fatigued & Rusty Metal
We’ll Start With a Striker Plate Cracked From Too Many “Slams.” Then We’ll Replace a Rusty Portion of a Car Floor.
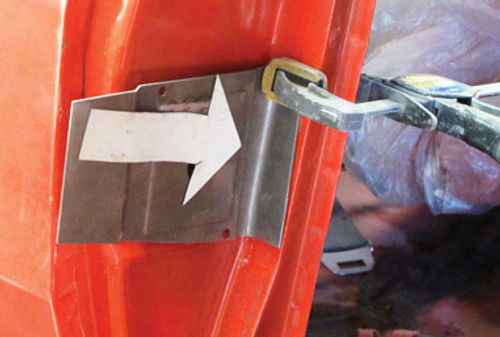
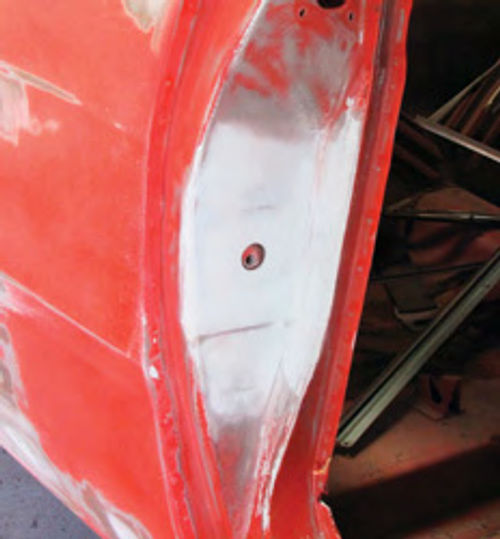
A COMMON MALADY found on a large number of ’60s muscle cars is metal fatigue around the door latch striker bolt. That fatigue leads to cracking and before you know it your door jamb looks like the one in Photo 1. Why would an area like this fatigue and begin to crack? A lot of years and a few thousand door slams will take its toll on metal that is too thin or that has not been adequately re-enforced. In the case of this jamb,themetalis 18-gauge with absolutely no backing to help strengthen it.
To deal with a problem like this I could bring out the MIG welder and weld up the crack, but that would not be a good long-term fix. To correctly address this problem I need to replace the tired metal around the crack. To do that I need a replacement striker bolt mounting plate like the one shown in Photo 2 from Dynamic Renovation.
This is a reproduction piece designed for use on the A body Dodge but I think it is strong and generic enough in design to be used on just about any ’60s ride that uses a striker bolt-type door latch. (Contact information for Dynamic Renovation is at the end of this article.)
Time for Detailed Measurements and Metal Bending

The plan for installation is straightforward enough in that it calls for cutting out the old striker bolt mounting plate and replacing it with the new one. The new piece comes with a detailed set of instructions to help with the installation, but my plan is to deviate slightly from the instructions and modify this piece so that once it is installed this ride will end up with a stronger striker plate than the one that originally came on the car.
Notice in Photo 3 that I put a 90- degree bend on what will be the inside corner of the new striker bolt plate. Why the bend? The bent portion of the plate will tuck in behind the sidewall of the door jamb. Once I weld it into place the result will be a much stronger repair than if I simply had cut a hole in the panel and welded the new metal into place.
This bend is exactly one inch from the inside edge of the new plate, or an inch and three-quarters inboard from the edge of the striker bolt mounting hole. Determining the exact measurement took some time to calculate and get right, but doing so allows me to tuck the folded edge behind the original door jamb panel and still have the hole in the new plate where the striker bolt attaches align perfectly with the location of the hole in the original panel.
You can’t really tell by the photo, but that is exactly what I have done. The large hole in the new striker plate is in perfect alignment with the existing hole in the original panel.
Not only are the holes in perfect alignment, I can now use the new plate to mark around the original panel and eliminate a lot of measuring and hoping. Once I had the original panel marked I removed the new plate and laid a tape line along the marks I made on the old panel (Photo 4).
To remove the old plate I used a die grinder with a three-inch cutoff wheel attached and followed the tape line. Something else to notice in the photo is that I didn’t use the full width of the new plate. I used a metal sheer to cut it down slightly so that the opening I made would better conform to the bends and folds of the original door jamb.
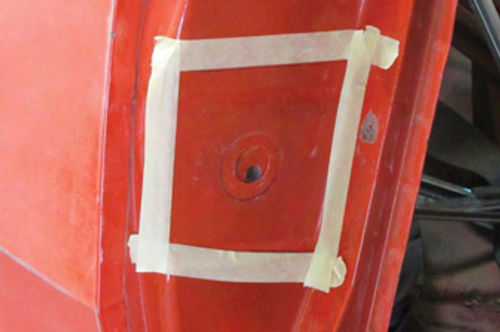

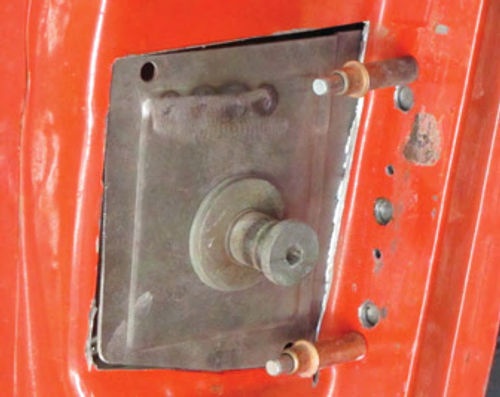
Photo 5 is a better shot of where I made my cuts. This entire area is basically flat and since my replacement plate is also flat, welding will be much easier. Also notice that I didn’t cut out the area where the bent portion of the new plate will go. I’ll explain that in a moment, but first take a look at Photo 6. The old plate is on the right, the new plate on the left. Before I weld the new plate into the hole I’ve cut in the door jamb I need to remove the free-floating nut plate from the old plate and install it in the new plate. That task is a simple matter of prying up one side of the old retainer plate to remove the nut then prying up one side of the new plate to install the nut.
Adding Strength With a Bend

The next step is to fit the replacement striker plate into the hole I’ve cut in the door jamb. Fit is critical here so I take the time to get it right. Part of getting it right involves trimming away a small bit of the new panel so that it fits the opening better. The other part of getting it right involves tucking that section of the new plate that I bent to 90 degrees in behind the side wall of the door jamb (Photo 7).
What is the thinking here? AsI mentioned above, the old striker plate had a tendency to flex every time the door was slammed shut. That is why it cracked. Bending the inside edge of the replacement plate to 90 degrees allows me to tuck this part of the plate behind the existing structure of the door jamb. Once welded into place the overall strength of the door jamb will have at least doubled. The result should be no more cracking.
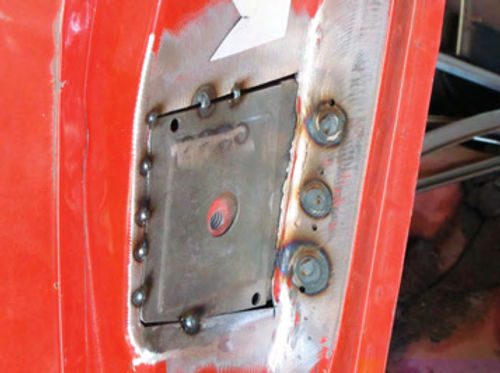
Photo 8 is a look at how I welded the new plate into place. I drilled 5/16-inch holes in the existing door jamb side wall and spot welded the bent portion of the plate behind it. Next I tack welded the new plate into place to secure it before welding it solid. Once the welding was complete I finished the repair with a coat of plastic body filler (Photo 9).
If you drive a Mopar you know the striker plate isn’t the only part of your ride that’s prone to stress cracking. To help with these issues Dynamic Renovation also offers replacement door latch plates, hood hinges, mounting plates, and door handle reinforcement panels.
I won’t go through the installation procedure for any of these pieces as it is basically the same process I used to replace the metal around the striker bolt. A few measurements, a little cutting followed by a few welds, and your stress cracking problems are solved.
Now, Let’s Do Some Floor Pan Sectioning
I get a lot of questions concerning the replacement of partial floor pans. Since we’re working with replacement metal here, this seemed like a good time to delve into that issue as well.
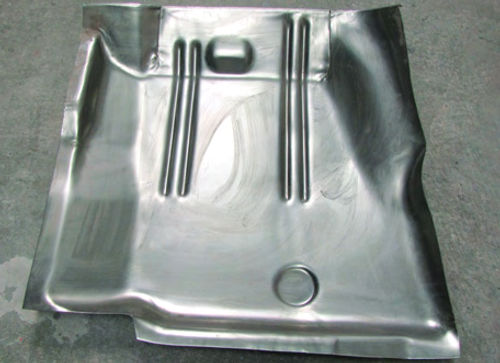
Photo 10 is an after market front driver’s side floor pan section for a 1969 Dodge Dart. Although it looks a lot like the floor pan sections available for many Fords and Chevrolets it does have one major difference. The forward edge of this panel folds downward so that it can be welded to a matching folded flange at the bottom of the firewall panel.
However, to use that folded flange for welding in the new panel I would have to pull the engine and transmission to gain access to that area of the floor. That’s a task I prefer to avoid. Instead, Photo 10. The front section of the driver’s side floor pan for a 1969 Dodge Dart. I’m going to trim away the folded edge on the new pan section and spot weld it to the face of the existing floor pan. Here’s the process:
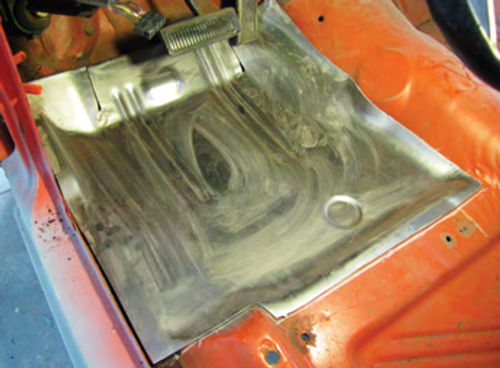
The first step is to cut away the folded edge at the front of the new panel then test fit the panel over the old panel inside the car. Remember my rule of never cutting out an old panel section before you have the replacement panel in hand? I’ve applied that rule, now I want to see how well my new panel fits (Photo11).
Note: To remove the fold on the new panel I used a metal shear and trimmed away the fold making my cut about a quarter of an inch back from the fold. That leaves me plenty of metal to overlap the old pan, I’ll show you that in a minute, and make my spot welds.
With the new panel laid in place the first step is to trace around the edges of the panel using a Magic Marker, remove the panel, then lay masking tape along the inside edge of my line to establish a cut line three-quarters of an inch inboard of my marks.
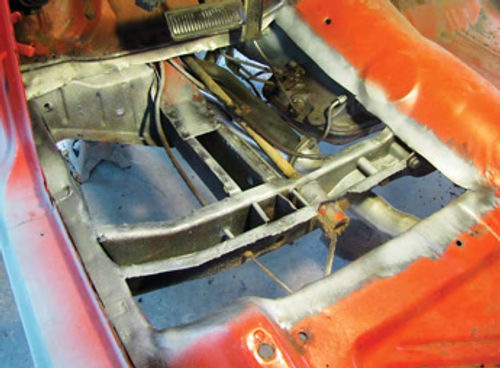
Why establish a cut line at that point? The plan calls for the new pan to overlap the old pan and give me a place to make my spot welds. After marking the old pan I used a die grinder with a three inch cutoff wheel attached to cut along the tape line. Out in the middle of the old pan, where it is welded to the understructure, I used a Blair spot weld cutter #BLR11096 to drill out the spot welds. That frees the old rusty panel for removal (Photo 12).
Notice in the photo that I’ve already cleaned the edges of the metal, ground smooth all of the old spot welds along the understructure, and coated everything with 3M#5913WeldThruCoating. Also, if you look closely you can see that I left the seam where the floor pan meets the fire wall structure intact and made my cut three quarters of an inch below it. That gives me that overlap I mentioned needing so that I can spot weld the new panel in place on top of the old panel. This method makes the installation so much easier.
The next step is to position the new panel in place and secure it with a few #8 x 1/2-inch sheet metal screws. The screws are there just to hold the panel from moving as I go underneath the car and mark it along the edges of the understructure. These marks tell me where to drill the 5/16-inch holes that will act as spot welds and allow me to weld the panel to the understructure (Photo13).


After that the new panel gets sanded on both sides using 320-grit sandpaper then it’s laid into place inside the car (Photo 14). The panel is again secured with #8 x 1/2-inch sheet metal screws plus a number of blind holders from the Eastwood #13751 Panel-Holding System before welding.
I eventually will prime and seam seal both sides of the new panel. After that a little paint will finish the inside portion of the repair and a little undercoating plus a coating of Eastwood #16032ZP Black Anti-Rust inside the understructure rails will complete the underside of the repair. Got a question? Send it along.
Resources
Dynamic Renovation
19143 Shadyside
Livonia, MI 48152
LPL Body Works, LLC
5815 Contented Lane
Amarillo, TX 79109


