
How to Replace Sections of Quarter Panels
An Article On Panel Replacement Led to Reader Questions… Such as, How Do You Replace Panel Sections?
AFTER DOING THE March 2011 article covering quarter panel replacement on a Mustang I received a number of questions concerning how to go about replacing sectional pieces on a quarter instead of replacing the entire panel. It took me awhile to find a good candidate to go through the process, but here it is.
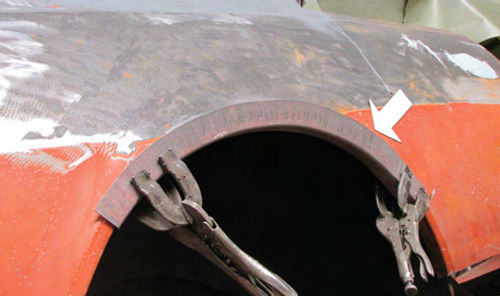
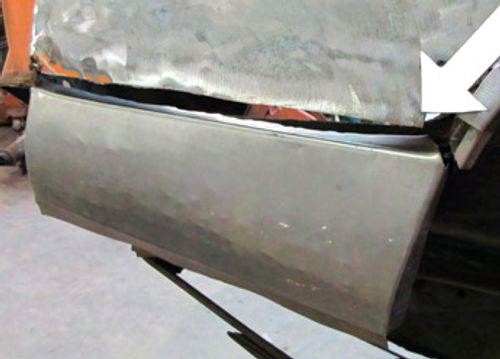
I will be sectioning in the lower rear and the lower front portions of this quarter panel as I go along but I wanted to start the work here, at the top of the wheel opening (Photo 1). If you look closely at the photo you can see the glob of plastic body filler the previous owner used to cover a rusty section of this wheel opening. Thatfillertellsme that along with having rust issues on both the front and rear lower sections of this quarter panel I also have a lot of rust to deal with around the wheel opening. So, let’s get started.
Begin With a New Wheel Opening Arch
You might think the first step would be to get rid of the filler around the wheelhouse and inspect the rust that surely lies beneath. It would be had I been able to purchase a replacement wheel opening arch and inner wheel house panel for this car. Unfortunately, neither piece was available in the aftermarket so my first step was to use the old rusty wheel opening as a template and fabricate replacement pieces for both the inner wheel house and the outer wheel opening using a two-inch-wide strip of 18-gauge steel.
This is the objective, to form a new wheel opening arch from flat steel (Photo 2). The process starts by cutting four separate 24-inch lengths of 18-gauge steel exactly two inches wide.
Once cut, the pieces are bent down the middle at 90-degrees using a metal brake to form the bends.
Why use 18-gauge steel? I used a micrometer to measure the thickness of the original metal in an area of the quarter that I determined to be rust-free. That measurement was .0460 inches, which is just shy of 18-gauge steel that would measure .0480 inches.
That’s the official reasoning, but from the standpoint of having to shape and work the replacement metal to get it to form the needed wheel opening arch I knew 20-gauge would be too thin and prone to warping from the heat of the welder while 16-gauge would simply be too thick to stretch using the metal stretching tools I’ll talk about in a moment. That left 18-gauge as the perfect steel for this repair.
After bending all ofthe steelstripsto 90 degrees, one lip on each piece is stretched using the Eastwood Shrinker/Stretcher #51088 until the pieces form the necessary curve needed to conform to the original wheel opening on the car.
In case you are not familiar with a Shrinker/Stretcher, this tool allows you to form either an outside curve or an inside curve on a piece of sheet metal. If you need to do any type of minor rust repair around a glass opening, one of these tools is a must-have.
You can’t tell it in Photo 2 but I’ve stacked two pieces of the curved strips together and clamped them to the car to ensure both pieces have the same curvature. This Step is absolutely necessary to ensure good alignment once the pieces are welded to the car.
The reason for making four separate pieces is that I will use two pieces to rebuild the rusted lip of the inner wheel house panel and the other two pieces to form the rusted outer lip and arch of the quarter panel. Yes, I could have gone with two pieces 48 inches long but this approach gives me more control over the process and more exacting curves in order to match the original curvature. Once that is done and the pieces fit correctly, I can chip out the glob of filler, grind the entire quarter panel clean of old paint, and use a die grinder with a three-inch cut-off wheel to cut out the rusted metal around the wheel opening.
Turning to the Quarter panel Section Pieces
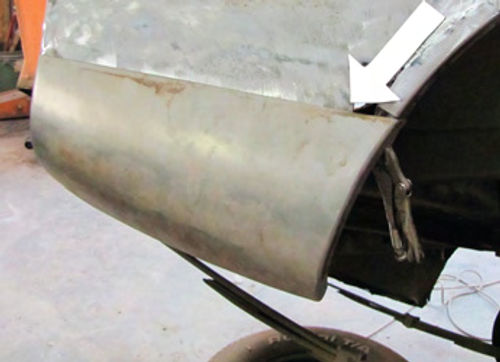
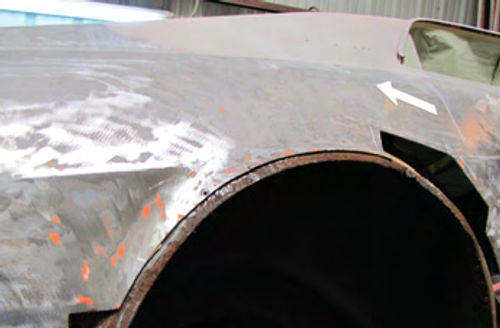
That will bring me to the point where I can clamp the forward and rear quarter panel section pieces into place on the car and mark my cut lines for installing those panels. In case you are wondering, the new section pieces were formed out of 16-gauge steel (Photo 3). That’s thicker than the original quarter panel but that’s OK as it will help reduce any warping caused by the MIG welder.
Here’s the process used to fit the new sections. The arrow you can see in Photo 3 points to a line I marked along the top edge of the new section panel. This happens to be the lower rear section, but the lower front section is treated the same. It also is clamped into place and the top edge marked to help identify where the cut line will be.
Next I’ll remove both of the sectioning panels and lay a length of masking tape along the underside of the cut lines drawn on the quarter panel. I’ll then cut away the old rusty quarter panel sections using the bottom edge of the masking tape as my actual cut line. What that does for me is leave 3/4-inch of old panel that will be overlapped by the new section piece.
What tools work best to remove the old lower quarter panel sections? I used a die grinder with a three-inch cut-off wheel attached to cut along the masking tape lines and an air chisel to break the old spot welds located along the wheel well opening once they were drilled out using a Blair spot weld cutter #13224.
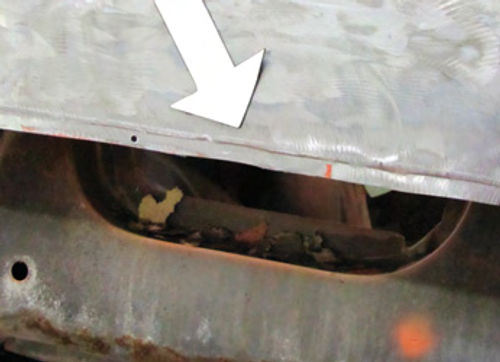
Photo 4 is a look at the cut line on the front section. Notice that flanged along the edge of the old panel using an Eastwood Panel Flanger#31092. Adding This flange will strengthen the repair and help reduce any warping that might be caused from the heat of MIG welding. It also makes for a more seamless transition from old panel to new panel.
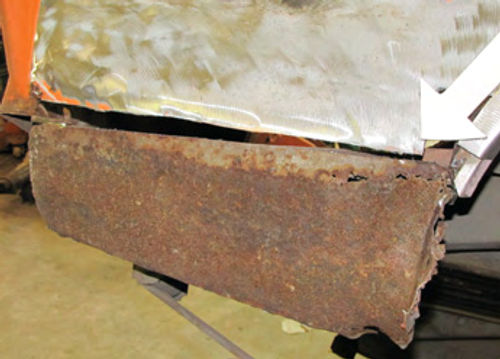
The rearsection gave me a little more grief (Photo 5). As you can see, the inner panel was rusted to the point of needing replacing. The problem was that the only way I could obtain this piece was to purchase the entire right side of the trunk floor pan. So instead of doing that, I elected to fabricate a new panel from scratch using a piece of 18-gauge steel. I rolled a slight curve into the front and rear flanges of the piece using a metal brake and the Eastwood Shrinker/Stretcher and ended up with a very satisfactory replacement piece (Photo 6).
Let’s Return to the Wheel Opening Arch
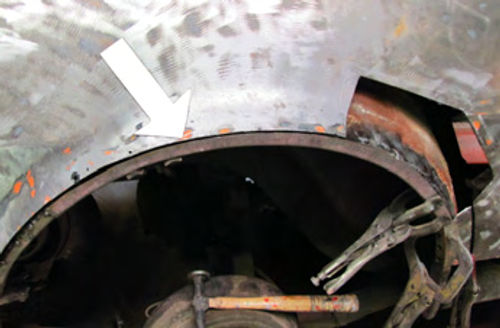
With the new lower section pieces ready to be installed, I can now go back to the wheel opening arch and finish dealing with the rust issues in that area of the quarter panel. Obviously, the rust was more extensive than what was first apparent (Photo 7).

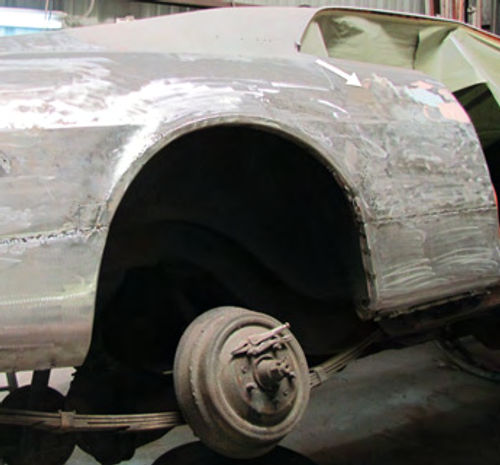
I ended up cutting away the entire outer wheel opening flange as well as a small section just above the point where the new sectional piece for the lower rear quarter will mount plus a much larger piece above the forward sectional piece. I also had to remove the entire flange area on the inner wheel house panel and replace that with two of the curved pieces I had fabricated earlier (Photo 8). These pieces were welded to the original wheel house panel to form the new wheel opening flange upon which I can weld the replacement outer wheel house arch.
That let me take the other two curved pieces and form the new outer wheel opening. These pieces were then welded to the new inner panel as well as being welded to the original quarter panel just above the wheel house opening.
To deal with the small hole at the rear of the wheel opening I cut a patch piece from the 18-gauge steel I used to make the wheel opening arch pieces then cut a larger piece from the same stock to fill the hole I cut into the quarter panel just forward of the wheel well opening. However, because of the shape of this piece I elected to use a planishing hammer to form the compound curves and body line this piece needed to fit correctly. Once formed, the piece is then welded into place (Photo 9).
Some Welding and “Lead” Repairs
Going back once again to the replacement sections I am now ready to weld both of these panels to the side of the car. Once they’re welded into place I need to grind all of the welds smooth, look for any holes in my welding and repair them if any are found to be sure I don’t have any points along my repairs where moisture could penetrate. Then I give the entire repair the once-over using my hand and a clean shop towel to feel for bumps that might need to be dolly worked (Photo 10). Once these steps are complete it is time for a little lead work.
Why lead work this repair? The fact is that my rust patching and section replacement left this quarter in need of more plastic body filler than I am comfortable applying. In order to reduce the amount of filler I apply to the panel I’m going to lead work nearly the entire wheel opening arch and that area of the quarter where the arch meets the forward body line.
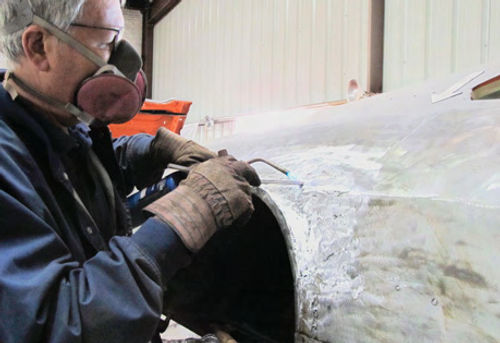
It has been awhile since I discussed the methods used to apply lead filler so this might be a good time for a refresher course (Photo 11). The product I’m using comes from Eastwood, #11465 Basic Lead Free Solder Kit, and as the name states, it actually is free of lead.
The fact that this product is lead-free makes it safer to work around, but the application techniques are the same as when you’re working with the real stuff. So I recommend that anytime you use this product you should wear heavy welder’s gloves to protect your hands from the heat of the torch and a welder’s respirator (3M 7183) to protect your lungs from the fumes caused by the heat.
The Eastwood kit comes with everything you need minus a torch to melt the lead-free solder sticks. I recommend using a plumber’s-style propane torch available at the local home improvement center.
The process starts with an application of flux over the entire repair area. This flux is heated until it burns to a reddish brown color which is then wiped away using a shop towel to expose the tin coating left behind. The tin coating, created by heating the flux, provides a surface onto which the “lead”will stick. Without the flux/tin coating, the “lead” will just run off onto the floor as it is melted.
The lead-free bars are heated with the torch and melted into the tin coating. With a little practice the lead-free bars can be used to build up a very thick layer of “lead” over the repair. I like to heat the end of a bar and push that molten end into the repair area to form lump after lump of “lead.” It is only after I have a number of lumps of “lead” melted into the repair that I bring out the wooden lead-working paddles that come in the kit and start the smoothing process.
To smooth the “lead” lumps I start by dipping the end of the wooden paddle into the tub of paraffin that comes in the kit. The paraffin is there to prevent the paddle from burning so a lot of trips to the tub are necessary during the smoothing process. As the “lead” lumps are heated they begin to melt and it is at that point I can take a paddle and smooth the “lead.”
All of this sounds easy, and it is, as long as you don’t overheat the area and allow the “lead” to run off onto the floor. Paraffin on the paddle to stop the burning and judicious placement of the torch will give you good results every time.
Once completed, the “lead” repair can be refined using a right-angle grinder with a three-inch, 24-grit disk attached. Any spots not deemed suitable for a finish coat of plastic body filler can be reheated, refilled with the “lead” product and repaired.
After that is all said and done, the acid in the “lead” must be neutralized before applying body filler or primer over the repair area. I like to mix up a paste of baking soda and water to the consistence of mayonnaise and scrub that mixture onto the repair then rinse the area with clean water.
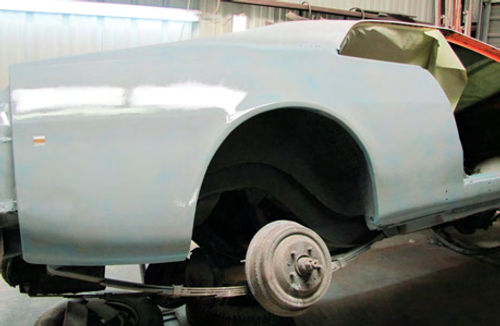
That brings the repair to the point where it can be finish worked with a thin layer of plastic body filler to deal with pinholes and other imperfections then covered with three coats of 2K primer/ surfacer (Photo 12).


