
How -to Installing a Dashboard Overlay
There Are Several Ways to Renew A Cracked & Aged Dash Pad. This Reader Was Pleased With His Overlay Kit.
MY 1970 COUGAR was in need of either a dash pad restoration or an expensive outright replacement. The original had developed several ugly cracks and holes, a situation not unusual for a car of its age.
The least expensive used replacement with the beginnings of cracks around the vents cost $445 from a Cougar specialist, plus shipping, plus repaint if my light brown was not available. A show-quality replacement from them would run $695.
Restoration by specialists was also very pricey, with one shop estimating around $500 and another, $1200.
Trying a Kit Instead
I opted for a $95 dash top overlay repair kit from West Coast Classic Cougar. The kit consists of the overlay or cap, a brief instruction sheet, and a tube of silicone cement.
The overlay is made of textured plastic molded to the exact contours of the original dash pad, with all the correct cutouts for vents, etc.
As it only comes in black, there is the extra cost of surface prep chemicals and the proper paint, which is not the discount store rattle can stuff.
Since I was passing through Salem, Oregon, near the home of West Coast Classic Cougar, I saved on shipping by going right to their shop to get the overlay (plus a lot of other goodies I hadn’t intended to buy).
The adherence of new paint to old vinyl is an issue, so I went with SEM brand Color Coat, a flexible coating specially formulated for vinyl and plastic car parts. SEM was very helpful in sending me a product guide and a paint chip chart from which I made a fairly close match.
An alternative would have been to have the paint custom-made to the original code by SEM or another blender, but at a higher cost. If you live in a large metropolitan area (I don’t), you might find a local shop that will match your paint and load it into spray cans.
You can get the paint from SEM in either spray cans or regular cans. I opted for a spray can, which was sufficient for the job, but had to be ordered from my local auto supply shop’s regional warehouse, a common situation in the area where I live. No big deal—it arrived the next day, although that isn’t always the case.
Even though I am leery of mixing products from different manufacturers, I did use the wax/grease remover and surface prep products that my auto supply shop carried in-stock. (Photo 1). I’m happy to say that things turned out fine.
Fitting the Overlay to the Dash Pad
The first step is to slip-fit the overlay onto your old dash pad to see if you got the correct one (don’t laugh!), and to see if you need to trim either it or the old pad.
About now you also will need to decide whether you want to leave the old dash pad in place, or work on it out- side of the car. I would say that if it is a simple shape and you can see ways to wedge, clamp or sandbag the overlay in place while the glue dries, then do it in place. My Cougar dash pad has lots of complex shapes, making the wedging and clamping a real challenge, so I worked on it outside the car and was glad of it.
If you are going to remove the old dash pad, remember three things: be patient, be creative, and be gentle. All of us have pried on plastic parts and had brittle mounting tabs snap off. Repairs can be difficult, to say the least, and embarrassing bad words might be said. In the case of the Cougar, I had an advantage in that the previous owner had removed the lower dash pieces to gain access to the gauges, thus exposing a couple of screws that I might have had trouble finding right away. My pad is mainly held in place by three Phillips- head screws across the top in the ventilator channels right below the windshield—easy to find—one right in the middle, and one more on each side between the “A” pillar and the center. There are a few more at knee height and below the instrument cluster that would not have been apparent until removal of some plastic pieces.
So, the procedure is to unscrew everything that seems to be holding the dash pad on, then pull and pry gently, up and out. If it doesn’t yield, there are screws, clips or tabs hidden by sadistic designers that you will have to outwit. That’s where the “be creative” advice comes in. If you use too much force, something will snap. At this point, stopping by a body shop or dealership would be a good idea, or maybe buying a shop manual.
As far as the overlay fitting the old dash, it was excellent. I had to enlarge the overlay’s cutout for the VIN tag by about 1/8”, but it needed no other trimming.
You will need to remove bulges on the old dash pad, and anything else that pokes up that would prevent the overlay from being in good contact with the old pad, or would somehow spoil a nice, smooth repair. My old pad had some rather sharp ridges or kinks at the corners by the “A” pillars and a few other spots. I found that a loose hacksaw blade laid on its side worked well to shave them off while following the contours of the pad.
For the more gently rounded warps or imperfections, the saw blade didn’t have anything to bite into, so I tried most everything with sharp teeth in my shop. The winner was a coarse wood rasp. Be very careful of gouging if you’re using power sanders or grinders; but you probably won’t need them anyway.
After smoothing the tears and bumps, I followed the instructions and went over the whole dash pad with 400-grit sandpaper, then washed it well with a sponge and detergent, and then followed that with the wax/grease remover.
Prepping and Painting the New Cap
You have to be careful when handling the overlay. It is thin, made of 20-gauge plastic material, and is quite floppy. I got a little hasty and caused a couple of small tears, which I repaired with some plastic scraps for backing, and Superglue to keep them from spreading any further.
I had already removed the various under-dash plastic pieces, so to give them a good cleaning I ran them through our dishwasher. (Editor’s note: In an effort to keep peace on the home front, it’s always a good idea to talk with your Significant Other before you use household appliances for your automotive projects.)
Next, I wet-sanded both the top and underside of the overlay with 400-grit sandpaper to improve adhesion, washed it well with a sponge and detergent and then with Windex (which contains ammonia, as instructed). After letting it dry completely, I cleaned it again with the wax/grease remover, and after that had dried, I applied a surface conditioner to ensure that the SEM Color Coat would bond well to the overlay.
The color match was a problem, but not a huge one. Although SEM has some exact code matches in their ready-made paints, they don’t have one for a 1970 Cougar, and it took me two tries to get close.
Over the years, different parts of the interior had faded to different degrees, so the issue was: Which part did I want to match? I solved that problem by matching the door panel color and painting all the under-dash plastic pieces the same as the dash pad. It took three paint coats to get good coverage over the black plastic, essentially the entire spray can, because I Sprayed fairly lightly to avoid runs. The only problem that I ran into was that as I neared the end of the spray can’s contents and its pressure had diminished, drops of paint would spatter out and would probably have caused runs had I not immediately applied my index finger paint smoother.
Making the Final Fit
After letting the overlay’s paint dry a couple of days, I applied rows of silicone cement to its underside and to selected spots on the old pad, including under the small tears to make sure that they would never grow, and then installed the new overlay.
Obeying the instructions, I was careful not to put cement close to the edges of the overlay so that none would ooze out and be visible. Later, I found that it would have been better to have put a thin coat right up to the edges to avoid a few puckers.
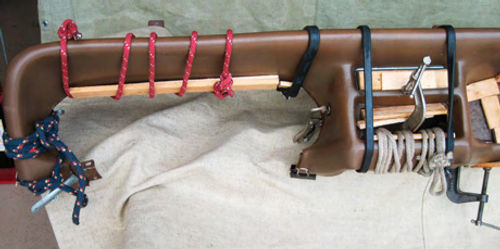
Next came the fun part where I had to figure out how to hold the cap tightly in place while the silicone cement cured. If done in place, the top surface would not be a great problem. You could cover it with baggies filled with fresh kitty litter, sand blasting media or dirt or gravel, which would make the overlay follow the dash pad’s contours perfectly. The vertical and overhanging surfaces will be a challenge. In my case, it would have been very difficult to wedge and clamp the complex insets and overhangs had I left it in place. Even on the workbench, it took a lot of creative construction involving rubber tie-downs, rope, clamps and wedges (Photo 2). Wood slats were needed to keep uniform pressure on edges that would otherwise have rippled and looked bad.
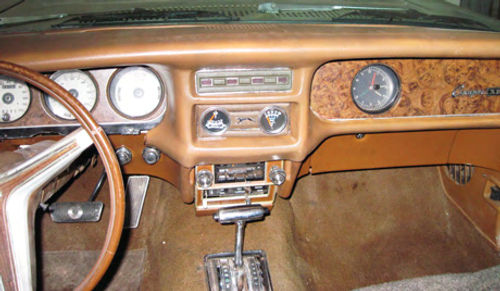
The cementing and wedging job took about an hour, even after carefully plan- ning how I was going to go about it. All those curved surfaces! Still, the final results look good (Photo 3).
If you carefully inspect along the edges, you can find a few places that show that this is an overlay and not the original dash pad.
But, this is a huge improvement compared to the ratty old pad, and it was done at a reasonable cost for a car intended to be a driver and not one headed for concours judging.
Furthermore, while I have had compliments on “what a great-looking dash” I have, nobody has asked if it is an overlay.
The project’s total cost, including the overlay, chemicals and paint, was $132, and I am quite happy with the results.
Resources
West Coast Classic Cougar
5377 Waconda Road, NE Salem, OR 97305
SEM Products, Inc.
1685 Overview Dr. Rock Hill, SC 29730


