
How -to In the Market For a Welding Helmet
When His Old Helmet Gave Out, This Restorer Went Shopping. Here’s How He Found a Suitable Replacement.
MY OLD JACKSON Master EQC welding helmet died after years of service, so I was in the market for a replacement. As a little background, if you have never used an auto darkening helmet the protective lens will remain somewhat clear so you can see with the hood down before striking an arc. The moment you strike an arc, the lens immediately darkens to protect your eyes.Just as important, the lens will clear again once you stop welding.
No doubt there are some old pros out there that laugh and shake their heads at the thought of these helmets. They also can likely weld with their eyes closed, working overhead behind their back. I have the utmost respect for those in that league, but for the rest of us, these auto darkening helmets can be a big help. Situations where you are unable to flip the hood up and down, such as lying on your back welding in close quarters; or stitch welding thin sheet metal, where there is a momentary pause in between the welding processes are just a couple of examples where these types of helmets take a giant leap over the traditional passive (fixed lens) type helmet.
Which One Should I Buy?
There are many manufacturers out there to choose from, including some names that were new to me. There also is a large selection of inexpensive auto darkening helmets that are priced so low you might confuse them with the fixed lens variety. There may be nothing wrong with many of these inexpensive helmets, but for myself, I prefer purchasing a helmet where I know that when the time comes, replacement parts can be obtained at my local welding supply shop. I also feel better trusting the safety of my eyes to a company I am familiar with, or at least one where I recognize their name.
After some research, my focus landed on the Jackson NexGen (made in the USA) and Miller Digital Elite (made in Korea) helmets. I liked the features offered in the Miller, and, as noted above, was familiar with the Jackson line from past experience.
Going online allows you to quickly obtain comparison information between different companies and models. But in some instances you still might find it necessary to call the manufacturer to determine what some of the listed features actually mean. For example, the Miller Digital Elite listeda“#3lightstate.” I kind of expected this was the lens shade with the helmet on, before an arc was struck, and Miller confirmed that. Jackson NexGen listed a “Clear Vue light state” (their spelling, not mine). So what’s the difference? According to a rep at Jackson, it appears there is none. Essentially it’s the same as Miller, “slightly shaded, probably #3.”
(If you find that you are interested in either of these products, there are websites and phone numbers listed at the end of the article.)
A Systematic Approach
I made up a list of “likes” for each helmet. Here are some of the things about each that went into my decision-making process.
Miller Digital Elite #241-979 (suggested retail $359).
1. Lens shade begins at #8 for welding as opposed to #9 in the Jackson. (This is especially helpful for me. While my eyes are healthy, I am unable to see well enough through #10 shade while welding thin sheet metal. My old helmet began at #9, but #8 might prove to be better yet. As my welding instructor once very aptly said, “If you can’t see your work piece, you can’t weld properly.”)
2. Slightly larger viewing area.
3. The front of the helmet opens for easy access to change the front lens. This feature currently is only available on the Black(#241-979)and Titanium Models.
4. Battery life is listed at 3000 hours, almost four times longer than the NexGen. This isn’t a deal breaker for the NexGen, but it certainly must go in the plus column.
5. Less expensive.
6. A $25 manufacturer’s mail-in rebate was available at the time but has since expired.
7. $25 worth of free merchandise. Five outside and two inside protective lens covers (you know you will consume those); a helmet bag; and a comfort cushion for the headgear.
Jackson NexGen #14989 (suggested retail $433.20).
1. 100% made in the US; helmet and electronics. This was confirmed twice with two phone calls speaking with two different individuals. If this is important to you, make certain to verify the fact again before purchasing. Given the ongoing changes in manufacturing, what’s true today may not be applicable tomorrow.
2. I am already familiar with the helmet, having both a passive (fixed lens) version and the Master EQC.
3. If needed, parts could be interchanged between the new helmet and the ones I already own.
4. Faster switching speed, 1/25,000 sec (Milleris 1/20,000sec).This is worth mentioning, but didn’t influence my decision.
Qualities In Common
There are also many features shared by both helmets, such as:
• Automatic shut-off after a predetermined period of inactivity.
• Special lens mode for grinding, welding and cutting.
• X-Mode (Miller’s terminology); for outdoor use and low current welding. It eliminates sunlight interference.
• An optional magnifying lens is available to fit inside the hood.
• Arc powered battery assist. Something resembling a tiny solar panel will take over the chores of the batteries during welding, thus extending battery life.
• A two-year warranty.
• Manually adjustable lens shade; delay and sensitivity, and here is what that translates to:
• Lens shade. Where most passive helmets come with a (fixed) #10 shade lens, both the Jackson and Miller have adjustable shades for welding, #9-#13, and #8-#13 respectively.
• Delay. This allows some control of the time it takes for the lens to switch to the “clearstate” after welding or cutting.
• Sensitivity. This control allows you to make the lens more responsive to different light levels, in special welding conditions.
So, What Did I Buy?
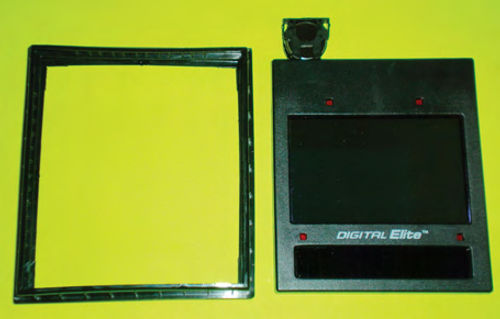
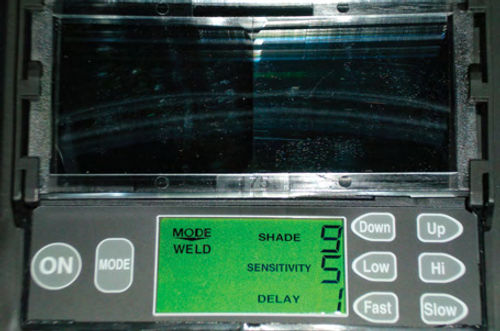
I gave it a lot of thought, and the fact that the Jackson NexGen was made in the US was huge to me, but the more I considered the two, I knew I couldn’t base my decision on point of origin. While I was familiar with the Jackson Photo3.The electronic shade and vinyl gasket are removed through the front. Two batteries fit into the top. Photo 4. A view from inside the helmet shows the easily read display and controls. hood, and could interchange parts with my current Jackson helmets, this probably only came to mind because of problems that arose with my old headgear in the first place. I am not saying there was necessarily anything wrong with it, but over the years I often had to “fiddle” with it and purchase replacement nylon pivot assembly parts.
Ultimately, the larger viewing area and front access of the Miller Digital Elite seen in Photo 1 won me over.
Where Did I Make My Purchase?
If at all possible, I prefer to purchase products from my local welding supplier. They have been helpful over the years whenever I had a problem, and generally their prices were quite acceptable. Had they been even 10% higher than the Internet competition, I would have chosen to trade locally with them.
Well, the price differential between the Internet and my local supplier turned out to be much greater that that, closer to 30%. A Google search located many supply companies. I ended up dealing with CYBERWELD based in Linden,New Jersey.
Their customer reviews sounded very positive, their price was $274.55 for the helmet and shipping was free. My only add-on purchase was the magnifying lens for $8.29. I placed the order online on a Tuesday; they shipped it out the next day via FedEx ground, and it was delivered to me on Saturday. That’s a plus for FedEx ground over UPS ground—Saturday delivery! Their communication via email was what it should be, confirming the order, and then confirming shipping. When calling their phone number with a question, a person answered. You can place orders over the phone, but there is a small surcharge for doing so. I would have no hesitation in dealing with them again, and from my standpoint having the shipping included makes price comparisons much easier. I realize the shipping is built into the total price, but it simplifies things.
A Closer Look at the Miller
Now that I have the helmet, let me point out a few things.
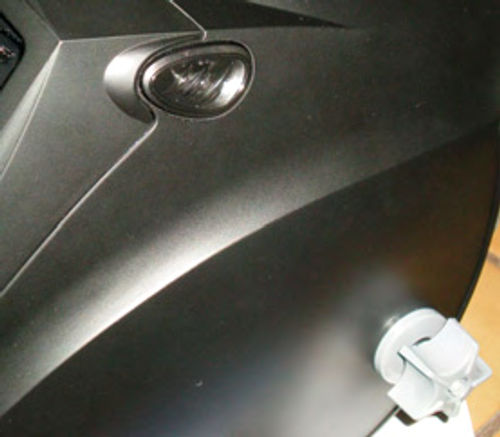
Photo 2 shows a close-up of the front lens opening and the left-side release button. This is used for changing the front lens and for access to the electronics. It’s a little awkward to get open; three hands would make it easier. This is most likely because the helmet has a lot of flex in it. Each button requires firm pressure before the lens frame can be pulled free. It’s easiest to press one button, then pull that side of the lens frame forward disengaging it, and then repeat the same with the other side. I found the best way to get hold of the lens frame was to use my fingernail to pull on the top edge. If there’s a better way, I have yet to discover it. This isn’t a big deal, but the point is it’s not as easy as you might imagine it to be. On the other hand, they certainly don’t want it accidentally falling out.
Photo 3 shows the electronic shade and vinyl perimeter gasket. Once the front cover is opened, this simply lifts out. Note the lithium battery removed from the top of the shade. There is a second one on the other side. Photo 4 is the view looking inside the hood with the shade turned on. The information on the display is large and easy to read, and the controls are obvious. Notice also the optional magnifier lens is in position in front of the shade. This simply slides in from the top, nothing needs to be removed from the helmet to do it. This was money well spent, costing only$8.29.It’s available in eight different magnifications, from 0.75 to 2.50.

So how do I like using the new helmet?
As Photo 5 shows, I didn’t waste any time before trying it out. Since I do a lot of welding outdoors, the “X-Mode” was immediately found to be of benefit eliminating unwanted shade darkening caused by the sun’s rays.
The improvement in adjustment controls when compared to my old helmet quickly became apparent. While the choice of shade number was easily defined with either helmet, the old Jackson Master EQC had small knobs for adjusting sensitivity and delay. There was really no way to tell someone what you had either adjustment set at. Should someone else use your hood and change the settings, you had to guess where you previously had it set, unless you made your own reference marks. The display window and incremental control adjustments show the improvements that have been made in the 14 years since my last purchase. (I should point out that the Jackson NexGen has a display similar to the one on the Miller Digital Elite similar display.) As noted, the magnifying diopter addition is great; I would highly recommend it.
Some Advice Regarding Eyeglasses
I wear eyeglasses with progressive (multi-focal)lenses and often find myself in positions where my eyes are sighting through the wrong part of my glasses when welding. The magnifying diopter compensation helps tremendously in these situations. Better yet, I recently purchased a set of single vision (reading) glasses, and that eliminated the welding problems associated with progressive corrective lenses. Still, the magnification lens is an added boost. And should I desire, it can quickly be removed.
Buy the Features You Need
There are other quality auto-darkening helmets available, and using the Internet and companies like Cyberweld are good ways to compare a large variety of products. However, don’t forget to check with your local welding shop to see what they have to offer. And keep in mind that the importance of the available features varies depending on your needs and how much you wish to spend.
Resources
Miller Electric Manufacturing Co.
1635 W. Spencer St.
P.O. Box1079
Appleton, WI 54912-1079
Jackson Safety
Manufacturing and Distribution Center
5801 Safety Drive NE
Belmont, MI 49306
Cyberweld
J.W. Goodliffe & Son, Inc.
1900 E. Elizabeth Ave.
P.O. Box 4370 Linden, NJ 07036


