
Crossing the Finish Line
After Nearly Two Years, Project ’46 is Going Back on the Road. But First Let’s Talk About Wheels, Hours Invested &...
THE TIME HAS come to put this ride on the ground. That means wheels and tires and that means decisions on wheel styles and tire sizes. Where wheels are concerned I could spend hours thumbing through catalog after catalog looking at everything from 14- to 20-inch-diameter wheels for this car. Have you seen the selections available? I have. If it’s round, someone has turned it into a wheel.
Where tires are concerned my decision on wheel selection will help dictate which tire and what size. You can’t put a big fat tire on a skinny 20-inch wheel anymore than you can put a skinny racing profile tire on a 14-inch wheel. The look just isn’t there.
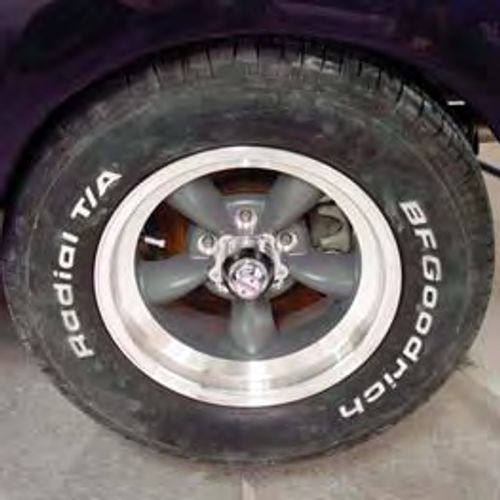
In the end I elected to stay with the old school look that has been prevalent throughout this build and went with American Racing Wheels Torq Thrust D style wheels (Photo 1). These are 15-inch wheels that are seven inches wide with gray painted spokes and a brushed aluminum rim.
Determining Wheel Size
How did I settle on 15-inch wheels that are seven inches wide? Fifteen-inch diameter wheels are the most common sized wheels out there and since the theme of this car is old school the choice came naturally. To determine the correct width all I had to do was to figure out the needed tire clearance and the wheel offset and that left me with the correct wheel width.
OK, there is a little more to it than that. The first step to determining wheel width is to determine the tire clearance. If you mount a fat radial tire on a seven-inch-wide wheel you automatically have a total tire width of about nine inches. I have 11 inches of rear wheel well space as measured from the inside edge of the rear fender to the inside of the wheel well. That’s the space my wheel and tire will have to tuck into. Subtract nine inches of tire width from the 11 inches of wheel well space and I end up with about an inch of clearance on the inside and an inch of clearance on the outside. Thus the need for seven-inch wide wheels.
That’s the easy part. The hard part starts when you pick up the phone to call the wheel guy and he asks about the desired wheel offset. What’s wheel offset?
Offset is defined as the distance from the inside edge of the wheel to the mounting flange. In conjunction with offset you will also hear the term “back spacing.” These are two different measurements but result in the same outcome as far as wheel widths are concerned.
Here is how it works. If a seven-inch wide wheel has a back spacing of 3.5 inches it also has an offset of zero. That means the mounting flange is centered in the wheel (7 - 3.5 = 3.5). If a seven-inch wide wheel has a back spacing of 2.5 inches it also has an offset of negative 1.0-inches. (7- (2.5+1.0) = 3.5) Negative offset simply means the mounting flange has been moved inboard, or closer to the inside edge of the wheel. A good example would be a seven-inch wide “deep dish” wheel.
That’s the definition of offset, now here is how to determine what offset works best for a particular application. I start by laying a straightedge vertically on the axle mounting flange then measuring the distance from the mounting flange to the inside edge of the fender wheel opening (Photo 2). That measurement is six inches.
Since a seven-inch-wide wheel with a zero offset has a measurement of 3.5 inches from the mounting flange to the outside edge of the wheel, plus roughly one more inch taking into consideration the width of the mounted tire, I’m left with roughly one and a half inches of clearance between the tire and the fender. That’s not bad, but if you take a closer look at Photo 2 you can see I’ve added a half-inch wheel spacer to the axle to see if adding more offset to the wheel would improve on the look. In the end I elected to go with seven-inch-wide wheels with a zero offset and hung the wheel spacers back on the wall.

You should also notice that I used the rear wheel well to make all of my calculations. Front wheel wells are always deeper and roomier to provide the needed clearance for turning and therefore don’t lend themselves well to calculating wheel sizes and offsets. You should, however, test fit the wheel of choice on the front just to be sure no clearance problems exist. Yes, most good wheel dealers will allow you to test fit a wheel before selling it to you.
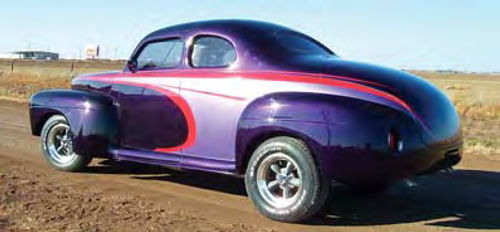
As for tire selection, I’ll be going with BF Goodrich Radial T/A P215/65R 15 tires on the front and BF Goodrich Radial T/A P225/70R 15 tires on the rear. How does the car look with this wheel and tire combination? Take a look at Photo 3.
Checking the Ride Height
Theoretically the ride height is perfect. It had better be because I really don’t have much of a choice when it comes to altering the ride height up front. That’s OK as I spent a lot of time working out the proposed ride height for this car back when I modified the frame. With the wheels and tires on the car I can see my calculations were pretty close.
The rear suspension is a little more forgiving. Back there I installed adjustable coil over shock absorbers that will allow me to increase the tension on the coil over springs to push the rear of the car upward, or release a little tension on the springs to allow the rear of the car to drop. As the car now sits I have a slight rake to the front which I think is about perfect.
A warning: Get the ride height correct before delivering the car to the front-end shop for an alignment. Even a slight change to the way the car sits can alter the setting on the front suspension. If you change the stance of the car after having the front end aligned it is imperative that you have the front end aligned again.
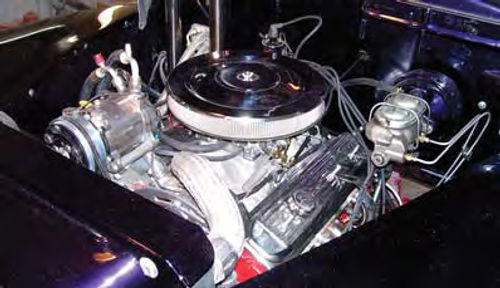
The next group of items needed for this ride is the fluids (Photo 4). The rear axle needs a quart of axle grease, the automatic transmission will require roughly two gallons of Automatic Transmission Fluid (ATF), the engine will need five quarts of 10-30 motor oil, the power steering unit will need about two quarts of power steering fluid, the radiator will need two gallons of antifreeze, and the windshield washer tank will need a quart of washer fluid. To be certain the fuel gauge is working properly I’ll add at least five gallons of gasoline to the fuel tank.
It’s Time to Start the Engine
The next step is to add a battery and power up the car. With the battery hooked up I don’t want to attempt to start the car until I’ve had a chance to give the electrical system a final once over. I’ll check the lights, the turn signals, brake lights, license plate light, interior lighting and, lastly, the sound system.
When I’m satisfied that no wires are smoking and all circuits are go, it’s time to bring out the Affordable Fuel Injection manual and go through the recommended start-up procedure. The best way to do this is to fold the manual open, climb into the driver’s seat and start reading.
Step One is to turn the ignition switch to the ON position and listen for the fuel pump to turn on for a few seconds then turn off. This procedure is repeated a few times and the fuel system is checked for leaks. If no leaks are found, it’s time to start the engine. The engine should start without having to depress the accelerator pedal. After starting, I let the engine idle for a few minutes then shut it off. It’s time to set the timing.
With the ignition switch turned off, I disconnect the single lead wire located behind the distributor. This is the wire the computer uses to monitor and adjust the engine timing. Disconnecting this wire stops the computer from trying to adjust the timing as you manually set the timing by moving the distributor. With this lead disconnected, I restart the engine and set the timing to 6 degrees, kill the engine, reconnect the lead, wait at least 10 seconds and restart the engine. If the Check Engine light flashes a code 42—a series of flashes best decoded by referring to the installation manual and indicating the single lead timing wire is disconnected—I disconnect the battery for at least one minute before restarting the engine. That will clear the code and at this point the engine can be started so the fuel injection system can take over engine management and yield a lot of nice driving (Photo 5).

Charging and Checking the A/C
Charging the Hot Rod Air A/C unit is not a do-it-yourself task. The system must be mechanically evacuated until a vacuum is created within and held there for at least an hour before adding R134A refrigerant. The amount of R134A introduced into the system is also critical. This particular unit calls for exactly 1.8 pounds of R134A refrigerant. An undercharge of gas will result in insufficient cooling while an overcharge of gas can damage the system.
It’s also a good idea to have them introduce a leak-detecting charge to the system as they fill it. Generally a leak in the system will reveal itself when the system initially refuses to vacuum down and hold that vacuum prior to adding the R134A. However, on occasion the leak will be so slight that it takes several weeks for the system to leak down to a detectable level.
What’s considered detectable? No more cold air out of the vents. A leak detecting charge contains a dye that can be seen under UV light. That makes the leak easy to find and fix.

Conducting a Walk Around
Before I take this ride out for its inaugural “get some thumbs up” spin, I thought I would take you for one last trip around the car. (I showed or told you about most of the alterations made to this ride as I moved through this project.)
Starting at the front of the car, I discarded the front bumper to give the ’46 Ford Coupe a little more streamlined look. I also did away with the chrome on the grille and added a narrow valance panel underneath the grille (Photo 6).
On the sides of the car I welded the running boards to the rocker panels and the rear fenders. I think it cleaned up the car’s look by getting rid of a lot of body seams. I am particularly pleased with the outcome of having welded the rear fenders to the body (Photo 7).
Moving to the deck lid, I rounded off all four of the lid’s corners. This is a very rounded car and it just didn’t seem right to leave the squared-off corners of the deck lid, especially the top two corners (Photo 8).
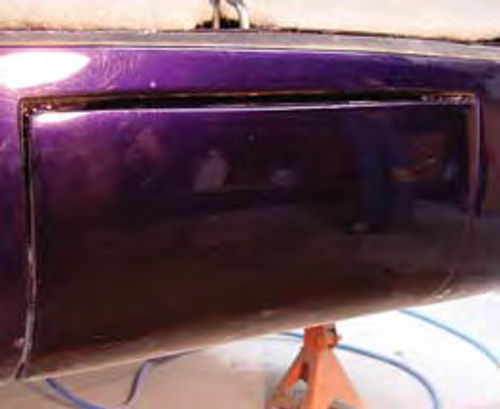
At the rear of the car I spent quite a bit of time hacking, chopping and welding in search of the perfect hidden license plate housing. In the end, I think this flip down door really completes the look (Photo 9).
Recessing the tail lights is something I spent a lot of time working out. The results speak for themselves (Photo 10).
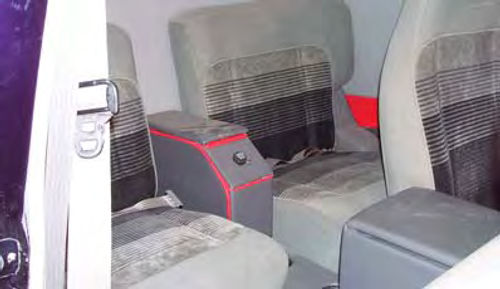
Inside the car, I decided to move away from the considered norm of painting the dash the same color as the exterior of the car. Instead I painted the dash a silver metallic color to complement the gray interior and gave it a red stripe for the sole purpose of bringing the outside in. I think it worked out pretty well (Photos 11a and 11b).
A 2000-Hour Project


This brings me to a few final thoughts about this project. I could talk on and on about things I did to this car, the changes I made during the process of building this car, and whether the end result is worth all of the effort I put out. Instead, I think I’ll discuss a few of the more important factors such as time, money and budget.
I never enter into a project this size with a written-in-stone timeline. I do know from experience roughly how long a complete rebuild such as this is going to take, but if that time frame comes and goes and the car isn’t finished I don’t get into a panic over not having the car completed. A build like this takes as long as it takes.
We have a saying in this business that goes something like this: “Never enough time to do it right, but always enough time to do it over.”
Doing it over means spending more money and if there is one thing I hate it’s spending money twice. Fortunately, most garage restorers/garage car builders aren’t on a time schedule. That should equate to slowing down and doing it right the first time.
Are you curious about how long it took? I spent roughly four hours a day, five days a week for almost two years working on this car. You can calculate the total while I go on to the budgetary aspects of a build like this.
I won’t disclose how much money was spent on this build, but I can tell you that I know the amount right down to the last penny. Is the car worth what I spent building it? Yes, without a doubt. And that reminds me of another saying we have in this business: “If you spend $5000 on a $500 car, you still have a $500 car.” This saying is well worth remembering if you are considering pouring money into a car that only you will love. And that brings me to budgeting.
I can’t tell you how many people I’ve talked to over the years who thought they could restore an old car or build a hot rod for a few hundred bucks. They seem almost shocked when I tell them the job they are considering will actually cost in the five-figure range if not a lot more.
What that tells me is that they never bothered to work out a cost budget, which is the easiest thing in the world to do, especially after the invention of the PC.
Most home computers come equipped with some form of spreadsheet software. What’s a spreadsheet? It is little more than a page filled with rows and columns, each one of which can be summed and totaled to your heart’s desire. Parts names can be listed, parts sources can be listed, and parts prices can be listed. That gives me a proposed budget before I ever turn a wrench and lets me continually compare my actual spending to my estimated spending. You’ll be surprised how thrilled you can become seeing the actual cost of a build hovering below the estimated cost. This is a spouse-pleasing moment.
What parts should be listed on the spreadsheet? I list every conceivable part the car will ever need. I’m talking about everything, including the price of solder for making wire connections and the cost of hand soap for cleaning up before supper. Yes, I know listing parts can be a daunting task, but list everything you can think of and don’t hesitate to add rows to the spreadsheet as you move deeper into the project and find more parts you need.
Once the initial parts list is complete, I browse catalogs, Internet sites, and even call my local parts store for prices. Each part is priced and the source is named. Six months from now when I need a pair of power window regulators it helps to know where I got the price listed on the spreadsheet.
One thing I don’t do is include the price of labor in the budget. I don’t have to as I do 95 percent of the labor myself and my labor rate varies depending upon my attitude on a given day. The remaining five percent is rolled into the cost of the part. A good example is engine work. Engine parts only cost so much. It is the labor to make all those parts work correctly that drive the cost of a good engine through the roof.
As work on the project begins, the actual cost of the part being purchased is listed in a separate column next to the budgeted cost column. That lets me know if I’ve found a good deal or if I’ve blown the budget in a particular area. Speaking of good deals, I never pass up the opportunity to browse eBay for a good deal. People are always changing their minds when it comes to car building. Someone may have purchased the exact part you need but later decided to go another route. You may get that part on eBay for a song.

An Important Word About Safety
The last issue I want to address before closing the doors on this ride is shop safety. You saw photographs throughout this build that showed jack stands in various placements under the car. What you could not see was that at any given time no fewer than eight, count them, eight jack stands were supporting the car. Some were under the frame; others were placed to support the suspension in order to keep those components at ride height. Never, I repeat, never go under a car that is not properly and securely supported by jack stands.
Now It’s Your Turn…
Whether your next project car still has weeds growing around it or has been collecting dust in the garage for the past few years, it is time to pull some weeds and do some dusting. Old cars like the ‘46 only return to the road when someone like you takes the time to put them there. Go to work…I hate touring alone.
See you on the road.
(Editor’s note: Did you start subscribing after this series began, missed an issue along the way or would just like to have it all in book form? Well, the entire step by-step series will be available soon as “Project Street Rod” and we’ll let you know how you can get your copy. (They’ll also make great holiday gifts.)
Project car provided by:
LPL Body Works, LLC
5815 Contented Lane
Amarillo, TX 79109
Paint and body repair books and DVDs


