Confirming Valve Timing
When a Car Won’t Fire Up, You Suspect the Battery or Starter. But Sometimes, You Need to Check the Valves.
AFTER THE SECOND installment of my article “Battery & Starter Troubleshooting” ran in the April issue, it was brought to my attention that I may have some unfinished business. That is, when I referenced a possible problem with regard to valve timing in the article, I didn’t address the various ways to check for such a problem.
So let’s recap by saying that difficulties in starting can go beyond the typical battery and electrical system problems that are most common. You could, for example, be dealing with a jump in the valve timing. That can cause your starter to spin the engine erratically, with a different sound as the valves would be opening and closing at improper times with relationship to the piston travel. The distributor rotor would also be out of position. This process is not something that just happens all of a sudden (at least in 99% of the situations), it is due to a gradual wearing of engine components, accompanied by a decrease in engine performance over a period of time.
Eventually, one day it happens—the engine shuts down with a different than normal sound. When you go to restart it, the engine spins to a different rhythm, and fails to start. Possibly you’re on your way home and you hear an uncomfortable spinning sound come from the engine, and the vehicle dies. The composite timing gear finally gave out. Many small block Chevy owners have certainly experienced that. These situations make diagnosis more obvious, especially when it is a vehicle you have owned for years, and have been noticing deterioration in engine performance.
But what about an unknown vehicle, one that is new to you? It won’t start, and you have no clues from previous behavior to go by.
Unless you have a good suspicion that there are mechanical problems, first eliminate the possibility of battery, electrical and advanced ignition timing as factors. If your valve timing has jumped, it’s very unlikely it would ever start, and if it did, it would run so poorly you couldn’t drive the vehicle.
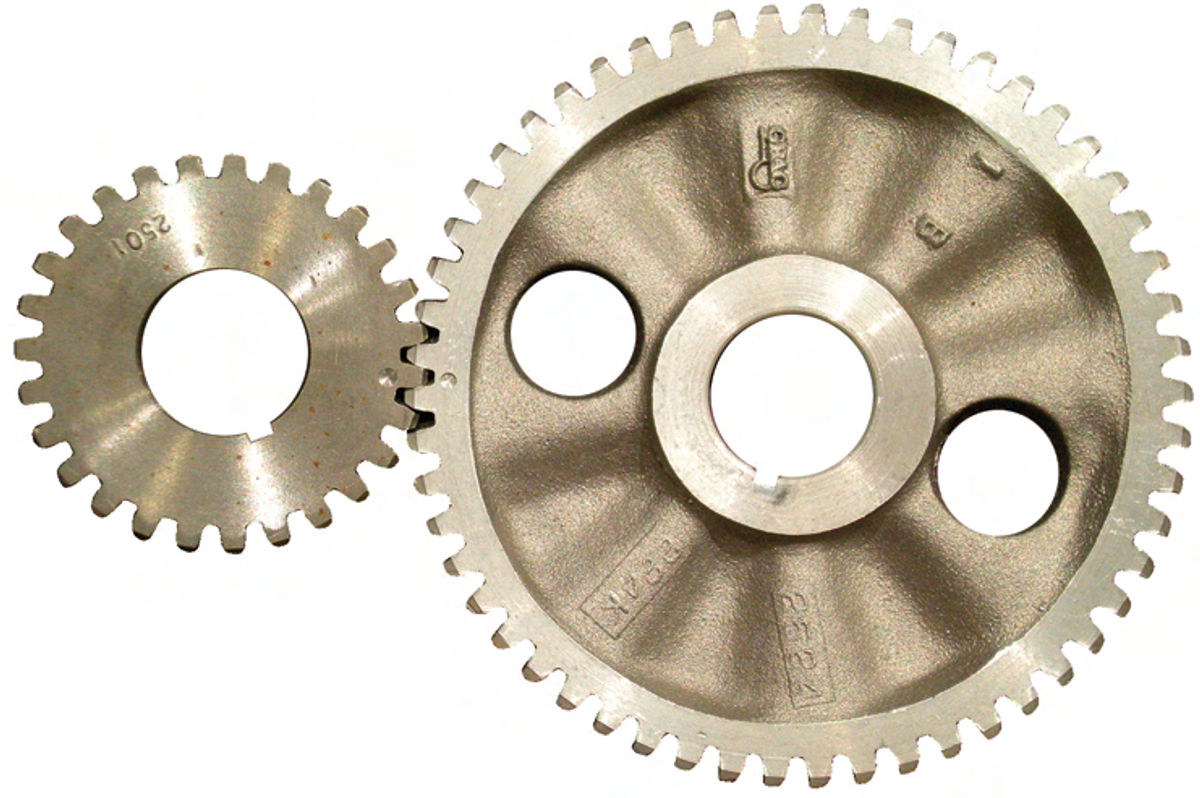
If the camshaft were driven directly by the crankshaft in your engine, in other words “gear to gear,” jumping time would be very unlikely although not impossible if a composite camshaft gear is used. An example of this setup is in Photo #1. These gears fit the 194 CID engine in my ‘66 Chevelle. The cam gear is aluminum and the crankshaft is steel. Look closely and you can see the timing marks on each gear. Check your shop manual to see if your engine is set up like this, or uses a chain or possibly a belt. Those can and do jump time. On vehicles using a timing belt, there may be an inspection port where you can view the teeth on the belt. Others may require the removal of a sheet metal cover to view the belt. Without too much difficulty you can possibly view the cogs and actually confirm visually if they are aligning with their timing marks. If you have these options, do a visual inspection. Most manufacturers recommend changing these belts every 50,000 miles, and it is often neglected.
Where a chain is used, you would have no way to visually inspect the chain and gears unless you started taking the engine apart. Once the timing chain cover was removed you would quickly spot a cam gear with broken, worn teeth, or a loose chain, and could also verify that the timing marks on both gears have become misaligned.
Some Easier Inspections
You don’t need to begin with a teardown; however, as there are several ways to check and see if your valve timing has indeed jumped before you start to disassemble your engine.
First make sure your vehicle is in Park or Neutral with the brake on, and the ignition system is disabled. On a conventional points-type ignition you can ground the distributor side of the ignition coil, usually the negative side. Simply connect a jumper wire with alligator clips to it and a good ground. On an HEI-type ignition (High Energy Ignition), unplug the battery connection from the cap. Also, you can choose to remove one or all of the spark plugs. This also would make it easier to rotate the engine by hand. (Use low-pressure compressed air and blow off the areas surrounding the plugs prior to removal. No need to risk getting any debris in a cylinder.)
And, if you are a relative newcomer to the hobby, here are a few terms and explanations that might help you with this project.
• The term Top Dead Center or TDC refers to the piston being at the top of its cylinder. The piston will actually remain stationary for a moment while the crankshaft continues to rotate. From the moment the piston reaches the top until it starts to move again would be measured in degrees. Half of that duration would put you exactly at TDC. This should correspond with zero on the timing plate.
• When I make references to valves, if you are uncertain which is which, identify both your intake and exhaust manifolds. The exhaust valve will line up with a port for the exhaust manifold, and the intake will be in line with an intake manifold port.
• Normal engine rotation: When viewing the flywheel and it’s located between you and the engine, rotation is counterclockwise.
• If the valve timing is correct, you should expect to find the following: With the #1 piston at the top of the cylinder (Top Dead Center) on its compression stroke, both the intake and exhaust valve are closed, and the distributor rotor is pointing toward the #1 terminal of the cap.
• If the valve timing has jumped (is incorrect), depending on how far off it is you might expect to find the following: When bringing the #1 piston to TDC on the firing/compression stroke there is little or no compression evident from the cylinder. One of the valves may be open, and the distributor rotor may be pointing in between terminals or at an entirely different one.
Now, let’s do some troubleshooting:
1. A quick way to check valve timing is to verify the location of the distributor rotor and that you have compression. Remove the #1 spark plug (as we noted earlier, removing all of them will make for easier rotation of the engine). With the tip of your finger over the #1 spark plug hole, use a remote starter button and bump the engine over, or have an assistant carefully do it using the ignition key. You should start to feel pressure blowing against your finger, and hear air escaping around it. This is the compression stroke.
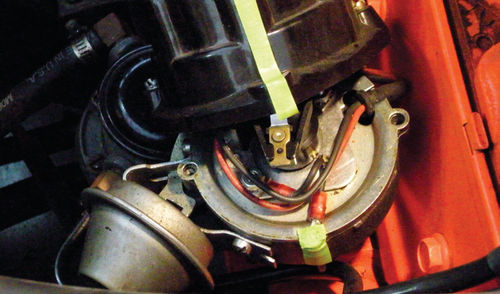
Now, by using a socket and ratchet on the crankshaft bolt, or by possibly turning the fan blade, have your helper continue to rotate the engine by hand. Make sure to rotate in the proper direction. You should continue feeling air pressure against your finger until the timing mark lines up with zero (TDC). If that’s the case, next remove the distributor cap to verify the rotor is pointing toward the terminal for the #1 cylinder as seen in Photo 2. If the answer is “yes” to both compression and rotor location, it would appear your valve timing is OK.
If you want to go a step further, you also can visually verify the valve timing. To do that, read check #2 below.
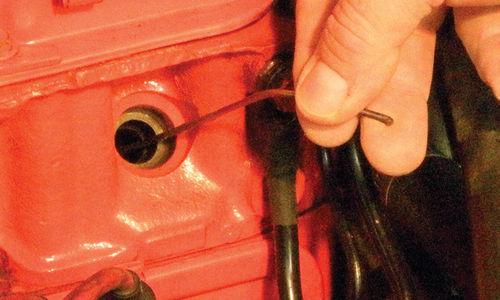
Note, before getting too far along in making these checks, it’s a good idea to make sure that you are not being mislead by a timing mark on the harmonic balancer (also referred to as a vibration damper) that has slipped. This has nothing to do with a jump in valve timing but would create a confusing coincidence. On occasion, the outer steel ring of the harmonic balancer can actually slip on the section of rubber between it and the inner hub. When this occurs, the timing mark will have moved, and will no longer accurately represent TDC. Sometimes it can slip quite a bit. A simple test to see if the ring has slipped is to use a piece of gas welding rod or a small screwdriver to feel inside the spark plug hole (Photo 3). With the timing mark lined up at zero, you should feel the piston at the top of the bore. If you are unsure, rotate the crankshaft slightly and note if it rises higher in the cylinder, or starts to drop.
The odds are that all things won’t go wrong at the same time, but you should be aware there is always the possibility.
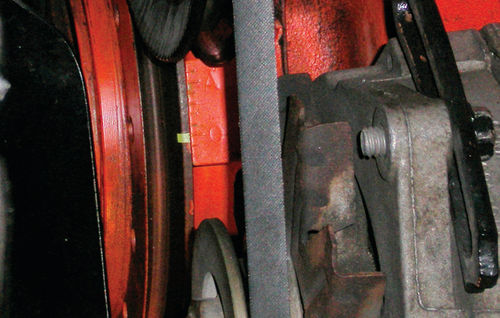
2. Here is probably the best approach to checking the valve timing. You will actually verify the valve timing by viewing valve or lifter movement. We don’t need a degree wheel or anything like that. This is just a visual confirmation. Start by putting a mark exactly opposite the timing mark on the harmonic balancer. In other words, 180 degrees off (Photo 4). In this case, a tiny piece of masking tape served as the second reference point.
Now you will know when the piston is at both the top and bottom of its stroke. Do what is necessary to allow you to see either your #1 cylinder rocker arms, lifters or the valves themselves. On my 194 engine I chose to remove the rocker arm cover, although I also had the option of removing one of the lifter covers on the side of the block.
Start with the timing mark lined up at zero. The piston will be at the top. Next start to rotate the crankshaft by hand (as the engine would normally rotate). Once again it’s not necessary, but removal of all the spark plugs will make this much easier. Proper valve action is as follows:
As the piston travels downward with both valves remaining closed, that’s the combustion stroke.
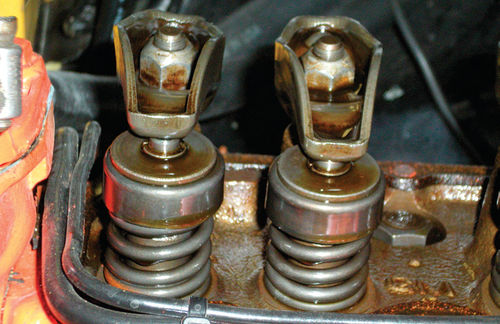
If the intake valve starts to open immediately, it’s the intake stroke. Photo 5 shows the rocker arm just beginning to depress and open the intake valve. (The valve to the right.)
When the second mark lines up with zero on the timing plate (the new mark you created), the piston is at its lowest point and will start the next cycle. Slowly continue to rotate the engine while watching the valve action.
As the piston rises with both valves remaining closed, that’s the engine’s compression stroke.
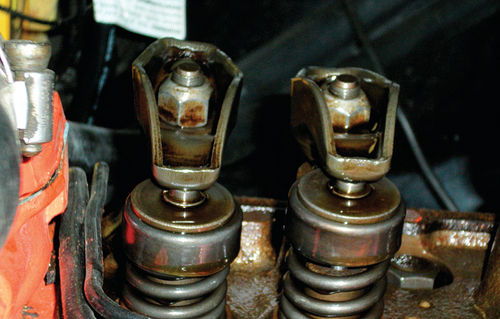
If the exhaust valve starts to open immediately, you’re on the exhaust stroke. Photo 6 shows the rocker arm just starting to open the exhaust valve.
So what’s the big deal, watching intake-compression-combustion-exhaust? Well, if the valve timing has jumped, knowing where the piston is and what should be happening will confirm it.
For example, if the piston is traveling upward on the exhaust stroke but the exhaust valve doesn’t open until it’s halfway up or almost near the top, you have jumped time. The same thing applies on the intake stroke if the piston is already in a downward motion before the exhaust valve closes and the intake valve starts to open. A rather obvious example would be the intake valve opening as the piston is traveling upward. Valve timing jumped? I think so!
(For those of you where your timing mark is located on the flywheel, you will need to make a second mark exactly opposite it on the back of the flywheel. Or you might find it easier to temporarily establish a reference pointer and mark your front pulley or harmonic balancer. A piece of metal coat hanger could be used as a pointer. Locate it as close as possible to your balancer and secure it to a bolt. Clean the pulley or balancer so you can now make two reference marks. With the timing mark on the flywheel lined up, make the first mark on the balancer to establish TDC. Now make a second mark exactly opposite.)
If this appears to be becoming a big production, you can make your observation by only watching half the cycle. When the piston is approaching TDC if both valves remain closed before and after TDC, this is the compression stroke. The next time you are coming up on TDC you should see the exhaust valve closing as it reaches zero and the intake is opening. There is actually a minimal amount of time where the valve action overlaps by design.
Knowing when the piston reaches the bottom of the cylinder gives you more to view and confirm. Should you have any doubts, this is worth the effort.
3. This method allows you to see if your timing chain and gears have excessive looseness. Use the fan blade (unless it’s a clutch-type fan) or a socket on the crankshaft bolt to rotate the engine. First rotate the engine (clockwise as viewed from the front of the crankshaft) until your timing mark is at TDC. You will either be on the compression (firing) stroke for your #1 cylinder, or the exhaust stroke, but that’s not important.
Remove the distributor cap so you can view the rotor. Now rotate the crankshaft in the opposite direction (counterclockwise) and stop the moment you notice any movement of the distributor rotor. Note how many degrees of travel the crankshaft moved. Perform this several times until your reading is consistent. A second set of eyes can be helpful here. If you need to, take a piece of masking tape, and mark it off in degrees as seen in Photo #7. Use the same spacing as is on your metal timing plate. Now wrap it around the balancer. This will extend your scale range for this evaluation. Of course you will expect to see some delay in response when changing direction of the crankshaft rotation as a certain amount of backlash is normal. If you notice quite a bit of reverse travel before the rotor moves, this indicates extreme wear. While this doesn’t actually confirm the engine has jumped time, it’s a good indicator that it may have, and if not, possibly will in the near future.

The 194 engine in my Chevelle was recently rebuilt (which included new gears) so I thought I would see how many degrees the crankshaft traveled when changing direction of rotation. It appears to be 6 degrees. This is not to say 6 degrees is a standard to go by, but it is a place to start. I think it’s safe to say if you see 20 degrees of travel, you have found the problem.
Once again, there are many vehicles where the timing mark is not located on the harmonic balancer. If your timing mark is on the back of your flywheel, you may have to create a scale of some kind to be able to measure this travel. You might consider purchasing a timing tape to temporarily wrap around your balancer or pulley.
These timing tapes can be purchased through companies like Summit Racing Equipment in Akron, Ohio, for minimal cost, and are soldbased on the diameter of your harmonic balancer (summitracing.com).
Performing a compression test would alsoshow all cylinders to have very low or no compression had there been a jump in time, (although I wouldn’t rely on this test solely as a means of complete diagnosis). Look in your shop manual for your engine’s specifications.
Before performing such a test, verify in your shop manual that your engine is not an “interference fit.” In this type of engine, the pistons can actually make contact with the valves should it jump time, causing internal damage. Granted, damage may have already been done, but why take a chance on compounding the problem. (I believe this would apply mostly to four-cylinder engines).
Some Handy Helpers
Here are a couple of tips that may make performing these tests easier on some engines.
If you want to see if there’s compression in the cylinder but it is too difficult to reach it with your finger, use a short section of rubber fuel hose and insert it into the spark plug hole.
If your #1 cylinder is very difficult to access, you can perform the same tests using the first cylinder in the second half of your firing order.
For example, the firing order of my 194 engine is 1, 5, 3,—6, 2, 4.
The first to fire in the second half is the #6 cylinder. This is the cylinder that fires opposite #1, where the timing mark lines up once again on the second revolution of the crankshaft. (It takes two revolutions of the crankshaft to fire all of the cylinders, while the camshaft only rotates once.) You can do this with any vehicle’s firing order as long as it has an even number of cylinders.
Your cylinder may not end up being #6, but whatever it is, remember to substitute it for any reference made here to the #1 cylinder.
So, as you can see, there are several ways to approach checking the valve timing, and probably others as well. Some people may simply rely on judging the location of the distributor rotor, and that might work most of the time.
But then there are the unknown situations; did someone disturb the distributor in an attempt to get the vehicle started? Maybe your distributor rotor is out of position only because it was equipped with a nylon drive gear which has been stripped.
To be sure, actually watch the valve action in relation to the piston’s location as it rotates through its cycles.


