
How to check the accuracy of the gauges on your vintage automobile
We May Put More Faith In Our Vehicles’ Gauges Than We Should. Checking Will Show If Your Confidence Is Justified.
MOST OF US faithfully rely on the accuracy of our dashboard gauges, yet we are asking a lot of them considering that they likely were installed decades ago during factory assembly of our vintage vehicles. Now, consider that corrosion, wear and other age-related factors can combine to cause significant errors.
Erroneous gauge indications can lead to unnecessary maintenance being performed. On the other hand, required maintenance may be neglected because we are unaware of the true condition of the engine and related components.
Meanwhile, errors in readings on fuel gauges and speedometers may bring about embarrassing problems even if they are not safety concerns.
As restorers, it’s easy to understand why checking gauges for accuracy is especially important whenever you buy a “new” vintage vehicle. When you test other systems for proper operation on your latest acquisition, you also need to verify the gauges for correctness.
Note: You can turn to your Factory Service Manuals for help in this project, but you’ll find that while they usually contain good troubleshooting advice for completely inoperative gauges, they offer little information on partial failures that can cause misleading readings.
So let’s look at some ways to check the accuracy of gauges that appear to be working.
Coolant Temperature Gauges
One gauge that has caused a great deal of unnecessary effort and worry is the coolant temperature gauge.
Obviously, we expect our temperature needle to remain in the center of the range between “C” and “H.” If the gauge routinely stays above that point, we conclude that something is wrong. But before we start replacing parts, flushing the system or take more drastic measures, we need to verify the accuracy of the gauge reading.
Start by bringing the engine up to normal operating temperature.
Measure the temperature at key points on the engine with a remote sensing thermometer or a contact thermometer. Check the temperature at the top of the radiator near where the coolant enters, at the thermostat housing, and near the location of the gauge sender in the block.

If you’re using a remote sensing thermometer, remember that the size of the measured area varies depending on its distance from the thermometer. Check the instruction sheet that comes with the thermometer to find that ratio. Several popular ones will show that, if the thermometer is eight inches away, the measured area has a one-inch diameter. If the thermometer is four inches away, the area is a half-inch.
To get the most accurate reading possible, wipe the area that you will check with a rag containing degreaser to remove dirt or grease that might act as a thermal insulator.
Many owners are surprised to learn that the normal operating coolant temperature of many engines is in the 190- 210° F range. They assume that with a 180° F thermostat, the temperature should not climb above 180° F. The boiling point of the coolant is usually well above the thermostat temperature rating. A 50-50 mixture of water and glycol antifreeze will boil at about 260° F with a 15 psi pressure cooling system.
There are benefits to operating an engine at a higher temperature. Engines are more efficient at higher temperatures and some emissions produced by the engines are minimized at higher temperatures.
A thermostat’s purpose is to get an engine up to operating temperature quickly by blocking flow to the radiator until the threshold temperature is reached. It then regulates the flow to maintain that temperature until it is completely open. Once it is open, it no longer actively affects the temperature of the coolant.
The sender may not be at the hottest location on the engine, but engineers chose that location for a reason. Most are mounted near the thermostat housing, but some are at the rear of one of the cylinder heads.
Compare the temperature at the sender to the needle position on the dash gauge. If there is a large difference in the needle position from what you anticipated, the problem can be the sensor, the gauge, the wiring, or the instrument voltage regulator.
Check your Factory Service Manual to see if an instrument voltage regulator is used on your vehicle to maintain a low-ered voltage to the temperature gauge and fuel quantity gauge. If there is, and these gauges are simultaneously giving bad readings, check the output of the regulator. With the ignition key at the “accessory” or “on” position, test the voltage with an analog voltmeter. If the voltage cycles between zero and 12 volts, it is operating correctly.
To check the sender, you need to remove it and measure the resistance with an ohmmeter at different temperatures and compare those readings with the specifications given in the Factory Service Manual. Unfortunately, many manuals don’t list this information. Temperature senders are usually so cheap— often $10 to $20—that many owners replace them rather than go to the trouble of testing them.
Be aware that not all senders that fit the mounting hole of your engine will be electrically matched to your gauge. Be sure to get a sender for the specific year, make and model of your car.
If the sender is good, check the gauge and wiring.
Oil Pressure Gauge
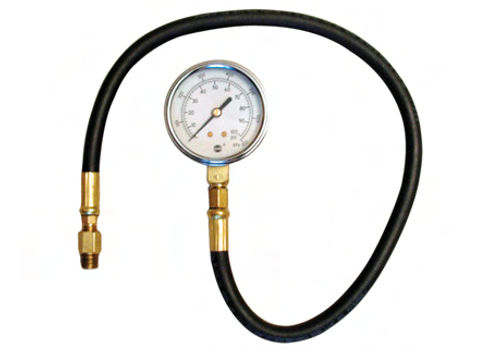
Comparing the actual oil pressure with the dash gauge reading is made quite simple by the use of an external oil pressure test gauge. An external oil pressure gauge is not expensive, but if you expect to need it only once or rarely, you might borrow one or share the purchase price with a friend.
Most external gauges have a flexible hose and several adaptor fittings so that each can be used with several types of engines.
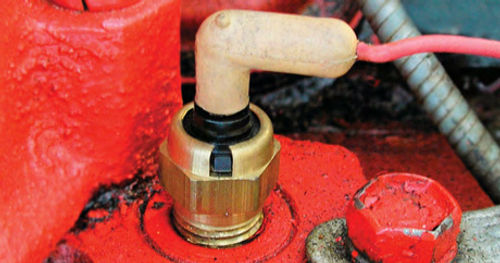
If the location of the sender isn’t obvious, check your Factory Service Manual.
You should have a rag handy to catch the small amount of oil that may drip from the opening as you remove the sender from the block.
Insert the fitting with the appropriate adaptor into the opening in the block and tighten to a snug fit.
Start the engine and warm to normal operating temperature.
Most service manuals list minimum oil pressure at idle and at a higher rpm, commonly between 2000 and 3000 rpm. Record the readings of the external gauge at each point.
Compare the readings you’ve taken with the limits listed in the maintenance man- ual. Shut the engine down and replace the external gauge with the original sensor.
Restart the engine. Record the needle position with the engine at idle and at the elevated rpm. You now know the pressure corresponding to each of those needle positions.
If a reading appears erroneous, check the sender, the gauge and wiring. As senders are not expensive, replace the original one. Be sure that you have a correct one and not one that is meant for a warning light.
If the reading is still in error, the gauge may need to be replaced or professionally repaired.
Ammeter/Voltmeter
These gauges are used primarily to check the operation of your electrical charging system.
In very early cars with few electrical accessories, ammeters were used for this purpose. The meter was installed between the generator and battery. The entire low output—maybe 10 amps— was sent through the gauge. This was not very efficient and required large wires to carry the current. However, it did effectively show whether the current was flowing into or out of the battery by deflecting the needle to the positive or negative side.
When cars began requiring more electrical power, it became necessary to send only a specific fraction of the current through the gauge and the rest through an internal or external shunt. The gauge sensed only part of the current flow, but was calibrated to show the full amount. This introduced another potential error.
To check the accuracy of an ammeter, refer to your factory shop manual for the test procedure for your specific type.
About the time that alternators became popular substitutes for generators, volt- meters became the common means of checking the health of the charging system. They were easy to install and supplied more useful information without requiring as much driver interpretation of the readings.
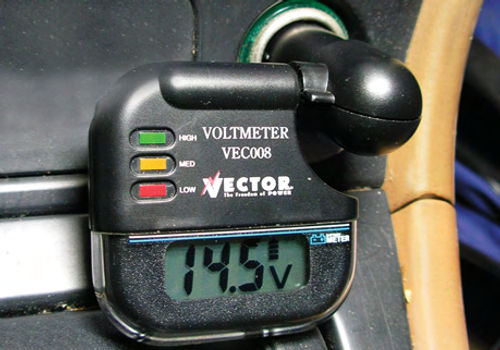
To check a voltmeter, use a multimeter to check battery voltage. With the engine off, a fully charged battery will show very close to 12.6 volts. With the engine running above idle, the multimeter will read the charging voltage. Check your shop manual for the proper reading. Modern charging systems produce between 14 and 14.5 volts. If your dash gauge reads differently, check connections for looseness or corrosion.
Modern digital voltmeters that plug into the cigarette lighter are a handy means to check voltage and most cost less than $20.
Fuel Quantity Gauge
Calibration of your fuel gauge can avoid an embarrassing situation and is especially worthwhile soon after you buy a vintage vehicle.
If the indication system completely fails, it becomes apparent quickly. The most common failure symptom is the needle dropping to, or staying at, “Empty.” Occasionally, it may freeze at “Full” or an intermediate level.
It is not so obvious when the gauge works, but with erroneous readings.
Corrosion, wear, leaking floats, bad voltage regulators, poor electrical connections, and dented fuel tanks can cause the indication to be misleading.
However, if the error isn’t too large and is consistent, you may choose to live with it. You will need to interpret the reading to estimate the actual amount of fuel remaining. Of course, it isn’t critical to know if the gauge is off by a couple of gallons at the “1/2” mark, but it is important to know how much is left at the “Empty” mark.
The most accurate means of calibrating a fuel gauge requires emptying the tank using the drain plug. If your tank is not equipped with one, you can use a siphon hose, hand pump or by disconnecting the output feed line. The fuel line may incorporate a short standpipe to avoid sucking the very last bit of fuel and residue from the bottom of the tank.
However you empty the tank, catch and save the drained fuel. At today’s prices, there is no reason to dispose of it unless there is a risk of it being old or contaminated. You should filter the drained fuel before returning it to the tank.
To check the gauge readings, turn the ignition key on and note the needle position. Chances are good that it will be below the “E” mark. Most indicating systems were designed to have a few gallons as a reserve. If your reading is above the “E” mark, that is important to note as that is where the engine will quit in the future.
Assuming your needle position is below the “E” mark, record the amount of fuel that you must add to the tank to bring the needle up to the “E” position. That is the buffer amount of fuel available after you get to that low a reading.
Continue adding fuel slowly enough that the gauge needle will have time to keep up with the addition. Pause at each mark on the gauge to record the number of gallons added between marks. The amount needed to fill each quarter tank segment may differ from the others. The tank may have been designed with an indentation to allow room for a spare tire or a structural member. An older car’s tank may have been dented by a road hazard.
Add the amounts you needed to fill to each mark on the gauge, including the amount to reach “E.” You have now completed the calibration of the fuel gauge.
If draining the tank seems too labor intensive, there is another procedure that will be less work but will take more time.
You can drive until the needle reads empty. Of course, there is a risk that you may run out of gas at or before that point. To avoid becoming stranded, keep a full DOT-approved, metal gas can in your trunk in case the gauge reading is erroneously high and the tank empties before it gets to “E.”
Once the gauge needle reaches the empty mark, fill the tank, noting how much you put in between gauge marks as described above.
Subtract the total number of gallons added between the empty mark and full from the capacity of the tank that is listed in your owner’s manual or service manual. This will give you the very important number of gallons of reserve you have at “E.”
Speedometer/Odometer
Although not as critical as oil pressure or coolant temperature, an inaccurate speedometer can cost you dollars along with points on your license due to speeding tickets. An inaccurate odometer may record miles faster than the actual miles and make your car less attractive when you sell it.
Speedometer accuracy can be affected by switching differential gears, changing tire size, and internal changes in the gauge.
The following accuracy checks of the speedometer entail driving and recording information simultaneously. This has obvious safety implications, so take a friend along to write down information while you concentrate on driving. If you must perform both functions, use a straight, wide, lightly travelled road and minimize the distractions.
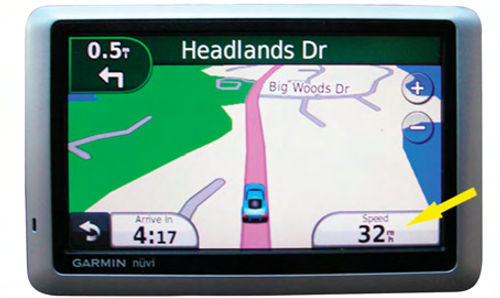
The simplest test of the accuracy of your speedometer entails the use of a handheld GPS. If you don’t have one, borrow one from a friend. They are easy to read and can be powered by an internal battery or the cigarette lighter socket.
Choose the speeds that you want to check and list them vertically on a notepad. Drive at each target speed with your speedometer at the target speed. Stabilize long enough at each speed for the GPS to get an accurate reading. About 10 to 15 seconds should be sufficient. Your assistant should write the GPS speed next to the target speed.
Do this task at each of the target speeds. Speeds up to the surface street speed limits can be done on a secondary road. Higher speeds should be done on a freeway.
If use of a GPS doesn’t appeal to you, you can use a pacer car. That is a car with a speedometer known to be accurate. Have a friend drive it steadily at each target speed while you match the speed with your car. As with the GPS method, your assistant records your speedometer reading at each target speed. Coordination between the two cars can be done on a cell phone by a passenger in each.
Again, the drivers should avoid distractions that would make this procedure hazardous.
Warning Lights
We probably all agree that warning lights provide limited information—they often illuminate only when there is a condition already at a critical level. The only advantage warning lights have over gauges is that a glowing red light will attract attention much faster than a slowly moving needle on a gauge.
Oil pressure warning lights are set to illuminate at a very low pressure, in part to avoid alarming the driver needlessly. As a result, many are set to light in the 4- 5 psi range or even lower. You may have already noticed other symptoms of low pressure, such as valve lifter noise or even bearing knocking by the time the light illuminates.
Coolant temperature lights will not signal a problem until the coolant is very hot, often due to lack of fluid or a broken accessory belt. Frequently, the engine will smell hot or produce steam before the light comes on.
Generator lights are triggered by a generated voltage being less than battery voltage. The light often illuminates when the engine is idling due to the generator not producing sufficient voltage at low rpm. Alternator lights, on the other hand, shouldn’t illuminate at idle because alternators supply enough voltage at low rpm levels to preclude it.
Warning light trigger values are not easy to calibrate. For example, I am not familiar with a simple procedure to hold oil pressure at a low enough level to check if the warning light is coming on at the correct value. And short of heating coolant temperature sending units in an oven, it is difficult to test the temperature at which the resistance in the unit drops enough to allow the warning light to turn on.
One test that is available is to notice if the lights turn on when you turn the ignition key to “accessories” or “on” prior to starting the engine. This checks that the bulbs are OK and, in some cases, checks a section of the circuit.
If the oil pressure light or coolant temperature lights don’t illuminate, you can short the connecting wire at the sending units to ground. If the light then comes on, the sending unit is bad. Caution: don’t do this to check an alternator light as you will ruin the diodes in the alternator circuit.
Adding Some Gauges
If you’ve been relying on warning lights, you may choose to install aftermarket gauges to better monitor your engine’s condition. Keep in mind that these aftermarket components need to be checked for accuracy using the same techniques we recommended above for original gauges.
But if you stay with the warning lights, you would do well to periodically check oil pressure and coolant temperature with external gauges to ensure that conditions are not just barely outside the threshold value of triggering a light.
All of these checks of gauges and lights that we have discussed can be accomplished in one Saturday morning and should give you confidence that you know what your gauges are really telling you.


