
Blasting Away the Years
All You Need Is a Hand-Held Blaster, a Compressor and Paint. Then Those Small Steel Parts Will Be Like New Again.
THE STEEL VALVE covers on my ’67 big block Corvette coupe had seen better days, what with paint peeling and traces of rust starting to lift the paint in other spots. These are natural occurrences when you live in a reasonably damp and humid environment, such as here on the New Jersey shore where I hang my hat. But natural or not, something had to be done to remedy the situation, and the solution didn’t call for a major expenditure.
Moreover, it doesn’t matter if you’ve got a six-cylinder or a big- or small-block engine in your collector car—as long as it has painted steel valve covers, the restoration steps I’m showing here will apply to them as well. And, of course, this process also will apply to other painted metal parts that are in need of refurbishment.
Using a Compact Blaster
To get the absolute best results, you’ll have to start the project by stripping the valve covers down to bare metal. While you can use chemical paint strippers, I don’t like them at all for three reasons: 1. A chemical stripper is very caustic. 2. Disposing of it is not easy if you want to be ecologically correct. 3. The stuff makes a royal mess. That being said, the other logical choice is sand- or bead-blasting, and that’s the route I chose to go.
Fortunately, you don’t need a large or expensive blasting cabinet to do this job. I use a hand-held sandblasting gun I got from Sears for about $50, and it does a very adequate job on items like valve covers, intake manifolds and other small parts. (I also stripped both doors of a 1948 Dodge club coupe using this gun and sand and it worked just fine, although the gun’s relatively small sand capacity meant frequent refills for a job of that size. A siphon-blasting setup that draws sand from a large drum would be better for such applications, but the blasting itself was definitely the way to go for getting those doors right down to the bare metal in very little time with very little effort.)
The blasting gun holds about five pounds of media and, of course, you’ll need an air compressor to power it. A compressor with a 20-gallon tank should do nicely. The smaller ones (like the portables used for nail guns) will work too, but you have to wait for the tank to refill before you have enough pressure to blast effectively, and then that will only be about 30 seconds’ worth before you have to wait for the tanks to charge up again.
You’ll definitely want to use eye protection, some heavy gloves and other protective clothing—sand particles propelled at high speed HURT! I highly recommend using a face shield rather than just goggles, since getting pelted in the face with ricocheting sand is no fun, believe me!
You’re also going to need some primer to seal and prep the bare steel for paint, and you’ll need the appropriate color spray enamel for your valve covers. My ’67 ’Vette required good old Chevy Orange, but for later years blue will be the right color. While you’re at it, you would do well to get yourself a couple of spray can trigger grips—they make controlling the spray a lot easier and much more comfortable than pressing the spray button on the can with your finger.
An Appropriate Workplace
Be sure to choose a work area that has lots of light and is far enough away from any other objects that you don’t want hit with sand or overspray. I used a plastic tarp in the yard to blast on, and this (or an old shower curtain) will work just as well in your driveway. In addition to catching the spent sand, there will also be paint particles and chips in the mix, and this paint waste is toxic, so dispose of this sandy refuse in a responsible manner.
As I mentioned, I live on the New Jersey shore, so getting sand is no problem whatsoever—it’s literally all over the place. However, if you live in an area that’s far away from the beach, you can pick up a 50-pound bag of play box sand or sand for cement mixing at the local home center for under $5. I’ve found that 50 pounds will be more than enough to do a pair of valve covers and there’ll be plenty of it left over for other projects, too.
As for spraying the primer and color coats, the ideal situation is to have a spray booth, so if you have access to one, by all means use it. I, however, don’t have that luxury, so my spray station consisted of a piece of plywood on two sawhorses in my garage with the door open for ventilation. I used a disassembled cardboard box to act as a backsplash and I wore a disposable dust mask; a respirator offers better lung and bronchial protection, however. In any event, make sure you have plenty of ventilation. Also, as noted above, be sure to cover or move anything in the vicinity that you want to protect from the spray paint mist. If you haven’t done much spray painting, you’ll be surprised at how much mist goes into the air and how far it can travel.
Before we get on with the step-by-step photos, a few more words about painting are in order. The first and most important rule when using aerosol spray paints is to shake, shake and shake! The better you mix the paint, the better it will cover. The second thing is to put on several light coats, rather than a heavy, wet coat. A heavy coat takes longer to dry, increases the chances for a run and won’t give you a uniform finish. OK, so now let’s get started.
Doing the Job
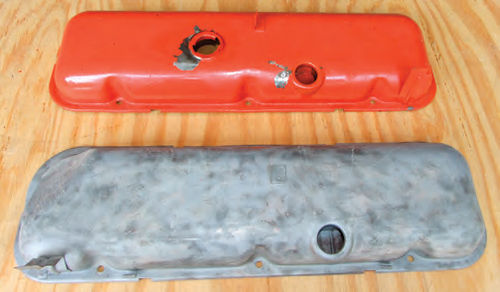
In Photo 1 you see my valve covers as they looked when they were taken off my engine. You also can see where the paint has chipped off and it’s starting to lift in other spots due to dampness.
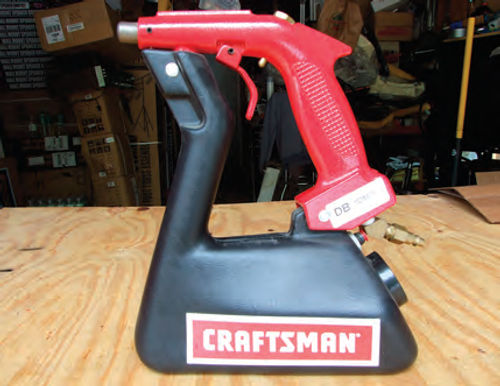
The Craftsman hand-held sandblasting gun from Sears shown in Photo 2 is compact, affordable and very efficient. The large knob below the air connector is the filler cap. While the gun holds about five pounds of sand, more than that would make it too heavy and unmanageable.
A face shield along with heavy work gloves like those from Tillman’s (jtillman.com) are great for protecting you from flying sand. I also wore a long-sleeve sweatshirt, heavy jeans, thick athletic socks and work shoes to eliminate the sting of fast-flying sand particles.
I like Eastwood’s self-etching primer for all my metal prep work. Aerosol Chevy Orange (or the color needed for your engine) is available from any major auto parts store.
The blasted sand really takes the paint off in a hurry. As noted earlier, I used beach sand because it’s plentiful and free in my neck of the woods, but sandbox sand or cement-mixing sand works just as well.
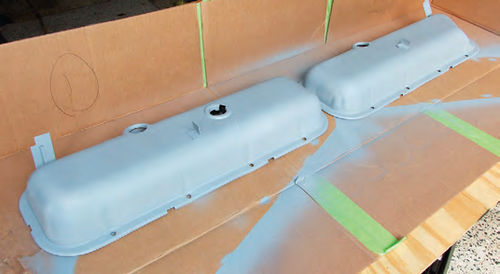
In Photo 3 you see one of the valve covers that’s been completely blasted. I highly recommend getting a coat of primer on the bare metal as soon as possible to minimize the chances for any oxidation. Remember: Rust never sleeps!
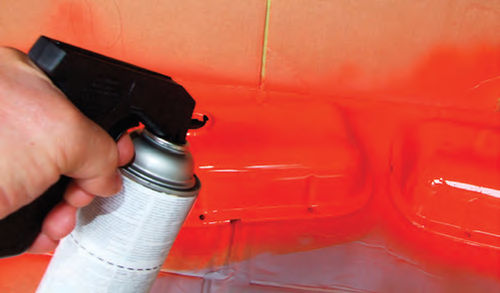
With several coats of primer on them, the pair of blasted covers start taking on a more completed look (Photo 4). As with the finish color, for best results apply the primer in several light coats rather than shooting a single, heavy wet coat. I’m applying another light coat of Chevy Orange in Photo 5.
I used a disposable dust mask to keep the paint overspray from entering my breathing passages and had the garage door completely open for ventilation.
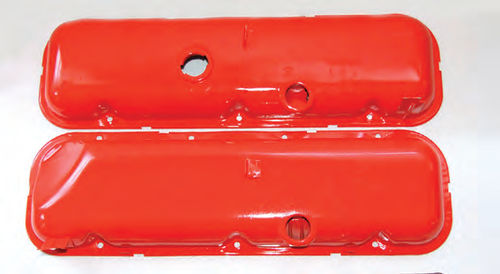
The finished valve covers, ready to be re-installed in my big block coupe, are seen in Photo 6. A nice new oil filler cap, breather elbow, rubber grommets and cork valve covers from Paragon Reproductions will add the finishing touches and make the installation look as good as it did when the ’67 left the factory four decades ago.
Tom Benford has been a freelance journalist for some 30 years and has written a dozen books on automotive subjects. You can order autographed copies on his Web site, tombenford.com.
Resource—Paragon Corvette Reproductions
8040 South Jennings Road
Swartz Creek, MI 48473
Corvette parts and accessories


