A Front Disc Brake Conversion, Pt. 1
They Can Be Invaluable for Anyone Who Drives Their Vehicle. This Month, We’ll Discuss the Necessary Parts.
WHO NEEDS FRONT disc brakes on their old ride? If you have ever tried stopping a vintage chrome boat equipped with four-wheel drum brakes after driving through a puddle of water, or after having to ride the brakes to get down a hill, or when some driver who can’t read a stop sign nearly takes you out, you probably already know how nice disc brakes would be, if only you knew how to install them.
Well, here’s your chance. First we’ll prep with some background information and then we’ll move ahead with an actual installation.
The Evolution of Disc Conversion Components
Converting a vehicle from front drum brakes to front disc brakes probably started at the street rod level. Street rodders would scour the salvage yards looking for workable components, make a few changes, grind a few tabs, weld a few brackets, and end up with a serviceable braking system.
From there the conversion movement moved to the resto-mod level. Guys like me would still scour the salvage yards looking for workable, interchangeable components, make a few changes, grind a few tabs, weld a few brackets, and end up with a muscle car that would actually stop.
These days, unless the car I’m working on is going to be a concours-type restoration, making the conversion from front drum brakes to front disc brakes has become a simple matter of clicking to a few Web sites or checking out a catalog or two to find the right conversion kit to give whatever vehicle I happen to be working on some definite stopping power.
That’s because times have really changed and off-the-shelf disc brake conversion packages are available for just about any vintage ride out there. Is this a great hobby or what?
Start With a Parts List
But don’t log onto the Internet or order up a catalog just yet. Conversion kits are like computers. You can get one with some of what you need, or one with more than what you need. It’s up to you to figure out exactly what it is you do need. Of course, the trick to that is in knowing what parts are needed to make up a quality disc brake conversion kit.
So, with that thought in mind, I’ll start by offering you a list of the parts I consider necessary to make up a quality and safe front disc brake conversion kit. After all, making the change isn’t as simple as removing the drums and bolting on new rotors. To do the conversion safely and correctly requires the right parts and a little bit of brake anatomy knowledge.
I’ll start with the parts and some brake anatomy explanation, and next month actually make the swap.
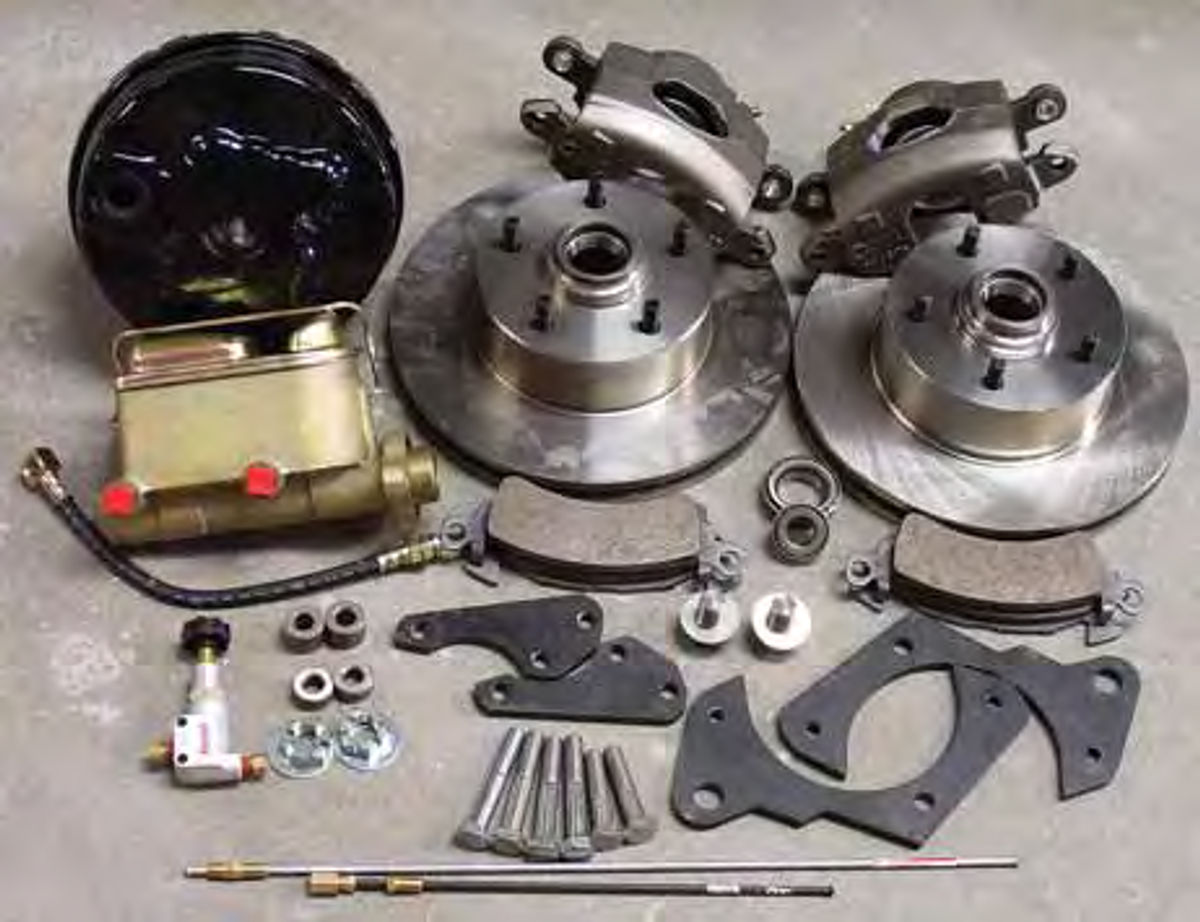
The parts list includes a brake booster and master cylinder, spindle brackets, brake rotors, brake calipers, brake pads, brake hoses, steel brake lines, wheel bearings, seals, and a proportioning valve (Photo 1).
As I’ve already mentioned, you can browse the Internet or thumb through a catalog or two in search of the perfect conversion kit for your particular ride. The kit you are looking for will contain all of the parts mentioned above, which will be enough to let you safely make the swap, and you won’t be left wondering if you missed anything. But, just to be sure the kit you are looking at has everything you need, let’s go through the what and why of the necessary parts.
Anatomy of a Brake System
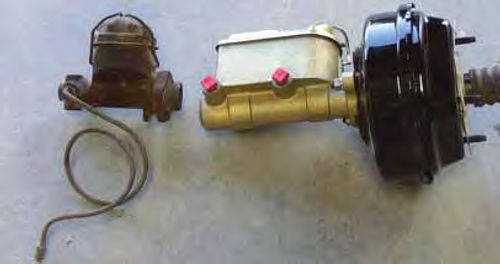
I’ll start with the power brake booster and master cylinder. Check out the side by-side comparison between the new master cylinder/brake booster unit and the original master cylinder I removed from our conversion project (Photo 2). Notice that the original master cylinder has a single bowl and the conversion master cylinder is much larger and has two bowls. What’s that all about?
Think safety first. If a brake line, whether it be to the front brakes or rear brakes, fractures or cracks on the original unit, all of the fluid will drain out and braking ability will be lost. However, with a two-bowl unit the front and rear brakes are separate. If, for instance, a brake line going to the rear brakes fractures and loses fluid, keep in mind that the front brakes are separate from the rear brakes, so only half of the vehicle’s braking power is lost. Half or none, which is better?
Second, think capacity. Disc brake calipers require more fluid than drum brake wheel cylinders to operate correctly. The original master cylinder isn’t large enough to supply the necessary amount of fluid to handle both the new disc brake calipers and the old rear drum brake wheel cylinders.
As for the power brake booster, the project vehicle didn’t have one. Power brakes were an option for this model, but did not come on this particular car. Would a power brake booster have helped this car stop better with drum brakes? You bet it would. The car still would not have had the stopping power I’m about to give it, but the booster would have made a world of difference.
Is a booster really necessary now that I’m about to convert to front disc brakes? Definitely. The project car weighs just over 4000 lbs. Adding a power brake booster will give this ride some serious stopping power.
Is there any situation where adding the power brake booster isn’t necessary? Yes. In my spare time, between the hours of 4 and 6 a.m., I occasionally build up an AC Cobra replica car. I give these cars four-wheel disc brakes but I don’t install a power brake booster. Why not? The Cobra weighs in around 2400 lbs. It will stop on a dime without the power assist. If I ever build one that tips the scales beyond 2800 lbs., I’ll add the booster.
Remember This Number
You might want to note this fact in a file somewhere. If your ride weighs in over 2800 lbs., you should add a power brake booster whether the car has drum or disc brakes. In the old days we had a term for this situation: “Stomp the brakes.” Without the addition of a power brake booster on a heavy car that term is as accurate as a cop’s laser.
Now, for the Brake Lines…
Your conversion brake kit will come with at least two lengths of steel brake line. That’s because the original braking system probably used a “T” connector, usually mounted on top of the frame rail, to join the front brakes to the rear brakes with a single steel line going from the “T” up to the single bowl master cylinder. Note the single brake line on the original master cylinder shown in Photo 2. This line would have attached to the “T” to distribute brake fluid to all four wheels.
Now that I am converting to a dual bowl master cylinder, the front brakes will be separate from the rear brakes. It’s that safety thing we discussed earlier. Remember that this separation between the front brakes and the rear brakes ensures that even if you do somehow fracture a brake line, you will always have some stopping power. Thus the need for the additional lengths of steel brake line, to help make this separation.
One length of the new brake line will connect to the rear bowl of the master cylinder, usually the smaller of the two bowls, and connect to the existing brake line going to the rear brakes.
Another length will be used to connect the front bowl, usually the larger of the two bowls, to the new front disc brakes (Photo 3).
Did I say large and small bowls? Yes, and I mentioned the reasoning behind this above, but let me elaborate further.
Front disc brakes can require as much as twice the amount of brake fluid as would have the old drum brake wheel cylinders. So, in order to properly supply the front disc brakes with fluid, the brake master cylinder reservoir must be larger.
Conversely, the rear drum brake cylinders are small in comparison to the front disc brake calipers so these require less fluid for proper operation. What if you elect to go with rear disc brakes at some point in the future? You will find that the brake calipers used on the rear brakes are much smaller than those used on the front. Therefore, they require less fluid to make them work and the new two-bowl master cylinder will provide the necessary fluid to allow rear disc brakes to operate correctly.
Why are rear brake calipers usually smaller? The front brakes are doing most of the stopping, therefore that’s where you want the most braking power. Smaller calipers on the rear equal less stopping power and that helps to prevent the rear brakes from locking up in an emergency stop situation.
Now, you noticed that I coiled the two new brake lines that are going up to the master cylinder? Yes, this is another safety issue, but I’ll save that discussion until next month when I start plumbing this brake system.
The Proportioning Valve
In most cases, your front disc brake kit will come with an adjustable proportioning valve to be installed in the rear brake line. So, just what is a proportioning valve, why does it need to be adjustable, and why install it in the rear brake line?
A proportioning valve is just what its name implies. It proportions the amount of brake fluid being distributed to the rear brakes.
In my ongoing quest to keep things simple, once installed, the proportioning valve restricts the amount of brake fluid being pumped to the rear brakes to prevent them from locking up when you press the brake pedal. Older model vehicles didn’t use proportioning valves and it wasn’t uncommon for the rear brakes to lock up under emergency braking conditions and cause the driver to lose control of the vehicle.
Having a proportioning valve that is adjustable allows you to change the degree of braking power the rear brakes receive. Once properly set, the rear brakes should not lock up, even under hard braking conditions.
How do you go about setting a proportioning valve? That’s another subject I’ll cover next month.
You say your street rod with four wheel disc brakes doesn’t have a proportioning valve? This may sound like an echo, but if you do a side-by-side comparison between the front disc brake calipers and the rear disc brake calipers you will see the rear brake calipers are roughly half the size of the front calipers. Smaller size, less braking power. Less braking power, less chance of the brakes locking up. But, let me warn you. Under extremely hard braking conditions, even these rear brakes can lock up without the addition of a proportioning valve.
Can you use a salvage yard proportioning valve? In the old days we did just that. We would weigh the car receiving the disc brake conversion then go to the salvage yard and look for a car of equal weight that had the same brake configuration, that is, front discs and rear drums. We would then remove the combination valve, which is what factory front disc brake equipped vehicles came with as opposed to an adjustable proportioning valve, and insert it into the rear brake line system.
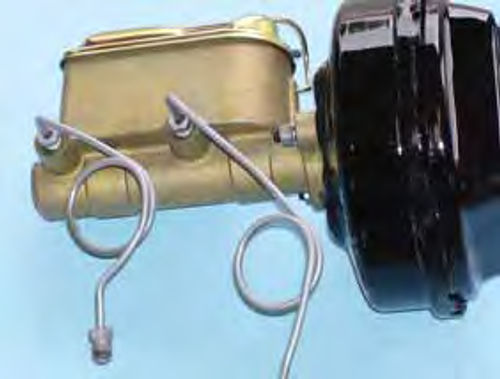
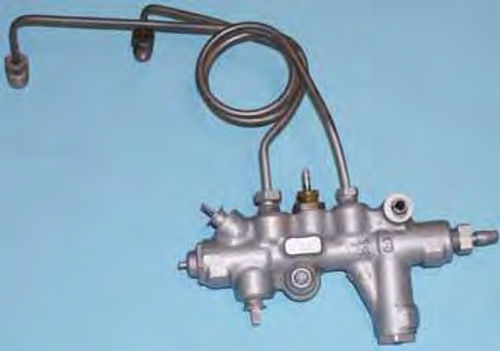
To answer that questioning look, a combination valve, like the one in Photo 4, is a proportioning valve except that it receives fluid from both the front brake bowl and the rear brake bowl on the master cylinder instead of fluid from only the rear brake bowl. Note the two coiled steel lines that would go to the master cylinder.
Fluid from the front bowl of the master cylinder moves through the valve unimpeded and is sent to each of the front brakes via two outlet ports on the valve. Fluid from the rear bowl enters the valve, moves through a restrictor port to reduce the output flow, then exits the valve via a single outlet port leading to the rear brakes.
Why weigh the car when looking for a combination valve? You wouldn’t want to use the combination valve from a Pinto in your ’59 Cadillac. The valve from the Pinto will restrict too much fluid, making the rear brakes on the Caddy useless.
Is this a good way to achieve brake proportioning with your conversion kit? No. Stick with the after market adjustable valve.
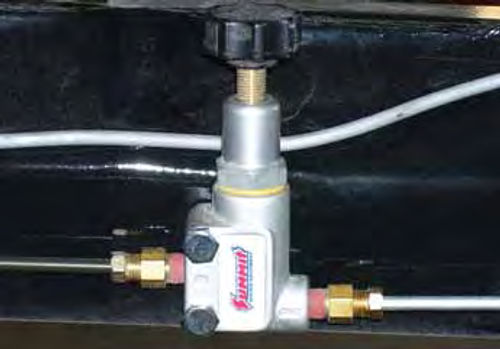
Now we’re really confused, so let’s take a closer look at the situation. OK, here’s the lowdown. An adjustable proportioning valve is an after market item and is always inserted in the rear brake line somewhere between the master cylinder and the rear brakes (Photo 5). It never goes in the front brake line.
Spindle Brackets
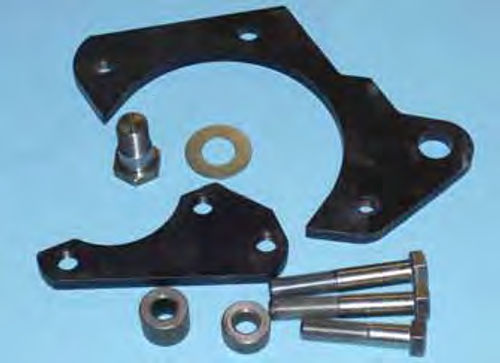
Your disc brake conversion kit will come with spindle brackets much like the ones in Photo 6. The idea here is to allow you to keep your old drum brake spindles and convert them for use with disc brakes. The large, C-shaped bracket holds the caliper. The smaller bracket facilitates mounting the C-shaped bracket to the spindle.
Calipers and Rotors
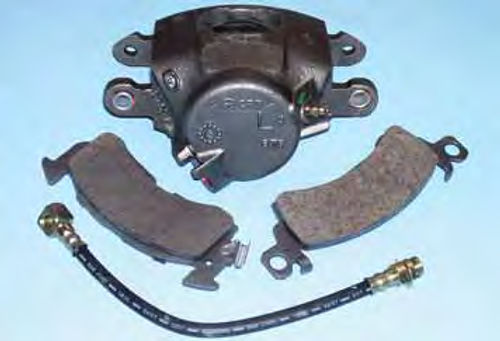
Most conversion kits will come with calipers and rotors that are stock replacements for later year model vehicles.
For example, the calipers and rotors in this kit are stock replacement items for a 1972 Chevelle (Photo 7).
Others that are exceedingly common to these conversion kits are calipers and rotors for Camaros, Dodge Chargers and Ford Mustangs.
The information you need when purchasing a conversion kit is what calipers and rotors are used in the kit. This is information that won’t matter until you need a brake job.
Yes, you will find conversion kits with exotic calipers and rotors.
Some calipers will have two pistons instead of the single piston I’m using, and some with have four pistons. Rotors can be purchased that offer better cooling and better performance under race conditions. Let your bank account and vehicle usage dictate which is best for your application.
Now, let’s take a look at the little things nobody tells you about.
That starts with the brake lines. Most conversion kits will come with new flexible brake lines and at least two lengths of steel brake line. You can’t use the original flexible brake lines on your car. They won’t fit. They were not designed for use with disc brakes.
Your new flexible brake lines will come with two brass washers each but may not come with the “banjo” bolts needed to attach the lines to the caliper. What’s a “banjo” bolt? This isn’t an ordinary bolt. This bolt is pre-drilled to allow fluid to pass through it. This is one more reason you have to know the year/model of the calipers. “Banjo” bolts are not totally universal and you must use the correct size “banjo” bolt to ensure proper sealing between the flex line and the caliper. Your local parts store will carry a supply of these “banjo” bolts. (It’s called a “banjo” bolt because the brake line fitting the bolt fits into is shaped like a banjo.) By the way, the brass washers go on either side of the flexible line mounting plate.
The new steel brake lines are there to help you separate the front brakes from the rear brakes. Here’s a scenario: One new steel line is needed to go from the front bowl of the master cylinder down to the frame where it can be connected to the front brakes. Another line is needed to go from the rear bowl of the master cylinder to the line leading to the rear brakes.
This connection is going to get a little complicated as the new adjustable proportioning valve will have to be inserted somewhere in this line. But don’t fret. By the time you order a new kit, have it delivered, check it for missing parts, and clean out a place in the shop to work, I’ll be back with another installment covering the installation.
Oh, one last thing. Spilled brake fluid is a great paint stripper. Just thought I’d remind you. Got a question? Send it along.
Resource
LPL Body Works, LLC
5815 Contented Lane
Amarillo, TX 79109
Paint and body repair DVDs