
This Old Truck, Pt. 4
He Needs to Address a Low Vacuum Reading & Other Tasks… …And Then Drive It From Nebraska to Florida.
Editor’s note: In his final installment, Curt wrestles with a low vacuum reading, installs a new window channel and otherwise wraps up the mini-restoration of his 1967 Ford 3/4-ton pickup before heading off on a 3300-mile journey. The last three months’ installments have had 24 images, so we’re starting here with Photo No. 25.
YOU’LL REMEMBER HOW my engine nearly drove me to distraction by losing power on the highway and producing an earsplitting explosion when it fired up again?
I corrected that bad habit by replacing the carburetor’s swollen, sticking composite-foam float.
After just a few thousand miles, however, the engine began to run rough and loggy once again. What’s more, at idle the engine exhaust smelled of raw gasoline, bolstering my suspicion that one cylinder was missing intermittently.
Had my new carburetor float gone bad? To eliminate that possibility, I installed a brass float I bought for $13 at my local NAPA store.
It made no difference.
What ensued was what seemed like an eternity of testing and troubleshooting, consuming many hours over several days as I sought to determine why the engine was idling so poorly.
In a compression check, cylinders 1 through 5 were producing between 150 and 155 pounds per square inch. Cylinder 6 tested lower, but not dramatically so, at 145 psi. Not bad for a high-revving, hard-working engine with 150,000 miles on it.
I readjusted the carburetor mixture to no effect and checked both the idle speed and ignition timing, which were fine.
A Disturbing Vacuum Reading
By attaching a vacuum gauge to the intake manifold, however, I learned that I had a big problem, indeed. Instead of reading 18 to 22 inches of vacuum, which is generally considered normal at sea level, the gauge’s needle hovered around 12 with a jerky 1-inch variation.
A vacuum test alone cannot pinpoint the cause of a problem, but it can suggest some possible new tests to perform.
According to literature accompanying my vacuum gauge, late valve timing can cause a low reading. Thus I removed the valve cover and, with the engine running, I loosened each rocker-arm nut until it began to chatter. I then slowly tightened the nut one-half to three-quarters of a turn against the pressure of its hydraulic tappet. Readjusting the valve lash in this manner raised the vacuum reading from a jerky 12 to a steadier 14. I believed I could do better, however.
An air leak at the intake manifold could produce a rough idle and a low vacuum reading. Therefore, with the engine running I sprayed ether (starting fluid) around each intake port in turn. If the engine sucked ether through a leaky gasket, it would rev suddenly. But I detected no change in its idle speed.
Tweaking the Carb Boosts Vacuum
Next, while watching a tachometer, I again fiddled with the carburetor.
Specifically, I backed out the carburetor’s idle-mixture screw—it adjusts the air-fuel ratio to an ideal mixture for idling—to achieve the highest idle speed.
I stopped with the screw turned out a whopping three full turns—which was twice the recommended setting.
Because this caused the engine’s lumpy idle to smooth out and the miss to disappear, however, I must conclude that the idle mixture had been too lean.
The engine’s vacuum reading now jumped to a steady 161 ⁄2 inches, a reading I achieved partly by simultaneously advancing the ignition timing a bit beyond its recommended 6 degrees BTDC (before top dead center).
I’ve since had two mechanics tell me that the former rule of thumb—after a rebuild, to turn the carb’s idle mixture screw out 11 ⁄2 turns and adjust it slightly from there—is old school. With modern gasoline formulations, they say, backing the idle mixture screw out three full turns is now closer to the norm.
Looking “Inside” the Engine
As a rough test of the engine’s ignition system, I connected my timing light to each plug to observe a steady flash at each cylinder.
Because the spark plugs are new, I have every reason to believe that they’re firing on schedule.
It’s possible for even a brand-new plug to fail, however, so I substituted a new set of plugs with no change in engine performance.
I wished for some way to look into each cylinder as it fired—a window provided by Gunson’s Colortune.
This handy tool, available through auto parts stores for about $70, acts as a spark plug but has clear tempered glass in place of a spark plug’s white porcelain center (Photo 25).
So, by substituting a Colortune base for a spark plug, I literally had a window into the combustion chamber.
In a Colortune test with the engine idling, I saw a normal blue flame in cylinders 2 through 6. Aha! The air-fuel charge wasn’t exploding at all in cylinder 1.
When I applied my carburetor’s manual choke to richen the air-fuel mixture, a blue flame appeared in the No. 1 cylinder. It disappeared when I released the choke. Similarly, when I blipped the throttle to activate the carburetor’s accelerator pump, cylinder 1 began firing briefly. When the temporarily richer fuel charge passed, however, the cylinder fell dark once again.
Off With the Manifolds
Because of my earlier compression test, I felt I could safely conclude that the cylinder 1 piston rings and valves were sealing tightly.
Cylinder 1 had passed the ether test, suggesting that I couldn’t blame an air leak for artificially leaning that cylinder’s air-fuel mixture.
But could its intake port be blocked or the cylinder be running lean due to other causes? Yes, it’s possible.
What about my camshaft? Couldn’t I have a camshaft lobe worn so badly as to prevent the No. 1 cylinder intake valve from admitting a full air-fuel charge?
To investigate this possibility, I removed the valve cover. With the engine running, I used a steel rule to determine that each intake valve stem was traveling a similar distance. The camshaft was fine.
It was time to check for physical obstructions, including a build-up of carbon, in the intake ports.
Consequently, I bought a manifold gasket set and removed the united exhaust and intake manifolds. Other than some noticeable but harmless carbon deposits in the cylinder 1 intake port— immediately behind the water pump, this cylinder presumably runs a bit cooler than the others—I spied no obstructions.
Still, I had an opportunity now to smear the intake-manifold gaskets with red silicone high-temperature sealant to absolutely rule out the possibility of vacuum leaks at the intake manifold.
With the manifold bolts tightened to their proper torque specs, the vacuum gauge rose slightly from its earlier 161 ⁄2 to an even 17 inches. Quite possibly, then, I’d cured a slight vacuum leak that the ether test failed to detect.
Two tests confirmed that every cylinder was now pulling its share of the load. Colortune showed a blue flame in each cylinder of the idling engine.
And when I used plastic pliers to pull off the spark-plug wires, I noted a marked drop in engine speed as I killed each cylinder in turn.
A Combined Approach Helped
My flurry of testing, adjusting and retesting suggests that not one but several things improved my engine’s performance: 1. Adjusting the valve lash. 2. Advancing the timing slightly. 3. Replacing the intake manifold gaskets to cure a minor air leak. 4. Backing out the carb’s idle-mixture screw a heretofore ill advised three full turns.
According to my factory repair manual, any vacuum reading over 15 inches is good for the Ford 240-cubic-inch 6-cylinder engine. Adjusting for my altitude of about 1000 feet above sea level, anything over 14 inches is therefore sufficient. Given a manifold vacuum of 17 inches and a consequently better-running engine, I’m now in fine shape.
A Few Tasks Remain
Only four tasks remained to complete my mini-restoration and place a much improved pickup truck back into service.
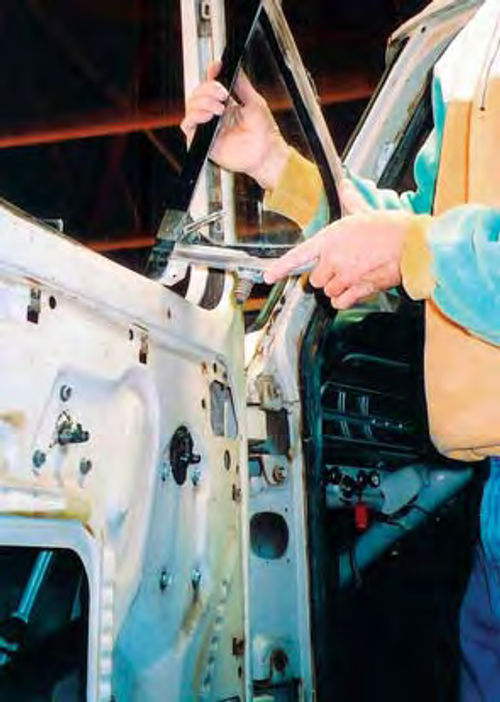
An oncoming truck had pitched a rock into my open driver’s-side wing window, shattering it. To avoid paying $75 for a new piece of tempered glass, I spent 15 minutes pulling a replacement window from a parts truck and a like amount of time installing it in Old Blue (Photo 26). The window fit fine and, unlike a replacement glass, had the correct “CarLite” logo etched into its surface.
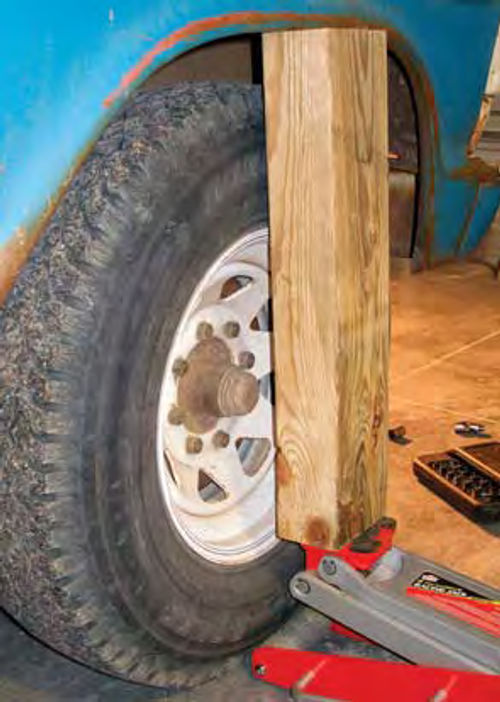
Next, I ducked under my right front fender well on an inspection tour. It seems a rubber biscuit had disappeared where the fender mounted to the frame, causing the fender’s leading edge to pitch forward at a disreputable angle. That corner of the front clip had also begun to rattle unmercifully.
To save the time and money necessary to locate the correct rubber replacement part, I opted for a farmer’s fix. That is, I cut and drilled a piece of wood to fill the gap left by the missing rubber.
To determine this gap, I used my floor jack and a 4-by-4 post under the reinforced lip of the right fender to raise the right side of the front clip to the same height as its left-hand counterpart (Photo 27).
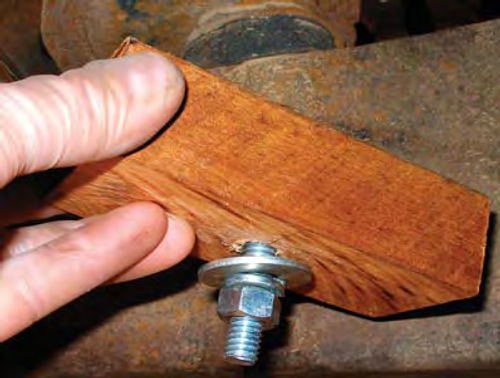
Given their natural resistance to rot, either cedar or Osage orange would be excellent choices for a shim to replace the original rubber biscuit between the frame and body. But because I had only a solid piece of oak available, I soaked it overnight in Thompson’s Water Seal to waterproof it (Photo 28).
No, it’s not a factory-correct repair and, although I don’t normally take such project shortcuts, my wooden shim has held up admirably.
A Long Trip Looms
I performed my final three tasks almost as an afterthought as my wife and I planned to drive the truck to Florida. It was a vacation, mostly, but a car—conveniently waiting at the end of our route—would ride home with us on the flatbed trailer we’d pull behind the truck.
Accordingly, I decided to take care of three deficiencies—merely annoyances in everyday driving—that promised to blossom into real trouble on a road trip of 3300 miles. The shortcomings involved the truck’s window channels and a pedal mounting bracket, both severely worn, and outside rearview mirrors that were too small for safely monitoring my trailer and its load.
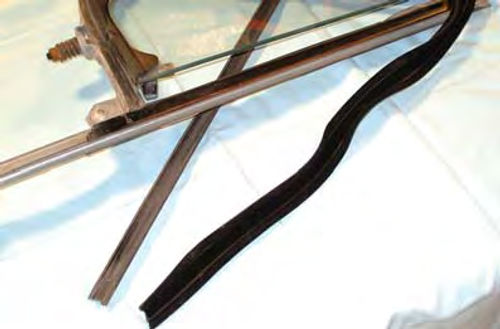
It was high time to replace the window channel in both doors: after all, the felt had worn away from the original equipment channel, allowing the window glass to rattle and bang against hardened rubber every time the truck hit a bump. I knew we couldn’t endure listening to thousands of miles of that kind of banging and slapping. As it turned out, the replacement rubber-and-felt channel appeared plush in comparison to the worn-out original channel (Photo 29).
I thought it might be a headache to locate and order new parts. The truck, after all, uses two window channels—a straight front piece and a curved piece for the top and back of the window opening—and anti-rattle felt strips on both sides of the door’s lower window opening. That’s four pieces per door or eight in all.
The LMC Truck catalog, unlike two others I often rely on, thoughtfully groups all eight pieces (enough for both doors) into what it calls an “anti-rattle kit” for $99.95 plus shipping.
As exact copies of the original Ford item, the replacement rubber channels have a T-shaped cross-section, designed so both legs at the top of the T press into a door-mounted retainer.
This holds the channel in place without glue, making installation a snap (you’ll pardon the pun). Metal clips and a sticky back hold the anti-rattle strips to the door’s lower window opening.
New Mirrors & Homemade Brackets
At a truck-equipment store, I cheerfully bought two large outside rearview mirrors, backed with stainless steel, for the bargain price of $18 apiece.
My truck’s aging mirrors had always been difficult to use. Because my driver’s-side mirror was mounted too high, I had to hunch over to use it. This not only hurt my back but forced me to take my eyes off the road for precious seconds. Using new, larger mirrors, I could check on my trailer with a mere glance.
The mirror mounting bars, made of heavy stainless-steel tubing, sold separately for a whopping $33 apiece or $66 per door, at which I balked.
Instead, I cut some lengths of galvanized heavy steel tubing, flattened the ends in my vise and drilled mounting holes. Thus some scrap tubing salvaged from an old umbrella clothesline has been reincarnated as professional-looking mounting brackets.
Changing a Worn Pedal Bracket
Finally, it was time to deal with a worn-out pedal bracket.
From this heavy-gauge bracket, suspended between the firewall and dashboard and bolted to both, the clutch and brake pedals dangled—somewhat loosely, in fact—from a common shaft.
After years of use, the shaft had wrenched free from its right-side mooring. Each time I clutched or braked, this now-floating shaft end would bump and grind until it had greatly elongated its former mounting point.
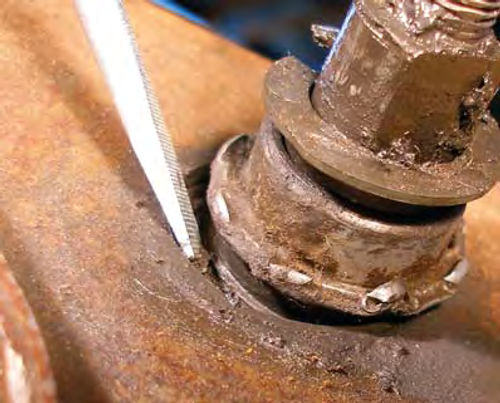
In fact, I found that a gap the width of a screwdriver blade had opened up between the pedal shaft and its mounting bracket (Photo 30).
Though the loose shaft was a long way from breaking free of the bracket, it did waste brake-pedal motion by translating some of it upward rather than forward toward the master cylinder.
The steering column mounted on the dashboard end of the bracket, complicating this repair.
It forced me to jack up the truck, remove the left front wheel and unscrew three long bolts that held the steering gear against the inside of the left frame rail. Then, by removing two bolts at the front of the bracket, I was able to lower the steering column until the steering wheel nearly rested on the seat. This gave me barely enough clearance to unbolt the bracket and rotate it out from under the dashboard.
The very tight replacement bracket— a year newer, since I’d pulled it from my 1968 F-100 parts truck—appeared to be a sure fit.
It appeared so, that is, until I’d bolted it up and tried to connect my master cylinder pushrod to the new brake pedal. I found that I had to move the brake pedal almost to the firewall before I could engage the push rod. Yikes.
Sure enough, the 1968 parts truck had a pushrod some 2 inches longer than did my 1967 truck.
It would have been easy enough to simply switch pushrods and be on my way…except that the pushrods for these Ford models are permanently affixed to the master cylinder pistons. Suffice it to say that “simply” switching them would have been a project unto itself.
Ultimately, I borrowed the bracket from another 1967 F-250 I own, a used part with only a modicum of play in it. Of course, it meant sidelining my other truck until I can repair and install Old Blue’s bracket in it but such are the vagaries of auto repair.
Project Completed…For Now
As to the road trip from Nebraska to Florida, Old Blue distinguished herself by missing nary a beat, even on the return trip while pulling an 8000-pound load a distance of 1700 miles.
So there, I can put away my tools…at least for now.
Old Blue is sporting, among other improvements, new brakes and front suspension, a lower-mileage transmission and a smooth-running engine. I adjusted the steering column, replaced a wing window and door-window channel, fixed the brake lights and turn signals, installed new outside mirrors and performed some cosmetic surgery by installing a new floor pad and mat and shimming a sagging front fender.
Granted, due to her peeling paint and battle scars, Old Blue looks every bit like the old truck that she is.
But I can at least rest easier knowing that even at 41 years of age she still performs like a new one.
Resource
LMC Truck
P.O. Box 14991
Lenexa, KS 66285-4991


