
This Old Truck, Pt. 1
He’s Not Looking for Concours-Level Results From This Project, But After 40 Years, His Pickup Had Some Problems.
Editor’s note: This month we begin a four-part series detailing the mini restoration of a hard-working older pickup truck.
LIKE RODNEY DANGERFIELD, the 1967 Ford pickup truck I’ve been driving for a quarter-century gets no respect, least of all from me.
But times are changing.
Now that the 3/4-ton truck that I’ve owned since 1981 has passed its 40th birthday, I’m increasingly aware that my daily dray—despite its many bumps and bruises—has become something of an automotive novelty.
Think about it: How many brand-new 2008 trucks will still be plying the roads in 2048?
I use my aging truck more now than ever since equipping it with two trailer hitches. The first is a receiver trailer hitch, designed to pull a car-hauling trailer with greater safety than a bumper hitch affords (September 2005 Auto Restorer).
The second, a gooseneck hitch— named for the curve of the trailer’s over the-tailgate tongue—allows for the safe hauling of even heavier loads. It requires a frame-mounted plate on the floor of the pickup box, on which a 25 ⁄16-inch ball is positioned two or three inches ahead of the truck’s rear axle. Because a gooseneck hitch shifts the trailer’s tongue weight forward from the back of the frame, a truck can safely haul more weight on a gooseneck hitch versus a receiver hitch.
The capacity of my car-hauling trailer is 7000 pounds; the capacity of my gooseneck trailer is 14,000 pounds.
Why Do I Keep It? Here’s Why
But its ability to haul heavy loads only partly explains why I keep such a dinosaur of a truck.
I can think of seven other reasons: 1. It’s paid for. 2. My insurance rates are low. 3. I can repair it myself. 4. It’s made of heavy sheet metal, not the glorified foil used in modern trucks. 5. It may not be pretty but it sure can work! 6. Hey, it has character. And 7. Have you priced a new truck lately?
Still, nearly everything on “Old Blue”—her body, brakes, engine, steering, suspension, transmission and wiring—needed work so the truck could continue to perform reliably and safely.
Could I afford to take her out of service long enough to perform a full-fledged restoration? Not a chance.
Instead, I invested more than 100 hours, some of it in long-deferred maintenance, to bring Old Blue back up to snuff mechanically.
What was involved? Read on…
The Project Started With a Bang
Frustrated owners often send their high-mileage autos to the bone yard for minor but either potentially expensive or downright unfathomable ailments. My truck almost went out with a bang—literally. Old Blue’s engine had developed the unnerving habit of cutting out abruptly at highway speeds.
I thought I’d found the culprit: sooty ignition points were apparently causing the ignition to cut out for intervals of two to three seconds. The sudden loss of power was a slight annoyance; the earsplitting explosion that followed was the unnerving part.
An engine running at 3600 rpm (my truck’s 6-cylinder engine runs that fast at highway speeds) revolves 60 times per second. Each time my ignition cuts out for three seconds, the engine revolves 180 times, inhaling atomized gasoline that it discharges, unexploded, into the muffler.
When the spark plugs resume firing, flame ignites the gas in the muffler to produce a massive, truly frightening explosion or backfire.
Following each incident, I’d file the points until they were bright and shiny again. After resetting the point gap I’d resume driving, confident that I’d solved the problem. Yet each time, the problem returned a day or two later.
Finally, filing the points did nothing to halt the problem; the engine seemingly backfired at will. I could stand it no longer: it was time to fix not only this problem but a long list of others.
Since the ignition points were apparently at fault—and I wanted to eliminate the drudgery of cleaning and re-gapping points every few thousand miles besides—I removed them for good.
Ignition Fix a Flop?
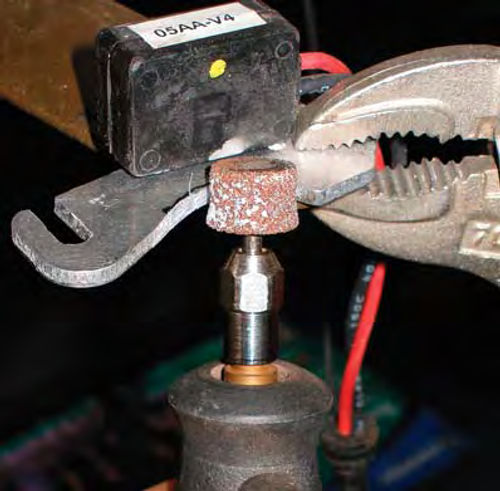
I had seen ads from at least two companies that offer kits to convert a points and-condenser system to semi-electronic ignition. For $79 I bought a PerTronix Ignitor kit from CBS Performance Automotive in Divide, Colorado, (www.cbsperformance.com). (See Photo 1.)
The kit I received didn’t fit.
Granted, the two pieces in the Ignitor kit slipped right into place. The magnet that slips over my distributor’s six-lobe cam fit fine, as did the “electronic switching module”—in effect, solid-state contact points—that mounts using the same screw holes as the contact points it replaces.
What, then, was the problem?
I couldn’t adjust the electronic switch to within .030 inch of the magnet. In fact, the smallest gap I could get was several times larger.
I returned the kit, waited several days and then rushed to install the new kit that arrived. But it fit no better, much to the bafflement of the supplier’s technician. (Both electronic switching modules had bases with an elongated hole for the lock screw but they weren’t as elongated as I needed to achieve the proper gap.)
“Can I just elongate the hole further until it fits?” I asked the technician. He eagerly gave his blessings to this modification.
I Made It Fit
Accordingly, so that I could extend the elongated hole with a minimum of filing, I drilled a new hole near one end of it and then filed through the small piece of metal separating the two holes. This moved the electronic switch closer to the magnet, it’s true, but it was still too far away to meet specs. As a last resort, I used a cut-off wheel on a Dremel tool (a high-speed electric motor for precision work, similar to a dentist’s drill) to convert the elongated hole into a slot.
This helped but didn’t do the trick. It was then I discovered that the switch base, despite its curvature to avoid such interference, was striking a raised area in the bottom of the distributor near the distributor shaft (Photo 2). After magnifying the arc of the base to eliminate this interference, I had no further trouble setting the .030 gap with a feeler gauge.
My truck now has a semi-electronic ignition system. I’ve replaced the mechanical ignition points with a solid state, non-wearing switch. But the Ignitor kit retains the truck’s original rotor and distributor cap to route the spark to the proper spark plug via high-tension cables. It looks original except it has not one black wire but two wires—one red, one black—running from the distributor to the coil.
I chose the Ignitor conversion kit partly because of its advertised claim: “Never change points again!” Only after my time-consuming modification did the kit install in minutes, as the manufacturer claimed it would.
Will the kit also improve my truck’s gas mileage and give me “fast starts, every time,” as its maker claims? On these “points” (Pardon the pun!), it’s too soon to tell.
To eliminate a second potential cause of the backfiring, I replaced Old Blue’s coil with an identical unit from a 1967 parts truck.
Engine Still Backfires
Although I’m very glad I’ve switched to the Ignitor electronic-ignition system and swapped coils, the changes did nothing to stop my truck from hiccupping. I’d only assumed that an ignition problem was causing the engine to backfire: I was wrong about that.
In fact, I was having a gas-supply problem. It revealed itself when I started the engine after rebuilding its one-barrel Holley carburetor for the first time in about five years and 50,000 miles of use.
During the rebuild, I’d soaked all the metal pieces in a 5-gallon pail of carburetor cleaner, blew out all passages with compressed air and reassembled everything in its proper position. I set the float—not brass but a modern-day composite-foam float—to factory specs.
I’ve rebuilt this carb a half-dozen times with no trouble. Yet this time when I started the engine the rebuilt carburetor immediately flooded. I have never seen a needle valve hang up the way this one did! Raw gas poured into the throat of the carburetor, ran down the outside of the unit and even dripped onto the manifolds.
Enough raw gas dripped into the engine to cause a hydraulic lock when I tried to restart it. That is, when I cranked the engine, one of its pistons encountered a cylinder full of gasoline, which it was unable to compress. So the piston, connecting rod and crankshaft stopped turning rather abruptly—all with no permanent harm to the engine, fortunately.
What went haywire inside the carb?
I quickly concluded that as the fuel pump filled the carburetor’s float bowl, the carb float rose and pressed against the needle valve, which is supposed to stop the flow of gasoline. But something—a piece of dirt, a misaligned float, a worn-out needle seat?—was obviously causing the needle valve to hang up.

The Fix: A New Float
After removing the carb’s float-bowl cover, I pressed a finger against the float’s needle-valve tang to raise the float to its uppermost position.
Strange, the float wouldn’t budge; it was stuck at its lowest level, leaving the door wide open to incoming gasoline.
In fact, the needle valve wasn’t the problem: the float was at fault. It seems that the composite-foam float had expanded over time so that its far edge was periodically sticking to the inner wall of the float chamber.
At highway speeds, this caused raw gas to pour into the intake manifold until it temporarily extinguished the spark at the spark plugs, effectively shutting off the ignition. When the engine “cleared its throat,” the spark resumed, with a resulting explosion in the muffler. A new float solved the problem.
New Rubber Bushings
For the next repair, I placed the truck on jack stands and removed the front wheels, giving me easy access to the truck’s worn-out front suspension.
My Ford uses a twin I-beam front axle. The inner end of each axle beam pivots in a metal-and-rubber bushing, which allows the outer end of the axle to rise and fall as the front coil spring compresses and then rebounds.
At the outer end of each axle I-beam, just behind the spindle, is a seat for the coil spring.
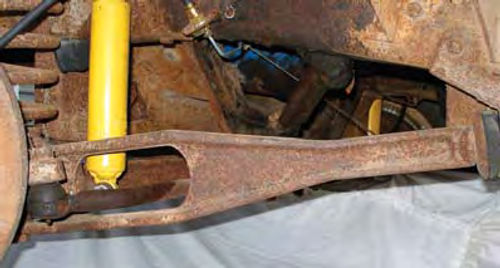
From this spring seat, a radius arm extends backward and passes through a bracket riveted to the frame.
This union—both fore and aft of the frame-mounted bracket—is cushioned in rubber. Because of its rubber mounting, the radius arm—whose function is to brace the outer end of the front axle beam—can pivot up and down, much like the I-beam axles, as the coil springs react to road irregularities (Photo 3).
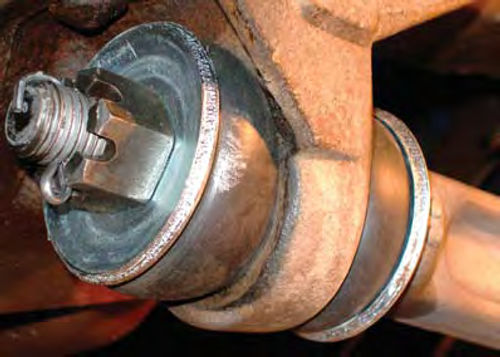
As you might imagine, the 41-year-old rubber bushings on both the axle shafts and radius arms were shot. The radius arm bushings had disintegrated so badly, in fact, that the radius arms would bang against the frame brackets with every bump in the road.
After months of hearing the sharp “cachunk” of metal-to-metal contact, I one day sprang into action by replacing the original all-rubber bushings with kits by Moog. These kits contained metal-and rubber bushings that are actually sturdier than the originals (Photo 4).
Likewise, I had a shop press new bushings into the inner ends of the front axle I-beams.
To Weld or Not to Weld?
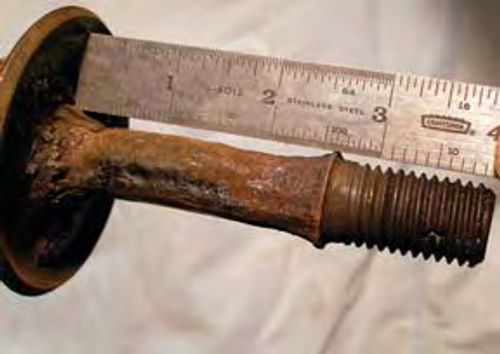
Ford’s original rubber bushings allowed road spray to collect and remain next to the radius arms. Over time, rust had seriously weakened the arms where they passed through the brackets (Photo 5).
Were the radius-arm castings even salvageable? I feared that the castings were forged and heat treated, which meant I shouldn’t weld on them.
At a local welding shop, however, I learned otherwise: I could run stringer welds to build up the rust damaged areas because the radius arms were cast of malleable steel.
So, after sandblasting the damaged ends of the radius arms, I used my MIG welder to lay down overlapping beads. These I ground to a smooth and mostly uniform diameter with a pneumatic grinder (Photo 6). Lacking specifications, I took as my target diameter the inside diameter of the new bushings. Because I used plenty of anti-seize compound on the axle and radius-arm fasteners, things should pop apart easily when I repeat these repairs in 25 or 30 years.
Front End Still Bounces
Instead of driving happily ever after with a rock-solid front end, however, I continued to have problems. The new set of heavy Monroe gas-charged shocks that I installed went bad in one week and 200 miles. A mechanic at the suspension shop where I’d purchased the rubber-bushing kits told me that the Monroe shocks were too light; he recommended the shop’s KYB brand. Because I’d heard good things about KYBs, I paid $114 (ouch!) for a pair of gas-charged KYB front shocks. I also parted with $91 for a pair of new Moog front spring coils, figuring that my truck’s hard-working original springs had earned an honorable discharge.
Whew, I’m glad that’s done—not!
The KYB shocks shelled out in well under 1000 miles, leaving the truck’s front end to bounce three or four times when I give the slightest love tap to the front bumper. Historically, Old Blue has rarely racked up more than 18,000 or 20,000 miles on a pair of front shocks. But just a few hundred miles? Something’s wrong .
When I returned to Inland Truck, the suspension shop where I purchased both the KYB shocks and the Moog front-end bushing kits, technician Jim Bryant hoisted Old Blue into the air for an inspection. Afterward, he said he was unable to pinpoint why the front end had loosened up. The new rubber-and-metal bushings were installed properly and working well, he noted, and the shocks also seemed to still be working.
Allowing that the front end did seem slightly springy, Bryant offered to replace the front shocks. I declined his offer at the time. I considered it a futile gesture to install another pair of shocks until I determine—with help from some old hand at another suspension shop, I hope—why they are wearing out so quickly.
Several months later, however, I did accept Bryant’s offer and exchanged the front shocks for a new set of KYBs.
As before—although not so quickly this time, it seemed to me— the tight front end loosened up once again. And that’s where matters stand as of this writing.
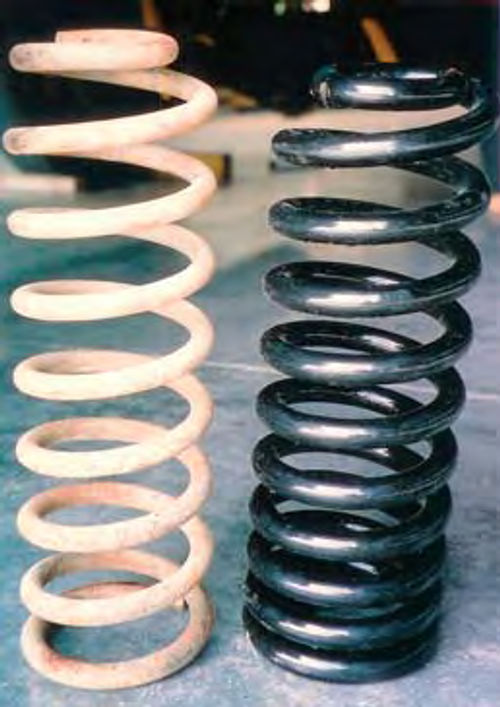
The Springs Weren’t Quite Right
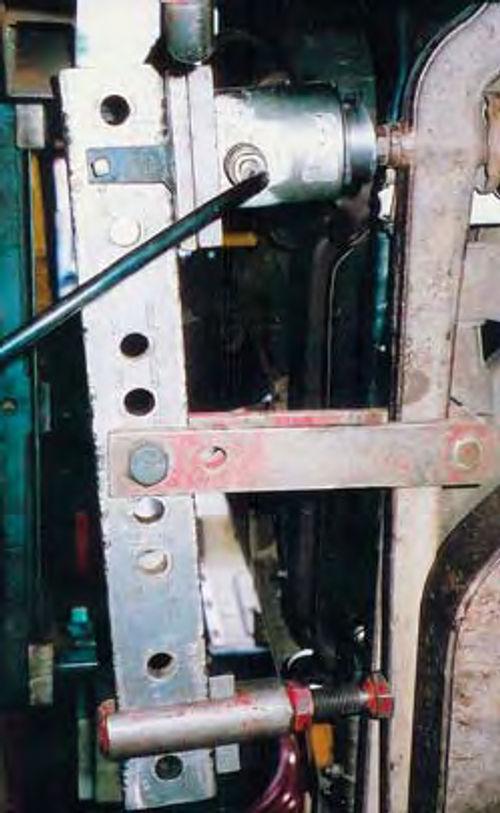
There was one problem with my newly rebuilt front end, however. When I’d installed the new coil springs, I’d noticed they were a slightly different height than the originals (Photo 7). I’d shrugged it off as no consequence whatsoever. Jim Bryant, however, caught what I had not: the new coils had altered the camber, or tilt, of both front tires.
Because the only way to adjust camber on my Ford F-250 is by bending the I-beam front axle, Bryant performed such an operation with a heavy duty tool using a large hydraulic ram (Photo 8).
In the next installment, we’ll upgrade the steering, swap transmissions, fit a new floor mat and padding, and begin a brake job.


