
This Old Truck, Pt. 2
Time to Work on the Steering and Replace the Transmission. It’s Too Bad the New Flooring Aged So Quickly…
Editor’s note: Last month, Curt started a mini-restoration to bring his hardworking 1967 Ford 3/4-ton pickup up to snuff mechanically. His project resumes here with some steering work, a prelude to replacing the transmission. Last month’s installment had eight images, so we’re starting here with Photo No. 9.
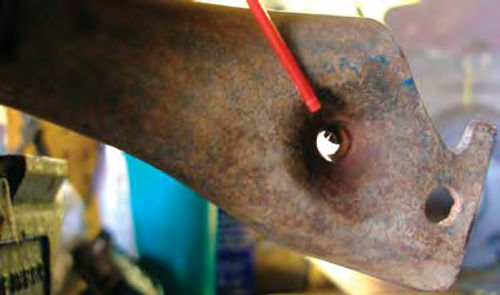
AT THE SAME time I replaced my front axle and radius-rod bushings, I upgraded the steering system. Specifically, I replaced the tie rods. Through tie rods, the motion of the steering wheel is conveyed through the steering gear to the front wheels. The ends of my truck’s two tie rods are fitted with ball joints, four in all, that allow for front suspension movement (Photo 9).
Because my tie rods and accompanying ball joints had 17 years and 100,000 miles to their credit, I decided to retire them. It’s good that I did so: a couple of the ball joints would no longer move by hand.
I’ve been careful to change my engine oil and filter every 2000 miles. Sadly, I’ve been much less fastidious about lubricating the tie rod ball joints. The counterman who sold me the new tie rods told me that he lubricates his truck’s front end every time he changes oil. With that kind of care, he said, a ball joint will last indefinitely.
The various 1930s through 1950s cars I’m familiar with are cheaper to service because they use ball joints that unscrew from the ends of the tie rods. Because Ford’s ball joints are permanently attached to the tie rods, replacing worn out ball joints is an expensive proposition: it requires buying a new set of heavy metal rods in addition to the ball joints.
Thus the hardest part about replacing drag links on a 41-year-old pickup truck, I learned, is paying for the new parts: $373 worth. This expense is due only partly to the ball joints being integral with the tie rods. Another reason for the high price, I suspect, is the dwindling demand for such vintage parts. The suppliers who still make them must charge enough to justify their limited production runs.
A Crude Toe-In Adjustment
One of the tie rods uses a threaded adjusting sleeve with clamps on each end. Using this sleeve, a skilled mechanic can lengthen or shorten the tie rod and thereby set the proper toe-in of the truck’s front wheels.
I had to transfer this threaded sleeve from the old parts to the new, which disturbed my truck’s toe-in setting.
To keep the toe-in adjustment reasonably close to specifications, I counted the number of exposed threads on either side of the sleeve and set up my new tie rod in a like manner. Later, technician Jim Bryant at Inland Truck found that because of this precaution my truck’s toe in adjustment had strayed a mere 1 ⁄4-inch from factory specs.
Transmission Time
With nearly a quarter-million miles to its credit, my truck’s manual transmission, a Warner T-18 4-speed, was beginning to chatter, a sure sign of wear. Not to worry! An identical 1967 Ford parts truck that I recently purchased has an odometer reading of just 113,000—or is that 213,000? I’d guess the former because its transmission, an identical Warner 4-speed, is nice and tight. Accordingly, I swapped gearboxes between my pickup, Old Blue, and its parts truck.
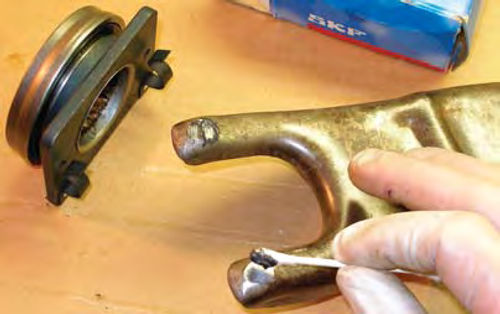
Several million shifts, I’d guess, had actually worn a hole where the tip of the clutch linkage contacted the clutch release fork (Photo 10). After welding the hole I drilled out a bit of the new metal. This created a beveled crater that will cup and center the tip of the clutch linkage.
Now, to the transmission itself. I’ve pulled Old Blue’s gearbox at least three times over the years: twice to replace the clutch or its throwout bearing and once to remove the engine. The first time I used brute strength—a mistake, for the tranny must weigh 125 or 150 pounds. More recently, I inserted the boom of an engine hoist into the truck cab and used the hoist to lower the gearbox to the ground. This method is safe, if cumbersome.
This time I resolved to buy a transmission jack and do the job right. Because I’ll seldom use such a jack, I bypassed the highest-priced professional models— the ones selling for $1000 or more—and opted instead for a $140 J.C. Whitney special (J.C. Whitney, 761 Progress Parkway, LaSalle, IL 61301-0300; www.jcwhitney.com).
Overall, the caster-mounted, 450- pound-capacity scissors jack worked well enough. But no matter how I attached the nylon strap that is supposed to lash the gearbox to the jack—inexplicably, no instructions accompany this strap—I could not get it to tighten and stay tight. The result: I had to lower and raise the jack very gingerly to keep it from dislodging its load (Photo 11).
Guide Pins Smooth the Way

To lower the transmission, I first removed the truck’s floor mat and a sheet-metal access cover. This allowed me to unbolt the gearbox cover, which contains the floor-mounted shift lever. (Only with difficulty can the tranny be removed with this long lever still attached.) I plucked off wires to the tranny’s backup-light switch, removed the speedometer cable and unscrewed four nuts to lower the driveshaft out of harm’s way.
To prevent an unwanted spill, I removed a pipe plug to drain the gearbox oil. Finally, with my floor jack bearing against the bottom of the gearbox, I unbolted and removed a frame cross-member that serves as a transmission support.
Because the transmission cross-member doubles as a rear-engine mount, I now needed to support the back of the engine. This I did by shoving blocks of wood between the bell housing and a frame cross-member positioned directly below it.
One at a time I removed the gearbox’s four mounting bolts, replacing each one with a 4- or 5-inch-long homemade guide pin. These pins are as necessary as they are easy to make. Your local hardware store can supply bolts of the proper diameter, thread pitch and length.
By removing the head and cutting a slot in the end of each bolt, you can create guide pins that will install easily with a slotted screwdriver. The guide pins, rather than the transmission front shaft, will bear the considerable weight of the vehicle’s gearbox as you remove it from the engine.
New Seals for the Donor Tranny
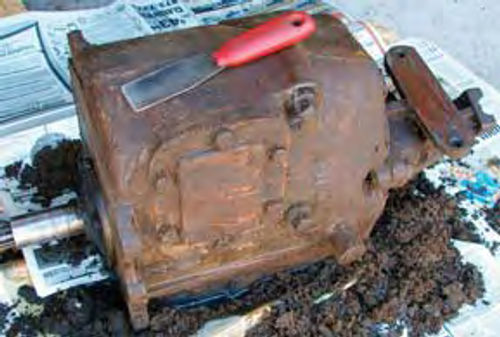
With the gearbox out of my parts truck at last, I used a putty knife to strip its thick skin of grease (Photo 12).
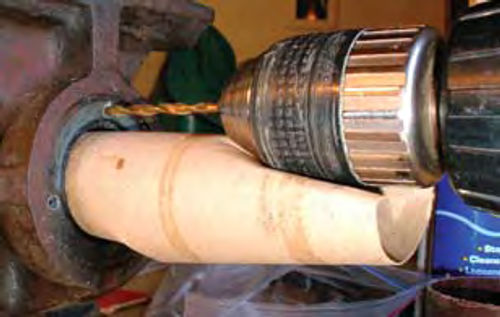
While I had the opportunity, I used an inexpensive puller to remove the tranny’s front seal, which was probably original equipment. Call it preventative maintenance: if this aging seal began to leak it would soak my clutch and cause it to slip. I tapped a new seal into place using an inexpensive seal-driver tool I’ve had for years.
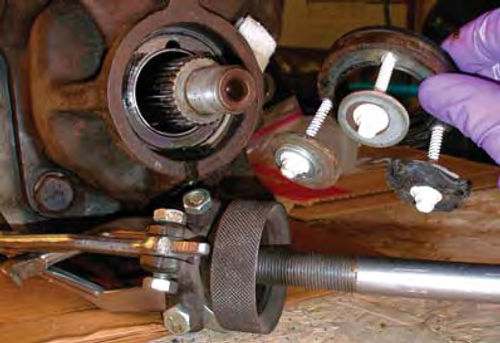
The front seal is just one of two on my transmission. Although a leak at the tranny’s rear seal is merely an annoyance, I replaced it because it would never be easier to do. The rear seal is a trick to remove, however, because the transmission shaft is in the way. A special puller is available for the job, but lacking this tool, I drilled three holes in the seal’s metal case and screwed in three self-tapping screws, each one equipped with a large, heavy washer (Photo 13). By slipping the legs of a slide hammer over each washer in turn and giving the slide hammer a light rap each time, the seal popped free with no damage to the transmission shaft (Photo 14).
Because of the protruding transmission shaft, I couldn’t use a traditional driver to seat the new seal. The solution, then, was to find a socket the same diameter of the new seal and one deep enough to fit over the exposed shaft.
Fortunately, I had just purchased a 1- inch-drive socket set containing sockets as large as 2 inches. I used a dead-blow hammer to strike the proper-size socket and thereby seat the seal. Before doing so, I followed the advice of the counterman who sold me the seal by coating its inner edge with grease (Photo 15). This prevented a circular spring, which stiffens the seal’s rubber lip against the transmission shaft, from jumping out of position when I tapped on the seal.
Greasing Friction Points
Before installing the gearbox in Old Blue, I reached inside the truck’s bell housing to unclip the clutch throwout bearing. Since it already had 50,000 miles to its credit, I replaced it with a new bearing. I figured the alternative was to wait a year or two and then remove the gearbox once again just to replace this bearing.
Finally, while the transmission was still out, I applied grease to friction points that are normally off-limits inside the bell housing. This included placing a thin smear of grease on the bronze bushing that’s pressed into the center of the crankshaft’s rear flange. The tip of the front transmission shaft rides in this pilot bushing.
The clutch-release fork that I welded earlier also requires a dab of grease on each of its two fingers, where it contacts the throwout bearing (Photo 16). To finish the job, I lightly greased a fulcrum or pivot point on the opposite side of the fork, installed the fork and its attached throwout bearing and installed the gearbox using my guide pins.
Before installing the top cover and shift lever with a fresh gasket, I poured fresh 80W-90 oil through the top of the transmission to the level of the filler-plug opening. This saved me from diving under the truck later to fill the tranny using a suction gun.

Note: It pays to study your shop manual’s specifications section periodically. Although for 25 years I’ve used heavy gear oil in my transmission, the shop manual actually calls for a lighter SAE 50 oil. I look forward to trying this!
New Floor Mat and Padding
The budget for my mini-restoration included $80 (plus shipping) for a rubber floor mat from J.C. Whitney.
The new molded mat fits around the transmission hump just as well as did the truck’s dry, brittle and cracked original mat, although the replacement has a pattern of random lines instead of the original mat’s pebbly finish.
J.C. Whitney also supplied a roll of 3/8- inch-thick, foil-lined jute backing, an insulation material I’ve read much about recently in articles and advertisements.
To fit the padding, I measured 33 inches from the lower edge of the firewall material to the rear edge of the mat. I then cut a 33-inch strip from the roll of padding, which, given its four-foot width, provided me with a piece of padding that measured 33 inches by 48 inches. This four-foot-long strip of padding not only covered the driver’s side but extended up and over the transmission hump and most of the way down the hump’s passenger side.
I measured and cut the remaining piece to fit under the passenger’s feet, a task that required some finesse (Photo 17). I was supposed to use aluminum tape on the foil side of the two pieces to join them and also use a spray adhesive to permanently attach the padding to the floor. But I am planning, eventually, to replace my rusty cab with the rust-free cab from its parts truck. When I do that, I want to also transfer the mat and padding to the replacement cab. (Had I glued the mat to the floorboards, I would have left a cut-out opening around the gearbox inspection cover for any future transmission repairs.)
Fit the Padding Carefully
Now, it was time to modify the padding and mat to achieve a custom fit. Two cuts in the driver’s side of the pad and mat were obvious—around the dimmer switch and gearshift lever, both floor-mounted. But to get a clean, tight fit I also made a V-cut in the padding to the right of the accelerator pedal, where the padding folded over itself in the small space between the pedal and the front of the transmission hump.
My last cut came almost as an afterthought. I was giving the rubber floor mat a final fitting when I realized that I was shortening the stroke of the accelerator pedal by the thickness of the padding: 3/8-inch. Although this doesn’t sound like much, it probably would have been enough to prevent my throttle from opening fully. I therefore cut out a swatch of padding from beneath and around the accelerator pedal.
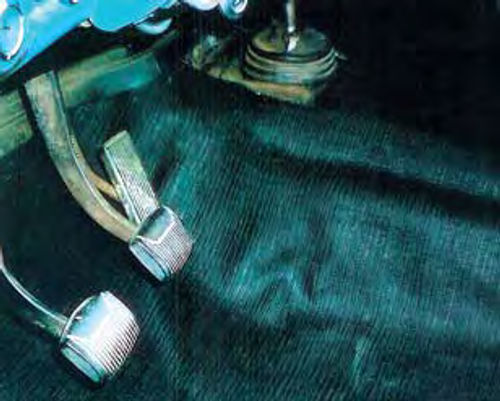
Since cutting and fitting the layer of padding foil-side down beneath the rubber floor mat (the foil faces the source of the heat), I’ve noticed that the floor is no longer hot to the touch due to exhaust heat or sizzling summertime pavements. No, the heat now radiates inward from the metal roof of the cab, which is insulated only by a thin perforated-fiberboard headliner. Still, I invested my time wisely because the truck, which lacks air conditioning, is now cooler inside on hot summer days and quieter as well. It will doubtless be warmer in the winter, besides. And nothing dresses up an old truck as easily and inexpensively as installing a brand-new rubber floor mat (Photo 18).
My only disappointment is that, just a few months later, cracks resembling the weather checking of tires began to appear in the floor mat, which apparently was made of inferior rubber.
Next on the Checklist: A Brake Job
During the six years and 53,000 miles that have passed since my last complete brake job, my brake pedal has only recently begun to feel slightly spongy. Furthermore, my parking-brake cables, which manually lock the rear brake shoes, have begun to occasionally stick in the “on” position. Clearly, the truck was due for some brake repairs.
Accordingly, after placing the truck on jack stands, I removed all four wheels and drums and set to work. My first task was to remove everything—wheel cylinders, springs, adjusters, cables and brake shoes—from the brake backing plates.
Before doing so, I took photographs and placed the resulting prints in four zipper-top plastic bags, one for each wheel. They’ll act as nifty guides when I’m reassembling all that brake hardware.
I bought new brake shoes from a machine shop that also turned my front drums—that is, cut enough metal from the inside of the drums to smooth and true their braking surfaces.
My rear drums, however, had worn beyond their service limits, due possibly to the frequent driving I do on gravel roads. I suspect that when the front wheels send the gravel flying, some of the pieces ricochet into the rear drums, which were severely scored. For a reasonable $40 apiece I bought a pair of new rear drums and had the removable hubs from the old drums placed on them.
Next time, Curt finishes the brake job and repairs the brake lights, the taillights and more.


