Inspecting a Collectible Vehicle
Before You Buy a Vintage Car or Truck, Go Over It Carefully. Follow This Guide to Avoid Unpleasant “Surprises.”
DID YOU EVER buy a collectible car that “looks nice,” only to discover that it needs lots of mechanical repairs to bring it up to safe touring standards? Or maybe your introduction to your new vehicle amounted to little more than a short drive with the owner. Or, you loaded it onto your trailer, took it home, unloaded it, and it wouldn’t start.
These types of disappointments can be avoided, however, through some mechanical checks you should perform before you finalize your deal.
And, fortunately, you won’t need to drag along a lot of special tools to perform these procedures.
So, ask the seller if he will let you check this stuff in order to determine the mechanical soundness of the vehicle in question. (If the seller declines, you probably should re-think your purchase.)
Also note that the mechanical checks and potential repairs outlined here apply to most makes, models and years.
Checking the Electrical System
Battery and Starter: First, check the vehicle specifications for battery polarity (positive or negative ground) and the battery voltage (6 or 12 volts).
If the polarity and/or voltage is incorrect (like 6 volts converted to 12 volts, and positive ground converted to negative ground), take note; question the owner on the history and why it was converted. Most often the answer is “it was converted to 12 volts so it would crank better and start quicker.” The conversion may be your first clue to starting system problems (plus other possible problems).
A 6-Volt Electrical System: A 6-volt system should have large one (1) gauge cables, the correct ground polarity, and a (redundant) one gauge ground cable to the engine.
If serviced and cleaned properly, a 6- volt system is fully charged at 6.4 volts measured at the battery. The cranking voltage should be at 5.2 volts or more measured at the battery. The cranking amps should be 400 or less. The ground voltage from the battery ground terminal to the engine block should not exceed 0.5 volt during cranking.
With 12-Volt Electrical Systems: A 12- volt system is fully charged at 12.6 volts. It should crank at 10 volts or more. The cranking amps should be 200 or less. The ground voltage should not exceed 0.3 volts during cranking.
Repairs: If the starting system on your “new” toy does not meet the above performance criteria, be prepared to service and repair, accordingly.
In many cases, the cables have bad connections with poor ground(s) or the “new” battery is no good. Quite often the cables are too small (4 gauge instead of 1 gauge, for instance, on a 6-volt system) or old “original” cables have high resistance.
Sometimes the starter button or solenoid is no good. In a few cases the starter needs overhaul.
Ignition key switches also develop high resistance, carbon tracks or open up (electrically) and fail.
Charging: After startup, test the generator/alternator for charging. A 6-volt system will show a voltage of 6.4 or more measured at the battery. A 12-volt system will show from 13.5 -14.5 volts measured at the battery.
Check for any loose, slipping or cracked belts.
How to Measure: Review the Auto Restorer March, May, July, September, and November 2006 articles on using test meters (all “how-to” withphotos). You may also want to visit my Web site (www.milttheinstructor.com) for “howto” information on 6- and 12-volt battery and starter performance.
Wiring: Old collectibles are very prone to electrical fires.
Look under the hood and dashboard. If the wiring is “frayed,” be prepared for a complete re-wiring of the whole vehicle. Install fuses if it’s not so equipped.
Fuses: One 30 amp in-line fuse is adequate protection against wiring “shorts.” This can be installed in the wire that supplies all the battery power to the vehicle’s electrical system.
The main battery power lead is usually connected to the starter switch or at the solenoid “bat” terminal.
Quick Disconnect: I would install a “quick disconnect” on the ground side of the battery as a safety measure to help prevent electrical fires. Disconnect this every time your collectible is parked overnight.
Engine
Oil: Check the oil. If it’s black, inquire, “How long since the last oil change?” Ask about the brand and the weight. If it’s been changed often, that’s great.
Internal Coolant Leaks: If you change the oil, watch for water coming out before the oil starts when you first remove the pan plug. A few drops of water are OK. If you get a cup or more, watch out for head gasket failure, and/or block cracks.
New Oil: Install the specified amount of oil and change the filter if applicable.
If you or the owner have no preference, install 20-50 weight detergent, any brand. The “viscosity” will adjust to the oil temperature, and the “detergents” will gradually clean the engine. If you buy the vehicle, change the oil three times (every 100 miles) to clean up the innards.
Note: Do not use engine oil additive, flush, diesel fuel or kerosene with oil to “flush” the engine. Do not use block seal in the coolant—repair the leaks.
Clean multiple viscosity oil changed often is the “lifeblood” of the engine.
In my experience, some additives may cause smoking out the tail pipe. Block sealers may plug up small coolant passages in the block.
A Dry Compression Test: As you know, the compression must be at specification and uniform between cylinders for a good-running engine.
I recommend conducting a “dry compression” check on a cold engine before the first startup. Remove all the spark plugs, install a compression gauge, disable the ignition, or ground the coil wire and crank the engine.
“Bump” the compression gauge at least four times during cranking and compare the pressure to specification. If the pressure varies more than 10% from the average pressure, the valves may need service.
If any cylinders have zero compression, watch out. A valve may be stuck open or there may be a hole in the piston top.
Hand Crank the Engine: On an old collectible vehicle with only a hand crank, oil the crank handle bearing. Remove the spark plugs. Then pull the crank through the compression stroke with your thumb in the plug hole. Note the “puff.” Are the puffs equal, and/or is one at zero? If so, the valves will need service before startup.
Note: On 4-cylinder engines with one cylinder at zero, the engine may not start due to poor breathing.
A Wet Compression Test: Conduct a “wet compression” test by squirting oil into each cylinder. If the compression pressure increases over 10% of the original dry compression pressure, the engine may need piston rings.
After startup and warm-up, the compression is usually higher than the cold engine check, and, most often, more even.
Smoking Exhaust:“Smoking” exhaust conditions can be identified after startup. Plugged exhaust, and/or worn timing chains can be checked after startup. Smoking checks are outlined later in this article after the vehicle startup.
Tune-Up Checks
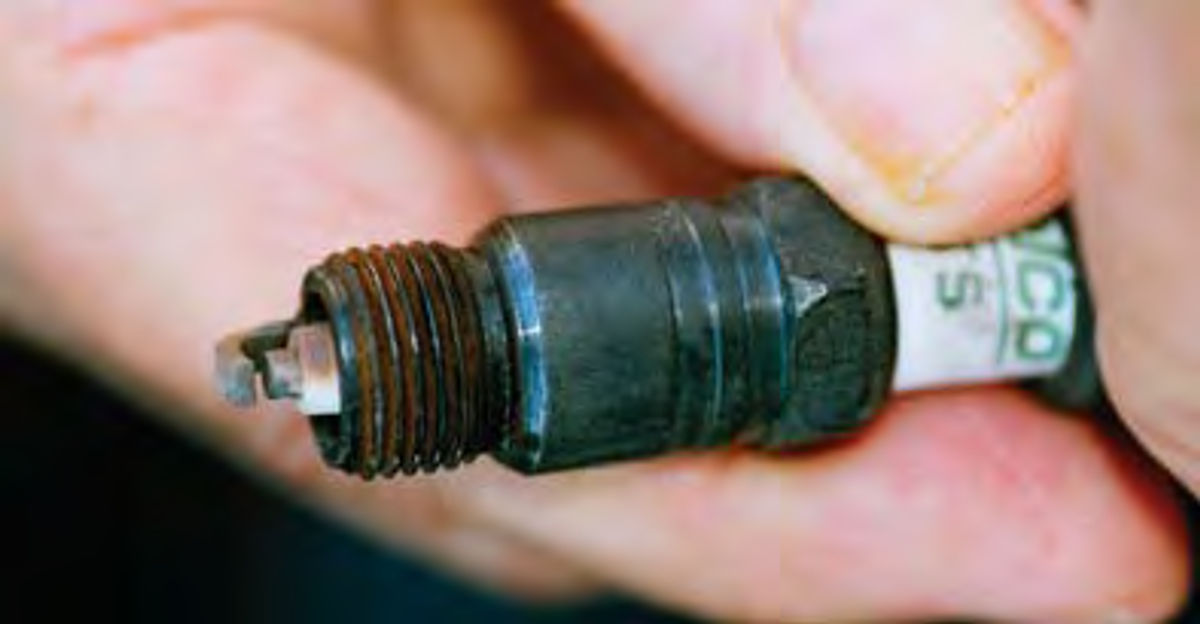
Spark Plugs: As you conduct the compression tests, note the condition and cylinder number of the spark plugs. The inside porcelain surface should be tan to orange (Photo 1).
If the porcelain is black on the inside surface, the carburetor mixture may be rich or the base ignition timing is retarded.
In extreme cases the plugs (1 or more) may be oil fouled. It may be time for rings.
“Hotter” plugs won’t work.
Other causes for severe plug wear can be caused by lean carburetor mixture. (Look for white to grey plug porcelain).
Fuel Supply: Visually inspect the fuel tank, cap, and fuel lines. Look into the tank at the bottom surface, if visible. Some bottom surface rust is OK. Excess “junk,” and dried up fuel residue from “old gas” should be cleaned out and leak source(s) repaired professionally.
Gas Cap: Note the vent in the gas cap.
Fuel Line: Check the fuel line. Originally, it is steel, not copper
Inspect “flex” lines for cracks.
Old copper fuel lines tend to become brittle and may crack, leading to a fire.
Fuel Gauge: Does the gas gauge work when turning on the key?
Electric Fuel Pumps: Does the fuel supply include an electric fuel pump “to fill the carburetor” with gas? I believe this points to a weak mechanical pump system, and/or a carburetor that leaks gas when sitting for long periods.
Fuel Pressure and Flow: Disconnect the fuel line at the carburetor. Block the choke open with a screwdriver. Install a combination vacuum pressure gauge (purchase at auto parts stores).
Measure the fuel pressure and flow during cranking. Compare to specifications. If under specifications, replace the pump. Also, replace the filter and replace the flex lines.
Most mechanical pump systems will measure from 3-6 psi. New or rebuilt mechanical pumps and electrical pumps may pump up to 8 or 9 psi, which is too much. This must be regulated back to the specified pressure. Purchase and install a fuel pressure regulator between the pump and the carburetor.
“Vacuum tanks” were installed on many pre-’30 vehicles. For touring, I would install an electric pump regulated to one PSI.
Regarding NOS (new old stock) pumps: No, do not use. Old diaphragms will fail. If the car is equipped with an old mechanical pump, and it has been installed “for years,” it will fail (caused by old age). Install a new or rebuilt pump.
Mechanical pumps won’t suck fuel with fuel line cracks or restrictions.
Carburetion: Disable the ignition by grounding the distributor end of the coil wire or disconnecting the hot wire from the coil primary terminal (insulate).
If there’s gas up to the carburetor from the pressure tests, crank the engine for 10 seconds to fill the carburetor bowl.
With the engine off and not cranking, look down the carburetor throat(s) and note any fuel wetness. It should be dry on top of the throttle blades. If equipped with an automatic choke, manually open the choke blade. If wet, the carburetor needs service (flooding or “dripping”).
Next, with the engine off, open the throttle, slowly. Note a squirt from the accelerator pump discharge port. Open a second time. You should now have a strong squirt. If there’s no squirt, service the carburetor.
Ignition: You have already checked the old spark plugs for mixture and/or oil fouling. Replace with new specified plugs gapped to specification, regardless of how good the old plugs look. Old plugs may misfire even though they look good. Oil or apply Never-Seez or a similar product to the threads prior to installation.
“Taper seat” plugs should be torqued to 1/16 turn past seat contact while “washered” plugs should be torqued to 1/4 turn past seat contact.
Older vehicles’ spark plugs may use pipe threads with no washer. Torque these spark plugs to 35 ft.- lbs. Minor leakage (small bubbles) is normal.
Plug Wires: If the plug wires are over 5 years old, replace with a new set. “Carbon core or resistor” wires are OK. Check the Ohms. New “resistor” wires are around 3000 to 4000 Ohms per foot. Older stranded plug wires should measure 0 Ohms (continuity).
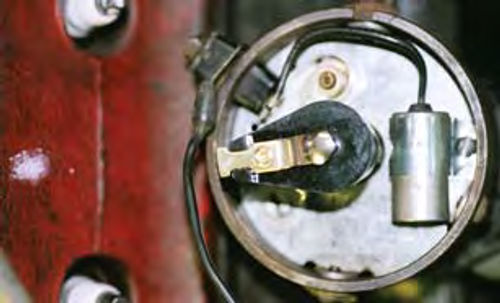
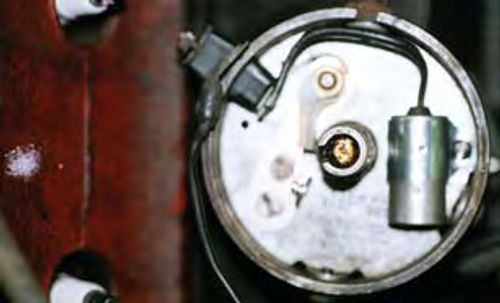
Distributor: Replace the points, distributor cap, and rotor. Check the mechanical advance. The rotor should rotate around 10 degrees and then snap back as you let go of the rotor. If sluggish or there’s no spring action, disassemble and clean the distributor advance weight pivots. Replace broken advance springs.
It may be easier to purchase a rebuilt or new distributor. (Try a parts store such as NAPA or Car Quest.)
Check the vacuum advance, if equipped. Hook up and pump up diaphragm vacuum with a hand vacuum pump. Watch the distributor plate rotate as pump vacuum increases. Does the diaphragm hold 20 inches vacuum?
Install new points and condenser. Adjust points to 0.002 over the specified gap. This allows for rubbing block wear-in.
Lube the cam sparingly with moly or silicone grease. Make sure the “ground” wire on the distributor plate is installed, use only very flexible wire.
Note: The cam is usually dry because it was not lubed the last time the new points were installed.
Also note that it’s best to do all of this on the bench.
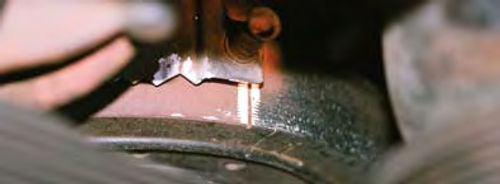
Base Timing: Look up timing specs in a tune-up manual.
Mark the damper (Photo 2) or flywheel on some older vehicles. Most references have diagrams of timing marks.
Upon startup (previously running vehicles), check the base timing (vacuum advance disconnected).
Timing Advance: Reconnect the vacuum advance and rev the engine to see if the timing advances.
If you have an adjustable timing light, hold the RPM at 2500, adjust the advance degree knob to align the TDC mark with the pointer.
On cars with mechanical and vacuum advance you will measure around 25-40 degrees advance at 2500 RPM.
Check-chart manuals have “total advance” specifications in crankshaft degrees for many old cars.
Motor manuals have distributor specs. You can look up the mechanical advance degrees at 1000 distributor RPM, then multiply the distributor RPM and distributor degree advance by 2. Look up the vacuum advance degrees at high vacuum (15”) and multiply by 2. Add up the mechanical advance, the vacuum advance and base timing. Now you have the “total advance” in crankshaft degrees for your collectible.
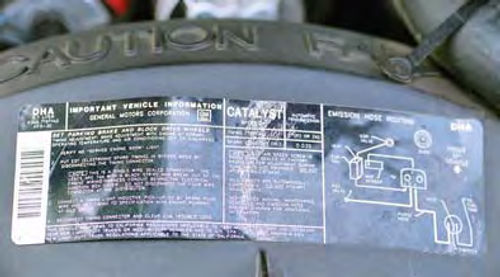
Computer Controlled Timing: If your collectible is equipped with computer controlled ignition timing advance, read the underhood label, follow the setup procedure, and adjust the base timing to specifications (Photo 3).
If the label is gone or faded, look up procedures and specifications in a tuneup manual.
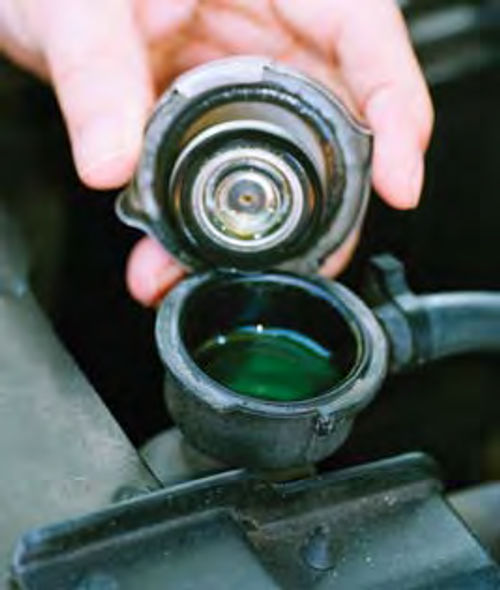
Coolant: Change all hoses including heater hoses and the thermostat. Add water (only) for now.
Check for overheating after startup. Drain again and add “radiator flush.” Drain and flush. Install a new pressure cap if equipped (Photo 4). Look for water pump and core plug leaks.
If it “boils over” you’ll have to have the radiator cleaned or re-cored.
A caution: Old radiator fins lose their “bond” to the radiator tubes. No matter how clean it is, the radiator may still “boil over.” Take that opportunity to re-core.
Start Your Engine
Startup: Pump the gas pedal twice, choke and crank.
Right after startup, look for immediate oil pressure and notice any knocking.
If there’s no oil pressure after startup, stop the engine and check the oil gauge. Install a mechanical oil gauge. Compare oil pressure to specifications.
After Startup: Run the engine 30 minutes to check for overheating and oil pressure. Re-check compression (wet and dry). Change oil and filter again.
On older collectibles with main circuit fuel mixture adjustment, adjust the mixture halfway between lean and rich.
Engine Manifold Vacuum: If the engine doesn’t knock or smoke excessively, measure the manifold vacuum. Hook up a vacuum gauge at a manifold or carburetor port (below the throttle blade). Rev the engine to 2500 RPM in neutral. The vacuum will usually read 20 inches of mercury or higher on a good engine with no exhaust plugging.
From 2500 RPM, snap the throttle closed. The vacuum should increase up to 24” or more during the short deceleration period. If it does, this shows you the engine is a good “pump.”
At idle you should measure from 18- 21” with the correct RPM, base timing and fuel mixture.
If the vacuum drops while holding a steady 2500 RPM in neutral, the exhaust system may be plugged.
Some old collectibles also have “double wall” exhaust pipes before the muffler. Double wall pipes tend to collapse, causing restriction.
Engine Knocks: Rev the engine to a steady 2500 RPM. Short out one plug at a time with an “insulated” screwdriver. If it’s a knocking rod, the knock will usually go away. In addition, listen for a “knocking to return” as you remove the screwdriver from the shorted plug.
If you have “lots of knocking” at 2500 RPM and at idle, have a professional engine mechanic analyze the knocks; then, let him/her advise you on the approach to repairs.
Smoke: If the engine smokes upon startup, note the color. White is oil smoke, and black is rich carburetion.
If you see water vapor (steam), “cup” your hands, collect exhaust and smell the exhaust. A “sweet” smell will expose a possible antifreeze internal coolant leak in the block.
If it smokes, run the engine one hour and change the oil again. If it continues to smoke, have the engine condition analyzed for overhaul.
Don’t use an additive: I do not recommend additives to cure smoke problems.
Chassis Checks and Tests Manual Transmissions:
Check gear lube level. If “foamy,” change and install the specified gear lube.
Check the transmission overdrive gear lube level, if equipped.
Fill to the bottom edge of fill plug threads.
Automatic Transmissions: Change the transmission and converter fluid. Install the specified fluid. Chek-Chart manuals have lubrication specifications and quantities (available at www.motor.com).
Differentials: Check the fluid level. It should be at the bottom edge of the fill plug threads. If foamy, change it! Install the specified fluid.
Note: some “non-slip” differentials require special gear fluids. Check the lubrication requirements in Chek-chart manuals (www.motor.com).
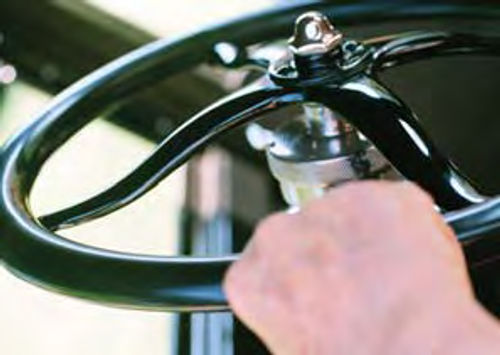
Steering: Have a helperwiggle the steering wheel gently back and forth. Ideally, the free play should be around 1” before the front wheels start moving.
Wiggle the wheel more vigorously. Check for steering box looseness on the frame, and all tie rod ends. While wiggling the steering wheel note axle or “A” frame movement (Photo 5).
Springs: Many times shackles on longitudinal springs have excess clearance.
Axle Alignment: On fixed axle vehicles measure axle alignment with respect to the frame.
Are the axles parallel to each other? Are the axles perpendicular to the frame? This check could identify problems from previous wrecks.
Frame Cracks: On one Chrysler I was checking, the frame at the spring shackles mount was cracked. It had to be welded professionally with an extra plate for a reinforced repair.
Looseness in Joints: On Fords with “wishbones,” look for radius rod ball looseness at the back end of the wishbone. This must be snug with no movement when wiggling the steering wheel.
On all axles and joints, look for rust between spring perches and saddles. Rust is an indicator the joint is loose. Loosen the nuts, oil threads, re-torque, and install the cotter pin.
All this looseness in the front end will cause low-speed “wobble.”
Wobble occurs when you hit a rut in the road or going over the railroad tracks at slow speeds. The front end begins to shake and at times the driver must stop the vehicle to end the wobble.
Steering Gear Box: Check the steering box for gear fluid (85-140w is OK).
If the cross shaft bushing or seal leaks gear fluid, repair the steering gear.
Loose Steering Joints: If the steering is loose, all joints must be tightened and lubed, first, before steering gear repairs and/or adjustment. Many times, steering gear boxes are repaired at great expense prior to front end repairs. Then the car still wobbles at low speed.
Power Steering: On power steering systems install the specified fluid, and check the drive belt. If old, (5 years) install a new belt.
Mechanical Brakes: Does the car pull to one side upon brake application? Does the emergency brake hold or lock up wheels during slow speeds? Check the mechanical levers for angle during application of the service brake.
With no application the lever angle should be “tilted forward” of lever rotation direction. With brake pedal application, the lever should be vertical or slightly forward. This check will prove good mechanical advantage.
If the lever is “tilted behind vertical” rotation center during brake application, major adjustment and/or repairs are in order.
If you can remove all wheels and drums, visually inspect the linings for wear, grease on the brake linings, and brake drum grooves. Lubricate all brake rods, pivot joints, and cable housings with penetrating oil spray.
A caution: Many times mechanical brakes have been relined with hard “bonded” linings, which is a no-no. A hard bonded lining grooves old brake drums and leads to expensive repairs. A riveted “soft” lining is correct for most old collectible vehicle mechanical brakes.
On Model T and Model A Ford mechanical brakes, I use Tri-Mec HD woven lining. It’s available from clutch and brake rebuilding shops in various thicknesses, widths and lengths. Have the brake lining arced to the drums. This results in a good mechanical brake with correct installation, adjustment and 100 miles of driving.
Hydraulic Brakes: As outlined above, check linings for wear and grease. Replace all wheel cylinders and the master cylinder. Replace all flex lines. Most often, these are available through auto parts houses.
If not available, have wheel cylinders professionally restored.
DOT 3 brake fluid is OK for several years. If you choose DOT 5, replace all cylinders, flex lines and the steel brake lines. Do not “short change” on the safety aspects of your collectible.
Wheel Bearings: Clean and inspect all wheel bearings. If they’re not pitted or worn out, replace with “fibrous” heavy duty grease on drum brake vehicles.
On disk brake vehicles, use “Moly” wheel bearing grease.
Replace all hub seals including the “inner” seal on rear axles, if equipped.
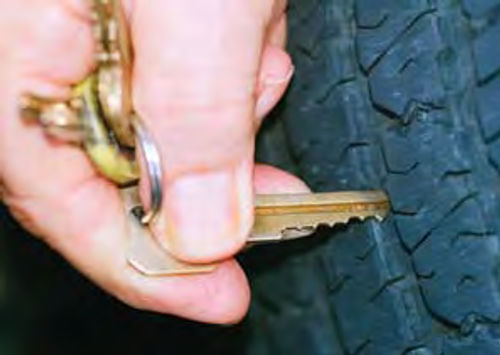
Tires: Inspect the tires for age, major cracks, cupping, and abnormal wear. I would suggest a tire shop perform this inspection and advise you regarding a potential need for replacement.
Hobby sources, such as Coker Tires, have a variety of sizes, including “wide” whitewalls. See Photo 6 for checking tire tread depth.
Alignment: I would advise that alignment checks and corrections be performed professionally.
Many old collectible front wheels are adjusted with toe-out. All specifications prior to radial tire vehicles, call for some toe-in, usually, around 1/16 – 1/8 toe-in.
If alignment and toe-in is incorrect, your collectible vehicle will “wander all over the road.”
Driveshaft: If you already have purchased the collectible, remove the driveshaft. Install new U-joints with grease fittings. Have the driveshaft balanced. Lubricate the U-joints.
Lubrication: Lubricate all grease (Zerk) fittings.
Many older collectibles have fittings different than Zerk. The special fittings are available from hobby parts houses and will fit your later grease gun, usually 1/8-inch pipe thread.
Computer Vehicle Tune-Ups
On 1980 and newer vehicles, the engine tune-up includes testing and confirming the computer control system of the ignition, fuel, and emission controls are operating in “closed loop,” and at specifications. Spark plug color on the inside porcelain should be white on computer carburetor and fuel-injection vehicles. This is a must for good drivability, best gas mileage and lowest emissions. All the previous paragraphs in this article apply to computer controlled vehicles.
My guidebook “Tuning Up Autos and Trucks” (listed below) will show you how to tune up ’80 and newer model computer controlled vehicles.
Motor and Chek-Chart manuals have specifications for computer controlled systems (www.motor.com).
Before and After Buying
Before Purchase: Perform as much as you can of the tests and inspections outlined above. That way, you’ll find out what you’re in for. Also, when you’re contemplating the outlay of thousands for a vehicle, consider hiring a general auto technician for a day to help you evaluate the soundness and the mechanical defects of your prospective purchase.
After Purchase: I would suggest you perform all the mechanical repairs and adjustments, first. After each major repair, drive the vehicle.
Repair Approach: I would approach the repairs in this order: Tires, brakes, steering, transmission and differential, and then the engine condition and tuneup. Then, after all mechanical repairs are completed, do the cosmetics.
Resource—“Tuning-Up Autos and Trucks, A Guidebook of Solutions for Testing, Evaluating, and Analyzing Computer Controlled Vehicles;” Milt Webb, 8737 Lodestone Circle,Elk Grove, CA, 95624; www.milttheinstructor.com


