How -to “Tune-Up” a Vintage Radio
You’ll Need to Clean, Test and Possibly Replace Components. Then Listen for That Nice Hum as It Warms Up.
Editor’s note: In the September issue we showed you how to modify the vintage radio in your car or truck so you can play modern portable music devices through it. This month, we’ll discuss rebuilding your ride’s vintage AM tube set. Now, if only more AM stations would start playing vintage music and old-time radio programs we’d really have something going here…
REPAIRING AND RESTORING your old vehicle’s tube radio is not as hard as you might think. Surprisingly, parts are readily available. And there is nothing like hearing that audio hum as your old AM warms up, followed by the sounds of yesteryear. Here’s how to make your classic’s squawk box as good as new:
Things You’ll Need
Small, soft brush
Vacuum cleaner with crevice attachment
Small soldering iron
Solder(60% tin, 40% lead, resin core)
De-soldering braid
Needle nose pliers
Pocketknife
Clean It Up
Find a small, soft paintbrush and hook up the crevice attachment to your vacuum cleaner. Next, remove the covers on your receiver, and then use the brush to dislodge any dust or dirt that has accumulated on the chassis and components. Suck up the loosened dust with the vacuum cleaner. Be careful not to bump and break fragile components.
Pull each tube out one at a time, and clean under it. Shoot the prongs with contact cleaner, then slip the tubes in and out of their sockets several times to help clean the contacts inside.
Clean exposed points on switches with contact cleaner. Shoot some in the tuning mechanism (called a variable condenser) and turn it back and forth to loosen corrosion. If your radio has a separate control head with flexible cables going to the receiver, clean the head then shoot a little Teflon spray (not WD-40) down the cables to free them up. The tuning mechanism is the most critical component of any antique radio. If it is rusted and ruined, the radio is only good for parts.
Tube Test Tricks
One quick, simple way to check tubes is to gently tap their tops using a pencil eraser. If you hear buzzing, howling or other odd sounds, that tube is bad. Of course, this is not the best way to check tubes. If your radio isn’t working, try the following: Mark your tubes with bits of tape or a china marker as to where they go. Don’t use a graphite pencil, because graphite conducts electricity. Then call around to TV repair or electronics stores to find one that has an old-style tube tester. Take your tubes in and have them checked out. If any are bad and your electronics repair shop can’t furnish replacements, have a look for them on the Internet. In addition, here’s a good source for parts:
Antique Electronic Supply
6221 South Maple Ave.
Tempe, AZ 85283
Rewire It
The insulation on old wiring is generally stiff and brittle; especially wiring made seven-plus decades ago. Back then, wiring was insulated with rubber, wrapped with silk, then lacquered. Because these materials are so biodegradable, they usually only lasted about 10 years at most. Look your radio over carefully for wires that are burned, scorched or have crumbling insulation. Check for loose or corroded solder joints too.
To replace a bad wire, heat the old solder in the joints with your soldering iron, then when it becomes molten, suck it up with de-soldering braid. Be careful not to bump other components with your hot iron. Cut a new wire to the length of the old one. Use the same gauge (or slightly thicker) wire as the one you are replacing.
Don’t use wire that is finer than the original because it will increase resistance and cause problems. Strip the ends of the wire with your pocketknife, and then, using fine sandpaper, brighten the terminals to which the wire attaches. To solder in the new wire, heat the metal contacts enough to get the solder to flow, and use a pair of needle nose pliers to hold the wire and act as a heat sink to prevent burning the insulation.
Replace the Condensers
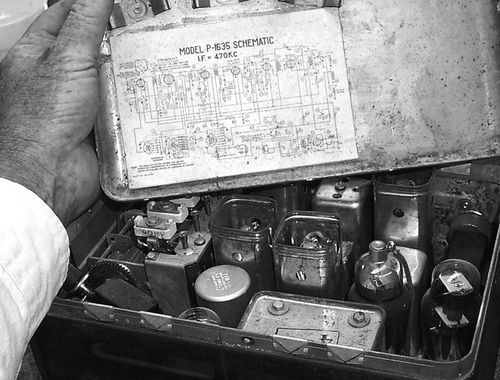
On the underside of the receiver chassis you will see a number of small cylinders with writing on them and wires sticking out of each end of them. These are condensers. They look like paper tubes filled with wax.
If you want dependable service out of your old car’s radio, you will need to replace all of them with their modern equivalents called “capacitors.” Capacitors are a major improvement on oldstyle condensers. Note the capacity and voltage of each condenser, then replace it with a capacitor of plus or minus 25% of the same capacity, and the same, or greater voltage.
Install a New Vibrator
The most common power-supply arrangement in tube-type radios is a vibrator used in conjunction with a rectifier tube and a buffer condenser. Old-style radio vibrators fail with fair regularity, as do the rectifier tubes, often marked OZ4G. Replace your radio’s vibrator with a new solid state equivalent. It will last many times longer than the original. Modern vibrators are polarity conscious, so make sure you order one that is correct for your car.
The vibrator, buffer condenser and rectifier tube are often found in a walled-off section on your radio’s chassis. The vibrator is usually in a round metal canister, and most often has four prongs, but may have as many as six. If you are uncertain as to which it is, look for a circuit diagram in the access pans of your radio. Also replace the buffer condenser and rectifier tube when you replace the vibrator.
Repair the Speaker
If your speaker’s paper cone has deteriorated or is badly torn, you will need to get it re-coned. But if your speaker only has a couple of small tears, you can easily repair them with small pieces of light vellum paper and white glue. Just put a drop of the cement on a bit of vellum and gently press it into place over the tear.
Restore the Knobs
If you are unable to find replacement originals, you can make new knobs using a poured latex mold made from a good or repaired knob. When you have a mold made, use casting resin (available from craft stores) to make new ones, then paint them to match. And, of course, if your radio’s knobs are simple, you can turn new ones on a lathe from plastic stock.
Repair the Cloth
If your speaker grille cloth is torn or missing, it’s not a big problem as new speaker cloth is available from Antique Electronic Supply in the correct-looking brocades. But if your cloth is just a little faded, you can probably save it.
Just remove it carefully from the speaker grille. Place it with its outside against a piece of Stitch Witchery. (Available from sewing shops, it’s a fusible web that permanently bonds two layers of fabric together.) Place a piece of fine, neutral-colored silk on top of the Stitch Witchery and grille cloth, and carefully iron this assemblage. You now have a strong piece of original fabric that you can put in your speaker grille with the new-looking side out.
Now, Try It Out
Bench-test your radio using a car battery. Make sure you have the polarity right when you hook up the wires as many vehicles made from the ’50s and before were positive ground, unlike modern practice.
Attach a multi-tester or ammeter in the hot wire from the battery to the radio. When you turn on the radio, it should draw between 6 and 8 amps if your car has a 6-volt system, and between 3 and 4 amps if it has a 12-volt system.
If the meter goes up past 9 amps (5 amps on a 12-volt system) turn the radio off immediately. If you do not have an ammeter, you can hook an in-line fuse holder in the power line with a 9-amp fuse, in the case of a 6-volt system, or a 5-amp fuse in the case of a 12-volt system. If your radio reads too high on the ammeter or blows the fuse, check the vibrator, buffer condenser, and rectifier tube.