
How -to More On That New Wiring System
Our Discussion of the ISIS Multiplex Brought Reader Questions. Here’s Another Look at the Wiring and the Manual.
I INTRODUCED THE ISIS Intelligent Multiplex System in the November 2009 issue and since then I’ve received a number of questions ranging from, “Will it work in my car?” to “Why make the swap?” to what seems to be the most often-asked question of all…“How do I read the installation manual?”
Some Answers
Will the system work in your car? Yes, as long as your ride has a 12-volt system. As of this writing, ISIS does not have a system for 6-volt vehicles.
As to why use the system, the best answer I have for that is the reduction of wires, which means a reduction in electrical problems. Ever try to deal with a bundle of aging wires? I have, and I can easily see how huge an advantage this system has over the old, heavy bundle of-wire systems I’m used to working with. How can you beat a single cable snaking through the car versus 50 wires?
Then there is the issue of the manual. I was fortunate in that I spent time on the phone with Jay Harris, the designer of the ISIS system, while he explained the system step-by-step. Ultimately, he pushed enough of his knowledge of multiplexing systems into my brain to allow me to put together the three-cell starter kit and make it work the very first time I turned the key on the test vehicle.
However, being dense most of the time and only aware of my surroundings when there is paint in the air, I shelved the manual for a while as I worked on other projects, then went back to it after I had slept several nights. I have to say I now understand your predicament. The manual needs a “dummy” version for people like me who become easily confused and only understand the effects of electricity when touching an electric fence. (That’s a little farm humor for those of you not laughing at this point.)
Another Look at the Manual
So that’s where I want to go, to the installation manual and try to figure out what all those columns and technical terms mean to the average restorer.
The first thing I want you to understand is that the ISIS system isn’t there to replace every inch of wire in your ride. For example, you won’t find an Output terminal on one of the Power Cells that controls the alternator. The alternator is eventually controlled by the unit via the Ignition output wire, the white wire with a blue tracer on the MasterCell, and the light green wire on the forward PowerCell, but for all intents and purposes the alternator is basically wired the old way, to the battery power source at the starter solenoid. OK, this sounds like a good candidate for a wiring schematic a little deeper into the article, but for now I want to stick with explaining the manual.
Referring to the installation manual for the three-cell starter kit you will find three columned pages, 8-10, listed as the “Standard System Assignments” pages. Since these three pages do most of the traffic directing for the installation, this is a very good place to start the understanding of this system.
I’ll start by explaining each of the columns moving from left to right, but first please note that the first column is labeled “Function” and the last two columns are labeled “PowerCell wire color” and “MasterCell wire color.” This is very important as the first column tells you what the wires listed in the last two columns do, thus the name for the first column: “Function.”
Now, let’s go deeper. The first line under the Function column reads “Open.” That tells you that this circuit is open for almost any use desired. I said almost because first you need to scan across this line of columns to determine to which PowerCell this circuit belongs. But that’s in the fourth column, farther down the line. I’ll get to that in a moment. Confused? Just hang on.
The second column is the “Switch Input” column.All You See here is a number. If you count down all of the lines in this column you will find 32 different circuits listed. I may be wrong, and Jay Harris may call me on the carpet for this, but for non-techies and old car guys like me this column doesn’t do much and can be ignored for the most part.
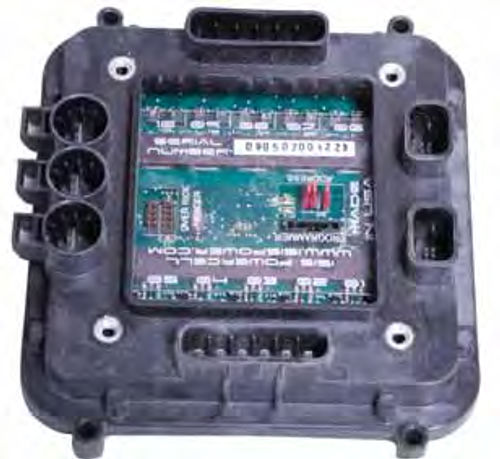
The third column, the “MasterCell Connector” column, tells you to which side of the MasterCell the circuit listed in the Function column is connected. In this case the first line in column three has an “A” in it. That tells you to use the “A” side of the MasterCell. Which is the ‘A’ Side? Photo 1 shows both the “A” and the “B” sides.
Column four, the “PowerCell Address” column, tells you which PowerCell to use. The three-cell starter kit comes with two Power Cells, PowerCell “1” and PowerCell “2.” In this case, the PowerCell being used is number two. Number two PowerCell is always mounted near the rear of the vehicle as it services the tail lights, brake lights, and the other circuits found at the rear of the vehicle. How do you tell the Power Cells apart? They are identical. Just pick one and designate it number one and the other one number two.
In some cases, such as the turn signal circuits,the Power Cell Address will read 1:2 to let you know that both the front and the rear Power Cells are used to make this circuit work.
Column five, the “PowerCell Connector,” tells you to which side of the PowerCell the wire noted in column eight is connected. In this case, that would be the “B” connector. Which side is “A” and which is “B” on the PowerCell? The same as on the MasterCell. (See Photo 1.)
Column six is the “Personality” of the circuit. The personality of the circuit tells you whether the circuit has been pre programmed to do anything special. Special Like What?Since This Is abasic system, the personalities are few. Some are labeled “Track,” which means the circuit is sensitive to whatever switch you use to turn that circuit on or off and will provide a full 12 volts the instant the switch is flipped. Others Are Labeled“Soft-Star Track,”which means the system is not only programmed to sense the turning on or off of the switch in that circuit, but the system also known to slowly apply the 12 volts to prevent a power surge through that circuit.
The headlights, which require a lot of power, use a “Soft-Start Track” to bring the circuit to life.
Finally, the “Personality” may be labeled to a specific task such as operating the turn signals, emergency flashers, and brake lights.
Column seven is the “PowerCell Output” column. Each PowerCell circuit is fused and those fuses are numbered one through 10 (Photo 2). The “PowerCell Output” column tells you which fuse connects to a particular circuit.
Like the PowerCell Address column, you will find some instances where the “PowerCell Output” column indicates the use of two circuits (1:2), as would be the case with turn signals.
Column eight, the “PowerCell Wire Color” tells you which output wire to use to supply power to a given circuit. In the case of the first line, that wire color is light blue.
Column nine, the “MasterCell Wire Color” tells you which input wire to route to the switch that controls the PowerCell circuit selected for use with the light blue wire. In this case that wire is a white wire with a black tracer.
A Closer Look Into the Headlights
Now that I probably have you completely confused, let’s take one of the circuits I dissected in the first article, the headlight switch, and go through it again.
We’ll do this by the book, so the first Function I want to look at is the “Headlights.” This is the low beam side of the headlights as two lines down from the “Headlights” line in the Function column is the “High Beams.” That’s good to know because to wire the headlight switch I’ll need to wire both the low and the high beams.
Reading across the “Headlight” line I see that the MasterCell connector uses the “A” side, the PowerCell used is the forward unit (1), the PowerCell connector is the “B” side, and the fuse for the low beams is number five. The wire used for the PowerCell is a white wire and the wire used for the MasterCell is a white wire with a green tracer.
The only difference for the High Beam circuit is the use of a blue wire from the PowerCell and a blue wire with a red tracer from the MasterCell.
Referring to Illustration 1, I build this circuit by first routing a black wire from the “A” connector on the MasterCell to the headlight power input terminal on the Headlight Switch. Notice that I also connected this black wire to the park light power input terminal on the Headlight Switch. Why do that? In the old system, 12 volts were applied to the headlight switch at both terminals so that the park lights and tail lights could operate without the headlights being turned on. With this system I don’t want 12 volts applied to the switch. All I want is a simple series circuit using the black wires as the common wire to complete the circuit.
I think I failed to remind you that you never apply 12 volts of power to any wire on the MasterCell. Voltage is only applied to the PowerCells. If you think of the black wires as the power input for the MasterCell you can see that’s what I’ve done here, routed a black wire to what would have been the two 12-volt power inputs on the Headlight Switch.
Now notice that I’ve routed a wire from the headlight output terminal on the switch over to the dimmer switch. This is exactly how this wire would be routed in the old system, from switch to dimmer.
That’s all there is to this half of the circuit. What I’ve created here is two series circuits that only become activated when the Headlight Switch is pulled to turn on the lights.
To connect the other half of this circuit, refer to Illustration 2. Here the forward (1) PowerCell is used. Notice that the wires come from the “B” side of the PowerCell per the instructions in the manual. The low beam wire is white; the high beam wire is blue.
Power comes into the PowerCell via the 12-volt input terminals and once the Headlight Switch is pulled, a signal is sent from the MasterCell out to the PowerCell and the headlights come on. To switch from low beam to high beam just trigger the dimmer switch.
Park Lights, Tail Lights, Interior Lights…
Now let’s do the park lights, tail lights, and instrument lights. Notice in Illustration 3 that I have already connected the black wire coming from the MasterCell to both the headlight power input terminal and the park light power input terminal.
Next, I refer to the Function column and find the “Park Lights” line, refer to that information, and then connect the blue wire with a black tracer from the MasterCell to the park light output terminal on the Headlight switch.
Now life gets difficult asI don’t find a line in the Function column marked “Tail Lights.” That could just be an oversight, but nothing we can’t handle.
To trigger the tail lights to come on, I look for an “Open” line in the Function column that has a “PowerCell Address” of “2.” The “2” address tells me I’m using the rear PowerCell. That was easy enough as this was the first line. The wire colors are light blue for the PowerCell and white with a black tracer of the MasterCell.
Now I route the white wire with the black tracer to the tail light output terminal on the Headlight Switch.
Just like the headlights and park light, this series circuit is only complete when the headlight knob is pulled.
Moving to the PowerCell side of the circuit in Illustration 4, I start with the forward PowerCell (1) and find the yellow wire and connect it to both park lights. Note: Threewire park and tail lights have a black ground wire, usually a brown “park light” wire, and a blue or some other color “turn signal” wire.
Moving to the rear Powercell(2),I find the light blue wire and connect it to the “taillight”wire on both tail light connectors.
What about the instrument lights? A separate circuit could be created to turn these lights on, but I prefer to route a single 18-gauge wire from the left park light back to the dash and up to the instrument lights. When the park lights are turned on the instrument lights come on.
And, what about interior lighting? My preference is to take power from the 12- volt power input on the front PowerCell, fuse this wire, and connect it to the interior light circuit.
How About Some Turn Signals, Too
Now that I’ve wired both the park lights and the tail lights, let’s look at adding the vehicle’s turn signals to this wiring system.
To provide the switching for the MasterCell, I refer to the manual and find the wire for the left turn signal, a yellow wire with a black tracer, the wire for the right turn signal, a yellow wire with a red tracer, the wire for the hazard flashers, a yellow wire with a blue tracer, and the horn wire, a blue wire with a yellow tracer.
I’m gong to use a GM column connector for my example so I need to connect the purple and yellow wires on the column harness to a single black wire coming from the MasterCell.
In the old wiring system the purple wire would have gone to the flasher and the yellow wire would have gone to the left rear turn signal. These two wires allow for the completion of the series circuit needed to signal the MasterCell any time the turn signals or hazard flashers are activated.
Notice in Illustration 5 that the horn wire connects to the horn wire on the connector, the left turn signal connects to the front left turn signal on the connector, the right turn signal connects to the front right turn signal on the connector, and the four-way flashers connect to the hazard wire on the connector.
That’s all I need to make these circuits work from the standpoint of the MasterCell. For the PowerCell connections refer back to Illustration 4 and notice that the front turn signals come from the “1” PowerCell and the rear turn signals come from the “2” PowerCell. Since the hazard flashers use the same wire as the turn signals there is no need to wire the hazard flashers separately. The PowerCells will take their cues from the MasterCell when called upon and turn on either a turn signal or the hazard flashers.
Why aren’t the green wire and the white wire being used on the MasterCell circuit? The green wire goes to the right rear turn signal and isn’t needed since the yellow wire on the connector is used to complete the series circuit for all four turn signals. The white wire is the brake Illustration 6.MasterCell Start/Charge. light wire and since the ISIS system has a dedicated circuit for the brake lights this wire is no longer needed.
Wiring the Ignition Circuit
Now Let’s go full circle and wire an Ignition/Charge circuit using this system (Illustration 6). First, connect one of the black wires on the “A” side of the MasterCell to the “B” terminal on the Ignition switch. Now Attach the white wire with the blue tracer (per the manual) to the “I” terminal. Next attach the white wire with the yellow tracer to the “S” terminal. Finally, attach one of the “Open” wires to the “A”terminal. In this case, I’ll pick an “Open” circuit that is connected to the forward PowerCell,a blue wire with a light blue tracer.
For the PowerCell side of this circuit,refer to Illustration 7. Here I take the “Ignition” wire, a light green wire, and route it to the plus side of the coil. The “Starter” wire for the PowerCell is a light blue wire and it routes to the “S” terminal on the starter solenoid.
The Accessory wire on the forward PowerCell is a green wire. I’ll route this wire to the 12-volt input wire on the radio and windshield wipers. I’ll show you how to do that in Illustration 8, but first I want to address the “Charge” part of the Ignition/Charge circuit.
Referring back to Illustration 7, notice that battery power still connects to the battery post on the starter solenoid, just like in the old system. Power to a onewire alternator also comes from this connection. Power to a three-wire alternator differs only in that battery power is jumpered from the battery power input terminal on the alternator to the “2” terminal on the alternator. The “1” terminal connects to the light green wire on the forward PowerCell.
Going back to the Accessory circuit, I selected an “Open” circuit from the “Function” column that uses the forward PowerCell. As shown in Illustration 6 that circuit uses a blue wire with a light blue tracer from the MasterCell and connects to the “A” terminal on the Ignition switch.
To better understand how the PowerCell side of the Accessory circuit works, I’ve added a radio and windshield wipers to the circuit. Notice in Illustration 8 that I’ve taken that “Open” circuit with the blue wire with the light blue tracer and connected it to both the Accessory terminal and the Ignition terminal on the Ignition switch. This Is The MasterCell side of the circuit.
For the PowerCell side of the circuit, I take the green wire and route it to the 12-volt power wire on the radio and the 12-volt power input terminal on the windshield wiper switch. What that does for me is provide an active circuit to operate the radio or wipers any time the key is in the ON position or turned to the Accessory position.
Note: Some radios require a constant 12-volt connection. Take this feed from one of the 12-volt power input terminals on the forward PowerCell.
Can anything else be powered this way? Yes, you can power any accessory you like by merely tapping into the “I” and “A” terminals just like I did in Illustration 8. Be sure you add a fuse in series to any additional component added to the circuit.
Like I said in the November article, this system is a complete switch from the way I wired cars in the past.
Adapting To this system will take some contrary thinking but once you have a circuit or two wired things will begin to fall into place and you will be glad you made the switch.
Got a question? Send it along.
Resource
ISIS Power
800 E. Northwest Highway
Des Plaines, IL 60016
ISIS Intelligent Multiplex Systems


