
How -to A Closer Look at Panel Joining
Our In-Depth Discussion StartsWith Tipson Separating Panels. Then We’ll Look at Flanging, Fish Plates And Welds.
TUCKED SOMEWHERE AMONG the past few hundred articles that I’ve done is some information on the techniques used to replace various types of sheet metal panels. I’ve mentioned the use of flanging tools to join flat panels together, the use of an overlap joint to reinforce butt joints to get a smooth transition from one panel to another, and the use of a spot welding tip to help those joined panels stay together.
What I’ve not done is to get specific on how to accomplish each of those tasks.
We’ll Start With the Separation
A good place to start isn’t with welding panels together, but rather with taking panels apart. In my opinion there is only one way to separate and remove old panels and that is to drill out the existing spot welds using a spot weld cutting tool like the Blair spot weld cutter shown in Photo 1 (blairequipment. com).Thistoolwill chuck into any drill large enough to accommodate a 3/8-inch drill bit.
The first thing to notice about this tool is that the cutting bit is double-ended and screws onto the end of the arbor. Double-ended means twice the mileage from one bit and being screwed on means this bit is easy to replace once it dulls or becomes broken.
Also notice in the photo that there is a centering pin on the cutter’s arbor. That means you first need to drill a 1/8-inch pilot hole through each of the spot welds to be removed before using the tool to cut out the spot weld.
My method for using this tool is to just start the centering pin in the pre-drilled hole, bring the drill up to speed, and then carefully press the cutting bit down onto the spot weld being removed. These cutting bits are made of hardened steel and that means they break easily. That’s the reason for bringing the drill up to speed before starting to cut. This action reduces the chances of breaking the bit.
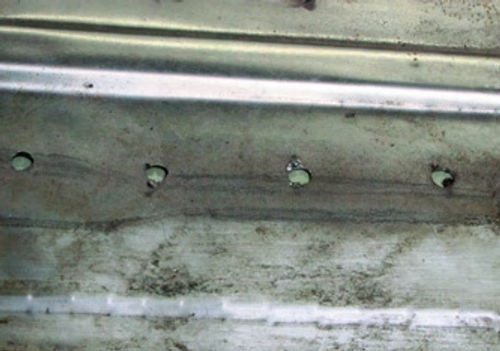
It isn’t necessary to drill through both pieces of metal as the panels will separate quite easily once the spot weld is freed from the top layer of metal(Photo 2). After all of the spot welds are drilled out an air chisel with a sharp, flat bit will make short work of separating the panels.
Can’t Find all of the old spot welds?Try sanding in the areas where you suspect the spot welds to be using 180-grit sandpaper, or try cleaning the areas with a rotary wire wheel attached to a die grinder. Both methods will highlight the dimpled areas that constitute spot welds.
Step Flanging a Panel for Welding
Shifting from removal to installation, step flanging is the simplest method of joining two panels together and you will find this method used all over your project vehicle. That’s because the use of a step flange not only leaves the joint nice and level, this method also equates to a stronger joint due to the crease created when flanging one of the panels. An added bonus to using this method of joining panels is that the flanged panel is less likely to heat warp during the welding process due to the added crease.
I like to use step flanges for both of the above-mentioned reasons as well as for one more reason that I think is quite often overlooked. This method provides me with the added assurance that the panels I’m joining have overlapped enough to provide a substantial welding surface.

Look at the flange shown in Photo 3. This flange was created using the Eastwood Panel Flanger #31092. The crease along the inside edge of the flange is easy to see. It is this crease that adds strength to stiffen the panel as well as provides a visual reference to be sure plenty of overlap is present to provide a good joint.Moststep flanges,like this one, are one-half to three-quarters of an inch wide so that when you push the overlapping panel all the way up the step on the flanged panel you know for certain you have plenty of overlap for welding.
Where would you need to add a step flange? The Most common use of this type of panel joining is when replacing sections of an interior floor pan or a trunk floor.
Sectioning With a Fish Plate
In body shop circles this technique of joining two pieces of metal is primarily used to repair rear unibody frame rails and rocker panels. The reasoning is pretty simple. It is far less invasive to cut out and replace a small section of rear frame rail or rocker panel than it is to literally cut a vehicle apart in an effort to replace an entire rear rail or rocker panel.
Note:Be sure you understand I’m Talking about rear unibody frame rails only. These rails can be safely sectioned. Front unibody frame rails must never be sectioned. Period. The front suspension movement and engine torque create too much stress on the front frame rails to allow for sectioning. What can go wrong? Usually the rails crack at the point where they were sectioned.
The trick to sectioning any other part of your vintage ride is to always know the length of whatever it is you are sectioning before you begin the sectioning process itself. How do you do that? Let’s assume you need to replace a rusted-out section of an outer rocker panel. You start by determining where you want to make your cuts and mark the rocker at those points.
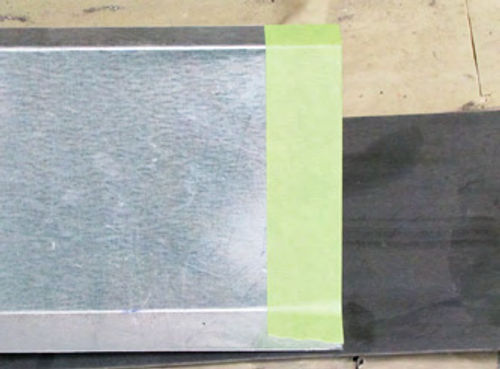
A good tip is to always use whole numbers when measuring to cut out a section of anything, then use 1 1 ⁄2-inch wide masking tape to identify the cut lines. Why should you work with whole numbers and use the wide tape to mark the cut lines? Whole numbers are easier to remember and much easier to find on the tape measure. Wide masking tape laid down nice and smooth will always produce a straight line (Photo 4).
Now let’s move to my sample pieces and go through the process of sectioning a rocker panel. Something to keep in mind is that any time you purchase a replacement rocker panel with the intention of sectioning in only a short piece you automatically end up with excess rocker panel. That’s a good thing because this is where you find the material to make the fish plates. What’s a fish plate? It’s a welder’s term for just about any type of backing material.
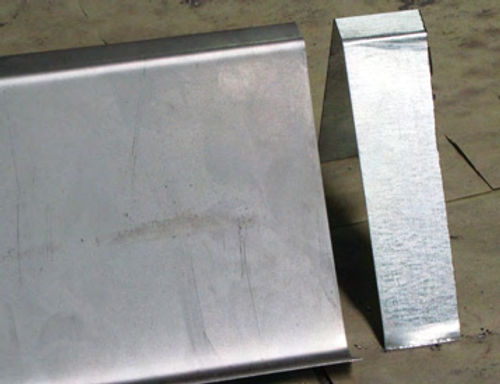
My preference is to cut both fish plates, one for each end of the sectioned piece, 1 1 ⁄2-inches wide. To do that I lay a length of 11 ⁄2-inch-wide masking tape on the new rocker panel and use the edges of the tape as my cut lines (Photo 5).
In Photo 6 I’ve removed the flanges from the fish plate piece. The flanges aren’t needed as these pieces are meant to slide up inside the old rocker panel.
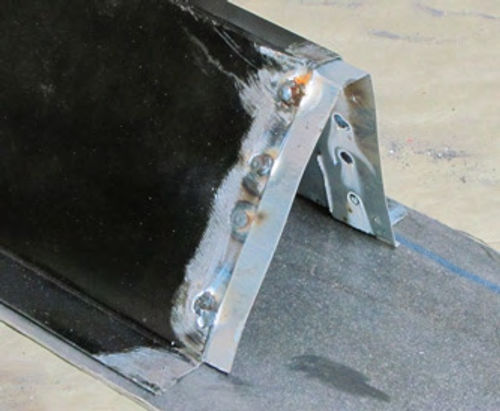
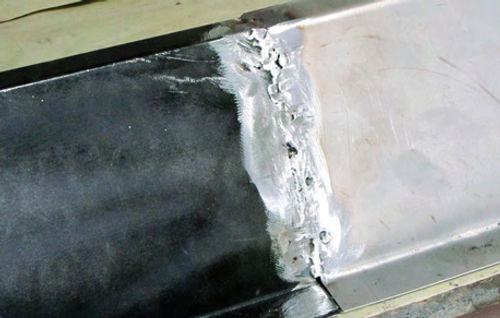
The next step is to drill a series of spot weld holes at the cut ends of both the old rocker and the new section piece. Next I fit the fish plate pieces into the cut ends of the old rocker leaving half of the fish plate piece exposed. The pieces can now be welded (Photo 7).
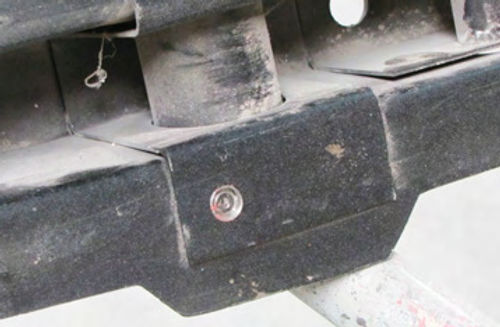
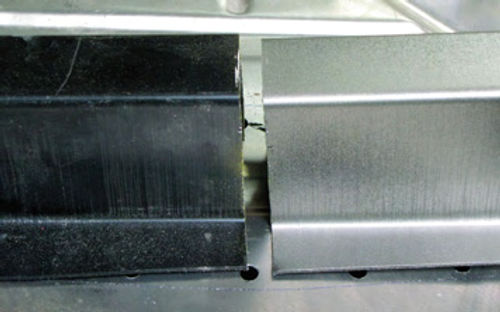
The result of all this work is that I now have reinforced backings to hold the new section of rocker in place. The new section is spot welded to the fish plate pieces then butt welded to the old rocker. Notice in Photo 8 that I left about 1/8-inch of gap between the new rocker section and the old rocker. This gap provides an excellent welding line. It will take at least two passes with the welder to fill this gap, but the result will be an invisible repair (Photo 9).
Sectioning Some Heavier Metal
Now, let’s look at sectioning a rear frame rail on a first-generation Mustang (Photo 10). On the left is the old rail; on the right isthe new rail. Notice that I cut the new rail 1/4-inch too short. That’s not a mistake. The plan calls for using a reinforced butt joint, or fish plate joint, to join these two rails, but because they are made of heavy 14-gauge steel I’m going to need that space between the rails for welding.
Let’stalk about making that weld along the butt joint before I move deeper into this process. When replacing the rocker panel I didn’t want to leave much space between the new panel and the old one because the rocker is made of 18-gauge steel. It is very easy to burn holes in 18- gauge steel, especially when welding three panels at once. By leaving only that narrow gap I didn’t need high heat and I didn’t have to worry about attaining the weld penetration necessary to give me a greatweld.On my Lincoln 175 MIG that would be setting “B.”
Frame rails are different. These are made of heavier, 14-gauge steel. To ensure a good weld here I need to turn the heat up a little on the MIG welder. On my Lincoln, that would be setting “C.” To ensure that good weld I left a wider gap and welded in an arcing motion from side to side as I welded the three panels together. The arcing motion helps to fill the wide gap and at the same time helps reduce the chances of burning through the panels. The wide gap also ensured that I didn’t end up with a bump of welded material at the joint and that made grinding and smoothing the union that much easier.
Getting back to sectioning the frame rail, the first step is to find suitable metal to use as the fish plate. I say suitable because the metal selected should be the same gauge metal as the replacement rail. Why the same gauge? You must maintain the strength of the rail; using a thinner metal would compromise that strength. In case you are wondering, the same goes for replacing rocker panels. That is another reason for cannibalizing the replacement rocker to make the fish plates.
Where do you find the correct gauge metal as well as a piece that already has the correct bends and curves? Since the process is to section in only a piece of frame rail, the fish plate material is cut from the unused portion of the new rail, just like I did with the rocker panel. I cut a 1 1 ⁄2-inch-wide piece from the new rail and removed the flanges. This will become my fish plate. Why cut off the flanges? The piece will only fit inside the rail if the flanges are gone. What did I use to cut the metal? My preference is to use a die grinder with a 3-inch-diameter cut off wheel attached.


Next comes a little fitting and welding (Photo 11). I start by drilling two spot weld holes on both sides of the new rail section then slide the fish plate piece halfway into the rail and weld it.
The idea here is to basically make a glove fit on the end of the new frame rail. The fish plate piece is then pushed inside the old rail, which I also drilled for spot welds. Next, the new section of rail is clamped into place and the overall rail length is checked to be sure it is the exact length of the original rail.Recall that when I did the rocker panel that I measured everything before cutting? Some goes here. You must know the length of the old rail before cutting the replacement rail. After all, if you don’t know the length of the old rail how will you know how much to shorten the new rail to gain that quarter of an inch gap I mentioned above?
Also notice in Photo 11 that I did not drill spot weld holes along the flange of the new rail. I’ll use the same holes drilled previously to remove the spot welds along the old rail to attach the new rail. That’s about as close to factory as you can get.
Replacing Those Drilled-Out Spot Welds
Since most of us don’t have access to a spot welding machine, or resistance welder, we have to resort to the tried-and true method of drilling holes in one panel and using that hole as a welding point to join the first panel to a second panel.
Let’s start by deciding which panel to drill. That’s an easy one as the panel to drill is usually the panel laid on top of the welding flange. That allows you to weld in a vertical position with the spot welding tip pointed down.
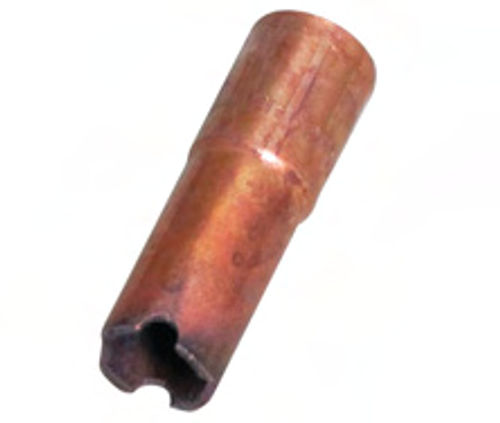
A spot welding tip? Yes, take a look at Photo 12; this is a spot-welding tip. Notice the half-circle scallops at the tip. Those are there to allow the welding gases to escape and they also act to provide the correct distance between the nozzle where the welding wire exits the tip and the panel being welded.
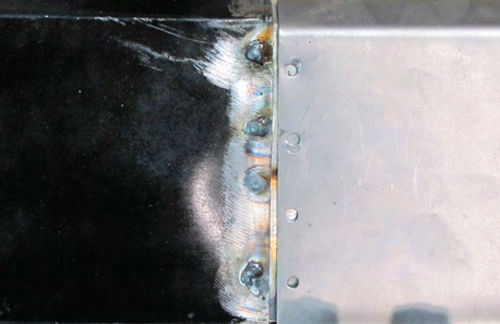
How long should you hold the trigger when making a spot weld? In most cases three seconds will yield a good weld. How do you know if the weld is sufficient? Check the back side of the panel being welded. It should be discolored, indicating it has been subjected to high heat (Photo 13).
Then there is the matter of spot weld hole size and distance between the welds. I like to pre-drill each of my spot welds to 5/16-inch and space them two inches apart. Yes, you can spend some time and measure the original spot welds to verify the distance between them, but you will find that in most cases two inches is the norm.
Another method is to use the existing weld holes left from drilling out the old spot welds. As I mentioned above, this is about as factory as it gets. Got a question? Send it along.
Products and supplies provided by:
LPL Body Works
5815Contented Lane
Amarillo, TX 79109


