
Removing a Stubborn Headlight Bucket
Here’s an Easy Job That Will Only Take a Few Minutes to Complete. Yeah, Right. You’ve Heard That One Before, Haven’t You?
SOMETIMES WE LOOK upon the “little” jobs involved in auto restoration projects as tasks that call for next to no thought or labor on our part. For instance, to detach a headlight “bucket” from a fender, the shop manual might say “remove eight bolts and lift out headlight housing.”
That sounds like something almost anyone could do in 10 minutes…and we’re sure that’s what the customer wants to see on his or her bill, too. Unfortunately, when we removed a headlight bucket in our shop this afternoon the job took just about an hour and is going to set the customer back $40.
Now, before you say “what a rip-off!” read this entire article. It will explain why the job took so long.
Since you’ve no doubt done some restoration work yourself, you are fully aware of how a project can take much longer than was initially estimated, and you might not need an explanation of why this job ran for an hour instead of 10 minutes. But on the other hand, our experiences might include a few tips and insights that will come in handy with your next project.
Encountering Trouble From the Start
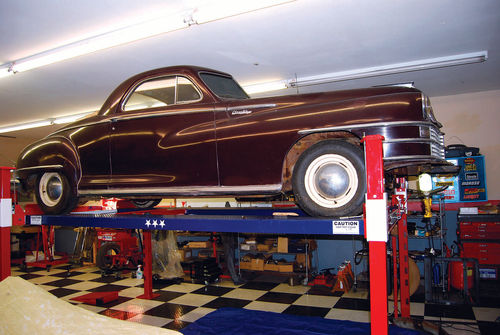
The headlight bucket in question belongs to a rare ’48 Chrysler Saratoga three-passenger coupe, but it’s the same as what’s used on other models. We were taking the fenders off of this car as part of its restoration, and to remove the fenders you must first remove the headlight buckets.
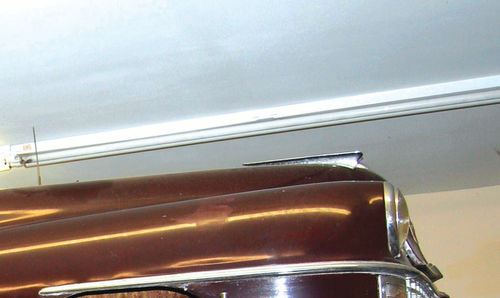
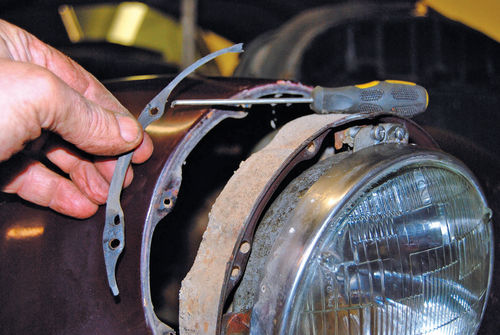
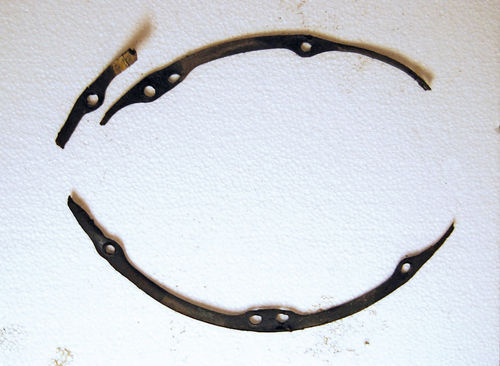
Technically, Chrysler called this component a “headlamp shell” with a bright metal “headlight door” around the entire unit. Don’t ask why they are called “doors”; they’re not rectangular and not hinged.
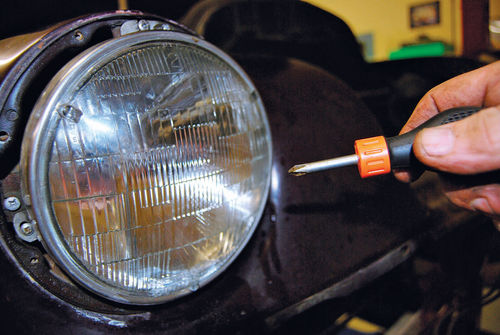
The single screw at the bottom attaching the headlight door posed the first problem. Someone had stripped the crosscut slot, and it would not turn with a screwdriver. We decided to drill it out.
When doing this type of work, the slower you run the drill, the more metal the bit will remove from the screw head. That runs counter to what most people think and try, but slow drilling increases torque.
Drill into the screw with a thinner bit at slow speed. Then use a thicker bit, with the tip in the smaller hole, to drill away the head of the screw. Eventually the head will get so small that the hole at the bottom of the headlight door will pull right over it. We only had to drill out one side.
If you’re lucky, you won’t have to do any drilling. The worst-case scenario is when you ruin the screw yourself. Then you want to kick yourself for making your own job harder. Keep in mind, however, that it is easy to destroy the slots.
Any time you’re fighting a screw slot, whether it’s a straight slot or a crosscut one or even a Torx style, don’t overpower the screw. Hold the screwdriver tight against the slot, pushing in with your body. Turn counterclockwise with a slow, steady twist.
Believe it or not, sometimes a short screwdriver will work better than a long one. It also pays to try different sizes and styles of screwdrivers. In some applications an impact screwdriver that you tap with a hammer will work. The easiest way to ruin a slot is often by using a screw bit on an electric drill. The quick torque bite can just chew up a slot before your eyes.
Next Comes the Retaining Ring
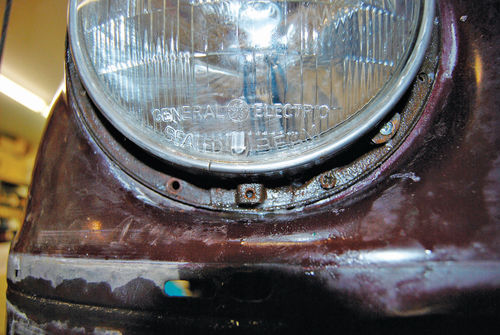
When you finally get the headlight door off, you’ll probably find a thin bright metal retaining ring with a “shoulder” in front that fits over the sealed beam unit and keeps it in place. Some people take everything apart, but you don’t have to. It is easier to leave the shell, sealed beam unit, retainer and electrical wiring all together as a group at this stage.
There’s a slight chance the parts in the assembly won’t need cleaning, blasting and refinishing, in which case you will take nothing apart and won’t upset the headlight adjustment.
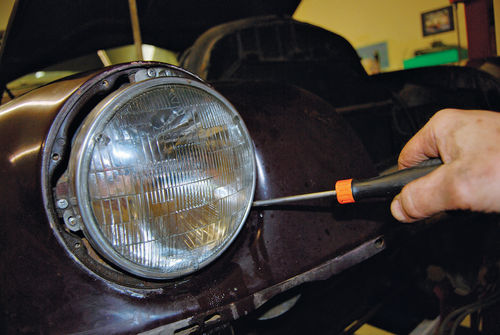
Around the edges of the sealed beam unit, you will see the flange of the headlight bucket that fits against the edge of the fender with a thin gasket between them. On the Chrysler this flange has a thin lip around its perimeter. The flange has holes in it for both headlight-adjusting hardware and the eight retaining screws that hold the sealed beam unit to the headlight bucket. These screws are often corroded so they get very tight and hard to turn counterclockwise. Usually the bottom-most screws are the hardest to remove because water (from rain or snow) tends to sit longer in the bottom of the headlight door. Another reason the retaining screws may be hard to remove is they have fine threads on them. Corrosion can “bridge” fine threads easier and clog them.
Time for Some “Magical” Assistance

On the Chrysler, a few of the screws pretty much came right out with a Phillips Head driver and a little firm twisting as described above. That left five or six screws that were absolute “bears” to remove.
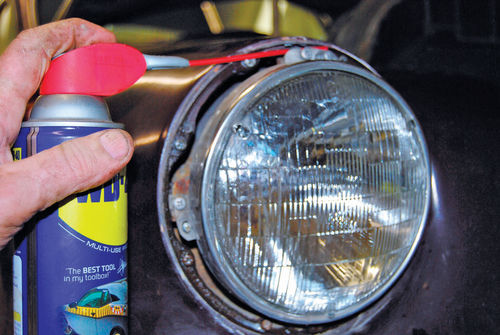
The first thing to do when faced with “bears” such as these is to liberally spray WD-40 or the penetrating oil of your choice on the screws. Sometimes it’s hard to imagine that spraying a smelly, foamy-at-first lubricant on the outside of a screw will help loosen it, but WD40 and many other penetrating oils can perform magic. WD-40 even has a newer product we’ve been testing that also removes rust (wd-40.com).
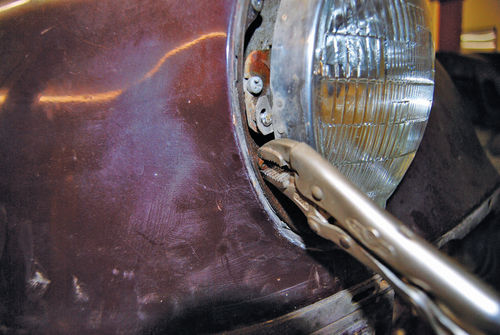
Another “magical” restoration helper — in our experience anyway — is a good quality Vise-Grips style pliers in the smallest sizes they offer. On many of the headlight bucket bolts we were able to clamp a mini Vise-Grips on the rather thick heads of the screws and give them an initial quarter twist to break them loose. It also helped when you could twist them in both directions for loosening. Due to the lip on the headlight bucket flange, it wasn’t possible to use the Vise Grips to remove the bolts (at this time), but once they were loosened up, it was often possible to keep turning them—at least a few turns—with screwdrivers.
We discovered to our surprise that a short, medium-thickness Phillips screwdriver sometimes worked best to back the bolts out a few turns once the Vise-Grips broke them loose.
Then, almost inevitably, the short screwdriver would start slipping out of the slot and no longer do the job. Sometimes a screwdriver with a longer shaft would then do the trick. Other times it was a matter of squirting more WD-40 on the fastener and waiting for it to soak in.
Saving the Originals vs. Using New Fasteners
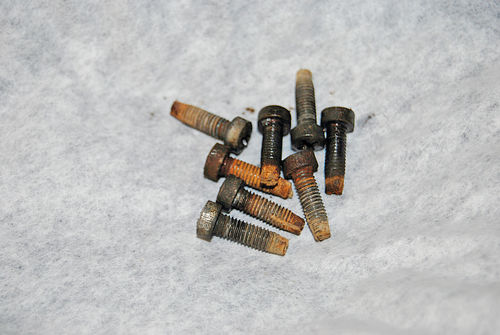
After almost exactly an hour of drilling, clamping, spraying and twisting, all of the bolts were removed from the headlight on one side of the car. At our shop rate, the customer’s investment was about $5 per bolt on average! But if you calculated the actual cost per each bolt, there were probably some that took $1 worth of time and others that took $20 worth of time.
Of course, there are some restorers who will just drill out or grind off all the fasteners and replace them with new hardware. There is a lot to be said for that approach. We have found that new hardware is less expensive than the labor involved in cleaning up old hardware, chasing all the threads and either blackening the old stuff or having it cad plated (which is hard to get done at all these days).
On the other hand, if you’ve worked on cars over 60 years old, you know that most of the fasteners used back then don’t look the same as modern ones, even when the size, pitch, thread style and length are the same. So, if you want things to look right, it pays to save as much original hardware as you can.
Approach the Gasket With Caution
After removing all of the fasteners from the headlight buckets, they can be pulled out of the fender, but go carefully. There are still a few more items to be considered. First, there is a very thin rubber gasket used between the bucket and the fender. In about 99 percent of all cases, this is not going to depart the fender intact. Since a new gasket from a parts house may require that extremely rare and exotic material known as “unobtainium,” and therefore be difficult if not impossible to find, you will want to use a dental pick to carefully remove the old gasket. And if it breaks into pieces, save all the parts so you can use them as a pattern to make a duplicate.
There’s Wiring Involved as Well
Finally, if you want to remove the bucket, you will have to detach at least the portion of the wiring that runs from a connection somewhere on the car through a hole in the bucket to the headlight.
On the ’48 Chrysler Saratoga there are two plates attached to the inner front fender panels between the radiator and headlight. All the wires juncture together at screw-style terminals on the plates. There is a screw-bolt at the rear end of the rearmost plate and at the front end of the forward plate. A common screw-bolt joins the two plates at their other ends. The wiring for the left-hand headlight runs to the two rearmost terminals. The right-hand headlight has long wires that run across the front of the car to the juncture plates on the left side.
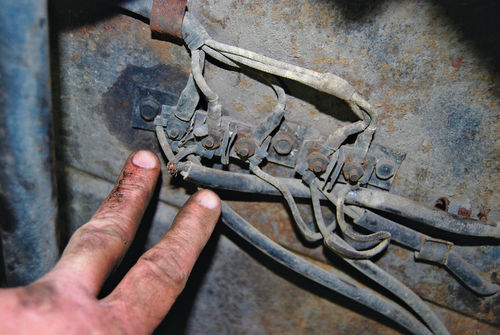

The wiring looks old and gray and any color-coding it once had is long since gone. Also, the screws that connect the wires to the plate terminals are very hard to get a wrench on due to there being delicate little “fins” that isolate each terminal. This setup dictates that the restorer should take photos, make sketches and tag the various connections so that things can be put back together the same way they were before being taken apart. This might be over-cautious if you’re planning to install a new reproduction wiring harness, but we think it’s still better to err on the side of caution.
Editor’s note: Contributor John “Gunner” Gunnell’s shop, “Gunner’s Great Garage,” is in Manawa, Wisconsin. Visit gunnersgreatgarage.com.


