
How -to Working With Rear Quarter Windows
Sometimes, They’ll Barely Move or They’re Much Too Loose. Here’s How to Get Them Back In Working Shape.
WE ALL HAVE certain areas of our classic rides that may not receive the proper attention they always deserve. They are taken for granted because they work, even if they don’t work in an optimal manner.
I recently had a 1970 GTO come into the shop with a broken rear quarter window. The window actually was completely loose in the window pocket and could be moved up, down, front and back by hand regardless of what the regulator was trying to do.
An inspection of the rear quarter window on the other side showed that it was almost impossible to turn the handle enough to make the window move all the way down.
I’m sure that over the last several years the performance of both windows had degraded from functional, to a fight to operate, and, finally, the broken driver side window was the wakeup call to do something about the neglected parts.
Less Than a Day’s Work Involved
Luckily, rehabbing the rear quarter windows on your vintage car is a fairly painless process that can pay big dividends in a half-day’s time or less. While not all manufacturers used the exact same setup, they are similar and the same concepts will apply.
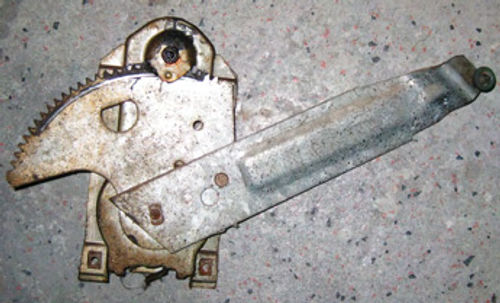
Generally there are some plastic rollers, a track mechanism, and the window regulator. By addressing all of these areas as a whole you can have windows that roll up and down as smoothly as the day they were new.
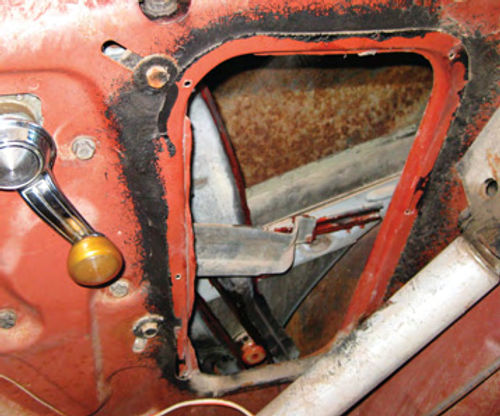
The first step is gaining access to the window assemblies. On the GTO it was simply a matter of removing the back seat and the rear trim panels.
The only specialty tool required to gain access to the assembly is a door handle clip removal tool that you can pick up at any local parts store for a few bucks. You also may want to remove the U-shaped rubber seal in the door jamb area. The seal itself doesn’t get in the way, but the screws could scratch your window trim or seal when you’re manipulating the quarter window in and out of the pocket.
After the trimpanelis off I usually stick the window crank back on so I can move the regulator up and down as necessary.

Removing the Glass
Now you can begin to remove the glass and hardware so it all can be cleaned up.
To get the glass out of the broken side of the GTO I simply had to remove the upper window stop and maneuver the glass and attached rollers out through the top of the window pocket. The glass on most quarter windows will need to be tipped forward to get it out of the car.
To remove the glass from the passenger side quarter, the window stop was also removed. However, because the assembly was still on the track the four bolts that retain the window regulator were unscrewed as well. This allows you to remove the regulator and release its roller from the window assembly. To get to the regulator you will need to remove the access panel that’s behind the factory trim panel. They are usually screwed into place and come off easily. You can then slide the glass out from the top freely.


As it turned out, the driver-side window assembly had a broken bottom roller. This is what allowed the window to jump off of the track and just flop around in its pocket.

Once the glass is out you can then remove the track that the rollers ride in. Over time the original grease from the factory can actually harden up and hinder movement. Also, the tracks begin to oxidize which freezes them up. Before taking any of the bolts out that retain the track I like to take a can of spray paint and shoot the bolts and surrounding area. This provides a fresh marking that’s easy to see when you’re reassembling and eliminates the hassle of getting your adjustments back to spec. Also note that this trick can be used for the placement of the window stops mentioned earlier. There are two bolts on the top of the track and one on the bottom on the GTO. After the track is unbolted you can angle it enough to pull it out of the access hole you opened earlier. Trying to pull it out of the top can lead to scratched paint or torn window fuzzies, even though it may seem like an easier option.
Time for Some Cleaning & Greasing
Now that the tracks are out you can use some Brakleen to remove any old grease and then a wire wheel on a bench grinder to clean up the surfaces that the rollers travel on to remove any oxidation. The tracks can then be re-greased. I prefer to use either white lithium grease or synthetic bearing grease as neither should harden up for quite a long time. After being greased, the tracks can be loosely bolted back into the window pockets.
I use the same process to clean up the window regulators: A good cleaning, some wire wheeling, and a new coat of grease on the teeth and crank mechanism. This is also the optimal time to inspect all of the teeth for damage and to be sure the regulator moves freely through its entire range of motion.
The other area to address on the assembly is the plastic roller that guides the window up and down. In this case there were some signs of wear so replacement now to prevent going back in again in the near future was a safe measure. The original roller was riveted in place. A quick shot with a grinder to remove the head and it pops right out. The new roller and pin can then be pressed into place using a shop vise and the rear of the pin mushroomed with a punch to keep it from pulling out.
The final piece to rehab before reassembly is the glass and roller setup. You have a few options when it comes to replacing your worn-out plastic pieces. There are new replacements available from some off-shore suppliers but I’m a proponent for parts made here in the good ol’ USA. Unfortunately, for this application they just aren’t available so we contacted Frank’s Pontiac Parts for a good used set of rollers and brackets (frankspontiacparts.com). They showed little to no wear and I knew thefit would be factory proper. The rollers are held together with a special nut and some aftermarket suppliers offer a tool for working with that and it will run you about $20.
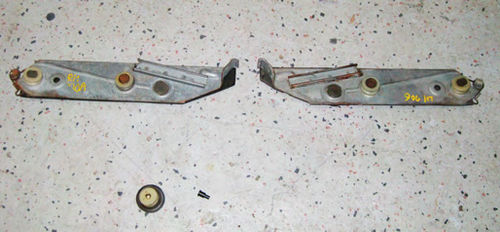
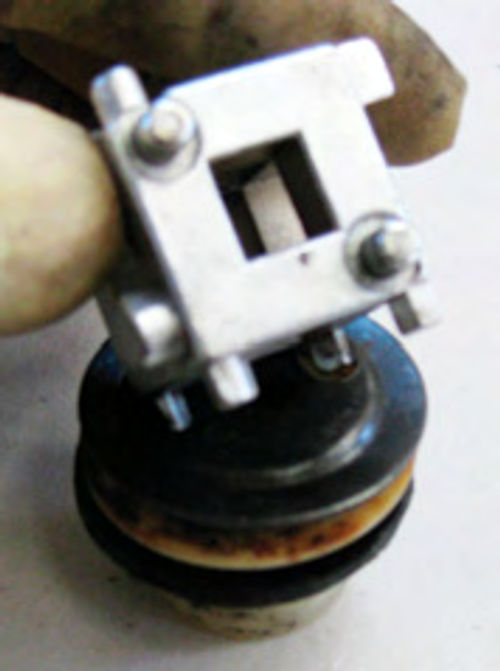

I was able to modify a brake caliper tool I had in the shop to work in the same way. Most local parts stores carry a universal brake caliper tool for $5-$10 with numerous pinned sides. With a little finesse with a grinder you can match the pins on one side to fit into the holes on the roller nuts. Swapping the rollers and track over is as easy as unscrewing the nuts, transferring everything over, and re-tightening. Then you can grease the rollers and the track for the window regulator roller.
Putting It Back Together
Reassembly is basically the reverse of when you pulled it all apart. Start by loosely bolting the track back into the window pocket, remembering to install from the inside and not the top. Leaving it loose will allow you to manipulate the window back onto the track easier. To do that you need to guide the window into the pocket and then align all three rollers into their corresponding slots on the track. Be careful because there’s nothing supporting the window at this point and it will most likely try to drop all the way down. Now you are ready to put the regulator back in. Slide it through the access hole and guide the roller into the track on the window. Depending on the position of the regulator you may need to slide the window up or down to allow you to line the regulator back up with the mounting holes inside the car. Once the regulator is bolted back into place and supporting the window, you can take the time to line your tracks back up to their original position using the paint marks made earlier as well as reinstalling your upper window stops.
Before buttoning everything back up, temporarily put your cranks back on and test the windows. There should be no binding and they should go up and down with ease. Also be sure that in the closed position they still line up properly with the front windows, roof line, and at the rear.
When you’re satisfied with their operation and alignment you can reinstall your interior trim panels and rear seat knowing you’ll have years of carefree operation from your windows once again.


