How -to Getting That “Factory” Look
Maybe Your Vehicle Still Has These Assembly Line Touches. If Not, Here’s How to Add Some to Your Ride.
Editor’s note: Last month a reader said he wants to restore vehicles to the level of workmanship they exhibited when they came off the assembly line. With that in mind, he wanted to know more about the procedures used in automotive plants decades ago. Restoration proandAutoRestorer contributor Larry Lyles gave him an overview of the process and products used and said he would follow up with more information. Here’s Larry’s report:
OCCASIONALLY YOU WILL hear the word “survivor” used to describe a vintage vehicle, such as one from the 1960s muscle car era. What that term means, of course, is that the car is in its original condition and has never been restored. And I don’t suppose I have to tell you that those old cars make old car guys like me drool when we come across them.
It isn’t so much that we like to see faded enamel or spider-cracked lacquer. It’s more that we see an opportunity to view a vehicle just as it rolled off of the assembly line. The actual condition of the car rarely matters. What we are looking for are the tell-tale signs of manufacture left behind from the people who built those vehicles decades ago. It is those signs, no matter how subtle or mundane, that help us restore these old rides back to a condition that could pass for “almost factory.”
Those signs are painted bolt heads, smeared and piled-on caulking, and marks left by the assemblers to indicate the use of specific parts. All of these things add up to tell the story of how a particular vehicle was constructed.
Take, for example, the doors. Were they installed before or after the body was painted? If you think about it, the doors were most likely installed before the body was painted. After all, what happens if a door gets installed after painting and the edges get chipped during alignment? Assembly line manufacturing isn’t going to put up with having to repaint something because of a chip or a scratch. The way you remedy that is to install and align the doors prior to painting.
That’s the way many vintage vehicles were assembled, but is that the way your ride was built? The only way to know that is to understand how your car or truck was constructed in the first place.
After the Welds Cool
A lot of things happen to the body of a vehicle between being welded together and being painted. It is those “between” things that can sometimes be difficult to recognize for what they are and even when recognized and noted they can be very difficult to replicate. The plan here isn’t to lay out a strategy for precisely replicating those steps; rather I want to point them out so that you will know what to look for when disassembling your vehicle, then I’ll give you my take on how best to proceed.
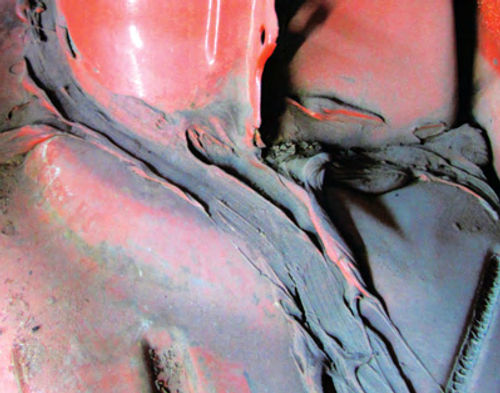
The first thing to happen after the welding has been completed is to deal with the sail panel seams where the quarter panel meets the roof panel (Photo 1). Thissail panelseam had lead in it as evidenced by my having melted away most of it. Lead was preferred by all of the Big Three any time the roof of the vehicle was to be painted because it could be worked smooth, primed and painted.
If the vehicle was destined for a vinyl top you might find plastic body filler in place of the lead. Plastic body filler was cheaper than lead and it could be worked smooth enough to be primed over before painting the car and installing the vinyl top. Imperfections such as pinholes in the filler were easily hidden underneath that new vinyl top.
Did the Big Three ever use plastic body filler in areas destined for paint?To my knowledge they didn’t. The only time I have ever encountered plastic body filler on a survivor vehicle was when that vehicle had a factory vinyl top. To add to that statement, I have found lead in areas that I could be relatively certain were repaired due to assembly line damage, such as on a door. I have never found plastic body filler any place other than on the sail panels and beneath the vinyl top.
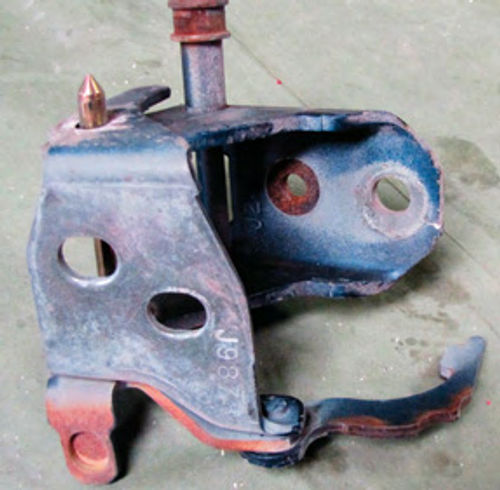
With the body basically perfected the next step was to hang the doors. How can you be sure that was the sequence? All you have to do is remove a door hinge and inspect the metal behind it (Photo 2). I’ve yet to take apart a ’60s muscle car that had paint underneath the face of the door hinges. That metal is always bare and on occasion rusty.
This is also the case with most deck lids and a lot of Chrysler hoods and front fenders. Those parts were often installed prior to the car being painted. How can you tell? In the case of the door hinges you will find caulking around the hinge where it mounts to the cowl post. In case you are wondering why they caulked around the door hinges, they didn’t. They applied the caulk to the hinge mounting face and when the hinge was installed the caulking squeezed out. The caulking was put there to prevent rust.
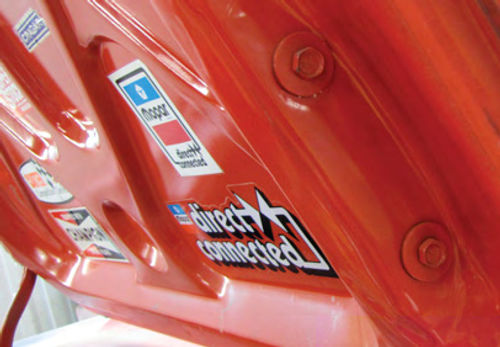
In the case of deck lids and Chrysler hoods and fenders, the bolt heads are always painted indicating the part was installed before the car was painted. The factory guys never painted the head of a bolt prior to installing that bolt (Photo 3). Having done so, you know from experience that painted bolt heads tend to chip and look bad. Is there any way to reduce the chipping when installing a bolt that has a painted head? Use a six-point socket to install it.
A note, in case you are wondering, is that back in the ’80s car manufacturers started welding on their door hinges. That gave them the flexibility to install the doors after painting the body and not have to worry about chipping. I can’t say that they did; only that weld-on hinges gave them that option.
Something else we had to deal with back in the ’80s was the rumor that GM truck door hinges were glued on. They weren’t; they were welded. I should know as I’ve drilled out my share of the welds on those weak hinges in order to replace them. (For more on replacing door hinges, see the June issue.)
A Major Dose of Caulking
After they mounted the doors, deck lids and anything else the factory deemed appropriate to install before painting, the body was thoroughly caulked to slow down moisture infiltration.
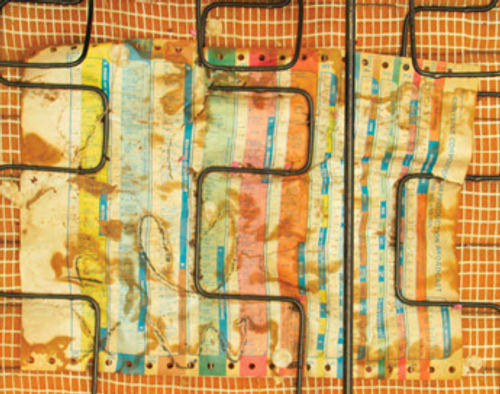
Notice in Photo 4 that the caulking in this trunk is extremely heavy and exceptionally messy. You won’t find a 21st Century ride with this kind of crude caulking anywhere on the body.Rookies no longer caulk cars, robots do it. My, how times have changed.
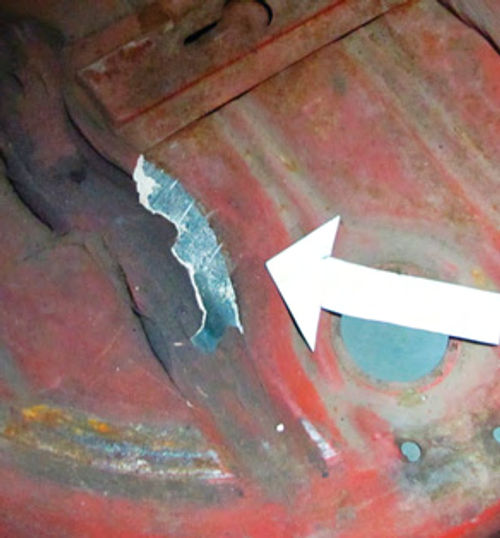
How do I know the caulking was applied before the body was primed? This is one of those forensic things that should be carefully analyzed then photographed. Photo 5 shows where I removed some of the caulk to expose the bare metal underneath. Is this the way most vehicles were constructed, caulk first then primer? To my knowledge it is. The only exception was the tar-based stuff Ford and Chrysler liked to use. That caulking was always applied over painted surfaces.
What products are restoration shops using today to replicate the old stuff? I’ll give you four seam sealing products made by 3M. The first, 3M #8500 All Around Sealant White is a latex-based seam sealer that can be used anywhere on your vehicle. This product cleans up with water and should be applied no more than a quarter-inch thick. It will tend to shrink as it dries and it can be painted 30 minutes after application.
The next is 3M #8505 Fast’n Firm Sealer Beige. This is a much heavier bodied product that also can be used anywhere on your vehicle. This product cleans up with lacquer thinner and can be applied up to a half-inch thick. It doesn’t shrink as much as #8500 and can be painted after 20 minutes.
Next is 3M Automix Self Leveling Seam Sealer #8305. This is a two-part epoxy seam sealer that works best when filling drip rails. You will find this product on late-model vehicles that have those two deep rails running the length of the roof panel. A self-leveling feature means this product will look great without expending the effort to make it look great. Clean up using lacquer thinner and wait for 30 minutes before painting.
The last sealer is 3M Automix Heavy Bodied Seam Sealer #8306. This also is a two-part epoxy sealer and is designed for use on vertical and horizontal surfaces. It is non-sagging and non-flowing. This is the stuff to use inside trunks to match the heavy application of sealer found there. Clean up using lacquer thinner and give this product 30 minutes to cure before painting.
The caveat to using these high-tech seam sealers is that all of them are designed for application after the body has been primed and sanded. All of these seam sealers will accept paint.
What about the tar-like stuff Ford and Chrysler occasionally used? You’ll find a good substitute for this stuff at the local home improvement store on the roofing aisle. It is known as roofing tar and can be purchased in caulking tube sizes.
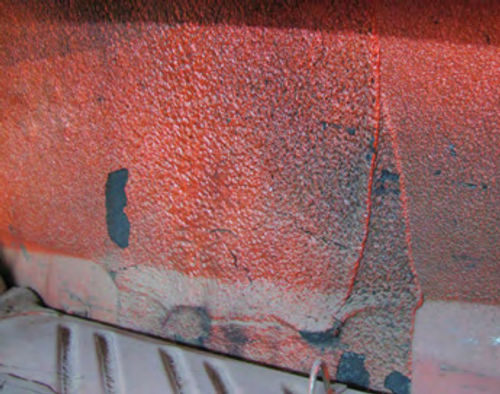
After caulking and before painting, Ford and Chrysler opened the trunk and applied rubberized undercoating to the side walls of the trunk (Photo 6). The purpose of adding this material was not to improve on sound deadening but rather to be used as a buffer to keep the inside of the trunk looking better longer. People have a tendency to toss all sorts of things in the trunk, most of which are free to bounce all over the trunk compartment.
In the rubberized undercoating world try 3M #8883. If you are looking for something to duplicate this type of finish and prefer not to use rubberized undercoating you can use 3M #8874 Rocker Schutz. This product is beige in color but is designed specifically for this type of usage. Both the rubberized undercoating and Rocker Schutz can be painted.
What about GM? They preferred to apply what we in the business refer to as “splatter paint” to the inside of the trunk. This paint came in Aqua/Black (Dupli-Color DM109) and Gray/White (Dupli-Color DM100) and was applied so that the trunk didn’t have to be painted to match the exterior of the vehicle. Ford and Chrysler preferred to paint their trunks to match the exterior, but only after a primer coat, which came next.
Clean First, Then Prime
Before priming, each vehicle was given a thorough cleaning. I can’t say with any authority how they cleaned these bodies only that they did. I suspect like we do today the body was washed with detergent and water then immediately dried and cleaned for a second time using a degreasing product. In the shop I use Dawn dishwashing soap and PPG DCX 330 Degreaser.
The primer used by the Big Three was an electrostatically applied product. I can’t tell you what I don’t know about this primer, but I can say that its purpose was to provide a bonding surface for the paint that was to be applied next. Yes, this is the same difficult-to-sand primer found on OEM replacement parts.
The application method was to first electrically charge whatever was to be primed and then dip it into a vat of this primer to be sure every inch was coated.
The three main primer colors were black, which GM preferred; gray, which Chrysler preferred, and red. Ford used red on the underside of some of its vehicles, gray sometimes on the bodies, and black on its bolt-on panels.
Of course, the application of any of these colors isn’t set in stone. I’ve found gray under factory lacquer on Chevrolets and black under factory enamel on Dodges. If the original finish happens to be hidden beneath 12 layers of subsequent paint the best way to determine the primer color is to sand off all those layers using a DA sander with 80-grit attached until you reach bare metal. The color right next to the metal is the color you are looking for.
When restoring any of these vehicles from a bare metal state, my preference is to start with a layer of epoxy. Epoxy is available in several colors including white, gray, black and red.
So, why not use a non-catalyzed primer like red oxide or gray lacquer primer? Although the factory did not use a catalyzed primer they did bake the primer once it had been applied. That made it extremely durable. All shop applied lacquer-based primers are fragile and prone to failure. That may be a question you have to ask yourself: How many times do I want to spend several thousand dollars on paint just to make the claim of being “sort of factory?”
OK, let’s go down that road for a moment. If “factory” is the goal, how are you going to duplicate the finish? Do you have a facility to bake the fresh paint at 165 degrees F? If you don’t, how are you going to achieve the same state of gloss the factory paint jobs achieved?
In case you are wondering, baking lacquer at 165° F gives it that factory gloss. Polishing the vehicle to achieve a gloss should be out. The factory simply did not go this route. So what’s the answer? I would venture to say that no matter how close to “factory” you reconstruct a vehicle, getting the paint “right” will be impossible. This paragraph is just something for you to chew on.
Bolt-On Parts With Identification Markings
The good thing about most restoration projects is that prior attempts at restoration usually consisted of a paint job and maybe some interior work. Suspension and drive train components are rarely touched. That’s a good thing as the majority of the marks left by the assemblers are found underneath the vehicle. Those marks did one of two things. They told whoever was inspecting the vehicle as it moved along the assembly line that either the correct part had been installed, or that a part not readily visible had been installed.
An example is Mopar torsion bars. A stripe of paint near the anchor end indicated the bar’s thickness.
This is the sort of thing to look for as you tear down your project. Any time you find a part marked with a contrasting color of paint, that mark indicates something and needs to be photographed so that it can be correctly returned to the part during restoration.
Scribbles and Build Sheets
Anything else you should look for? Yes, starting in the late ’40s and early’ 50s the Big Three liked to scribble assembly codes on the inside of the hood panel, the firewall and probably a few other places I’ve yet to note. They also liked to tuck the build sheets for their cars under the rear seat. If readable, this sheet will tell you everything about your ride (Photo 7).
Now, here are some steps to consider before having a body media blasted or chemically dipped.
Once a vehicle body has been cleaned down to the bare metal, determining how the body was caulked, what color primer was used, and which parts were installed before painting has pretty much gone out the window. Even though I’ve talked about it here, the only way to precisely determine the pre-restoration state of the body is to take photographs. Take a lot of pictures, take them often, and take them of every possible aspect of the vehicle. Then, before loading up the body for the long drive to the blaster or dipper, grab a DA sander with a disk of 80-grit attached and sand two or three spots on the body. What you are looking for are any signs of the original primer. It may be underneath 15 layers of paint but it is usually there. Verify the color of the primer with a good photograph and then load the ride up for the drive. Why wait until the last minute to check the color of the primer? Bare Metal tends to quickly rust.
Paint and Body, According to the Manual
Original service manuals for many of the ’60s muscle cars are now being reprinted and are available from various sources. One of the chapters found in those manuals covers the body and frame and within that chapter is a section on refinishing. Don’t run out and purchase one of these manuals hoping to garner great information on how your ride was painted. It isn’t there. At best what you will find are the color codes for that particular year, whether the paint was enamel or lacquer, and a look at how your ride might have been repaired back in the day. If nothing else, that information in itself is amusing. Got a question? Send it along.
Resource: LPL Body Works, LLC
5815Contented Lane
Amarillo, TX 79109