
Finding and fixing leaks and seals on your car
With Time, Most Seals Lose Their Ability to Keep Water and Dirt Outside Where They Belong. Here’s How to Find and Fix Those Problems.
Automobiles have openings in the body that are supposed to be sealed so that they don’t permit rain, car wash residue, condensation and dust and dirt to get inside the vehicle. If you’ve noticed pesky water or dust leaks and have thought about saving up money to have the leaks fixed, chances are you will never get them done. Leak repairs are usually not a high-priority fix and there’s plenty of other auto-related things calling for that money. However, you can fix the leaks yourself and save the frustration… and the cash.
Becoming a Leak Detective
Start by finding where the leaks are coming from and don’t assume the wet spots inside the car are directly below the leak. A few years ago we worked on a 1963 Pontiac Tempest that had a leak in the middle of the car. It turned out that leak was actually at the rear of the car, but the liquid was running along a control cable that passed through the floor pan at the center of the vehicle. There was a rubber grommet at that spot that stopped the drip. Since it couldn’t go through the floor, it pooled in the center of the car.
In the case of most water leaks, it is not unusual to find the source far from the spot where the water pools. That’s because old cars are made up of many sections of hollow steel stampings that make excellent troughs for the flow of the water. For instance, rain water may come into the car at the right side of the windshield, flow across the car on the inside of the dash panel and come out on the other side of the vehicle. When you finally pinpoint th When you finally pinpoint the real locations of your leaks, you will need to buy the necessary products for stopping different kinds of leaks. The following chart should help you in getting the things you’ll need: See chart below
Some Types of Leaks Windshield:
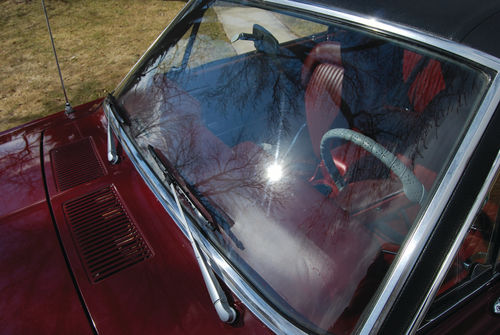
If you find a leak around the car’s windshield, try using your garden hose to flow water in that area and see if you can determine the spot where the leak occurs. It may not show up because the vehicle is sitting stationary and you don’t have wind forcing the water through the leaky spot. If you find no leak with the hose, but know that something is leaking,
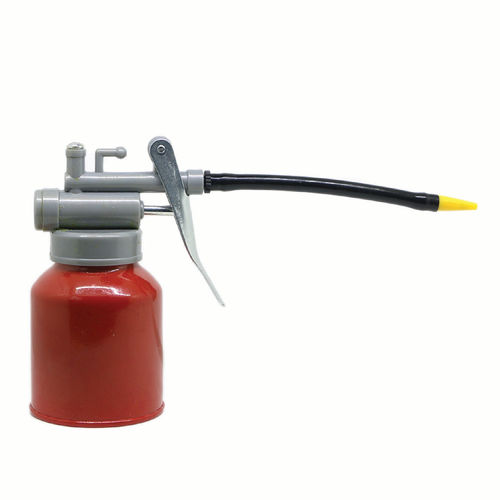
the answer is to seal all sections of the glass. Use a can of weather strip adhesive fitted with a Plews-type cap. What you want to do is get the nozzle between the rubber seal and the glass and squeeze sealant into that void completely around the windshield. The same technique can be used for a leaky rear window.
Sealing a Wet Car:
If it’s raining and you’re getting wet inside your car, an on-the-spot repair may be required to stay dry. It will be harder to determine where the leak is, but this can be done by using a syringe filed with food dye. Use the vegetable type to avoid staining upholstery and carpets. Insert the syringe inside the seal at the point where you suspect a leak. If the dye-colored water gets inside, you know you’ve found the leak.
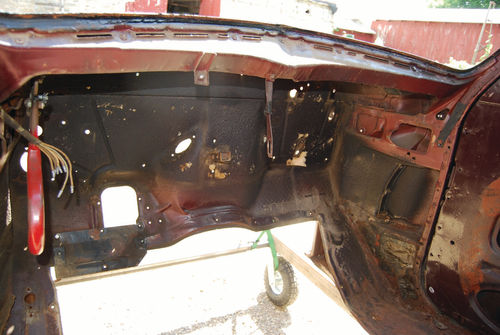
Sealing Firewall Leaks:
Water leaks through the firewall usually happen where the dash pad fasteners are located or at openings left for electrical wiring to pass through the firewall. The fix is to apply heavy caulking compound to all openings in the firewall from the engine compartment side. The caulking gun can be a helpful tool for this job.
Hood-to Cowl Sealing:
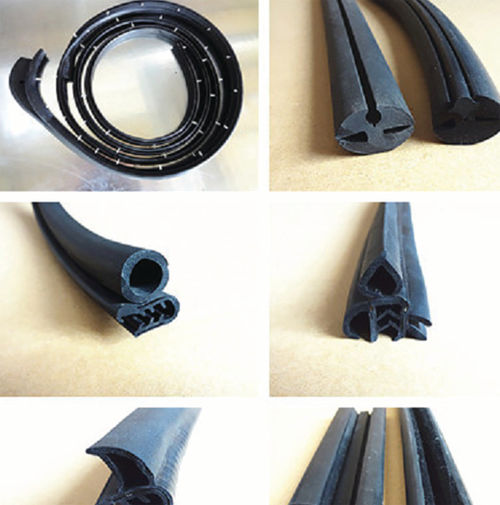
The seal between the hood and the upper cowl on most old vehicles is a rope seal nailed or riveted in place. In some cases, water will leak through the nail or rivet holes, then flow under the seal and drip on the floor mats or carpets. The cure is to apply body sealer to the entire length of the bottom of the rope seal using a Plews-type can. Work the sealer in under the rope seal so it fills the nail/rivet holes.
Product/Tool --- Source --- Repair Method
Black 3M Super Weather Strip Adhesive --- Auto Parts Store --- Used to apply weather strip to doors, trunk lid, cowl, vents and for sealing glass parts and weather-strips.
Body Sealer --- Auto Parts Store --- Used to seal body openings. Use where appearance is not super critical.
Body Putty --- Auto Parts Store --- Sealing small holes. Paintable. Can hand-apply.
Drain Trough Sealer --- Auto Parts Store --- To seal drain troughs. Apply with Plews can.
Shim Material --- Hardware or Auto Parts Store --- Used to shim up trunk, vent, door weather strips.
Caulking Gun --- Hardware or Auto Parts Store --- To apply body sealer.
Vegetable Dye --- Supermarket --- Used with syringe to check for sources of leaks.
Syringe --- Drug or Dept. Store --- Used with water and food dye to find leaks.
1-pc. Clothespin --- Your Laundry Room --- Use one “leg” to apply and smooth body putty.
Garden Hose --- Hardware/Dept. Store --- Used to check for window and trunk leaks.
Extension Light --- Hardware/Dept. Store --- Used to check for trunk and floor pan leaks.
Talcum Powder --- Supermarket, Drug Store or Big Box Store --- Prevents sealer from sticking to car parts.
Hood Ventilator Leaks:
Hood ventilators were used on cars through early 1950s models. Some cars like our ’49 Studebaker Starlite Coupe have ventilators in the front fenders instead. The rubber seals on these vents took a real beating from weather, as well as from the “Rube Goldberg” linkages used to operate them. Usually the seal fits over the edges (sort of like a brake pedal pad over the metal pedal). New seals are a good option and you can probably get them from Steele Rubber (steelerubber.com), Fix-It Rubber (fixitrubber.biz) or Metro Molded Parts (metrommp.com). If you can’t get them you may prefer upgrading the seals on the old ones by filling any voids with weather strip adhesive. But before you do, adjust the linkage for a tight fit.
Sealing Windshield Wiper Pivots:
If you think that water is leaking into the car by the base of the windshield wipers, it may be finding its way through the holes for the pivots. You will have to remove the wiper arms (sometimes a little tricky) and the pivot covers. Pack the pivot covers with body putty, re-install and tighten down. If you can’t figure out how to remove the wiper blades, consult an owner’s manual or get in touch with a Technical Advisor from a club covering your vehicle or one made by the same company.
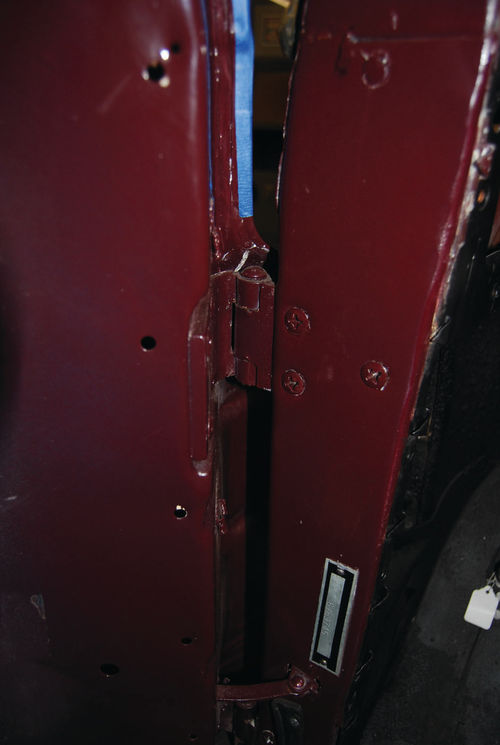
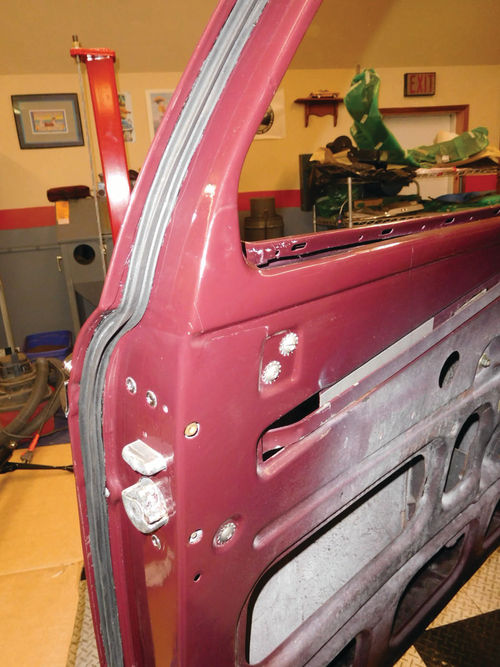
Door Hinge & Body Pillar Sealing:
Door hinges and body pillars on old cars are notorious for allowing water to leak inside the vehicle. If you suspect such a leak, get out the syringe filled with vegetable-type food coloring. The sight of colored water running down the pillar is a sure sign you have a leak. Apply body putty to the pillar/hinge area with half of a clothespin to create a satisfactory seal. Check the surface at the side of the pillar where the cowl panel is welded to the pillar. A rough surface at that spot prevents the weather strip from making a proper seal. Water can blow by the weather stripping and enter the car. You can test the effectiveness of the seal by squirting some water from your syringe against the weather strip with the door closed. If you see a leak: Cover the area around the weld with body sealer, then smooth it off and paint the spot the same color.


Hood Hinge Bracket Leaks:
The hood hinge bracket may be another place where water seeps through to the inside of the dash panel. If this seems to be a problem with your old car, seal the entire circumference of the hood hinge bracket with body putty.
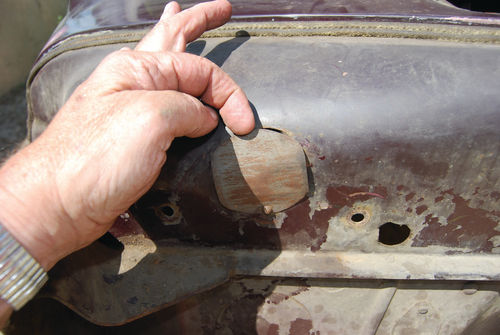
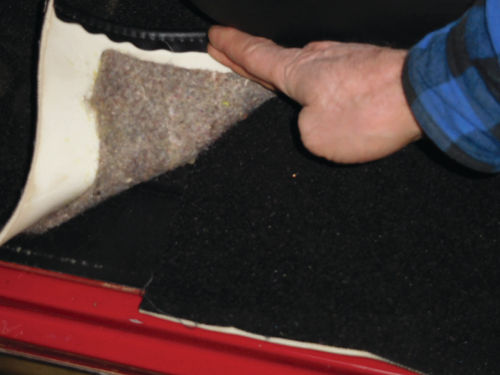
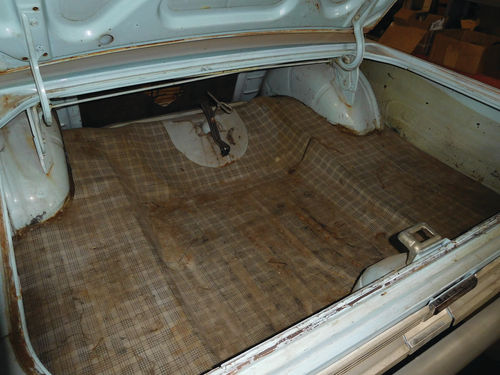
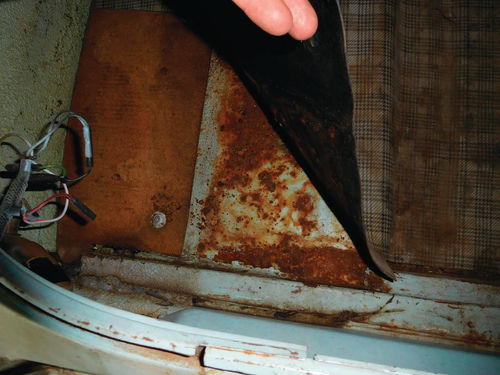
Floor Pan Panel Leaks:
Collector cars aren’t usually driven on rainy days, but it’s possible to get stuck in a storm going to or returning from an event or if you are traveling in the car to a regional or national meet. We’ve also had occasion where we stayed at a hotel during a hobby event and came out in the morning to find it had rained. If your car does get caught in a rainstorm and the carpets are wet, you may have water splashing up through openings between floor pan panels. As a first step, turn the floor mat or carpet back and tighten the screws that hold the panels together. Then, seal all around the edges of the panels with body sealer using a Plews-type can. Sprinkle talcum powder over the sealer when done. That will prevent your floor mats or carpets from sticking to the body sealer. Some floor panels also have felt sealers between them. These are usually pretty worn or missing and they may need to be replaced with new felt.
Door Seal Leaks:
The most-common car-body leak is a door seal leak. Doors move around, sag, slam, suffer bumps and bruises and endure all kinds of abuse. When the car was used all year round, the door seals probably froze up in winter and tore or pulled loose when the door was opened. In the hot summer, the adhesive softened up, allowing sags and gaps. Age causes seals to dry up and shrink, crack or deteriorate. The first step in a repair is to clean the door jamb and the weather stripping with cleaning fluid. Then apply an even coat of weather strip adhesive to the door metal and weather strip itself.
John Slusar of the Chrysler Town & Country Registry recommends using only black 3M Super Weatherstrip Adhesive. “Have a full can of acetone ready and a couple of rags,” says Slusar. “And use 80-grit sandpaper to scuff the rubber surface that is going to be glued. As you know, the adhesive must be applied to both the rubber and hinge pillars and allowed to dry completely before they make contact. After it dries, the moldings can be handled with care, but if any dried adhesive contacts any other surface coated with the adhesive (including your fingers) it will grab like steel. Therefore, make sure to use the acetone to thoroughly and frequently remove all adhesive that gets onto your hands or fingertips before you handle the dry, treated rubber.”
If you find that the door fits properly, but you still have water leaking past the weather strip, test the compression of the weather strip by closing the door on a piece of bond paper. If the paper can easily be pulled out, the old weather stripping is not compressing properly. Test the amount of compression along the entire edge of the door. Shim out the weather strip with shim stock at spots where the compression is found to be poor. If you can’t get good compression all around, you’ll never be able to get a good enough door seal. The answer then is to install all-new seals following the advice John Slusar provided.
Coach Joint Leaks:
The three joints at the center pillar of vintage cars are called “coach joints.” One joint is at the top and there is one on each side of the pillar. It you detect wetness on the inner door trim panels or the rear carpets after your car has been washed, the water is probably leaking past the weather strips at the coach joints. Check the seals used at these points. If you find an improper seal, replace it with a new one or use body putty to reseal the old joints. Then smooth off the putty and paint to match.
Drain-Trough Leaks:
If you see wetness on your car’s headliner, suspect drain-trough leaks (and check the section below on Headliner Stains). They can also let water drip onto the floor or around body pillars or into the trunk. Use draintrough sealer to stop the leaks. Apply it along both the top and bottom of the trough. Make sure that the seam just below the front end of the drip panel is effectively sealed. That’s where the cowl side panel and the cowl upper panel meet.
Trunk Panel Leaks:
Wet spots in a trunk are common and should be dealt with before they make the trunk floor rust. As with the doors, use the bond paper test to find spots where the rubber trunk seal isn’t sealing. If the paper comes out easily, try shimming the seal at that point. Use a garden hose to check for leaks along the edges of the trunk lid. Remove the nozzle and turn up the water until you have a heavy 2-inch stream soaking the lid. Test both sides as well as the top and bottom of the lid. Start at a bottom corner, move slowly to the top corner, move to the other side, then do the bottom and finish by testing the top edge. When a leak is found, seal it with weather strip adhesive.

If you find that water is getting into the trunk at the seam where the weather strip trough and the upper panel of the deck lid are joined together, pack some body sealer along the entire length of the seal, on its bottom surface, to stop the leak. If you’re not successful, order a new seal from Steele, Fix-It Rubber or Metro Molded Parts and replace the original. To check the trunk floor for leaks, have someone shine a light under the floor pan, Remove the trunk mat and seal in all spots where the light shines through. Also check the seams on the wheelhouses, around the gas filler tube and the taillight openings if any. On prewar cars, check the openings where the taillights bolt on and the wires pass through. Your car may have a spare tire well with a hole at the bottom. That’s a drain hole. Leave it alone.
Headliner Stains:
Stains on the headliner are often the result of water leaking past the small space between the metal glass run retainer and the roof. To stop a leak here, fill the space with body putty and paint over the area.
To remove stains from the headliner, use mild bar soap or a commercial upholstery cleaner. Work up lots of suds and apply only the suds to the headliner using a sponge. Using a liquid cleaner by itself could cause the headliner to shrink. When you have cleaned the headliner thoroughly, use a dry sponge to wipe off excess suds and brush up the nap with a bristle brush.
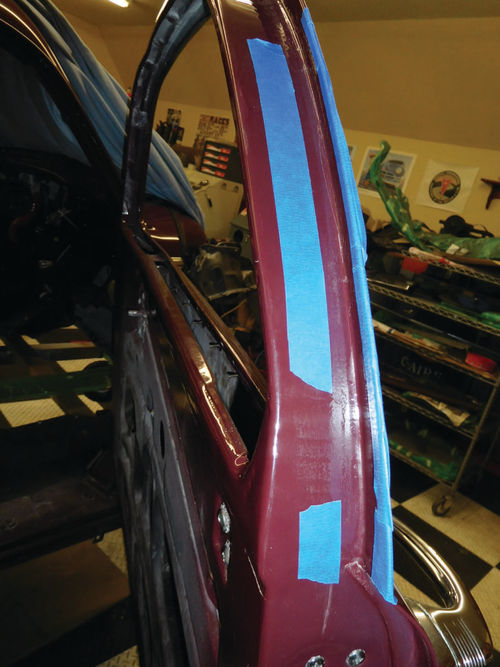
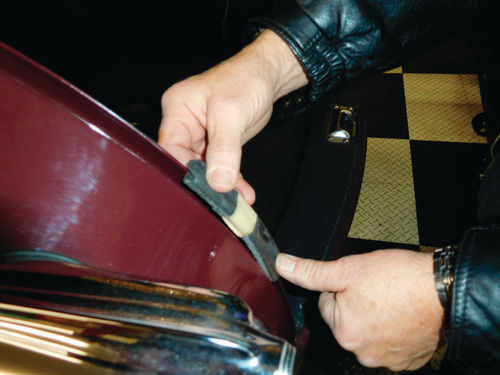
Special Body Leaks:
Two- and four-door hardtop models do not have B pillars. If the front and rear windows lost their seals, water will find its way in by the back of the rear seat. That suggests that water has entered the car between the glass run and the outer edge of the car body. To seal this area more effectively, compress some body sealer in the opening at the front or rear of the quarter panel window. Smooth off the sealer with your half of the clothespin, then touch up with matching paint. The flap-type drip moldings on hardtops can be sealed by applying drain trough sealer to the underside of the molding above the rear quarter window and quarter panel.
Convertibles also do not have B pillars. It is very important to have good seals between the body, the windshield, the side windows and the fabric convertible top. All the rubber used to seal convertible tops must be in good condition.
If a rubber component deteriorates, it must be replaced with a new one. Reproduction pieces are available for most popular convertibles. Generic seals are available for less popular models. Fabric tops tighten up and shrink. New convertible tops are expensive, so convertible owners should take good care of their top with dressings that make them more water repellent.
Dust Leaks:
Dust leaks don’t cause as much damage as water leaks, but they can be annoying nevertheless.
Opening the cowl vents and closing the vent windows will sometimes create an air pressure condition that helps keep dust out of a car interior.
If the floor pan seams in the rear compartment and trunk are admitting dust into a car, use body putty to seal openings. The dust will build up the most right where it’s getting into the car and will taper off as it gets farther away from the opening that’s letting it in.


