
A Restorer’s Story 1955 Chevrolet Beauville
The’ 55 Chevy—a Vintage Vehicle Icon—Turns 55 This Year. But With a Few Updates, It’s Still a Good Driver.
I FELL IN love with the shoe box Chevrolets when I first beheld them at a dealership back in 1955. I was only 14 years old at the time and, of course, if I had been car shopping I would have wanted a convertible or at least a hardtop so I could cruise the school and impress girls.
But that was then. Now that I am in my reclining years, I prefer a wagon. I’ve been married for decades, so wowing chicks is no longer high on my priority list. And besides, I have grandchildren that I like to take for weekend jaunts.
For those reasons, I decided to trade elegance and sportiness for brick-like utility and practicality in my search for a vintage driver.
We looked for a long time to find just the right car…there weren’t many good ones out there. In fact, I fully expected another worn-out heap when I went to look at the 1955 Chevrolet Bel Air Beauville four-door station wagon, six cylinder with overdrive that was advertised in a hobby publication.
But I was pleasantly surprised. The old wagon was straight—no rust—everything was there, in good shape, and it ran reasonably well. The price was fair, so I paid up and drove the car home. A four-door wagon with a six and a stick overdrive in it is not everybody’s dream car, but it was exactly what I wanted.
Well, almost.
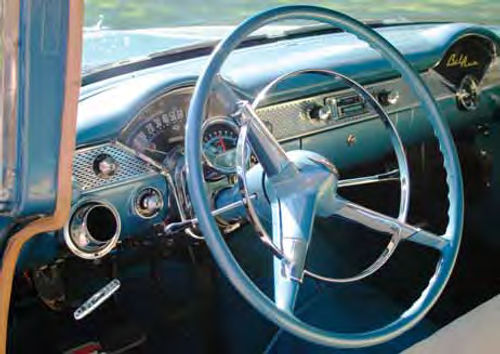
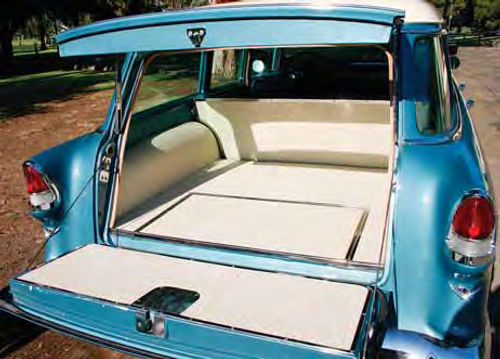
The car was a Bel Air, Chevy’s top series that year, with the deluxe interior and all the goodies, such as a push-button radio, windshield washer and clock. And though its look is rather utilitarian, the wagon was one of the most expensive models they made that year. The four doors, fold-down back seat, and cargo bay finishing trim all added to the price. And, as it turned out, such amenities added to the cost of restoration too.
Plans Changed Along the Way
I wanted this car to be a comfortable, roomy family driver in which we could do some long-distance touring, and the Chevy wagon seemed like almost the ideal solution. I also knew I would want modern air conditioning for those hot summer days. And I wanted power front disc brakes to help keep my family safe on Southern California’s frantic freeways, which entailed modernizing the brake system. A more contemporary AM/FM radio and tape deck seemed a virtual necessity too.
I started out just to make these few changes but—as usual—ended up doing everything else as well.
In other words, I began with a presentable driver, and now essentially have a show-quality restored wagon, though it is not strictly original. Oh, it looks 100 percent when you walk around it, and even the interior is new, correct and original, but if you look carefully, you might notice that in place of the old heater, there is an aftermarket heater/air conditioner combination that is about the same size as the original unit, though made of black plastic. And in the original dash opening there is a Custom Auto Sound AM/FM radio and tape player that powers a couple of concealed under-seat speakers as well as the original speaker in the dash (customautosound.com).
We also mounted a clunky, 1950’s style Moon Eyes tachometer on the steering column mostly for precise engine tuning and economical driving.
But the situation under the hood today is a somewhat different story.
When I first got the car I tuned the original 235 six to compete in modern traffic by porting the head, adding a couple of progressive two-barrel Carter Weber carbs, Fenton headers and a hot cam. But after driving it for a year or so I flattened some lobes on the cam, so I popped in a fresh,stock, 1957 283-cubicinch V-8.
This proved to be a sweet setup; the engine looks totally original.
Oh, the purists would say that the Chevy V-8 for 1955 measured 265 cubic inches and the cast-in oil filter boss on the lower portion of the block of my 283 wouldn’t have been there on a 1955 engine. And it is true that most of the 1955 V-8 powered cars were fitted with an add-on accessory bypass oil filter mounted on top of the engine. But I found out that toward the end of the model run that year, Chevrolet did go to V-8 blocks with cast-in bosses in their passenger cars. Those originally were designed for the 1955 Corvettes.
Installing the New Engine
Making the switch from a six to a small block V-8 is pretty straightforward,though no new engine “just bolts right in.”
For example, on many cars, the new, bigger engine weighs quite a bit more than the smaller one you are removing, so you end up having to change springs and shock absorbers as well. But fortunately for us, though the small block V-8 is 47 cubic inches bigger in displacement than the six, it is actually 44 pounds lighter so we didn’t have that problem.
But to replace the six in a shoe box Chevrolet with a small block V-8 of the era, you need to find a radiator core support that is made for the V-8 installation. You need a different core support because you must move the radiator back to position it for the much shorter eight-cylinder engine. Fortunately, like just about everything else for these cars, reproduction core supports are available for around $500 from a couple of sources. We were lucky enough to score a used one cheap that we sandblasted and painted before installing it.
You also will need to change the motor mount brackets in front and purchase new motor mounts for the rear of the engine because they differ from those on the sixes. Be careful to get motor mounts that are the same height as the originals for a V-8 though. We bought some after-market motor mounts that were about 1 ⁄4-inch too high, and this threw everything off until we figured out the source of the problem.
You also need to find a V-8 bell housing when you replace a six with a V-8 because they are not remotely the same. And don’t try to do without that tin spacer panel that goes in between the starter and the motor itself on a V-8, because the starter will not function properly if you do. Finally, you will need to find the correct carburetor linkage for a V-8, which is available from the usual sources.
On my car there was an additional wrinkle thanks to the rather uncommon Borg Warner overdrive. With it, the throttle linkage actuates the kick-downswitch that drops you into a lower gear and it’s in an entirely different location on the V-8. Also, the brackets that hold the switch for the four-barrel-equipped cars are different than the two-barrel brackets as are those for the six-powered cars.
I was able to find the correct bracket on the Internet, but you could make one pretty easily if you couldn’t find one. We also installed a new wire harness for the overdrive because ours was getting a bit stiff, and we would have had to extend the wires to make it work. That would have looked a bit tatty under the hood.
We Needed a Smaller Carb
As for carburetion, we were thrown a bit of a curve because the engine we bought had what looked like a typical Chevy Rochester four-barrel carb on it, but it wasn’t. Someone had taken a big, 650 cfm version of it from a contemporary Cadillac and put it on the original carb’s throttle body. This meant that the vacuum signal was too weak for the secondaries to kick in, so there was a flat spot in mid-range acceleration.I imagine this little problem was the reason I was able to buy a fresh 283 for a mere $500.
The previous owner probably believed, as many neophytes do, that the more carburetion the better, but that is not the case.
I switched to a 500 cfm Edelbrock Performer four-barrel and even that was too much. I finally found an original, correct Carter four-barrel for the car, paid a pretty penny for it, and then had it restored and flow bench tested at the Carb Shop in Corona, California. My friend Otis Bretzing did the work, and he is a master at tailoring carburetors for your needs, from mild to wild.
Original—and Otherwise—Under the Hood
In the end, I wanted the car to look as stock as possible, but I knew it would be obvious to any knowledgeable observer that under the hood the car has had some period incorrect upgrades done to it. For example, a heavy-duty 100-amp alternator hangs where the generator used to be, and a Sankyo air conditioning compressor hangs off of the other side of the engine.
But probably the most intrusive update is the big, dual-bore master cylinder and vacuum chamber hanging off the firewall. Other than those components, the engine is painted and accessorized the same way the factory did it, down to the bent wire hose clamps and a correct original oil bath air filter.
We Wound Up Doing a Lot
I should point out here that shoe box Chevrolets are especially easy to restore because just about everything is still available for them from several sources, and information is ubiquitous. For example, I was not at all impressed with the manager of the counter staff at the biggest Chevy repro parts vendor in Southern California,so I bought most of what I needed from The Car Shop locally, and other items were from out of state. Eckler’s Classic Chevy in Titusville, Florida, (classicchevy.com) carries tri-five Chevy components and was a favorite source. It was nice to have the luxury of choice.
Furthermore, it doesn't seem like it, but when I look at the photographic record of what we’ve done on the car, I realize we ended up doing a total restoration. When I say we, I have to point out that my good friends, ace mechanic Larry Cain, Chevy authority Gary Howard, and master body man Tom Horvath helped me along the way.
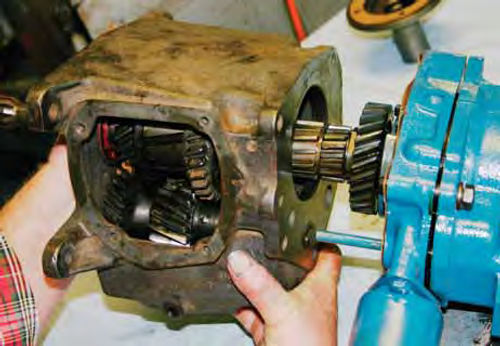
We tore down and blueprinted both engines at different times, even though the 283 was fresh, then we replaced the clutch in both instances; new bearings were installed in the transmission; new universal joints were added; and new axle bearings were put in all around. We also added new shocks for better handling.
We didn’t touch the steering because it was nice and tight, but we did add the aforementioned front disc power brakes which came as a bolt-on kit from MP Power Brakes in Mooresville, North Carolina (mpbrakes.com). It was easy to install using basic hand tools. We also added fresh drum brakes in the rear. And to complete the job, we replaced all of the brake tubing and fittings because they are known to rust out and burst after so many years. A nice thing about the MP kits is they furnish new roller bearings for the front wheels that are much more durable than the original ball bearings.
And since tires are the most important part of the suspension of a car, we added new radials all around that are made to match period white walls in appearance. They really do improve high-speed handling and ride. The tires were all balanced with the weights on the insides of the rims to give the car a cleaner appearance.
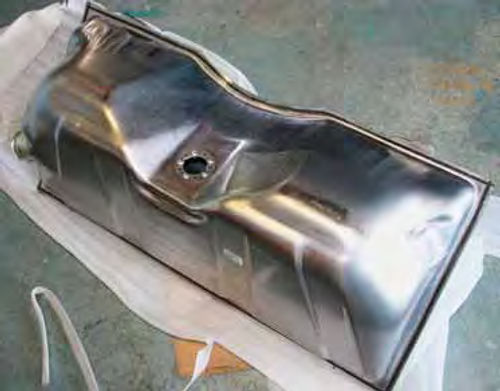
The car got a new gas tank, which was expensive because, in this case, it is a rather odd design unique to the station wagons. It seems that nearly every old car needs a new fuel tank sooner or later, so after pulling out the old one, which had already been patched in a couple of areas, we chose to just replace it. We also added an electric fuel pump in the rear by the tank, with an on-off switch concealed under the dash. We installed it mostly for priming the carburetor at start-up, and to use in case the mechanical pump failed. We also installed new fuel lines throughout, and added a manual fuel shut-off valve near the tank as an antitheft device.
Time for the A/C
Installing aftermarket air conditioning presented a few problems of its own. Aftermarket air conditioning adds considerably to the heat load the cooling system must deal with because the condenser hangs in front of the radiator and contributes the heat from the interior of the car to the overall load.
First of all we needed a kit that included all the components, e.g. condenser, evaporator, compressor, etc. But we also needed the aforementioned 100amp alternator to power it, and that meant some new wiring, so we ended up installing a complete new wire harness. We also installed a four-core Desert Cooler radiator, and after a bit of searching, found one of the rare original five bladed fans used on 1955 Chevys equipped with air conditioning.
This proved to be much more satisfactory than a later, six-bladed aftermarket mechanical fan or an electric one, both of which we tried with marginal results. Finally, we found the correct original in dash air conditioning nozzles for 1955,had them re-chromed, and installed them to make the car look as original as possible.
We got our air conditioning kit from Old Air Products in Fort Worth, Texas, and it came complete with excellent instructions (oldairproducts.com).
If you should decide to install air conditioning on your classic I suggest you pick up a book on the subject so you will understand how it works if you don’t already know; but that would not be absolutely necessary to the task.
Stripping the Old Paint
With the mechanics all done, we essentially had a new 1955 Bel Air wagon, but it still looked second-hand and dog-eared. The chrome was pitted here and there, and the stainless had the usual small dents and dings that come with 50 years on the road. Also, at some point the car had been repainted, and the original Shoreline Beige on the top had been covered with a stark, cold, appliance white that didn’t work with the original metallic Glacier Blue.
Never one for half-way measures, I decided to give the car a complete bare metal re-spray.
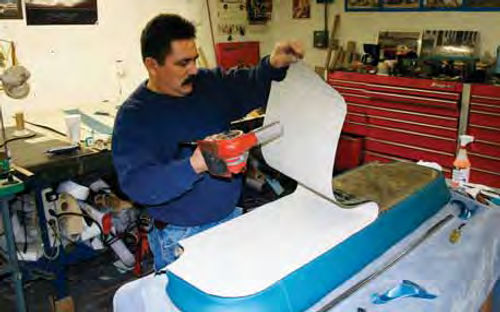
We removed all of the chrome and stainless, and then we took out all the glass because we wanted to have tinted glass throughout for the air conditioning. And we also wanted the pinch moldings for the gaskets to be painted and in good shape too. Luckily,all the glass is still available for these cars because we needed a new windshield in any case, and we managed to break one of those long, curved side windows while taking it out.
We stripped the car using Blue Lightning, the best paint stripper I have found over the years (bluelightningproducts .com).
I cannot over-emphasize that stripping paint off of a car is a nasty, dangerous job. The stuff is so strong that it can burn your skin and damage your lungs in a hurry if you don’t wear at least a particle mask and neoprene gloves and work in a well-ventilated area.
But as we went along we were pleasantly surprised to find that the old car had virtually no rust, and had required only a couple of minor repairs over the years. My usual experience stripping old cars is that of being horrified at how much rust and body filler a typical restoration candidate contains. We dug out a bit of Bondo and welded in a patch, and that was about it for body work.
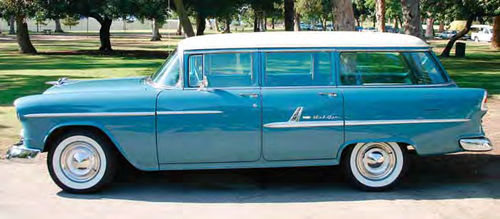
After priming and block sanding the car, we gave it a few coats of carefully matched original Shoreline Beige and Glacier Blue, and then clear-coated it with urethane.
This was lovingly color sanded using 1000-, 1500-, then 2000-grit micro-fine sandpaper, and then we buffed the car out and gave it a coat of carnauba wax. It came out beautifully. The two-tone with beige top helps take away from the brick-like blockiness of the wagon and makes it look longer and lower.
Tackling the Stainless Steel
Much of what most people would call chrome on the car was actually stainless steel, including the hubcaps. That was a blessing, because dents and dings can be tapped, filed and polished out of stainless pretty easily. We polished all of the bright work on a big Baldor buffer.
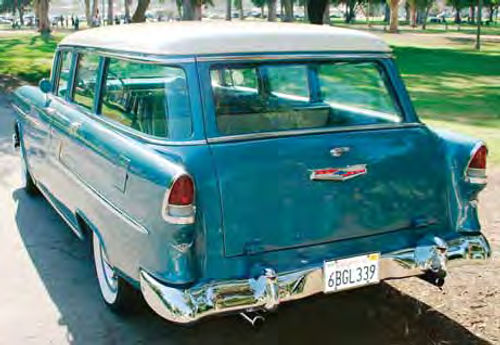
All I can say is, if you decide to do this on your car, wear heavy leather gloves and safety goggles, and hang on tight. You don’t want the local emergency room to have to surgically remove a fender spear from your forehead. We had the bumpers and head and taillight bezels re-chromed, and bought reproduction parts where necessary.
And, of course, since we had put in the V-8 we felt entitled to add the little chrome emblems under the tail lamps that were the only external indication of what was under the hood in a 1955 Chevrolet. I felt like I was pinning campaign medals on an old soldier. The build plate on the car would tell any knowledgeable Chevy buff that it originally came with a six, but not many people care enough to look. I would never try to fool a prospective buyer though.
A Cool—and Functional—End Product
This whole process took a meandering two years or so of hobbyist restoration work but the result is a brand-new 1955 Chevrolet Bel Air station wagon. And if you haven’t driven one lately, you probably don’t remember how comfortable and roomy they are. Bench seats may be old-fashioned, but I love them because I can change positions when my gluteus gets tired. Bucket seats may look cool and European, but you can only sit in them one way. And we did install lap belts front and rear to help keep everybody safe.
My old four-door wagon wasn’t considered cool when it came out in 1955, but it sort of is now, thanks in part to its aftermarket air conditioning.
It also rides and handles very well and stops even better, thanks to the front disc brakes and radials.
The whole family can pile into the thing, including my daughter’s Cocker Spaniel, and we still have room for a cooler and some lawn chairs.
Keeping up with traffic is not a problem thanks to the V-8 and the original overdrive transmission coupled to a 4.11:1 rear end. The Chevy gets away like a modern car, and cruises at 70 at around 2000 rpm.
Yes, it’s all very practical and I’m pleased with my sensible, no-nonsense approach to selecting a vintage driver.
It’s just too bad that there aren’t any drive-ins to cruise through anymore.


