
Restoring an Engine Compartment,Pt. 2
Working With Electrical Components Calls for Tedious Involvement. So, Was the Project Worth the Time and Effort Involved?
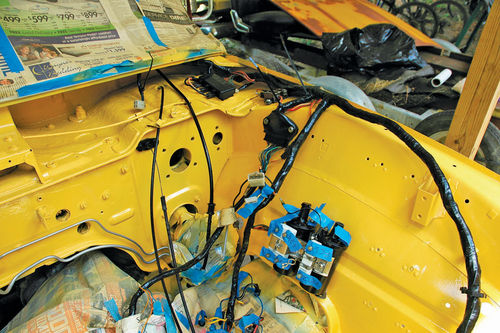
LAST MONTH WE started restoration work on the engine compartment of this 1977 Mazda Rotary Pickup with cleaning and paint prep work, application of a rust converter, priming and painting, and the freshening of items such as the wiper motor cover, coolant reservoir and windshield washer tank. Working with the wiring harness is next on the agenda.
Wiring Harness
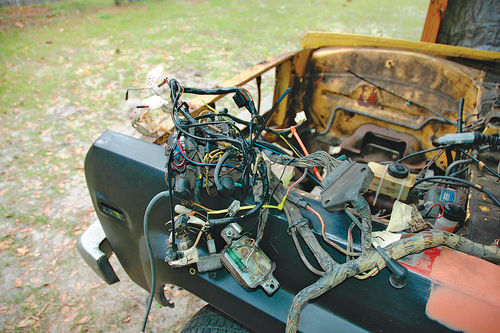
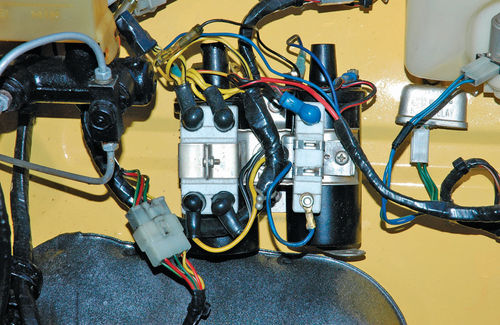
My original wiring harness seemed to not have any real problems when I took the engine out, so my goal was to just make it look good and carefully clean all the electrical contacts. Rather than disconnecting the harness from its electrical components under the hood, I unbolted all the components (relays, coils, fuse boxes, etc.) from the sheet metal, draped the whole assembly over the side of the truck and laid it out on a piece of plywood for cosmetic work and cleaning of contacts. I then disconnected all the components from the harness, very carefully labeling both sides of each connection as work progressed. I set aside all the labeled relays, fuse boxes and coils for their turns at cleanup, painting or polishing. I labeled everything with either Sharpie-marked masking tape or, in some cases, color-coded plastic zip ties. This process was not particularly difficult, just tedious and time-consuming, especially keeping track of all the connections on the stock dual-coil setup.
The main harness was wrapped in a spiral of what appeared to be the original friction-type harness tape. I wrapped the harness completely in Scotch Super 88 Vinyl Electrical Tape, designed for high temperatures and harsh conditions, in order to tidy up the appearance and afford more protection from humid Florida conditions. I cleaned all the wiring, connectors and covers with some combination of Simple Green and a toothbrush, fine sandpaper and sometimes a small nail file to reach inside otherwise inaccessible connectors before carefully wrapping the entire harness. I also fastened off all tape ends with small black plastic zip ties, which aren’t very noticeable and afford additional security. I was able to salvage most of the unique, large plastic Mazda harness clips and replace the smaller ones with modern equivalents.
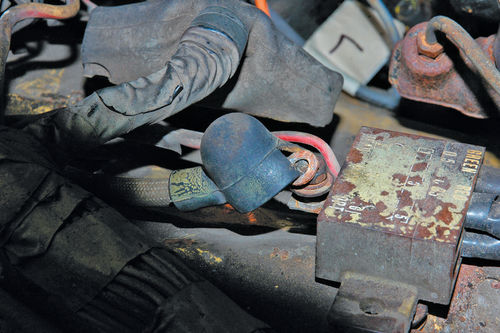
Some Quick Moves With the Fusible Link Box
One electrical component presented a particular challenge. The original Bakelite fusible link box located near the windshield on the driver’s side had yellow overspray left by someone (probably me) from previous paint work. The question was how to clean off the overspray without also cleaning off the original lettering, a bit of which was already missing. I wiped on a thin coat of Klean-Strip KS-3 Premium Stripper, left it for just a few seconds, and then wiped it off, removing the overspray and revealing the original lettering, unmolested.

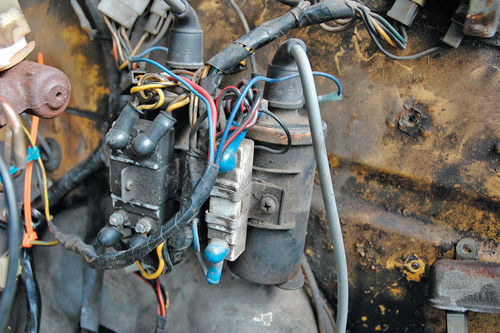
Dual Coil Paperwork Was Tedious
The dual coils with their external ceramic ballast blocks required tedious attention to detail and labeling to prevent wiring mix-ups. I cleaned and painted the coils themselves in satin black, cleaned the ballast blocks and polished or painted the metal parts before reassembly. Labeling, drawing diagrams and keeping track of everything for reassembly probably took as much time as the cosmetic work itself.
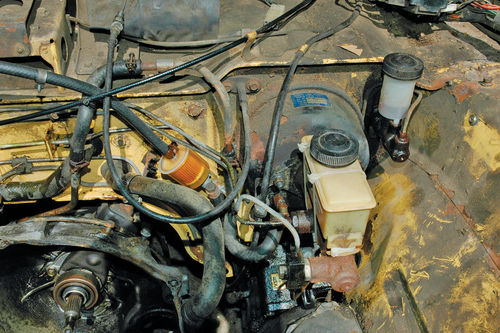
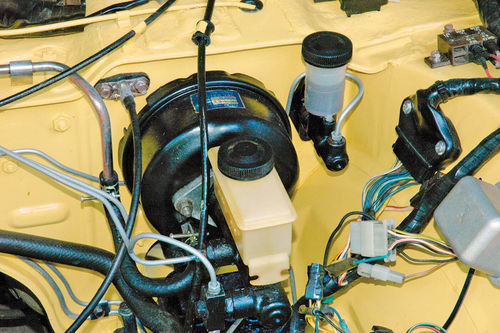
Brake and Clutch Master Cylinders
The brake and clutch master cylinders got a good cleaning and painting, where appropriate. Everything was working well when I removed the engine, but should they need attention in the future, rebuild kits and the hydraulic cylinders themselves, which Mazda shared with some Ford models, are available.
I still need to find a U-bolt of the proper size to secure the front hold-down bracket on the brake master cylinder reservoir. I was able to salvage the blue manufacturer’s decal on the original Bendix-licensed Jidosha Kiki brake booster.
Relays
Despite my efforts to keep the truck stock, various items have been removed or replaced with non-OEM bits over the years. This began with the exhaust system in 1989 when some pieces were no longer available when I had the factory-rebuilt short block installed, and ended most recently with the aforementioned carburetor. I have, however, done my best to keep items that have been removed in case I, or someone else, should ever decide to attempt to return it to total stock condition. In keeping with this I have left in place all relays and connectors on the original wiring harness, whether they are currently connected to anything or performing any function.
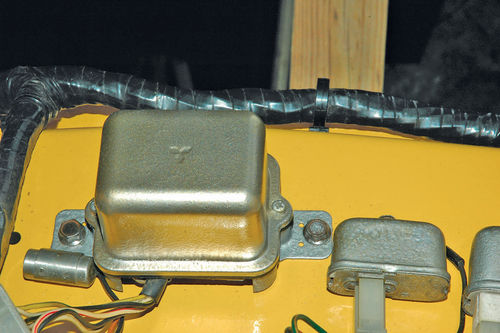
For this cosmetic work, I removed all the relays (labeling carefully, as always) and gave the relay covers a good cleanup for painting. I also cleaned the contacts. Most of the relays appeared to have been cadmium plated. After cleaning and prepping the covers as necessary, I gave them a combination coat of RustOleum Hammered Silver and, while still wet, a dusting of RustOleum Gold Metallic. This gives a mottled silver-gold appearance that resembles plating and looks good with my paint job.
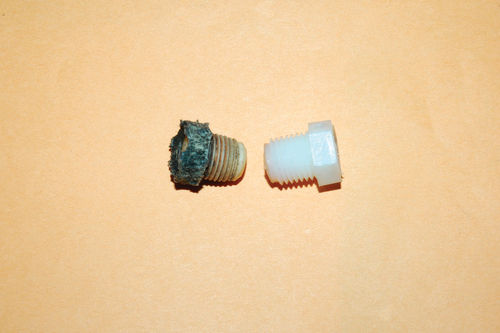
An Uncommon Source for a Steering Gearbox Filler Plug
One thing I have learned over the years when looking for hard-to-find parts is that it pays to look outside normal parts supply sources. For example, the original stock nylon filler plug on my steering gearbox was ragged and unusable. I was able to find a near-perfect replacement at my local Tractor Supply Co. store.
One of my favorite places to look for unusual parts is the loose hardware drawers at ACE Hardware. ACE is one retailer that still allows you to buy a single bolt, washer, etc., and they stock lots of unusual items in every material from nylon to stainless steel.
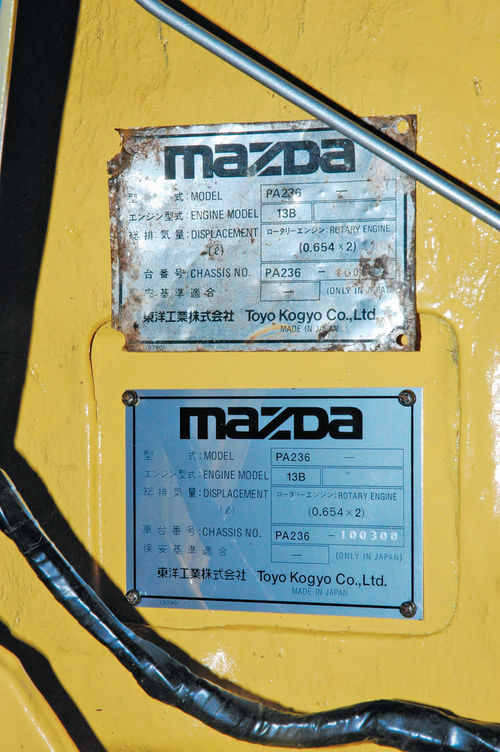
A Reproduction VIN Plate
The crowning cosmetic touch on my engine bay restoration is a perfect reproduction VIN plate sourced from Vintage Rotary Decals (which, unfortunately, appears to no longer be in business). The seller required photo documentation of original plates with legible numbers. My VIN plate was in pretty bad shape but the vehicle number is still legible on close examination, and I also have a legible door plate that also has the VIN number, and, of course, I have a matching title. I will keep the original VIN plate in case legal questions should ever arise.

Well Worth the Considerable Time Involved
Aside from the necessity of keeping the wiring and electrical components properly sorted during removal, repair and reinstallation of the wiring harness, there was nothing particularly difficult about this process. It is, however, long and tedious. Reassembly is, obviously, a reversal of what happened in the beginning.
Probably the most beneficial tip for anyone who has never done this before is to take lots of photographs of the overall engine compartment and all its components before removing anything. I find that I invariably forget the configuration of something I was sure I would remember and that photos — and in some cases, diagrams and labels — are absolutely essential.
It is also good to have a general strategy in mind, whether you want to restore to original or as close as possible, or just make it look good without regard to originality. For example, what is to be done with nuts and bolts and other fasteners? Will they be polished, painted body color, plated (Eastwood has a tin zinc electroplating kit for about $70) or given a clear coating?
If concours isn’t a goal, then consistency of treatment of a category of parts may be more realistic than unwavering commitment to originality. Some of my hex bolt heads and tubing have developed a light rust coating since reassembly. My original strategy had been to polish tubing and bolt heads that would take a polish and see what happened to them as time passed, possibly allowing a light tarnish as an acceptable patina of age. Oddly, however, some identical-appearing items have begun to rust while others have not, so I may have to rethink this and paint or plate them before I reinstall the engine.
One way or the other, a project like this requires a considerable expenditure of resources — time or money. Since I did all the work myself, my cost was about $250 overall, with more than half of that in the PPG Delstar acrylic enamel and related products. I stopped keeping track of my time after about 58 hours, at which time I had finished the engine bay painting and given cosmetic restoration to some components but had not begun reassembly.
In total, I probably have more than 100 hours in this project. That’s a lot of time, but the nasty engine compartment was the one thing that had held me back over the years from doing a real restoration on this truck while it was in use. By comparison, the prospect of rebuilding the engine, doing the interior,the front suspension and painting the truck (most body work is already done) seem not at all daunting.
There can’t be more than a few hundred of these (1974-77) Mazda Rotary Pickups still on the road, and I look forward with great anticipation to taking this one to a car show with my son when it is complete.
Resources
Simple Green All-Purpose Cleaner
Sunshine Makers, Inc.
Skyco Ospho
;
PPG Delstar products
PPG Industries
Gardner Bender Liquid Electrical Tape
Gardner Bender Co.
Performix Plasti Dip Multi-Purpose
Rubber Coating
Plasti Dip International
Dupli-Color High Build Formula
Filler Primer
Klean-Strip KS-3 Premium Stripper
W.M. Barr & Co., Inc.


