
Diary of a Salt Flats Racer, Pt. 3
They Were Aiming for 200 mph But Ruined a Bearing Instead. It Was Time to Go From Racing to Wrenching.
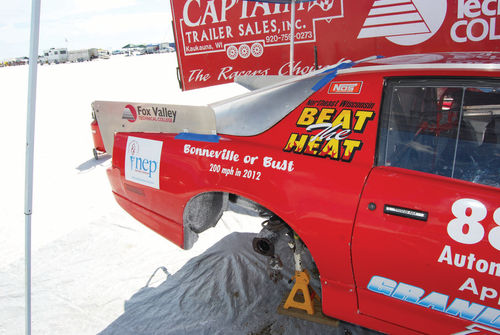
Editor’s note: In last month’s installment, Fox Valley Technical College auto technology instructor Dave Sarna reached a new high speed of 193 mph for the red FVTC Firebird on the Bonneville Salt Flats. Sarna was anxious to squeeze in a second run that day, hoping to get into the Bonneville 200-mph Club. The car went back on line, but time ran out because racing ends promptly at 6 p.m. The decision was then made to tow the car five miles to where the FVTC trailer was parked and tow it back to the starting line the next morning.
He Didn’t Get Very Far…
Bonneville racing starts daily at 8 a.m. so we had to get up early, grab breakfast and then hook the Firebird to our pickup and pull it to the Long Course starting line.
After a short wait, a starter waved the green flag and Sarna started down the Salt. But before long, he encountered trouble. As Sarna had sped along, he could hear noises coming from the rear axle and stopped the Firebird so it could be towed back to the pits.
The ’89 Firebird had been equipped with a later GM LT1 V-8 and a GM THM 350 transmission, while mounted at the rear is a beefy Ford 9-inch axle. The Ford 9-inch rear end is a favorite of all types of racers because of its simple design. Adjusting pinion depth and setting the backlash after the axle is rebuilt are fairly straightforward operations—unless, of course, you’re doing these things on the Salt at Bonneville with a limited amount of tools, equipment and parts.
We were lacking a shop manual and all of the stuff that manual would suggest having on hand, such as a list of torque specifications, a dial indicator with a magnetic/static base, and a caliper. We did have a floor jack, some stand jacks and inch- and foot-pound torque wrenches.
A few of us went into nearby Wendover and bought plastic tubs, rags and oven cleaner for parts that needed a scrubbing, but we needed a lot more to do the job.
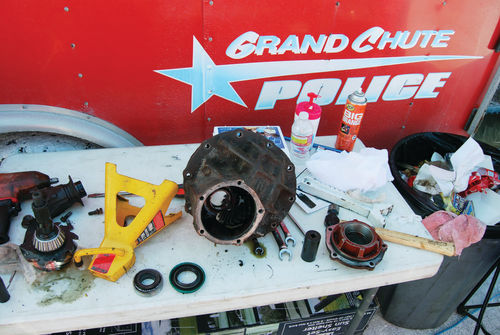
When we got back to the FVTC trailer, I suggested starting the teardown then— Sunday afternoon—so that if by a miracle we scrounged up some parts, we’d be ahead of the game. As soon as we had the axle apart, it was very obvious that the pinion bearing was bad—it was chewed up and bent—and that we also would need some gaskets and seals. Some crew members went from pit to pit to see if any other racers had parts available. No dice!
Airborne Assistance Arrives
Sarna then noticed that an airplane had landed on the Salt and offered the pilot $100 to go to Salt Lake City to get the needed parts, but that possibility fizzled. Fortunately, Sarna remembered that Tim May, a member of our team, also was flying in to join us.
Tim had a connection in Denver and we were able to call him there. We told him to see if he could stop in Salt Lake City, on a Sunday night, and find an open parts store. The possibility of this happening seemed remote, but somehow he did it. Early Monday morning he arrived at the Bonneville Salt Flats with the small pinion bearing we needed.
We removed the rear wheels and set the axle on jack stands. We removed the brakes and rotated the axle to line up the hole in the flange with one of the retaining bolts. We removed the bolt and repeated this until all four bolts were out. Then, the axle was pulled partly out. The axles only need to come out about four inches to allow the center section (third member) to be removed, but you have to be careful not to damage the wheel seals in the housing.
The bearing race was inspected and found to be intact. We inspected the axle seals for missing rubber and they looked good. There were no leaks and new seals weren’t needed. New bearings weren’t required. Using both hands, we cracked the gasket, pulling upward on the third member. The tubs we’d purchased caught any fluid leaking out. A screwdriver between the third member and the housing allowed the fluid to drain for about five minutes.
We removed the third member and placed it on a clean surface before mopping the remaining fluid from the bottom of the case and checking for metal particles. We set the third member on blocks and checked the backlash.
The use of a large adjustable wrench allowed us to hold the pinion flange and remove the pinion nut, as well as the bolts holding pinion, pinion bearings and retainer to the main casing.
Then team member Bob Buchman made the necessary adjustments by feel and we replaced the smaller pinion bearing. The retaining ring can be pried out and usually reused. We also checked to make sure the casing around the small pinion bearing wasn’t cracked.
We installed the ring gear and differential assembly and the bearing caps, temporarily leaving the bolts loose for now. The side adjusters were screwed into the side of the main case/bearing caps. Team members turned the adjuster opposite the ring gear teeth until the ring gear was tight against the pinion gear. Then they rotated the opposite adjuster until it got tight. Each adjuster was loosened and tightened until they were both tight with .008 in. of backlash. Then, the bearing cap bolts were snugged up tightly.
The ring gear teeth were painted with gear marking compound. By putting force on the ring gear in either direction and spinning the pinion and flange 10-20 times, we could get five or six teeth to mesh with the pinion gear teeth. By releasing the pressure and rotating the ring gear the pattern of previously meshed teeth could be seen and checked. The ring gear was then forced in the opposite direction and the pattern was checked again. What you want to see is a meeting in the center of the teeth, rather than running off at the sides.
We checked these patterns at different spots on the ring gear to ensure they were the same over the entire gear. This tells you the ring gear is seated properly on the differential and runout on the ring gear is acceptable.
If the pattern is not correct in all directions, a different shim must be used after removal of the pinion. Add or subtract only .002 inches of shim on the first check. Thicker shims can be added on a second try, depending on how much the pattern changes. When everything looks good, re-install the side adjusters and redo the adjustment to set backlash at .008 inches again. This can take a long time to get right, but Bob Buchman was both talented and patient.
We finished by applying Loctite to the main bearing cap bolts and tightening them to 75-85 ft.-lbs. The side adjuster retainers were then installed. Loctite was also used on the small bolts before tightening them. The ring and pinion meshed smoothly all around the ring gear, so we could put the third member back in the housing and apply Permatex Gasket Maker between the housing and third member. The brass washers went back on next after we inspected them. With a torque wrench we tightened the third member nuts to 30-40 ft.-lbs. using a criss-cross pattern We pushed the axles all the way in and torqued the four nuts to 50-75 ft.-lbs. Then it was time to put the brakes back on and the car was driven on the Salt to see if the axle heated up…it didn’t.
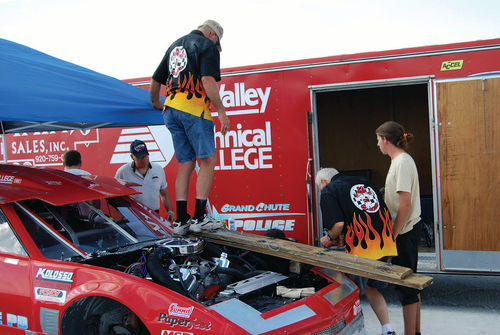
While the axle was being repaired, other members of the team got to work tightening the chains we used to cinch the car down for a lower profile and better airflow. While they were doing this, someone noticed a crack in the A-frame. Tim May was selected to weld up the crack while Dave Sarna held up our blue “welding blanket”—a tarp that’s meant to offer protection from sparks and spatter.
Once that repair was finished, one team member stood on a board on the left front fender to try to get the front end lowered enough to attach the chains. That didn’t work, however, and finally four team members provided the group effort necessary to sufficiently lower the front end.
Next time: The old salts make another short run, but the young shakers save the day with the Camaro.


