
John’s Tool Chest Special Edition
Here are 10 Tools Under $25…They Can Be Low-Cost Ideas for Your Toolbox or Holiday Stocking Stuffers for Your Car Pals.
Editor’s note: With the Holidays just around the next curve in the road, you might be scratching your head trying to come up with gift ideas for your car buddies that will bring a smile from the recipient and yet not flatten your wallet. Obviously, the all-time best gift idea is a subscription to Auto Restorer, and for more on that, check out the ad at the end of this article. But along with the subscription, a useful yet inexpensive tool is a good idea as well. Here are 10 suggestions from our Tool Man to get you started:
I thought it might be interesting to focus on tools under a certain value for this article, and $25 sounded like a good place to start.
Naturally, the more you are willing or able to spend, the greater the selection of tools out there. As the value gets lower, there is still plenty of stuff to look at, but much of it is of questionable quality or is simply useless junk. However, while it becomes harder to find good items at lower prices, they still are available. These items may not be fancy or high tech, but they are useful additions nonetheless and I think they’re worth including in a tool collection.
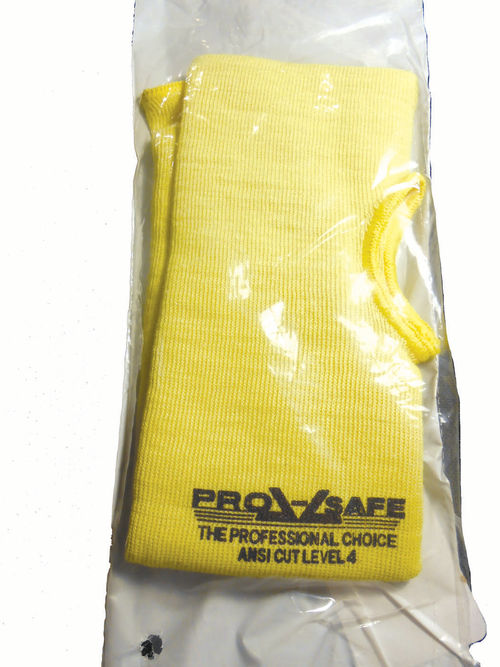


1 Kevlar cut-resistant sleeves by ProSafe. I can’t believe it took me so long to discover these. They are two-ply, offer great protection from cuts and burns, and are more comfortable than wearing a long sleeve shirt in warm weather. Don’t get me wrong, these sleeves are still warm, but overall are a more comfortable option. Furthermore, the word “Kevlar” tells you they offer far more protection than shirt fabric as this product has been used in a range of applications from tires to body armor. A few good times to pull on these sleeves would be when working around a hot exhaust system, inside a door or when trying to reach a difficult oxygen sensor. Inside a door is obvious…there are sharp edges on sheet metal everywhere. With exhaust work, you’re stretching your arm in between exhaust pipes and heat shields that are just looking for the opportunity to cut or burn you. In the past when removing my arm from an environment like that it often would come out with cuts or burns. Wearing these sleeves can eliminate most of that, as long as you remember to put them on before diving into the repair task. Photo 1 shows one of the 14” long sleeves with the thumb hole, as packaged (#MK404-3064). Photo 2 shows this same 14” sleeve in the real world. The thumb hole will keep it from being pushed up to your elbow, and allows for gloves, both leather and disposable Nitrile, to be worn. Disposable gloves go on first, and then the sleeve, and heavier leather gloves are worn over the top. Photo 3 shows some of their selections. To the far left is a 10” sleeve, this is open at both ends and priced at $2.66. Next are the sleeves with thumb holes. The 14” sleeve is $3.60, 18” for $4.74, and finally the long 22” for $5.89. All are priced individually.
The sleeves open at both ends are available in lengths from 10” to 24”, while the thumb-hole version is 14” to 22”. All are washable. If they have gotten greasy, pre-wash them with some GoJo (or equivalent) hand cleaner first; rinse, and then they can be dropped into a washing machine. They are inexpensive enough that after a couple of washes you don’t feel guilty if you dispose of an old pair in favor of a new one. The sleeves are available from www.use-enco.com (800-use-enco) and are frequently on sale for less, or include free shipping offers.
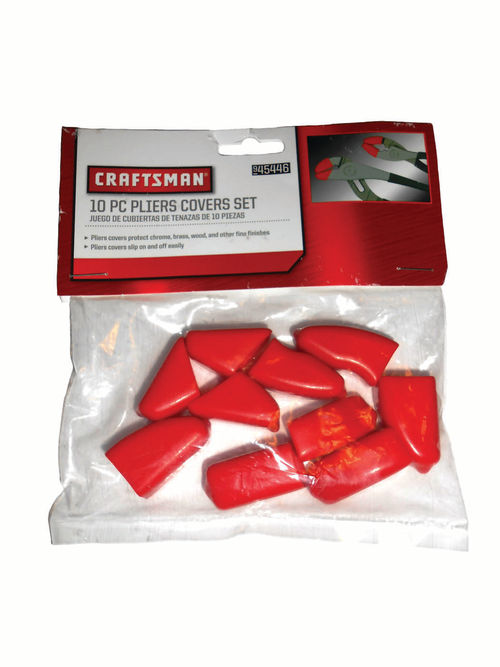
2 Protective vinyl tips for pliers: At first glance Photo 4 might be mistaken for a small bag of Halloween candy, but they actually are individual protective tips for your pliers. Occasionally there is the need to hold something with pliers coupled with a concern that you’ll mar the finish. Delicate surfaces like chrome will be easily damaged if you try to use the uncovered jaws of any pliers. You can try wrapping a rag around the item for protection, but it usually ends up out of position, and the part gets scratched anyway.
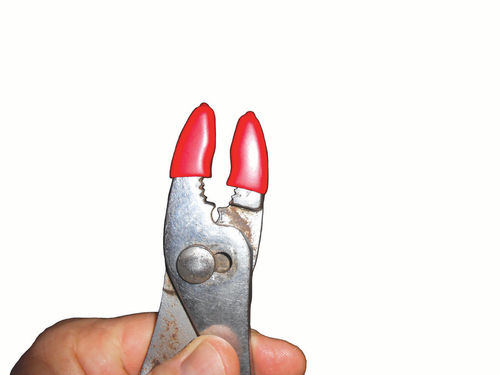

These tips simply slide over the ends of the pliers and you’re ready to go. The tips are not all identical. Photo 5 shows a pair of these tips on a conventional everyday pair of pliers. They fit snugly, and look like they will stay in place. Photo 6 shows a different set of vinyl tips on a pair of 10” curved jaw Vise-Grips, and they also fit snugly. If, however, you wish to use them on the 7” version, the tips used on the everyday pliers are a much better fit. Flat jaw Vise-Grips were too wide to fit into any of the supplied tips. It would have been nice if they were a little longer so as to more completely cover the curved portion of the jaws, but they are still handy as is. This package of 10 tips had some mismatched pairs, and one was split up the side, making it useless. If I were to purchase them again, I would open them up at the register (once purchased) and get a closer look at them. Maybe a store employee would tell me that they are not mismatched, but are individual extras included in the package, although the split one would be hard to explain away. It’s difficult to complain too much, though, when the cost was only $3.49 for the package. They are made in the US and available at Sears, item #45446.
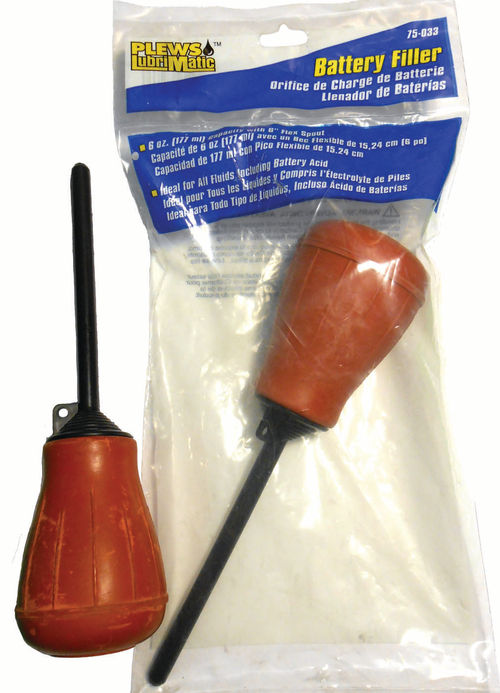
3 Syringe tool: Photo 7 shows a tool purchased from www.nationaltoolwarehouse.com. It’s marketed by Plews Lubrimatic, (item #75-033), and listed as a “Battery Filler.” It has a 6 oz. fluid capacity and the length of the black tube is 6” to where it connects to the squeeze bulb.
It’s handy for more than just filling batteries. Some other useful tasks that come to mind are: removing old brake fluid from a master cylinder before refilling with fresh fluid and flushing the system; doing the same with the power steering pump; removing some coolant from the radiator to allow adding a cooling system flush; retrieving a puddle of antifreeze that escaped onto the intake manifold when replacing heater hoses, or someone accidentally put antifreeze in the windshield washer solvent reservoir and you need to get it out. Add a short piece of hose onto the end of the tube to extend its reach and it will get the job done, although you might want to rinse the reservoir once or twice before refilling it with washer solvent. I have also found it useful when rebuilding wheel cylinders for applying denatured alcohol during the honing and rinsing process. And, yes, you can use it to fill your battery as well.
It isn’t a bad idea to have a couple of them, so one can be dedicated for brake fluid use only. They pop open easily enough so that the bulb can be cleaned out. Typically, after years of use, a radiator hose clamp can be placed around the base of the bulb to maintain a tight seal with the fluid tube. These are made in Taiwan, and sell for $5.75. You can find similar ones at auto parts stores, and Harbor Freight offers one for $2.99, but the squeeze bulb is made of noticeably thinner rubber.
4 Battery hydrometer: The best method of checking your battery’s state of charge is with a battery hydrometer, and it can also be an aid in determining a battery’s condition. This is an inexpensive tool, but it’s only useful for acid-filled batteries with removable fill caps. If you have a truly maintenance-free sealed battery (AC Delco for example), or gel/ dry cell type battery, the hydrometer is of no use to you.
For batteries with removable fill caps, though, it allows you to check each individual cell’s specific gravity. A reading of 1.270 at 80° F indicates a full charge. This also allows for comparison of specific gravity between cells.

Photo 8 shows an older style hydrometer purchased about 10 years ago from NAPA. They still show a similar one online, a Balkamp product, #7001145, priced at $10.80. My tester was made in Taiwan, so certainly this model is also, or possibly China. The older one is temperature compensated, whereas the one pictured here is not. That usually isn’t a big deal, and the differences are easy enough to calculate. Subtract .004 for each 10° F below or add .004 for every 10° F above 80° F. In most situations you won’t need to be concerned about this, but if you are checking a battery that’s been subject to cold temperatures, realize that at 30° F, a 1.250 specific gravity is the same as 1.270 at 80° F.
Before drawing any battery acid into the hydrometer, make sure the liquid level in all cells is equal and at the proper level. A low cell will give you a higher reading. If you need to, add demineralized water to bring each cell to the proper level, and then charge the battery briefly so an accurate reading can be obtained. Charging will assure the liquids have all mixed. In case you’re wondering, pure water has a specific gravity of 1.000, while sulfuric (battery) acid would read 1.835. The ratio of 64% water and 36% acid equals a specific gravity of 1.270 at 80° degrees F.
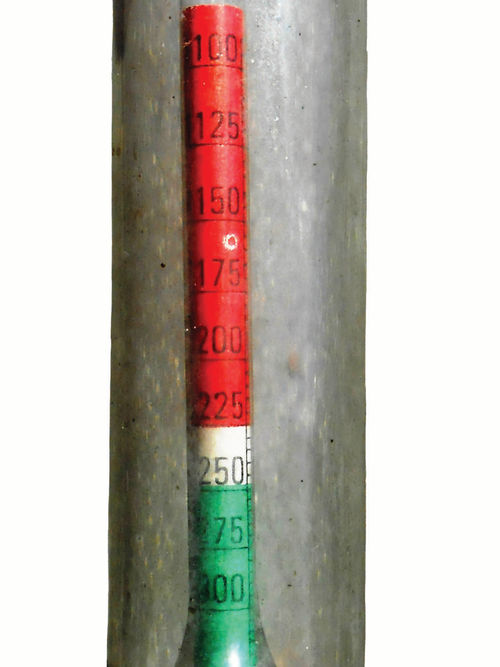
When using this style tester, read the liquid line against the scale on the float once it is floating freely. Photo 9 shows the float’s scale. It may be difficult to see in the photo but it starts at 1.100 at the top of the red scale, and is calibrated in increments of .025 until it reaches 1.300 at the bottom of the green scale. All cells should be within .050 points of each other; if not, this may be an indication of potential battery problems. Typically though, a bad cell will be significantly lower than the others, leaving little doubt there is a problem with the battery.

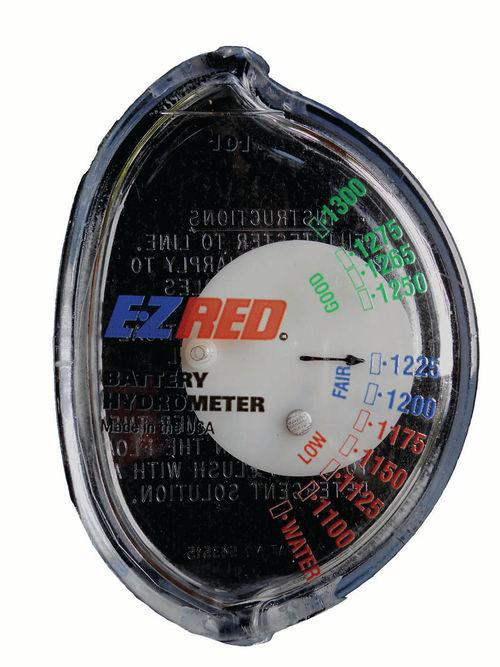
A more popular style tester these days is the EZ-RED(manufacturer’s #SP101). It’s available from www.nationaltoolwarehouse.com (their #EZRS101) for $7.52 and it’s made in the US (Photo 10). It looks similar to a Prestone Antifreeze tester, is read the same way, and is temperature compensated. Photo 11 shows a closeup of the fluid reservoir, indicator and scale. Just below the squeeze bulb there is a horizontal fill line…draw fluid in until it reaches the line. Hold the tester vertically with the liquid level parallel to the line and note where the float needle is pointing. The instructions are etched into the plastic on the reverse side. It has a lifetime warranty and comes in a vinyl pouch. There are numerous Chinesemade copies of this sold by most local parts stores for about $5.
Regardless of the style hydrometer used, remember that they are not a “last word” battery tester. To accurately and completely test an automotive battery you need a variable load carbon pile tester. But the hydrometer will accurately tell you the battery’s state of charge, which in most cases will also answer the question of whether the charging system is doing its job or if there is a drain on the battery.

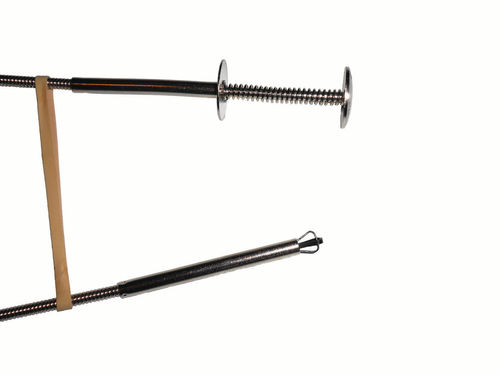
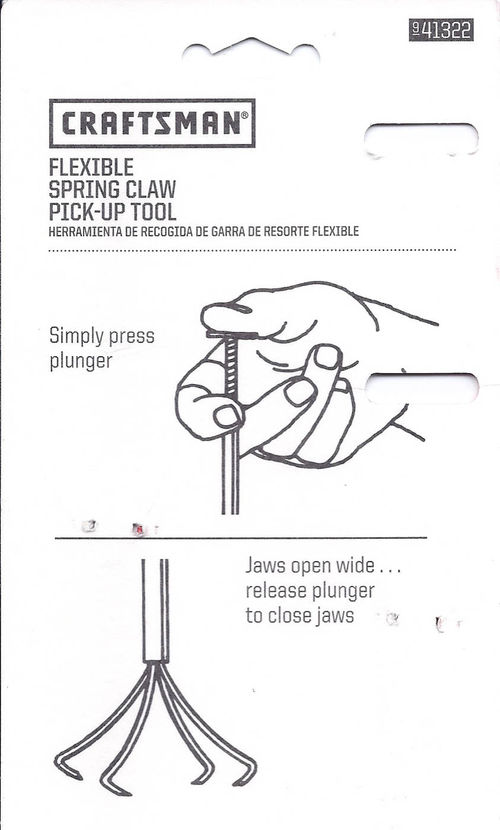
5 Flexible claw pickup tool: Occasionally there is the need to hold or pick up a non-ferrous object, so a magnetic pickup tool would be of no value. And even if the item is magnetic, there are times you want a more firm hold on it. As long as it’s a small item, the Craftsman #41322 “flexible spring claw pickup tool” shown in Photo 12 will do the job. They advertise that it will retrieve most small items of any material up to 2 pounds. Photo 13 gives a closer look at both the claw and squeeze portion of the tool. Photo 14 shows the instruction card outlining how it works. The reach of the tool is 22” while the total length is 24”. The most useful experience I’ve had with this tool came years ago while replacing a headlight adjusting screw andplastic nut. I don’t recall the vehicle I was working on, but it had to be inserted up from behind the headlight. The tool had the length to reach, and get up and into its mounting hole, and then my other hand was able to pull and snap the adjuster in place. It’s available at Sears, is still made in the US, and is covered by their lifetime warranty. I was fortunate enough to purchase this one on sale for $4.24, Wow! However, their regular price is still inexpensive at $7.99.
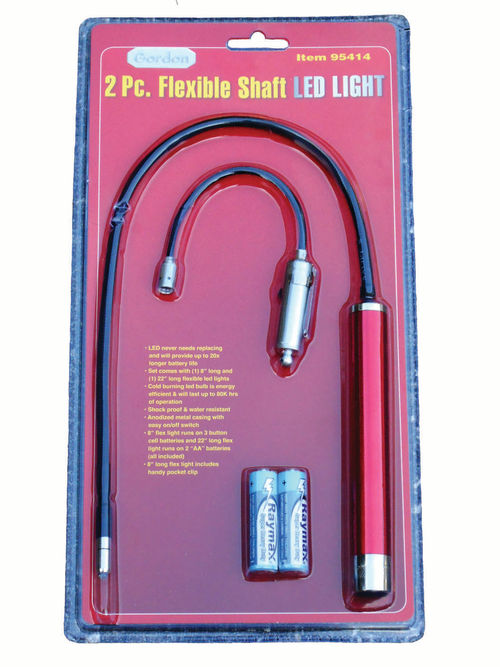
6 Flexible neck LED light: Typically I don’t purchase much from Harbor Freight, but on my last visit item #95414 caught my attention. That’s the package in Photo 15, a pair of flexible-neck LED lights.
The small one is powered by three LR44 “button” batteries and has a 5½” flexible neck. The bulb’s diameter at the end is just less than 3/8”. The total length is 8”. The body is made from aluminum with a small on/off button on the side, and a pocket clip.
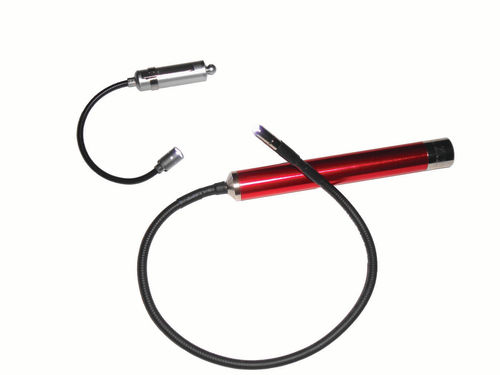
The body of the larger light is also made from aluminum and holds two AA batteries. The on/off switch is on the end of the body, and performs double duty, also securing the batteries in place. Its flexible shaft is 15½” long, and its bulb diameter is smaller, measuring less than 5/16”. The total length is just over 21”. With similar lights purchased in the past, the part that failed was the switch. The one on the larger unit has a good feel to it, and exhibits a loud click when operated. You feel confident it will last for a while. The small light’s switch is less impressive. Both yield a decent light, as long as the bulb is within a few inches of the area you want to see. More than 4” away and the light is much less effective. Remember this isn’t going to take the place of a conventional work light; it’s for those situations that are hard to reach and difficult to illuminate. The flexible neck will allow you to snake into tight locations. Photo 16 gives a better view of them both out of the packaging. I honestly can’t see much use for the small one, but time will tell. These have only been in my toolbox for a few days, so it’s too early to say how they stand up to normal use. However, had these items been for sale elsewhere out of their packaging (like at an auto swap meet), I wouldn’t have guessed they were a Harbor Freight product. Made in China, this two-light package was purchased for $8.99, and included the batteries. This item is available at their retail store locations or www.harborfreight.com.
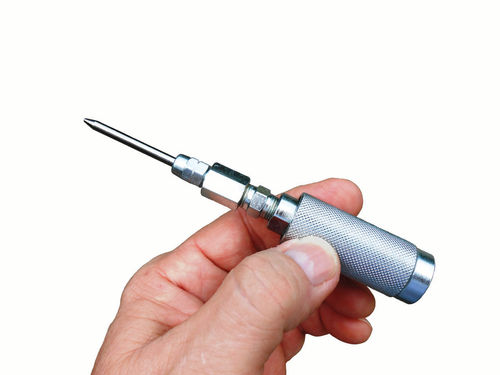
7 Grease gun adapter: If you have ever tried to grease universal joints with the normal grease fitting coupler, you most likely ended up with grease everywhere but inside the universal joint. Photo 17 shows a grease gun extension needle that will eliminate that problem. Its total length is 5¾”. The needle portion is 1 5/8” long x 5/32” in diameter…in other words long enough and small enough to reach most locations. This adapter is available from www.use-enco.com, under the Prolube name, item #319- 2802. Inside the hollowed knurled end that I am holding is a conventional grease fitting that connects to your grease gun coupler. Now use the needle end to depress the ball in the grease fitting on the vehicle, and pump away.

Photo 18 shows a comparison of an older needle adapter from my toolbox with the new one. The older tool’s needle is shorter and larger in diameter. Also, it lacks the knurled section for your grease gun’s coupler. This keeps the coupler centered up, and offers the benefit of something to hold onto while pumping the grease gun. This adapter is made in India, and is priced at $9.37, but can often be purchased during one of the company’s promotional discounts.
8 Driver bit set: Here I’m referring to those ¼” hex tips that fit magnetic screwdrivers. Everyone sells them; all are made in China and to my knowledge they are all considered consumable, thus carry no warranty. With all that information disclosed, it comes down to finding a set with a good selection and reasonable price. Photo 19 (pg. 12) shows the 100-piece “security bit set” (#255069) sold by www.northerntool.com. It includes 10 #2 Phillips bits; the size they expect to be used and torn up the most, followed by two #0, two #1, two #3, and nine different slotted bits. Additionally there are the Roberts square drive, Torx, Posi-drive, clutch drive, spline drive and more. In the top of the case they have a couple of adapters that will convert your screwdriver into a ¼” nut driver that you can use with your ¼” drive sockets. Also there’s an adapter for adjusting carburetor idle mixture screws, and a “Y”-shaped adapter for running wing nuts. (I had to read the paper sleeve that the kit came in to figure out that last one.) It’s highly unlikely the entire variety of bits will ever be needed, but it’s nice to know they are available and in the toolbox. As of this writing it’s priced at $12 including free shipping. No doubt Harbor Freight markets the same or a very similar kit.
9 A battery-powered LED headlight: I had talked about getting one of these for a couple of years and my wife thought I was getting goofy. There are tons to choose from, and the majority are in the price range from the low teens to over $50. Big Lots even had some priced at $5, but who knows how they will perform. Most all are made in China, but a few of the more expensive ones are made in the US.
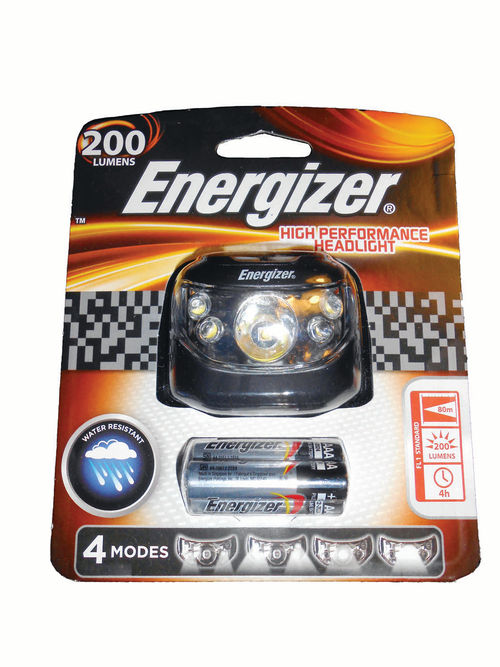
This one was purchased at WalMart, but Gander Mountain (gandermountain.com) had a much larger selection. Photo 20 shows the 200 lumens Energizer headlight. I chose it over some of the others because it was one of the brightest, and the light modes it offered were useful. Some have colored lights that may even flash, not of much use in my world. This model has a high/ low central spot light, and a “flood” light, also with high/low. The light has a pivoting lower mount that allows the beam to be directed where your eyes are focusing. It was surprising just how useful it could be while working on vehicles.
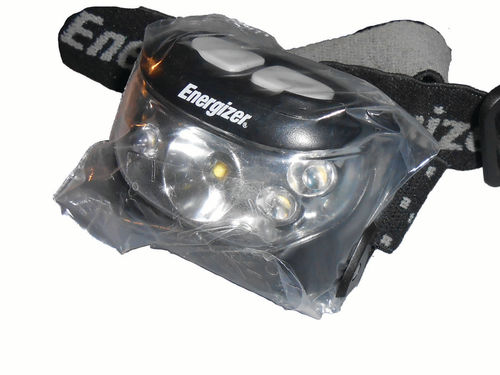
It’s a big help lighting up areas under the hood that the normal shop light has difficulty reaching. The low-intensity spot is my choice 95% of the time, and if that were the only mode, it would be fine. The package indicates a 4-hour battery life, and that may be true, but figure there are about two hours of fabulous powerful light in this mode, and then you can notice it’s not quite as bright. Forgetting to turn off the light wouldn’t be an issue if working at night, but is a problem when working in a daylight environment with this model. Waving your hand briefly in front of your face will quickly let you know if it’s on. Once the light starts to diminish, I switch it up to the high-intensity mode. Time is running out at that point, but until the batteries die completely, or new ones are installed, you again have that ultra-bright light, be it only for a short period of time. Recently the light was called upon when doing some painting overhead under a trailer, so for protection it was removed from its mount and wrapped in a sandwich bag as seen in Photo 21.
This model is powered by three AAA batteries, was made in China, and is available at Wal-Mart for $24.95. If you want to get that price down a bit, on a hook right next to it was another Energizer rated at 135 lumens priced at $19.97. As previously mentioned, there is a wide price range available.
10 Lighted inspection mirror: If you don’t have a mirror selection in your tool box, you certainly need to remedy that situation. I have several different shapes and sizes. Stuck to the outside of my toolbox is a 5” x 7” plastic mirror typically sold at Wal-Mart for kids to put in their school lockers. It’s handy for tasks like looking up under the dash of your vehicle where you want to see a broad view of things. From there the selection changes to the variety of “mirrors on a stick,” from the small round “dentist” style, to one the size of a credit card, some even telescope for added reach.

One particular mirror goes a few steps beyond by adding a built-in light and a magnification mirror. This is the STEELMAN mirror #05180A shown in Photo 22. It has a flexible shaft, remote control mirror tilt, and is lighted. In the grip you find a wheel like that on your computer’s mouse to control the mirror’s tilt, an on/off switch for the light and it holds two AA batteries. Mine is an older version so don’t be too surprised if the new ones look slightly different. The ight is mounted just above the mirror pivot, which puts it at the perfect spot to reflect into dark, hard-to-see areas like a threaded bore in the block. This eliminates using a second hand to hold a small light, or if wearing a headlight, needing to keep your head still and properly positioned. When using this tool the target always seems to be more visible than with my other mirrors. The addition of the 4-power mirror makes a big difference. The mirror measures 1 1/8” x 2 1/8”, the total tool length is 18” and the flexible shaft portion is 8” long. It’s made in China and currently available from Amazon for $22.76. STEELMAN also shows a 24” version of this tool, but their website didn’t show a price.


