Working With a Steering Column
He Was Having Major Problems Shifting Into or Out of Park. So He Ventured Inside His Column for the First Time.
EVER HAD A steering column out of the car and apart? I hadn’t either until recently, and I dreaded doing it thinking it was much more difficult than it proved to be.
After reading the manuals it seemed simple enough, just the rag joint and the shift rod to the transmission have to be disconnected under the hood and after the three sets of wires are disconnected, the cover plate at the firewall—four screws—and a clamp—one bolt—under the dash and it’s out.
Well, it’s not quite so easy as it has to be maneuvered out and that takes a minute and it was sealed to the firewall pretty well. I removed the steering wheel and turn signal lever before I started, and as a result the steering shaft wanted to stay behind while I removed the mast jacket assembly. With some effort I managed to keep them together as that is necessary for easier removal. The manual assumes you still have the steering wheel in place.
This Wasn’t Part of the Plan
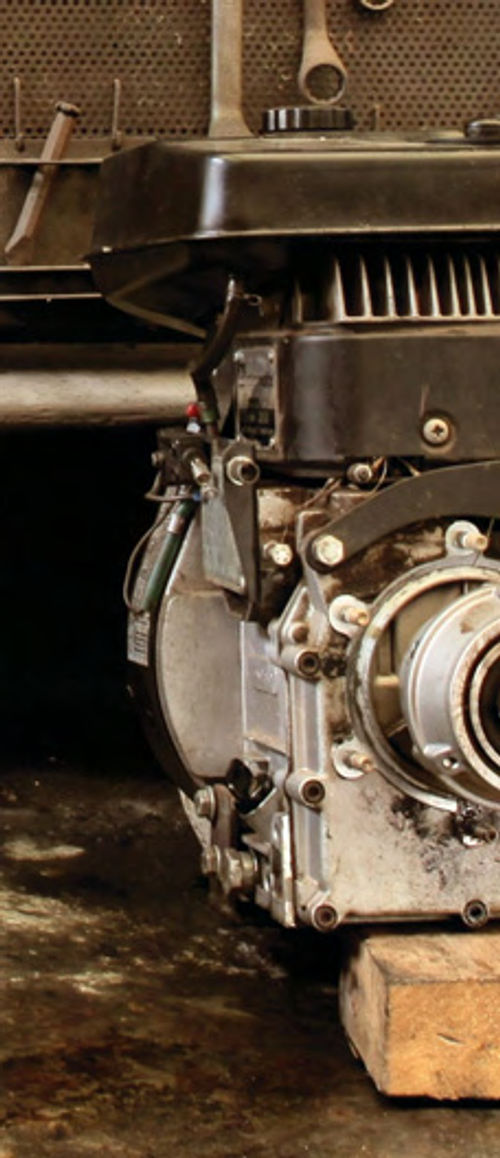
I had brought my 1964 Chevelle into my shop to replace the speedometer, install new brackets for the power steering pump and add an auxiliary transmission cooler. The plan also was to have a radiator leak soldered up while I was installing the cooler.
By the time I was done, I ended up taking out the steering column and doing a host of other things. Over 35 things in all. Sound familiar?
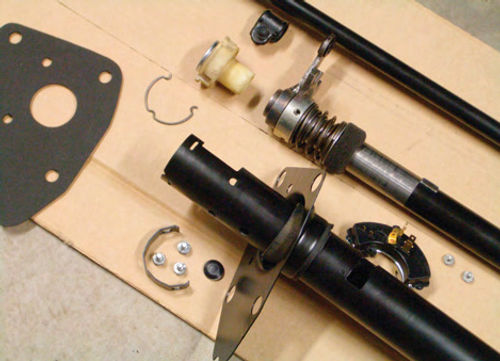
So here is the story of what I encountered when I serviced the steering column. It certainly wasn’t a rebuild as the only parts replaced are regularservice items— the upper and lower column bearings and a seal that goes between the lower cover plate and the firewall. The neutral safety/backup lamp switch was replaced too; as was one homemade washer.
I had expected to find a totally self destruct mechanism when I serviced the steering column, but the cause of the problem I was experiencing proved to be quite different.
An Extremely Hard Shift
The problem was that it had become increasingly difficult to shift into or out of Park to the point where it was near impossible. It didn’t take long to decide that at least part of the problem was at the lower end and to access that the column had to come out.
It was filthy and I spent many hours cleaning and disassembling it—at each step trying to diagnose what caused the lack of movement in the shifter tube. It rotated fine but would not move down enough to clear the detent index with the tang—even after having worn a groove making that shift easier. I had thought that an old neutral safety switch which had broken and lost a plastic piece down in the depths was at fault but later found that it would take a lot of such pieces to cause any problems—those pieces fell out when I turned the thing upside down.
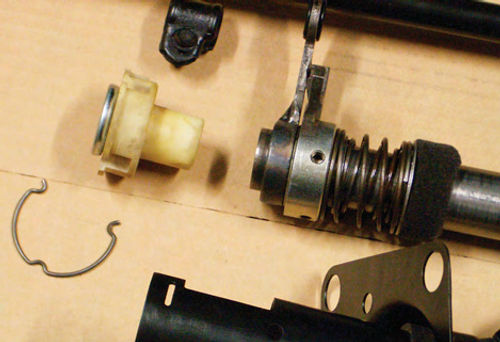
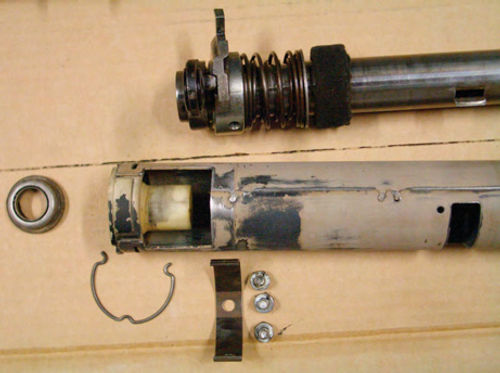
But the shifter tube still would not move down like it ought to. On the version for an automatic transmission, the lower spring-loaded mechanism (see the photo at the top of the previous page) is not designed to be taken apart and is welded at the factory. It was not allowing the unit to move until I ran a lot of brake cleaner through it followed by some Marvel Mystery Oil. The brake cleaner/MMO treatment brought out a lot of fine particles of old hardened lubricant, dirt and sealant. Yes, sealant. There is a hole in the mast jacket—not mentioned in either manual I have—that could be a place to add lubricant but I think it should have been plugged—I did that now.
Apparently the factory omitted this plug and when the column was sealed some sealant got into this opening. It hardened over the 48 years and nearly half-million miles traveled and reached the point that it restricted the shifter movement.
The top end had a few issues too. The bearing was toast. I can only guess that the shifter tube came up too high and put pressure on the bottom of the bearing which was designed only for pressure from the top. The assembly manual actually said a groove and lock ring on the steering shaft should be pressed against the bottom of the bearing— totally contrary to the design—but fortunately in real life no such groove or ring exists. Also contrary to the book is the foam seal on the shifter tube just above the spring mechanism. The assembly manual shows it as deleted but also shows a grommet on the outer mast tube that mine didn’t have.
The Case of the Missing Washer
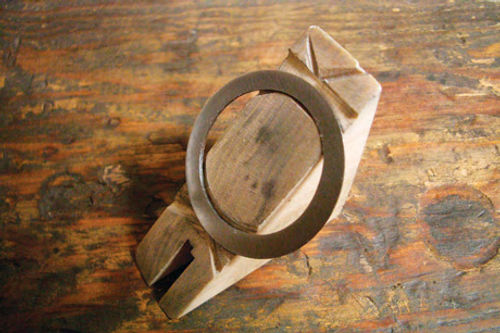
At the top, the shift bowl (housing) would not freely move up and down on the shifter tube due to hardened lubricant and dirt. I found that there was a “special” washer missing completely and that explains in part why the linkage lacked sufficient movement to clear the tang as well as why it hit the bottom of the top column bearing. I have no idea what makes this washer special other than it has a large center hole with a relatively small outside diameter. One book refers to it as a flat spacer washer. In fact it acts as a thrust washer. But as to the correct thickness? I had to guess—very thin. So I took a washer of the approximately correct OD and filed out the middle until it fit. Then I sanded it—for many hours—on both sides until it was as thin as I remembered the missing special washer to be.

I spent a lot of time cleaning these parts because it seems to me that that was where the real problems started—with dirt and the dried lubricant. The errant sealant didn’t help much either. Perseverance paid off and the mechanism freed up—both at the top and bottom.
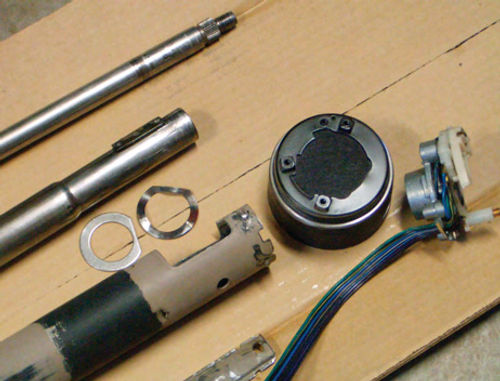
I found out that my 1960 truck has a few parts in common with the Chevelle. The lower column bearing is one. Since the car people don’t list it and the truck people do, I got it from them. The upper column bearing is part of the turn signal switch and is not replaceable separately. The turn signal switch does five things besides being a turn signal switch. It includes the upper column bearing. It locates the upper end of the shifter tube. It clamps its own housing to the upper end of the mast jacket. It provides a thrust surface for the shift bowl. And it transfers current for the horn. But the only function at fault here was the bearing.
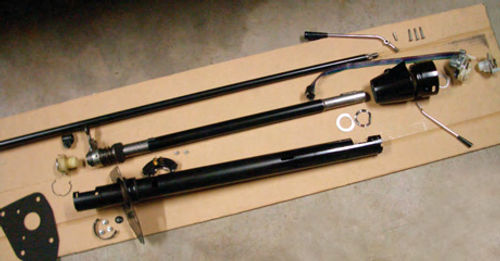
I painted the mast jacket including the wire cover, the cover plate and the steering shaft satin black. I also painted the shifter tube except where the bowl slides and, of course, the spring mechanism. These parts are not really visible and were painted for corrosion protection. I painted the upper part of the mast jacket and the shifter and turn signal housings gloss black to match the interior.
The upper bearing is factory lubricated. Upon reassembly I added lube to the spring mechanism, the shifter tube and housing (bowl), the D (so named because it’s shaped like a “D”) and wave washers and the “special” washer I made as it is a thrust bearing washer.
The new lower bearing came dry and has a foam ring to retain oil so I used some Marvel Mystery Oil on it.The steering shaft is supposed to extend 1.77” ± .02” from the signal switch housing. The clamp on the steering shaft is where the adjustment is made. The other adjustment made before I reinstalled the column was the neutral safety/backup lamp switch. The backup lamp portion is much more limited in useful range so I used reverse to align the switch.
From the manuals it seems the three speed column shift is similar at the top but the bottom is quite different and may use a different mast jacket. The shift tube is different and comes out the top during disassembly where the automatic transmission version—such as the subject of this article—is removed from the bottom.
A Smoother Shifter Once Again
Once I had the column reassembled it was a matter of putting it back into the car. For this I could have used a bit of help but managed without.
I left off the turn signal lever and the steering wheel to avoid conflict with the seat. Once again it was imperative that the steering shaft remain in the upper bearing as it would be difficult to slip it back in after the unit is set in place. Then I connected the rag joint—loosely—and then the clamp under the dash. The firewall cover plate with its seal was the last to be attached with four screws. Under the hood I finished the rag joint attachment and connected the shift linkage. Under the dash the main curved connector and the brake light and neutral safety/backup switch connectors were attached.
The final result was worth the effort. Now it shifts into and out of Park easily and the detents work correctly with the rest of the gears. The backup lights work for the first time in a long time as does the neutral safety switch. All the turn signal switch operations are good and the horns work too.
It steers easily and quietly—gone is that rough feeling probably caused by the bad upper bearing.
A final word of caution.It’s important to remember that the shop manual is not always correct. In this case I think they were written before actual vehicle production so that may account for some discrepancies.
Resources MuscleFactory, Placentia, California
1964-72 Chevelle & El Camino parts
Classic Parts of America, Kansas City, Missouri
Chevy & GMC truck parts